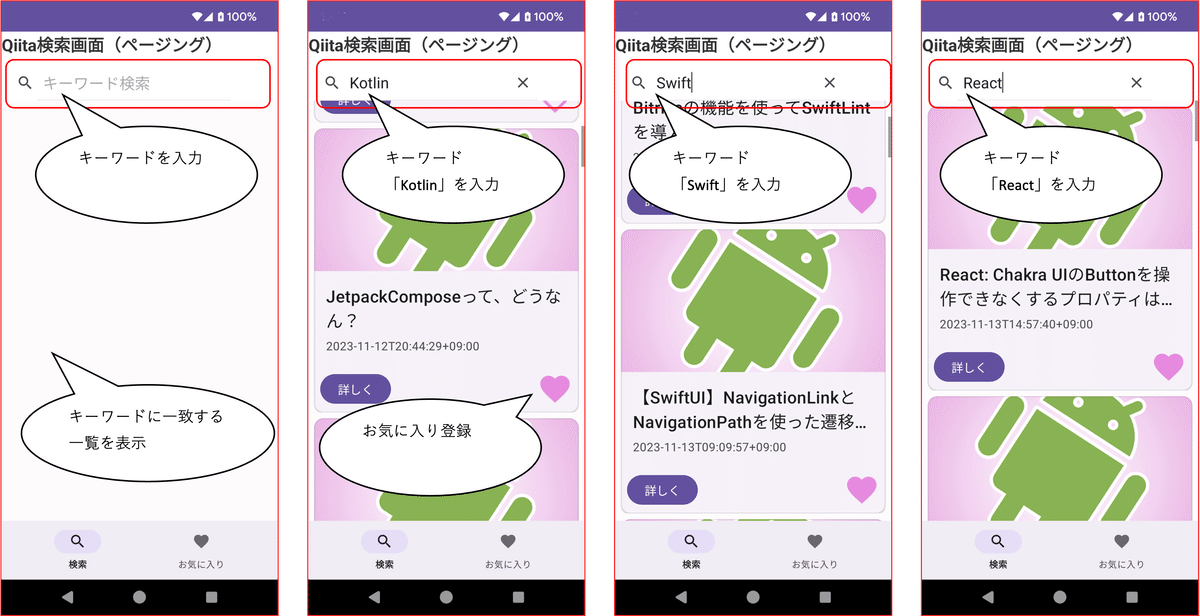
【Kotlin】MVVM + Retrofit2 + Paging3 でQiita検索アプリを作成してみた
こんにちは!ナディアのエンジニア Sです。
今回はRetrofit2を使ったHTTP通信の方法や、Paging3のページ読み込み処理を利用したQiita検索アプリを作成しました。
アプリから検索したQiita記事をお気に入り登録する機能も追加しており、何回でもQiita記事を見返すことができるアプリです。
API通信、ページング処理、並行処理の実装方法が知ることができる内容となっています。
1.何をするアプリか
Qiita記事をキーワードで検索した結果を一覧に表示し、一覧の「詳しく」ボタンをタップするとWebViewで記事の詳細画面を表示します。
また、興味のある記事をお気に入りに登録することにより、検索したキーワード別にお気に入り一覧に表示し、何回でもQiita記事を見返す事ができるアプリです。
2.Qiita検索アプリの設計について
1.デザインに関しては、Androidマテリアルデザインを元に作成しました。
2.Qiita記事を取得するAPIはQiita APIを使用しています。
(余談ですが、Qiita APIの使いどころは、ブログにQiita記事を表示する、アプリでQiita記事を投稿するなどがあるみたいです。)
3.HTTP通信はRetrofit2(サードパーティ ライブラリー)を使用しています。
4.画面読み込み処理はPaging3(ページング ライブラリー)を利用しています。
3.Retrofit2(サードパーティ ライブラリー)を使用したHTTP通信、Paging3(ページング ライブラリー)を使用した画面読み込み
Qiita記事をサーバーから取得するHTTP通信処理はRetrofit2(サードパーティ ライブラリー)を使用します。
Retrofit2は、Google公式が推奨しているライブラリーです。
APIから取得したJSONをオブジェクト型に変換するライブラリーは、Retrofit2のMoshi を使用しました。
build.gradle
ライブラリーを使用する為の設定ファイルです。(2023/11/17 時点)
一部抜粋
    // room
    val room_version: String = "2.6.0"
    implementation("androidx.room:room-runtime:$room_version")
    annotationProcessor("androidx.room:room-compiler:$room_version")
    // To use Kotlin Symbol Processing (KSP)
    ksp("androidx.room:room-compiler:$room_version")
    // optional - Kotlin Extensions and Coroutines support for Room
    implementation("androidx.room:room-ktx:$room_version")
    // optional - RxJava2 support for Room
    implementation("androidx.room:room-rxjava2:$room_version")
    // optional - RxJava3 support for Room
    implementation("androidx.room:room-rxjava3:$room_version")
    // optional - Guava support for Room, including Optional and ListenableFuture
    implementation("androidx.room:room-guava:$room_version")
    // optional - Test helpers
    testImplementation("androidx.room:room-testing:$room_version")
    // optional - Paging 3 Integration
    implementation("androidx.room:room-paging:$room_version")


    // recyclerview
    implementation("androidx.recyclerview:recyclerview:")
    // For control over item selection of both touch and mouse driven selection
    implementation("androidx.recyclerview:recyclerview-selection:1.1.0")


    //Coroutines コルーチン
    implementation("org.jetbrains.kotlinx:kotlinx-coroutines-android:1.7.3")


    // Retrofit
    val retrofit2_version: String = "2.9.0"
    implementation("com.squareup.retrofit2:retrofit:$retrofit2_version")
    // Retrofit with Scalar Converter
    implementation("com.squareup.retrofit2:converter-scalars:$retrofit2_version")
    // Retrofit with gson Converter
    implementation("com.squareup.retrofit2:converter-gson:$retrofit2_version")
    // Retrofit with moshi Converter
    implementation("com.squareup.retrofit2:converter-moshi:$retrofit2_version")


    // Moshi
    implementation("com.squareup.moshi:moshi-kotlin:1.15.0")


    // Glide
    implementation ("com.github.bumptech.glide:glide:4.16.0")

    // Paging
    val paging_version: String = "3.2.1"
    implementation("androidx.paging:paging-runtime:$paging_version")
model
JSONレスポンスをKotlin オブジェクトに変換するモデルクラスです。 一部抜粋
data class Article(
        val id: String,
        val title: String,
        val user: User,
        val updated_at: String,
        val url: String,

) : Serializable {

}
Service
このインターフェースで、Retrofit が HTTP リクエストを使用してウェブサーバーと通信する方法を定義します。
一部抜粋
companion object{
        const val URL_QIITA = "https://qiita.com/api/v2/"
}

/**
* pageは開始ページの番号
* perPageは一度に取得する記事の件数
*
*/
@GET("items")
suspend fun getQiita(
        @Query("query")
        query: String,

        @Query("page")
        page: Int = 1,

        @Query("per_page")
        perPage: Int = 10): Response<List<Article>>
Retrofitオブジェクト
HTTP通信を行う為のライブラリの設定。APIから取得したJSONレスポンスを変換します。
一部抜粋
companion object {

        val moshi = Moshi.Builder()
        .add(KotlinJsonAdapterFactory())
        .build()

        val retrofit = Retrofit.Builder()
        .addConverterFactory(MoshiConverterFactory.create(moshi))
        .baseUrl(QiitaApiService.URL_QIITA)
        .build()


        val api by lazy {
                retrofit.create(QiitaApiService::class.java)
        }

}


/**
* Qiita記事をページング ライブラリー(Paging3)で取得する為のメソッド
*
*/
suspend fun getQiita(query: String, page: Int, per_page: Int): Response<List<Article>> {
        return api.getQiita(query, page, per_page)
}
Paging3(ページング ライブラリー)
主に以下のクラスで構成されています。
PagingSource(DataSourceから移行)
Pager
PagingDataAdapter(PagedListAdapterから移行)
PagingSourceクラス
読み込まれたページングデータの途中の状態から更新を再開する方法を定義します。
一部抜粋
class QiitaPagingSource(
        private val repository: QiitaRepository,
        private val query: String
) : PagingSource<Int, Article>() {

        companion object{
                // APIのpage指定の最小値
                private val FIRST_INDEX = 1
                // APIの1チャンクあたりの取得データ数
                private val PAGE_SIZE = 10
        }


        /**
        * データを破棄した後、再取得する(再びloadを呼び出す)際に使用するkeyを設定する。
        */
        override fun getRefreshKey(state: PagingState<Int, Article>): Int? {
                return state.anchorPosition?.let { anchorPosition ->
                        val anchorPage = state.closestPageToPosition(anchorPosition)
                        anchorPage?.prevKey?.plus(1) ?: anchorPage?.nextKey?.minus(1)

                }
        }


        /**
        * データをソースからロードした結果を返す。
        */
        override suspend fun load(params: LoadParams<Int>): LoadResult<Int, Article> {
                val position = params.key ?: FIRST_INDEX
                try {
                        val page = position
                        val response: Response<List<Article>> = repository.getQiita(query, page, params.loadSize)
                        var items: List<Article> = mutableListOf()
                        response.body()?.let {
                                items = it
                        }

                        return LoadResult.Page(
                                //取得したアイテムのList
                                data = items,
                                //現在のページより前のアイテムを取得する場合に用いるキー
                                prevKey = if (page == 1) null else page - 1,
                                //現在のページより後のアイテムを取得する場合に用いるキー
                                nextKey = if (items.isEmpty()) null else page + 1
                                )
                } catch (e: Exception) {
                        return LoadResult.Error(e)
                }

        }


        private fun ensureValidKey(key: Int) = max(FIRST_INDEX, key)
}
ViewModelクラス
ページング処理(LivePagedListBuilder と RxPagedListBuilderが単一の Pager クラス)を設定します。
一部抜粋
private val _itemsState = MutableStateFlow<PagingData<Article>>(PagingData.empty())
val itemsState: StateFlow<PagingData<Article>> get() = _itemsState

fun getQiitaPagerToStateFlow(searchKey: String) {
        viewModelScope.launch {
                Pager(
                        config = PagingConfig(

                        // ページサイズ設定。
                        pageSize = 5,

                        enablePlaceholders = true,
                        maxSize = 200),
                        pagingSourceFactory = { QiitaPagingSource(repository, searchKey) }

                ).flow.cachedIn(viewModelScope).collectLatest {
                        _itemsState.value = it
                }
        }
}
PagingDataAdapterクラス
ページング処理時のレイアウトを設定します。
一部抜粋
class QiitaPagingDataAdapter() : PagingDataAdapter<Article, RecyclerView.ViewHolder>(DiffCallback) {
}
LoadStateAdapterクラス
アダプターで読み込み状態を表示します。(ローディング処理)
一部抜粋
class QiitaLoadingStateAdapter() : LoadStateAdapter<RecyclerView.ViewHolder>()  {

        inner class QiitaLoadingStateAdapterVH(private val binding: ViewHolderQiitaLoadingStateAdapterBinding)
                : RecyclerView.ViewHolder(binding.root){

                //ここでローディング中のレイアウト表示の切り替えを処理を行う。
                fun bind(loadState: LoadState){
                        binding.progressBar.isVisible = loadState is LoadState.Loading
                        binding.errorMessage.isVisible = loadState is LoadState.Error
                }
        }
}
4.実装完成イメージ


5.苦労した点、工夫した点など
工夫が必要な課題としては、apiから取得したデータを画面に表示するページング処理などは自前で作成することで工数もソースも肥大していましたが、 Paging3(ページング ライブラリー)を使用することにより、工数やソースの肥大化を抑えることができました。
それ以外にもデータ取得時に大量のセグメントを少量のセグメントでデータを取得し、ネットワーク負荷を軽減するメリットがあるため、その点を工夫しました。
実装するにあたり、Qiita記事などを参考にし、「trial and error」でアプリを作りながら理解をしていきました。
お気にり一覧取得、検索キーワード一覧取得を並列処理で実装
試しにChartGPTで質問してみました。
【質問】
android Kotlinで viewmodelの並行処理をベストプラティクスな実装方法。
例えば、一覧画面に表示するのをA処理(Aテーブルから取得する)、同じ一覧画面にカテゴリー一覧を表示するB処理(Bテーブルから取得する)を並行処理させる。
【ChatGPT】
ViewModel内で複数のデータ取得処理を並行して行う場合、ViewModelとLiveDataを使用して非同期処理をうまく扱うことができます。
以下に、Kotlinでの実装の一例を示します。
まず、ViewModel内で行いたい処理に対応するメソッドを作成します。
これらのメソッドはそれぞれ別々のスレッドで実行される可能性があります。
import androidx.lifecycle.ViewModel
import androidx.lifecycle.LiveData
import androidx.lifecycle.MutableLiveData
import kotlinx.coroutines.CoroutineScope
import kotlinx.coroutines.Dispatchers
import kotlinx.coroutines.async
import kotlinx.coroutines.launch

class YourViewModel : ViewModel() {

        private val _listA = MutableLiveData<List<YourModelA>>()
        val listA: LiveData<List<YourModelA>> get() = _listA

        private val _listB = MutableLiveData<List<YourModelB>>()
        val listB: LiveData<List<YourModelB>> get() = _listB

        // Coroutineのスコープを指定
        private val viewModelScope = CoroutineScope(Dispatchers.Default)

        fun fetchData() {
                // 並列処理を開始
                viewModelScope.launch {
                        val deferredA = async { fetchDataA() }
                        val deferredB = async { fetchDataB() }

                        // 結果を取得してLiveDataに通知
                        _listA.postValue(deferredA.await())
                        _listB.postValue(deferredB.await())
                }
        }

        private suspend fun fetchDataA(): List<YourModelA> {
                // Aテーブルからデータを取得する処理を実装
                // 例: repositoryからデータを取得する
                return yourRepository.getDataFromATable()
        }

        private suspend fun fetchDataB(): List<YourModelB> {
                // Bテーブルからデータを取得する処理を実装
                // 例: repositoryからデータを取得する
                return yourRepository.getDataFromBTable()
        }
}
この例では、fetchDataA()とfetchDataB()メソッドがそれぞれ異なるテーブルからデータを取得する非同期処理を行います。
fetchData()メソッドでは、asyncを使用してこれらの非同期処理を同時に実行し、結果をLiveDataに通知します。
このViewModelを使用する場合、アクティビティやフラグメントでlistAとlistBのObserverを設定し、データの変更を監視することができます。
class YourFragment : Fragment() {

        private val viewModel: YourViewModel by viewModels()

        override fun onViewCreated(view: View, savedInstanceState: Bundle?) {
                super.onViewCreated(view, savedInstanceState)

                viewModel.listA.observe(viewLifecycleOwner, Observer { listA ->
                // listAのデータが変更されたときの処理
                })

                viewModel.listB.observe(viewLifecycleOwner, Observer { listB ->
                // listBのデータが変更されたときの処理
                })

                viewModel.fetchData()
        }
}
この例では、fetchData()を呼び出すことで、listAとlistBが非同期に取得され、それぞれのObserverでデータの変更を検知することができます。
ここまでが一連のChatGPTの回答でしたが、ほぼこの通りに実装しました。
6.最後に
今まで画面のページング処理などは自前でAPIを呼び出すタイミングやローディング処理などを実装していましたが、それらをライブラリーに任せることにより、効率良く開発ができるようになりました。
その代わり、必要な箇所で適宜どのライブラリーを使うかなど判断や種類などを覚えていく必要があります。
ChatGPTに関してですが、若干曖昧な質問をしても、ほぼ的確な回答をするので便利と感じました。
(ただし、エンジニアという存在がどうなるかという懸念も感じました。)
