
【No burden on people and the earth】Can be cooked in a rice cooker☆Plum Summer Birthday Cake with handmade message plate & candle

This recipe is for also gluten-free, allergies (wheat, soy, dairy), additive-free, organic, animal welfare, and non-GMO.
This recipe is for also Chemical Free Natural Organic Beeswax Birthday Candle Recipe.
↑ 日本語でも記事を書いています
I also write articles in Japanese.

Summer birthday party that comes every year.
From the birthday message plate I cook by hand every time, but when I go to buy the ingredients for the cake, strawberries are not on sale. Instead, bright red plums (Ooishiwase) are lined up in the store.
It is characterized by strong acidity, firm, juicy flesh, and a faint aroma.
If you want to eat them as they are, another variety is sweeter and tastier, but their bright colors and strong acidity are actually perfect for cakes.
...What?
Do you like peaches better because they taste better?
Do you prefer melons and mangoes because they are sweeter?
Wait a minute!
Don't say that!
Summer is for plums. Plums and peaches are type of peaches, right!
Even though making a plum cake by hand from the sponge makes it really delicious....

A minor cake in the world.
But for me, it is a standard cake all the time.
I want more people to know the charm of this cake!
That's why this time,
Recipe for a brightly colored birthday cake using Ooishiwase
Tips for decorating a cake to make it look like a birthday cake even for the first time
Recipes for cake decorations that don't burden people and the earth
I would like to write about these things in my own way.

●How to cook a cake
・About the Sponge Cake
Be sure to use the sponge cake baked the day before.
If you bake it the day of, it will be too powdery and not very tasty, so be sure to bake it the day before.
I always bake in a rice cooker.
I whisk the whole eggs without separating them, and I cook them with no butter added.
Of course, you can whisk the yolks and whites separately, whichever you prefer.
My recipe for genoise without separating the yolks and whites can be found at the following. ↓
See below for my recipe for a separate method of beating egg yolks and egg whites separately. ↓
About eggs for sponge cake
The simpler the ingredients, the better the taste will be depending on what you choose.
However, if you ask me if the more expensive eggs are better, I can't say that in general.
In the end, it is up to the individual to choose, but if you want to know more about eggs, please read the article I wrote in the past. ↓
The freshness of the eggs greatly affects the foaminess of the dough, so be sure to use fresh eggs.
Although it is now possible to purchase ready-made sponge cakes that are gluten-free and additive-free, you can easily make them by hand with simple ingredients and tools.
Decoration should be done 3 to 6 hours before eating.
It is delicious freshly made, but it tastes much better if you let it rest in the refrigerator so that the moisture from the cream and other ingredients can blend well with the sponge.
Make a schedule and count backwards in time.
It is important to take your time and not be in a hurry.
・About plums
I recommend organic or pesticide-free Ooishiwase because the whole skin is used. The sales period is very short and there are still only a few producers, but they can also be purchased on the Internet.
The taste and size of plums vary with the variety, but other varieties can be made as long as they are reddish in color.
The method of seed removal is almost the same as for peaches.
Please refer to the video by Tabegoro Kajuen for a very clear explanation. ↓
1. Wash the plums well under running water and make one vertical incision with a knife along the cracks of the plums.
2. Make one more vertical incision so that it looks like a cross when viewed from above.
3. Twist the pulp with both hands as if you were spinning a Rubik's cube.
(If you can't get the pulp off well, make a small incision along the seed and remove it.)
You can cut and arrange them however you like.
In this case, I used 10 pulpy pieces cut into quarters for decoration, and cut the others into bite-size pieces and used them in between. Ooishiiwase is for one pack (about 8 pieces in all).
You can use smaller ones and increase the number. Use the red, well-shaped ones for decoration.
If the taste is too acidic, reduce the amount or sweeten the cream to balance it out. 3-tiered, you may want to reduce the amount of plums and use other fruits such as bananas.
If you want to reduce the discoloration of the plums, which I omitted this time, soak them in a 1% brine for about 10 minutes or pour a little lemon juice over them to acclimate them.
After preparation, place in the refrigerator until just before use.
・About fresh cream
The richness of the cream depends on whether it is low-fat or high-fat.
(About 30 makes it moderately rich, while about 50 makes it thicker.)
Fresh cream with additives is less likely to lose its shape after whipping, such as in the summer, but it is not necessary for health reasons.
Among the products available in general supermarkets, I personally recommend Takanashi's fresh cream, which is additive-free. ↓
If you are concerned about GMOs, I recommend Tanna's and Yotsuraku's fresh cream. ↓
For grass-fed, additive-free fresh cream from Japan, I recommend Nakahora Farm's.
What is grass-fed beef?
Grass-fed beef refers to cattle raised freely on grass in a natural environment.
Compared to grain-fed beef, which is the mainstream in Japan, grass-fed beef is characterized by less stress and environmental impact. Their meat and dairy products are often delicious in their original taste.
Although it is for commercial use, you can purchase organic JAS-certified fresh cream at Setana Organic's store. ↓
If you want to convert high-fat fresh cream to low-fat, Yotsuba's Q&A will be helpful. ↓
If you want to make dairy-free whipped cream, please refer to “Ingredients and How to Cook Dairy-Free Whipped Cream” below.

・How to cut the sponge cake
Always refrigerate sponge cake thoroughly before placing it on a plate.
Make one vertical and three horizontal incisions about 1 cm deep as landmarks.
While turning, cut in small increments, first making a shallow incision all the way around.
Continue turning and cutting little by little, and finally detach the center of the sponge cake.
After cutting three pieces horizontally, lay them on top of each other according to the first landmarks.
I always cut horizontally by turning the knife little by little while keeping my pinky finger touching the table and keeping the height of the knife fixed as much as possible.
There are other ways to cut the sponge cake, such as placing two parallel bars of the same height at the back and front of the cake as guides and cutting straight from the side along the bars, or wrapping paper around the sponge cake before cutting, but I don't do it because it is too much trouble to prepare the tools.
The method of cutting from one direction may not work well with a short household knife because the sponge cake may ride on top.
To cut cleanly with a familiar tool, it is recommended to cut the sponge cake little by little while turning it.
Since you are cutting securely from the perimeter, the sponge cake is much less likely to bend or crumble in the middle of the cut.
After cutting, wrap it again to prevent it from drying out and place it in the refrigerator until the whipped cream has finished whipping.

・How to make whipped cream
Ingredients and how to make animal whipped cream
Fresh cream:200 ml x 2
Strawberry jam:4-5 tablespoons
Using jam will slightly change the color of the cream, but the organic strawberry jam is used in this case because the pectin will shorten the time it takes to whip the cream.
(The larger strawberry pulp tends to scatter around when whipping, so the smaller pulp is easier to make.)
Ingredients and how to make dairy-free whipped cream
You can also make homemade whipped cream using coconut milk or rice flour instead of commercial vegetable whipping cream, which has many additives. Soy or almond milk is also acceptable.
↓ Morinokomepan's video is very helpful, so please take a look if you like.
(Be sure to refer to the overview section for how to handle cream, as it differs from animal cream.)
・Always taste and adjust
Always taste each ingredient except the cream before adjusting the cream flavor. Since many people are suffering from summer fatigue at this time of year, I recommend using cream with 35% fat content for animal cream to reduce the sweetness.
In addition to the season, consider the tastes of the people who eat it and the timing of eating it while making the decision.
・You can choose which ingredients to sweeten
Honey or maple syrup can be used in place of sugar.
Even a small amount will give the same level of sweetness as sugar and improve the overall flavor.
I am health conscious, so I basically use organic beet sugar, and where I can substitute it, I often use organic maple syrup, honey, organic strawberry jam, etc.
Caution when using honey
Honey may contain a bacterium called botulinum, and should never be given to babies under one year of age who do not have an adequate intestinal environment.
It is heat resistant and cannot be sterilized by cooking.
If given, it should only be given after the age of 1 year.
・In the summer, whipping cream will turn out just fine if you whip it to about 80% even if you don't squeeze it out
Fill a large bowl with lots of ice or refrigerant and fill it with water. Stack the bowl on top of it and be sure to whisk while chilling.
Whipping cream is sensitive to heat, so if you whip it slightly more firmly during hot weather, it is easier to get the final product just right. After whisking, be sure to continue chilling in the refrigerator or refrigerant.

・Layering order and tips for layering ingredients
Cream → Plum → Cream → Sponge cake
Repeat twice.
It is up to you to decide how much to put in between the layers, but do not put too much in the center, so that the tip of the cake will not fall apart when you cut it.

★Tips for applying cream
Put a lot of cream on the top first.
Spread the cream thickly over the entire surface, as if you were placing it rather than applying it.
Fill in the gaps of the sponge cake with cream.
Flatten the top surface first by rotating the plate with a spatula.
Flatten the cream on the sides while turning the plate.
Flatten the cream on the sides that protrudes from the top surface.
Finally, wipe off the cream from the dish to complete the process.
The key point is to place the cream first, being conscious of filling in the gaps, because if there are any voids, it will look like a hole while applying the cream.
↓ Some parts are different, but as a whole, please refer to Classil's video, which may help you grasp the image.
Flatten the surface of the cake as if it were a record in the old days.
The key is to turn the plate without moving the hand holding the spatula too much.
If it is difficult, you can add unevenness randomly for a stylish finish.
Do not apply the paint as if you were tapping the surface, as the bottom will peel off and reveal the underlying sponge cake.
The center will be decorated with a message plate, so place the extra whipped cream on top.
Place the plums so that they radiate outward with the pointed end facing outward. Once placed, do not rearrange them for a beautiful finish.
★Tips to make your cake look beautiful even if you cook it using simple methods
・Make the other ingredients take center stage rather than the cream
If you decorate with large fruits or a message plate, you won't mind the random shape of the cream so much. If you don't want perfection, you don't need to use a squeeze bag.
・Always keep your plates clean
Even if you are wearing casual clothes, if your shoes are shining, you look well dressed. In a sense, it is the same with cakes. If you keep the dish at the bottom free of cream and other stains, the cream on the top will come together nicely even if it is applied roughly.
If the dish gets dirty, fold up a clean tissue or rag and place it along the edge of the dish to wipe it all around.
This is not recommended in the summer, but if you use a squeeze bag, please refer to this article. ↓
●How to cook a simple handmade message plate
・Ingredients for message plates
I often make them by hand because the ones generally sold have many additives, coloring agents, etc.
A chocolate plate can be used as a base, but in summer it is easy to get condensation, especially because of the large temperature difference between the refrigerator and the room. IPersonally, I recommend using biscuits as the base because it's delicious and doesn't fall apart easily.
Cookies go relatively well with any cake.
↓ Here is what I often use

・Glico Shortbread scented with fermented butter
【Ingredients】 Wheat flour (manufactured in Japan and Singapore), fermented butter, sugar, macadamia nut powder, salt, (some dairy ingredients and wheat are included)
There is no further information on the place of origin, etc., so it is hard to say, but it is one of the few additive-free cookies currently available in supermarkets. They also contain no shortening or baking powder.

・Walkers Shortbread
【Ingredients】 Flour, butter, sugar, salt
Although slightly salty, British cookies are also easily available in Japanese supermarkets. Depending on the size of the cake, 2 to 4 pieces are just right for use.
There are organic cookies, but there are few squares and few with simple ingredients, so I hope to see more of them in the future.

↑ If you choose rice flour cookies instead of wheat, here is another good choice. These rice-flour cookies are wheat- and dairy-free, and are made with ingredients that are kind to the body.
Genki Town Yasashii Soy Milk Cookie Plain
【Ingredients】Rice flour (produced in Japan), sugar beet (produced in Japan), rapeseed oil (non-genetically modified), organic soy milk, soy flour (produced in Japan), sweet potato starch (produced in Japan), organic coconut, natural salt
・Message plates can also be made by hand with rice flour cookies
This is a healthier cookie recipe that does not contain eggs, butter, soy milk, nuts or sugar.
kinako's recipe is very helpful. ↓

While letting the cake rest in the refrigerator, I will write the letters.
Since they are individually wrapped, it's easy to adjust the quantity to match the letters. The small holes also serve as a guide when writing, which is convenient.
There are 11 pieces in total. This time, I will use 4 pieces.
Since they will be fixed to the cake, writing them slightly higher is key. If you use a large, traditional font, even beginners can write easily.
The leftover chocolate can be used to attach the biscuits. Once finished, put it in the refrigerator.
・There are various types of decorating pens
Even with natural food coloring, some people may have allergies or adverse reactions, so it is recommended to use an orthodox brown decorating pen.
If you want to make your own decorating pen, Patisserie's video are easy to understand and helpful.
When making them, use tools that are sold for food use.
Please refer to the following article for more information on how to choose the chocolate to use.
It also describes organic chocolates and chocolates that do not contain 28 allergens.
If you prefer to write with a pen other than chocolate, there is also Joy Vege made from vegetables ↓
You can also make decorating pens yourself, but it would be great if we could buy additive-free or organically sourced decorating pens at the supermarket as a standard option.

・Decorate and you are done
If you like a crispy texture, put a cookie on top at the same time you decorate the candles. The cake will be quite hearty.
It is very satisfying.

★Tips for Cutting Cleanly
Chill the cake thoroughly before cutting.
Sharpen knives well in advance.
Sear the knife on the stove or warm it in hot water, wipe it dry, and cut.
Wipe off any cream that comes into contact with the cake, and warm the knife again before cutting.
Cut in small movements as much as possible.
If the plums are difficult to cut, take them out on a separate plate and cut them individually.
Avoid moving the knife from side to side as much as possible, because it will look bad if cream gets into the gap between the cross section of the sponge cake and the knife. The key is to cut in small increments while keeping close contact with both sponge cross-sections.
Fluffy cross-sections, whether cut or not!
The fresh and tart ooishiwase goes well with whipped cream and sponge cake.
"Huh? Is plum cake really delicious?" For those wondering, I hope you find this helpful.
●About Birthday Candles

・Thinking about birthday candles that are friendly to people and the earth
From here on, this is a bit of an aside.
Every time I use birthday cake candles, I think about the smell of smoke after blowing out the fire, which bothers me a little.
Even though I ventilate the room, I still don't really want to breathe in this smoke....
I used to handle wax frequently when I was working as a Figure modeler, so I have a lot of thoughts about it.
Back then, I melted wax for modeling that contained synthetic fragrances and petroleum-derived paraffin, etc., with a wax pen or a high-temperature soldering iron to make prototypes on a daily basis.
Smoke is an everyday occurrence.
At that time, it was so commonplace that I didn't care....
Now, I feel it is not good for my health.
I have come to think that I want to buy or make birthday candles made from safer wax instead of paraffin.
It is unrealistic to look at the price alone, but as an option, I think it should be commonplace in the future.
And,
If I can use the skills I have cultivated over the years to improve the dining table that I share with my loved ones on special occasions, I would like to make something of my own to share with you.
I would like to start by writing a little something that is easy to make, even for first-timers.
I would be happy if you could be interested in it even a little and say, “Hmmm, I didn't know it was possible to do this.
・I recommend beeswax for wax used in candle making

Beeswax, simply explained, is the material of the honeycomb.
It is a natural wax secreted by the bees from their bodies after eating honey and pollen. If you have ever eaten honey that contains beehives, you may already know this.
Since it is made by removing impurities after harvesting honey, it has a sweet honey fragrance. It is also used in lip balms and baking (cannelés).
・If you want to make it the traditional way
The orthodox candle, which is made by repeatedly adhering a thin film of wax to the candle wick and covering it, is called a tapered candle. If you want to make thin and short birthday candles by hand with beeswax, this method is easy and simple to make.
↓ Letron's video is easy to understand and helpful to learn how to make it.
・If you want to make it with a handmade kit
There are candle kits that can be made in a fun, craft-like way without a pot or special tools.
I was shocked when I first discovered beeswax sheets because in the past, wax was usually boiled, melted, poured and molded. It is convenient to handle like paper or clay.
↓ Next up is intermediate
・If you want to use a mold to make
You can duplicate many candles at once by making a mold from a prototype of your favorite shape.
Konjac mold
This is a body-friendly mold made of food material.
It is not suitable for making detailed molds or for long-term storage, but it is very useful when you want to make candles with small children or when you want to make something that can be used as a base in a short period of time.
↓ For detailed instructions, please refer to this video
However, it does not appear to be handled at this time.
It may be difficult to purchase.
If I see another product or if it is sold again, I will introduce it here again.
Silicone mold
↓ It's a bit too large to place on a cake, but the handling of the mold and beeswax is helpful, so I will also introduce the video from the honey shop.
How to make silicon molds
If you have a prototype of your favorite shape, you can enjoy making a mold of it. Please read my previous article on how to make a mold.↓
This is how it was done with wax for soft vinyl molds, but it can also be applied to beeswax modeling to some extent, so I've included it here.
■■ Points to Note When Making Food-Grade Candles with Beeswax ■■
When using them for food, you need to pay more attention to hygiene and safety than usual. Even if you have tools that you are familiar with, please pay close attention to the following points.
・Do not make them for babies under 1 year old
・Make in a hygienic environment such as a kitchen
・Use only foods that are safe to eat as ingredients
・Always use cooking utensils and food-grade ingredients
・Do not share utensils or ingredients for other uses
When making them, always maintain an awareness of making food throughout the entire process.
■Examples of Tool Substitutions
・Cutter mat → Wooden cutting board, thick edible silicon sheet
・Cutter → Steak knife, fruit knife
・Acrylic ruler → Stainless steel ruler
・Cutter → Toothpick, barbecue skewer
・Spatula → Stainless steel spatula, disposable chopsticks
・Silicon → Food grade silicon
・Corrugated cardboard → Corrugated cardboard for food
・Thermometer → Thermometer for food
・Marker → Marker for food
・Glue → Melted beeswax, rice, food glue
・Packing material → Plastic wrap, aluminum foil, oven sheet
・Cleaning liquid → Disinfectant alcohol, kitchen detergent
・Straining cloth → Kitchen cloth, tea bags, kitchen paper
・Military gloves → Mittens
↓ When choosing silicone, it is safer to select silicone that has undergone component analysis.
・If you want to make it without using a mold
You do not need a mold if you have the right shaped container.
However, while paper cups and other containers are convenient, almost all of them are coated with plastic. Check product information before you buy.
I use dishwasher and microwave safe dishes when making this without a mold because hot wax is poured into them.
Resistant to heat
Can be used for food
Can be heated in a double boiler or microwave
Smooth surface
No grooves or narrow necks
Vertical wall surface
Has a good height
Not in regular use
Dishes like this are just fine.
Avoid also vessels dedicated to aroma candles, since they are used for cakes.
・You can make molds by hand with ingredients you have at home
For simple clay molds that are easy to use up, you can make them with rice flour, oil, and water.
Knead rice flour and water 3:1 with a small amount of oil.
Since the water absorption rate and the hardness of the dough vary depending on the rice flour, adjust the amount according to the situation.
It is not suitable for making precise prototypes because the size of the dough changes as it dries, but people with allergies or sensitive skin can make with it safely.
Once the clay is ready, press the prototype of your choice directly onto the clay to make an indentation, which will be used as the mold.
Before the mold dries, pour wax into it, and when the wax hardens, remove the surrounding mold.
◆Tips for making it yourself
・Gather body-friendly materials

Organic beeswax
For ages 1 and up, I recommend beeswax, which is environmentally friendly and produces very little soot.
And just like honey, there is organic beeswax as well. Rather than beeswax made by bees that are fed antibiotics and artificial sugar water on a daily basis, I choose beeswax from bees that live as close to nature as possible.
Characteristics of beeswax
・The most body-friendly and least burdensome among waxes
・No unpleasant odor when burned
・It has a deliciously sweet smell even while making
・Moderate hardness for easy modeling
・Moderately sticky, and not prone to cracking
・If not melted with heat, it will peel off even if it is attached
・Somewhat difficult to clean if it gets on other things
・Color fades when exposed to sunlight
・Slightly low melting point
・Decreases in volume when cooled
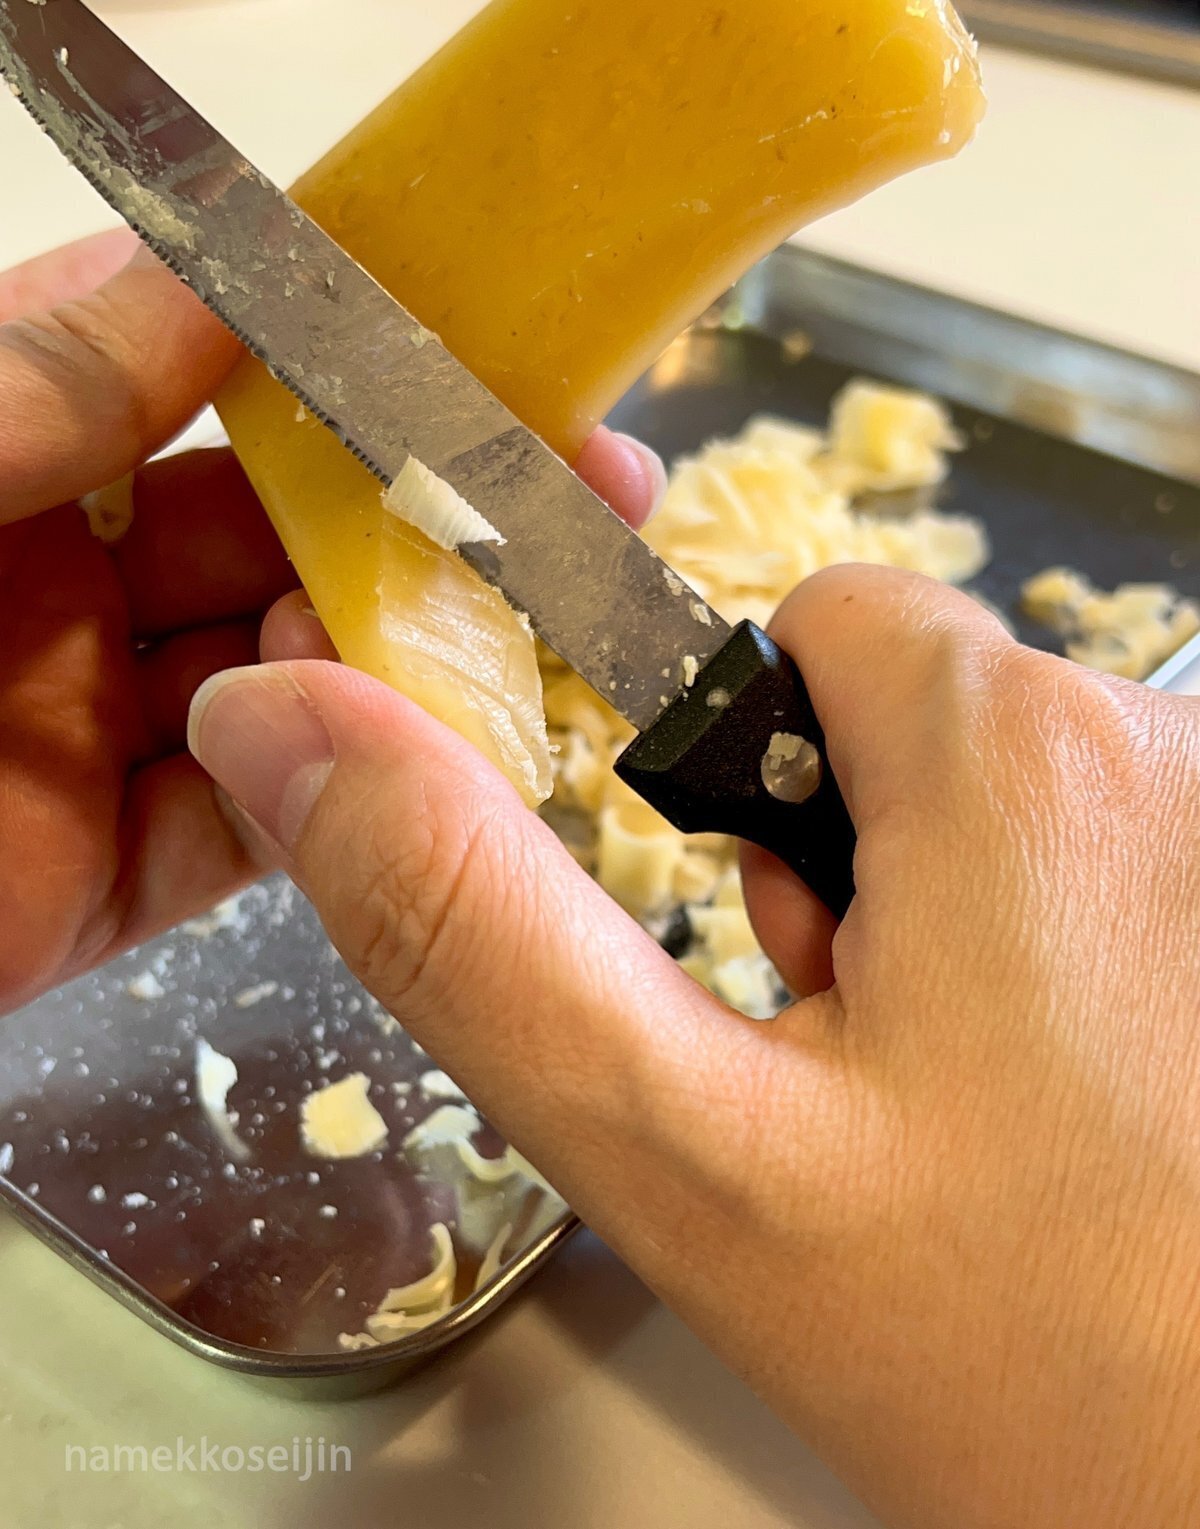
Block beeswax can be easily melted by scraping it off with a steak knife, which can be found at 100 yen stores, as if you were peeling the skin.
For those who find it troublesome, beeswax in granular form is also available.

No synthetic fragrances & synthetic colors
I choose to use what I have in my kitchen because I want to stick to natural and organic materials for the colors as well.
I melt about 5g of beeswax and dye in the container on the left and make 8 different kinds to try.
Top row, from left:Beets, coffee, plain
The same color no matter how many times you mix it, the dye sinks to the bottom.
Middle row, from left:Turmeric, cinnamon, paprika
Spices used in curry powder are easy to color.
Bottom row, from left:Matcha, pure cocoa, cayenne pepper
Oil-soluble and gives a solid, dark color.
Black sesame seeds are omitted because they are oily and may affect the firmness. I would also omit purple cabbage, as it is not sold very often in supermarkets. (Probably water soluble)
Beets and coffee are water soluble and do not dissolve at all.
The coffee in the café au lait that you casually drink every day is actually soluble in whey, not in the fat of the milk.
As for the brown color, cocoa is more soluble with better coloration than cinnamon. The beeswax can substitute for cocoa butter, resulting in a finish that resembles chocolate.
If you are interested in other natural dyes, the research data from the Rokkou Bioscience Institute may be of some help. It is interesting to see the variety.
・Gather body-friendly tools

Candle wicks should also be made of food-grade materials
Use metal-free materials that do not produce toxic substances when burned. In this case, since the candles are food-grade and will not be used for a long period of time, I use takoito, which is used to bind meat.

Prepare sculpting tools
From top
・Steak knife from 100 yen store
・Barbecue skewers from a 100 yen store
・Parfait spoons from a 100 yen store
・100 yen store crab fork
・Small forks from a 100 yen store
・Homemade pure copper wax pen
・3 handmade disposable chopstick spatulas
Others
・toothpicks
・Kitchen paper
・Cooking sheet
・Stainless steel batts
・Alcohol sterilizing spray
Tools are also cleaned and sanitized before use. Beeswax is relatively soft, so you can make with handmade tools made from disposable chopsticks. Disposable chopsticks with a slanted tip can be used as they are.
Although not shown in the photo, I use a hole-punching tool made by splitting the tip of a toothpick handle to half its original thickness.
By holding it in your hand and rotating it while pressing it against the wax, you can easily make a hole.

★A little tweak for the wax pen
A convenient wax pen that can melt wax.
Nibs for ordinary wax pens are made of brass material and plated with nickel.
Because nickel can cause metal allergies and other concerns, I have arranged to use pure copper.
I dare to choose pure copper nibs for soldering irons because I cannot find wax pen nibs that are made of copper or other safe metals.
I wrap aluminum foil around the existing nib and secure it by placing it over it.
Copper is a safe metal used in pots and dishes.
Although the heat conductivity slightly decreases due to the longer pen nib, setting the temperature a bit higher makes it perfectly suitable for beeswax.
( I hope that wax pens will be made with pure copper nibs in the future.)
●How to make handmade candles

1.Make the body
Finely grind beeswax as you would when melting chocolate, and place it in a heat-resistant container.
Beeswax is generally melted by placing a heat-resistant container in a small pot of hot water, but for small amounts, you can also melt it by placing it in hot water heated in the microwave.

The center of the beeswax will become concave because of its tendency to decrease in volume as it cools.
Once the beeswax has cooled and hardened thoroughly in the refrigerator, remove it.
Melt the beeswax by heating the sides and bottom of the heatproof container with hot water or a hair dryer, and invert the beeswax onto a cookie sheet as you would invert a pudding onto a plate.

2.Drill a hole with a toothpick and pass the core through it.
It is easy to do if you moisten the tip beforehand like a normal thread.

3.Add beeswax to the bottom and cover
Add a small amount of beeswax pieces and work with a wax pen to melt it. The key is to stand the candle wick vertically and fill it with beeswax around it.
Wax and wax must melt and mix with each other to fully adhere.
Pouring from the top is not enough, so a wax pen is a sure thing.
4.The candle wick is repeatedly dipped in melted beeswax to make the candle
Thin, short candles are done quickly.
For larger candles, break off the tip of the wick before dipping it in the beeswax, which is later melted to release it.

5.Shape the entire piece.
Place a lump of beeswax on the missing part to melt and replenish it.
If there are bubbles or cavities in the beeswax, they can cause cracks, etc. Melt them with a wax pen and then replenish the wax, filling them as nicely as possible.
When finished, scrape the entire surface and then polish the surface.
■Tips for comfortable beeswax modeling
・Cut fingernails and remove rings, etc.
(They can easily get scratched when they hit the surface.)
・Cut a piece of kitchen paper first.
(This is to make it easier to remove the oil and shavings from the beeswax.)
・Basically, never pour beeswax down the sink.
(It sticks and clogs up, so throw it in the burnable trash.)
■Polish with alcohol-soaked kitchen paper
In truth, it is much faster to use a chemical such as A benzine used in stain removal, but it is taboo for birthday candles.
Although alcohol does not have the power to dissolve beeswax, it can be combined with kitchen paper to make it shiny without compromising safety.

6.Put the colored wax on the part you want to color and blend it in
If you only put it on the surface, it will peel off, so mix and melt the adhesive surface moderately. You can make candles with colored wax alone, but it is important to melt it and use it only on the surface as much as possible because it smells when it is burned.

7.Shape and clean the wick and wrap it with aluminum foil.
If the wick is too thick, melt off the excess wax, and if it is missing, add more. Don't forget to cut it to an appropriate length. When finished, wash with dishwashing detergent, wipe dry, and wrap with aluminum foil once dry.
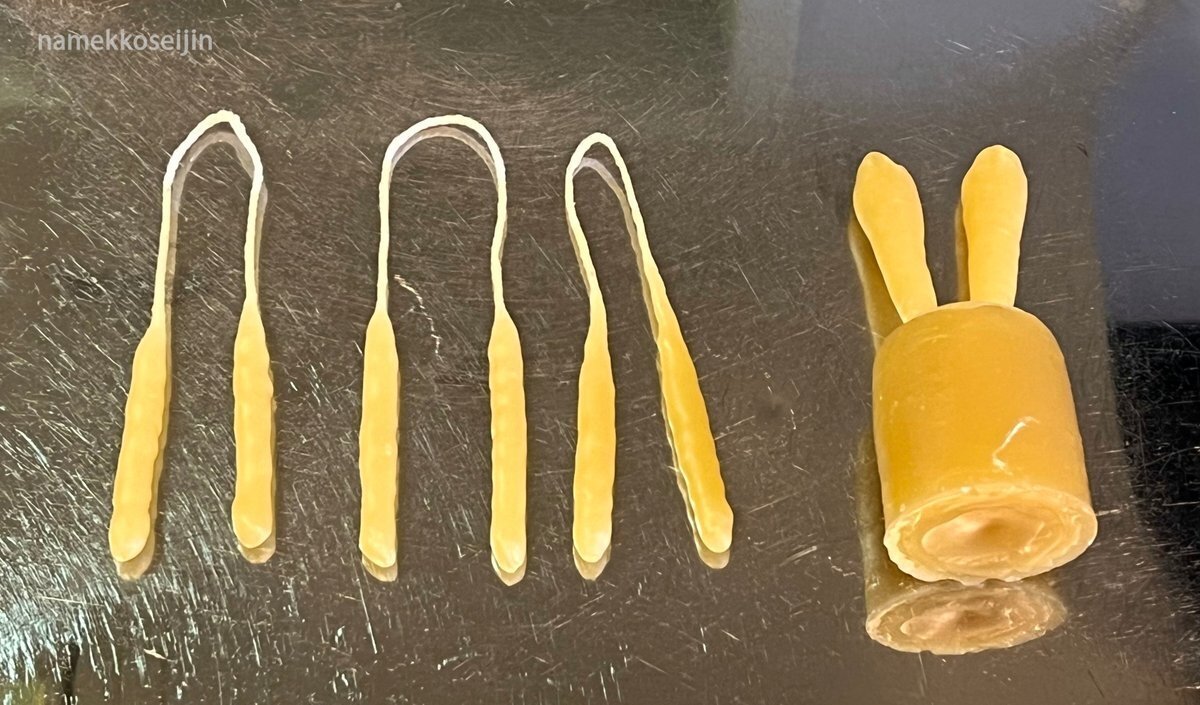
You can choose the length of the aluminum foil as you like; this time, I cut a 4 cm piece of aluminum foil and divided it into 4 equal pieces, making a 4 x 6 cm piece.
Fold the foil inward 5 mm on one side, lengthwise and widthwise, and roll it up from the unfolded end.
Finally, trim the tip so that it is slightly thinner.

From left to right: turmeric, paprika, cayenne pepper, cinnamon, green tea, pure cocoa, and the original character candle is also complete!
The character that is the motif of this original candle is my character, Loveme. For more details and its origin, please see below. ↓

Since they are made of healthier materials, they are safe even if they should melt and drip onto the cake, but beeswax birthday candles melt somewhat quickly, so please blow them out as soon as possible.
The type and amount of dye mixed in, as well as the length of the candle and wick, will affect the flame size and burning time.
It is difficult to achieve uniformity when making various types of candles, but I hope you will enjoy the differences in each type as a unique aspect of handmade candles.

About storage methods and usage
Beeswax is sensitive to sunlight and moisture, so after wrapping it in kitchen paper, wrap it in aluminum foil or other light-blocking material and store it airtight with a desiccant.
The next time you use it, check the surface carefully for mold or dirt, and wrap it in new aluminum foil after washing it again or sterilizing it with alcohol.
Over time, a whitish oil will appear on the surface of the candle, but you can wipe it off with alcohol and reuse it.

Cake is not just delicious to eat
Eating is just a moment. But for that important moment.
For the cook too,
For the eater too,
For the maker too,
For the producer too,
For the environment too,
There are things we can do to minimize the burden on each.
A single birthday cake is filled with care and thought.
This time I wrote it in my own way, including the inedible decorative parts.
(Somehow I got back to my roots as a Figure modeler.)
I'm deeply moved that in the process of making birthday candles, I was also able to create a safe wax that can be used for making prototype.

Color the beeswax with matcha (powdered green tea) to make it easier to see the shape and make the wax suitable for modeling.
Strain the wax through a tea packet or use wax except for the bottom part where powder tends to accumulate.
If you like chocolate, you can color it with pure cocoa, but be careful after making it, just in case insects might approach it depending on the storage conditions.
If you want to add more hardness to beeswax
Add the desired amount of carnival wax, which is vegetable-based and safe.
It will crack more easily when force is applied, but it will be more resistant to abrasion and contact, and will also make it easier to create fine, sharp details.
While there are an increasing number of products that are safe and environmentally friendly when it comes to food, the emphasis is often on price and efficiency when it comes to candle and wax prototype production, and the health and environmental concerns of the creators are often secondary.
There are a few production sites that use beeswax as a part of their materials, but they are still few and far between.
I think it is difficult in reality due to limited production costs, but I hope that more flexible material selection and consideration will be made in the field of production.
I think few people start with making candles when making a birthday cake in the first, but nowadays it is becoming easier to make handmade candles, so I hope this article will be of some help to you as one option.
Thank you for taking the time to read this.
About updates
(Any major changes will be posted here.)
Product contents and sales status are changing little by little.
Even if I write the latest information, it will be past information, and some products may have been changed, discontinued, or no longer sold.
I update the information as needed when I find other good products, but if I cannot find other good products, I will leave the information as past good product information. Please be sure to check the latest information carefully when making a purchase.
I will continue to update the article as needed.
I believe that a recipe is not finished once it is made, so I hope you will refer to this recipe every time you have the opportunity.
Thank you for your continued support.
↑ 全記事&マガジン一覧
List of All Articles & Magazines
↑ メンバーシップも始めました
会員限定記事を少しずつ公開しています
I've also started a membership.
I'll be releasing members-only articles little by little.
いいなと思ったら応援しよう!
