Fugaku-llm-13BをMacで動かしてみる
昨日プレスリリースが発表された富岳を使った日本製LLMをMacで動かしてみました。
さて、以下からお試しができるようなのですが、登録が単に面倒なため、ローカルで動かしてみました。
弊社のポータルサイトからもUI付きでお試しいただけます。https://t.co/Kgc7PWPQj4
— 淺間康太郎 | Asama Kotaro (@AsamaKotaro) May 10, 2024
まずは、mlx環境で、mlx-lmを使って動かないかを試しました。
mlx_lm.generate --model Fugaku-LLM/Fugaku-LLM-13B-instruct --prompt "以下は、タスクを説明する指示です。要求を適切に満たす応答を書きなさい。\n\n### 指示:\nスーパーコンピュータ「富岳」の名前の由来を教えてください。\n\n### 応答:\n"残念ながら、GPT2はサポートされていないというエラーで動きませんでした😭
次は、モデルカードにあるサンプルコードをちょっと弄ったら動きました。
device="mps" を付け加えてちょこちょこと改変しました。参考にしたのは自分の過去の下記記事です。
最終的なコードは以下の通りです。Gradioを使ったインターフェースです。
import gradio as gr
import time
import torch
from transformers import AutoModelForCausalLM, AutoTokenizer


device = "mps"

model_path = "Fugaku-LLM/Fugaku-LLM-13B-instruct"
tokenizer = AutoTokenizer.from_pretrained(model_path)
model = AutoModelForCausalLM.from_pretrained(model_path, torch_dtype=torch.bfloat16, device_map="auto") #
model.eval()

#system_message = "以下は、タスクを説明する指示です。要求を適切に満たす応答を書きなさい。"

fugaku_template = (
  "{% for message in messages %}"
      "{% if message['role'] == 'system' %}"
          "{{ '' + message['content'] + '\n\n' }}"
      "{% else %}"
          "{% if message['role'] == 'user' %}"
              "{{'### 指示:\n' + message['content'] + '\n'}}"
          "{% else %}"
              "{{'### 応答:\n' + message['content'] + '\n' }}"
          "{% endif %}"
      "{% endif %}"
  "{% endfor %}"
  "{% if add_generation_prompt %}"
      "{{'### 応答:\n'}}"
  "{% endif %}"
  )


def predict(message, history, system_message, tokens, temp):
    prompt = []
    #instruction_example = "スーパーコンピュータ「富岳」の名前の由来を教えてください。"

#prompt = f"{system_example}\n\n### 指示:\n{instruction_example}\n\n### 応答:\n"

    for human, assistant in history:
        prompt.append({'role': 'user', 'content': human})
        prompt.append({'role': 'assistant', 'content': assistant})

    prompt.append({'role': 'user', 'content': message})
    prompt.insert(0, {'role': 'system', 'content': system_message})


    full_prompt = tokenizer.apply_chat_template(prompt,
                                           tokenize=False,
                                           chat_template = fugaku_template,
                                           add_generation_prompt=True)

    print (f"\n**** 入力される最終プロンプトはこんな感じ:\n{full_prompt}")

    input_ids = tokenizer.encode(full_prompt,
                             add_special_tokens=False,
                             return_tensors="pt").to(device)

    tokens = model.generate(
        input_ids.to(device=model.device),
        max_new_tokens=tokens,
        do_sample=True,
        temperature=temp,
        top_p=1.0,
        repetition_penalty=1.0,
        top_k=0
        )

    out = tokenizer.decode(tokens[0], skip_special_tokens=True)
    print(f"\n**** 出力はこんな感じ:\n{out}")

    last_response = out[len(full_prompt):]

    # Split the output into lines
    #lines = out.split('\n')
    # Find the index of the last occurrence of "### 応答:"
    #response_index = len(lines) - 1 - lines[::-1].index("### 応答:")
    #  Extract the response lines starting from the next line after the last "### 応答:"
    #response_lines = lines[response_index + 1:]
    # Join the response lines into a single string
    #last_response = '\n'.join(response_lines).strip()

    #return last_response

    for i in range(len(last_response)):
            time.sleep(0.05)
            yield last_response[: i+1]

demo = gr.ChatInterface(predict,
    title="Fugaku-llm-13b-instruct",
    description="",
    additional_inputs=[
        gr.Textbox("以下は、タスクを説明する指示です。要求を適切に満たす応答を書きなさい。", lines=5, max_lines=50, label="System Prompt"),
        gr.Slider(100, 1024, value=512, label="Tokens"),
        gr.Slider(0, 1, value=0.8, label="Temperture")
                        ]
                       )

if __name__ == "__main__":
    demo.launch()
torch, transformersを pip install -U hogehoge でアップデートしました。
あと、Fugakuのテンプレートをこんな感じでいいかなと設定しました。
それと、出力には、入力したプロンプトもそのまま全部が吐き出されてくるので、最後の ### 応答: の部分だけを last_response と加工しました。
GPT4とGeminiに尋ねて試行錯誤しましたが、うまくいかず、Claude3Opusの回答を踏まえてまず、以下の部分がうまくいきました。(上のスクリプト内に残したままです)
    # Split the output into lines
    #lines = out.split('\n')
    # Find the index of the last occurrence of "### 応答:"
    #response_index = len(lines) - 1 - lines[::-1].index("### 応答:")
    #  Extract the response lines starting from the next line after the last "### 応答:"
    #response_lines = lines[response_index + 1:]
    # Join the response lines into a single string
    #last_response = '\n'.join(response_lines).strip()
その後、またGPT-4と会話をしていて、「このコードでは、prompt_length を使って直接文字列の長さを取得し(Pythonの len() 関数を使用)、生成されたテキストからこの長さ分をスキップしています。これにより、プロンプトの後に続く応答部分だけが抽出されます。これはテキストベースの処理であり、トークンの長さを考慮する必要はありません。」というシンプルな方法を教えてもらったので、こちらを採用して上手く応答部分だけを表示することが可能になりました。以下の部分です。
last_response = out[len(full_prompt):]Huggingfaceで公開されてる以下のモデルを使います。
サンプルコードでは、max_new_tokens=128, temperature=0.1, となっていますが、上のスクリプトは変えてありますので注意してください。
M3Max 64GBでメモリプレッシャー黄色になりながら、どうにか動きました。
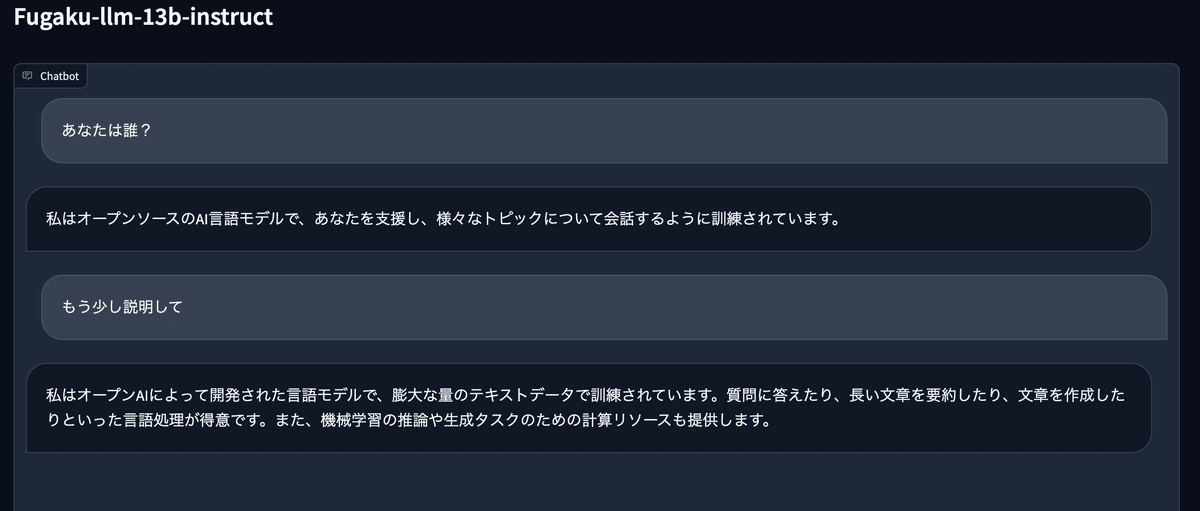
対話例です。

純国産製のはずなのに・・・笑
人生の意味を論じて
人生の意味とは、死後も続く物理的・イデオロギー的な遺産を残すことであり、それが時の荒波に耐えられるようにすることである。
メタファーやアナロジーを使って説明して。
人生の意味は懐中時計に似ている。懐中時計は時間を見るための実用的な道具ですが、同時に過去から未来へと延びる象徴的な線でもあります。つまり、人生の意味とは、現在を最大限に活用し、自分の過去を振り返り、将来に思いを馳せることである。
temptureのせいなのか、である口調とですます口調が混じってきます。
猫の一生の意味を、猫の視点から、猫の口調で喋って。
もちろん、これが猫の一生の意味についての会話の試みです:
にゃあ
私は生きている、それが私の目的だ。
私は空気を吸い、水を飲み、自由に生きている。
私は日向でくつろいだり、ネズミを追いかけたり、好きなように生きている
でも忘れないで、私は死ぬ、そして君は覚えていない
こんな感じです。
ちなみにterminalでの入力プロンプトと出力を確認していると以下の感じです。
**** 入力される最終プロンプトはこんな感じ:
以下は、タスクを説明する指示です。要求を適切に満たす応答を書きなさい。
### 指示:
あなたは誰?
### 応答:
私はオープンソースのAI言語モデルで、あなたを支援し、様々なトピックについて会話するように訓練されています。
### 指示:
もう少し説明して
### 応答:
私はオープンAIによって開発された言語モデルで、膨大な量のテキストデータで訓練されています。質問に答えたり、長い文章を要約したり、文章を作成したりといった言語処理が得意です。また、機械学習の推論や生成タスクのための計算リソースも提供します。
### 指示:
人生の意味を論じて
### 応答:
人生の意味とは、死後も続く物理的・イデオロギー的な遺産を残すことであり、それが時の荒波に耐えられるようにすることである。
### 指示:
メタファーやアナロジーを使って説明して。
### 応答:
人生の意味は懐中時計に似ている。懐中時計は時間を見るための実用的な道具ですが、同時に過去から未来へと延びる象徴的な線でもあります。つまり、人生の意味とは、現在を最大限に活用し、自分の過去を振り返り、将来に思いを馳せることである。
### 指示:
猫の一生の意味を、猫の視点から、猫の口調で喋って。
### 応答:
**** 出力はこんな感じ:
以下は、タスクを説明する指示です。要求を適切に満たす応答を書きなさい。
### 指示:
あなたは誰?
### 応答:
私はオープンソースのAI言語モデルで、あなたを支援し、様々なトピックについて会話するように訓練されています。
### 指示:
もう少し説明して
### 応答:
私はオープンAIによって開発された言語モデルで、膨大な量のテキストデータで訓練されています。質問に答えたり、長い文章を要約したり、文章を作成したりといった言語処理が得意です。また、機械学習の推論や生成タスクのための計算リソースも提供します。
### 指示:
人生の意味を論じて
### 応答:
人生の意味とは、死後も続く物理的・イデオロギー的な遺産を残すことであり、それが時の荒波に耐えられるようにすることである。
### 指示:
メタファーやアナロジーを使って説明して。
### 応答:
人生の意味は懐中時計に似ている。懐中時計は時間を見るための実用的な道具ですが、同時に過去から未来へと延びる象徴的な線でもあります。つまり、人生の意味とは、現在を最大限に活用し、自分の過去を振り返り、将来に思いを馳せることである。
### 指示:
猫の一生の意味を、猫の視点から、猫の口調で喋って。
### 応答:
もちろん、これが猫の一生の意味についての会話の試みです:
にゃあ
私は生きている、それが私の目的だ。
私は空気を吸い、水を飲み、自由に生きている。
私は日向でくつろいだり、ネズミを追いかけたり、好きなように生きている
でも忘れないで、私は死ぬ、そして君は覚えていない
context windowsの大きさは、このモデルではどうなっているのでしょうね?
どこをみたら分かるのか教えて欲しいです。
この記事を最後までご覧いただき、ありがとうございます!もしも私の活動を応援していただけるなら、大変嬉しく思います。
