
[Shopify]アプリを使わずに言語切替をヘッダーに設置(Dawn)1/100

こんにちは。Shopify専門エンジニアのまりん(@crowd37cord)です。
今日からDawnテーマベースでオリジナルレイアウトパーツを100個作ります!!
何かを突き抜けてやり遂げてみたいと思ったのがきっかけで、続けても心が折れないものといえばShopifyのコーディングしかないなぁ。。。ということで頑張ってみます♪
初回は言語切替ボタンの設置。デフォルトではフッターに言語切替セレクタ設定機能が備わっていますが、ヘッダーにも欲しい><
Dawnでは初めから言語切替セレクタの機能が備わってるので、そのコードをヘッダーに設置するだけ♪つまり、アプリをインストール必要もなく、しかも2ステップで簡単♪
✔️今日のゴール
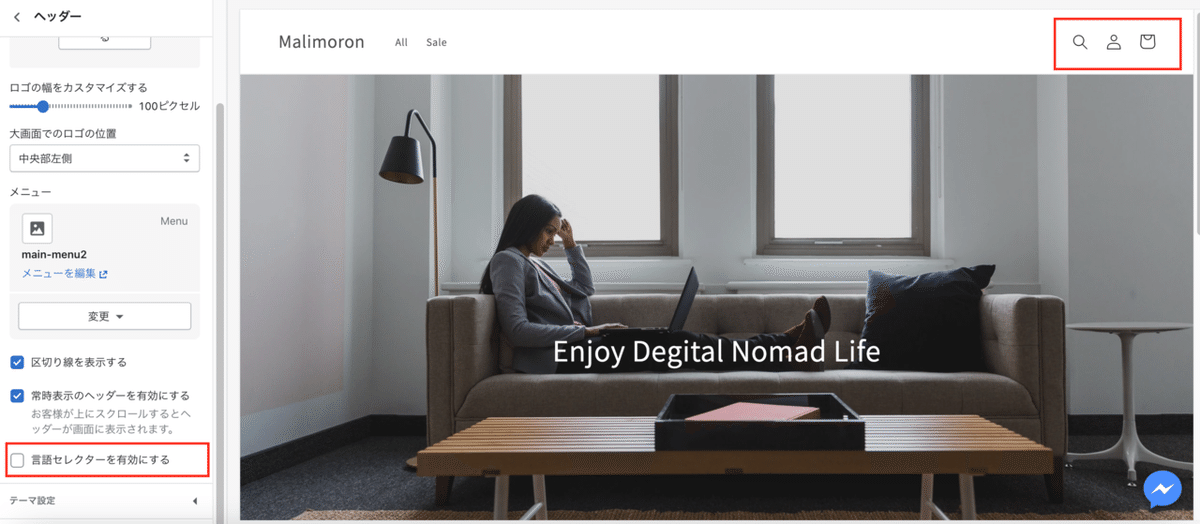
PC &モバイル共に右上に切り替えボタン設置。
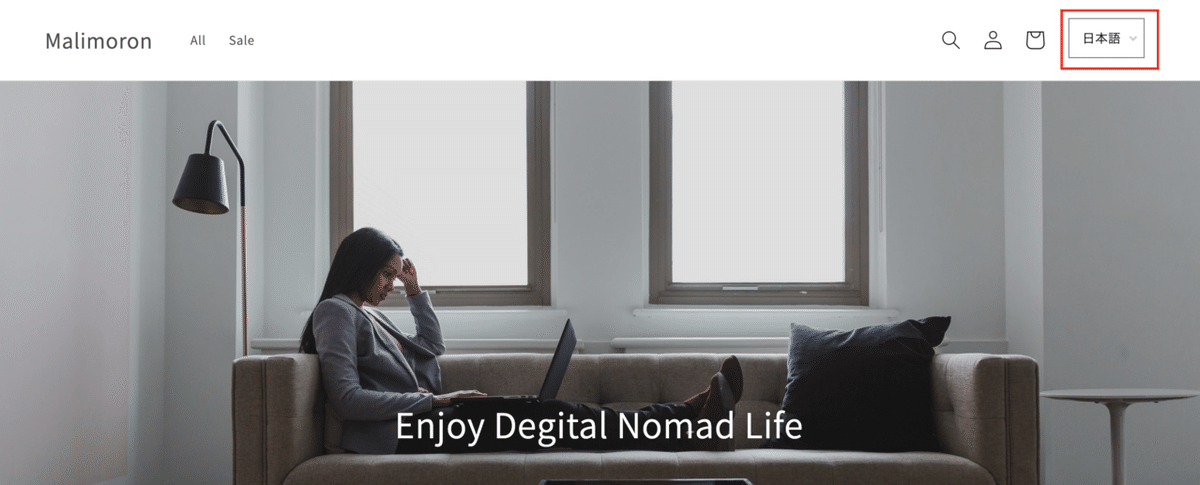

編集画面でボタン設置ON /OFF選択ができます

✔️設置手順
【たったの2ステップ】
❶Snipetを新規追加
❷作成したSnipetをHeaderファイルへ挿入
手順❶ Snipetを新規追加
1)管理画面>テーマ>アクション>コード編集
2)「新しいSnipetを追加する」を選択し新規ファイルを追加

※ファイル名はお好みでOKです。
今回、「malin-langage-switch」というファイル名にしました。
3)作成したファイルに以下をコピペ
html
<localization-form>
           {%- form 'localization', id: 'FooterLanguageForm', class: 'localization-form malin-localization-form' -%}
             <div class="no-js-hidden">
               <div class="disclosure">
                 <button type="button" class="disclosure__button localization-form__select localization-selector link link--text caption-large malin-lang-btn" aria-expanded="false" aria-controls="FooterLanguageList" aria-describedby="FooterLanguageLabel">
                   {{ localization.language.endonym_name | capitalize }}
                   <div class="malin-arrow1"></div>
                 </button>
                 <ul id="FooterLanguageList" role="list" class="disclosure__list list-unstyled malin-disclosure__list" hidden>
                   {%- for language in localization.available_languages -%}
                     <li class="disclosure__item" tabindex="-1">
                       <a class="link link--text disclosure__link caption-large{% if language.iso_code == localization.language.iso_code %} disclosure__link--active{% endif %} focus-inset" href="#" hreflang="{{ language.iso_code }}" lang="{{ language.iso_code }}"{% if language.iso_code == localization.language.iso_code %} aria-current="true"{% endif %} data-value="{{ language.iso_code }}">
                         {{ language.endonym_name | capitalize }}
                       </a>
                     </li>
                   {%- endfor -%}
                 </ul>
               </div>
               <input type="hidden" name="locale_code" value="{{ localization.language.iso_code }}">
             </div>
           {%- endform -%}
</localization-form>
Javascript
<script>
 class LocalizationForm extends HTMLElement {
   constructor() {
     super();
     this.elements = {
       input: this.querySelector('input[name="locale_code"], input[name="country_code"]'),
       button: this.querySelector('button'),
       panel: this.querySelector('ul'),
     };
     this.elements.button.addEventListener('click', this.openSelector.bind(this));
     this.elements.button.addEventListener('focusout', this.closeSelector.bind(this));
     this.addEventListener('keyup', this.onContainerKeyUp.bind(this));

     this.querySelectorAll('a').forEach(item => item.addEventListener('click', this.onItemClick.bind(this)));
   }

   hidePanel() {
     this.elements.button.setAttribute('aria-expanded', 'false');
     this.elements.panel.setAttribute('hidden', true);
   }

   onContainerKeyUp(event) {
     if (event.code.toUpperCase() !== 'ESCAPE') return;

     this.hidePanel();
     this.elements.button.focus();
   }

   onItemClick(event) {
     event.preventDefault();
     const form = this.querySelector('form');
     this.elements.input.value = event.currentTarget.dataset.value;
     if (form) form.submit();
   }

   openSelector() {
     this.elements.button.focus();
     this.elements.panel.toggleAttribute('hidden');
     this.elements.button.setAttribute('aria-expanded', (this.elements.button.getAttribute('aria-expanded') === 'false').toString());
   }

   closeSelector(event) {
     const shouldClose = event.relatedTarget && event.relatedTarget.nodeName === 'BUTTON';
     if (event.relatedTarget === null || shouldClose) {
       this.hidePanel();
     }
   }
 }

 customElements.define('localization-form', LocalizationForm);
</script>
CSSはお好みで編集してください♪
  .malin-lang-btn {
   margin-bottom: 0 !important;
   margin-top: 0 !important;
   padding: 1em !important;
   white-space: nowrap;
}手順❷ 作成したSnipetをHeaderファイルへ挿入
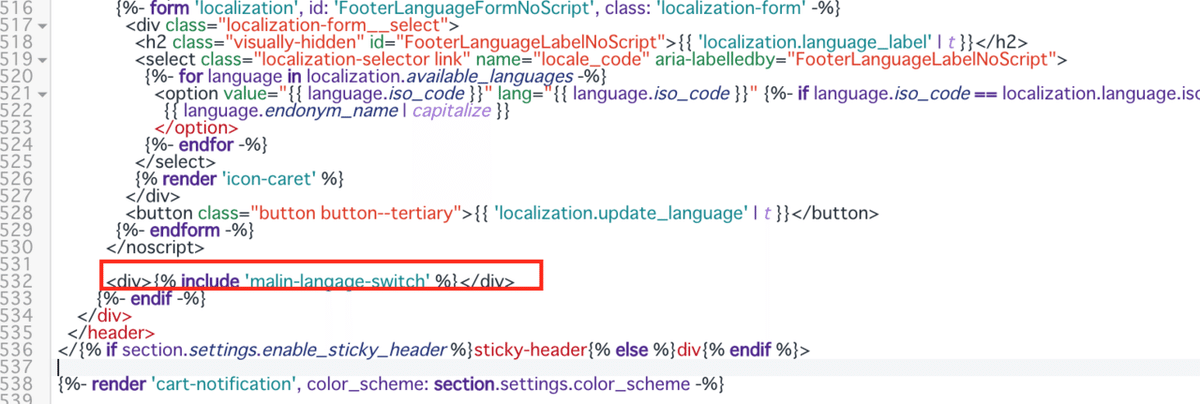
1)header.liquidファイルを開き設置したい箇所にSnipetを挿入
<div>{% include 'malin-langage-switch' %}</div>手順1で作成したSnipetファイル名を合わせてください。
{% include 'xxxxxx' %}
Snipet名:malin-langage-switch.liquidの場合
Header.liquid内に挿入するincludeタグを
{% include 'malin-langage-switch' %}
にする。
私はカートアイコンの右隣に入れてみました
2)編集画面にボタン表示・非表示を選択できるようにするなら以下をSchemeへ追記
こちらはお好みで。
{
     "type": "checkbox",
     "id": "enable_language_selector",
     "default": true,
     "label": "t:sections.footer.settings.enable_language_selector.label"
}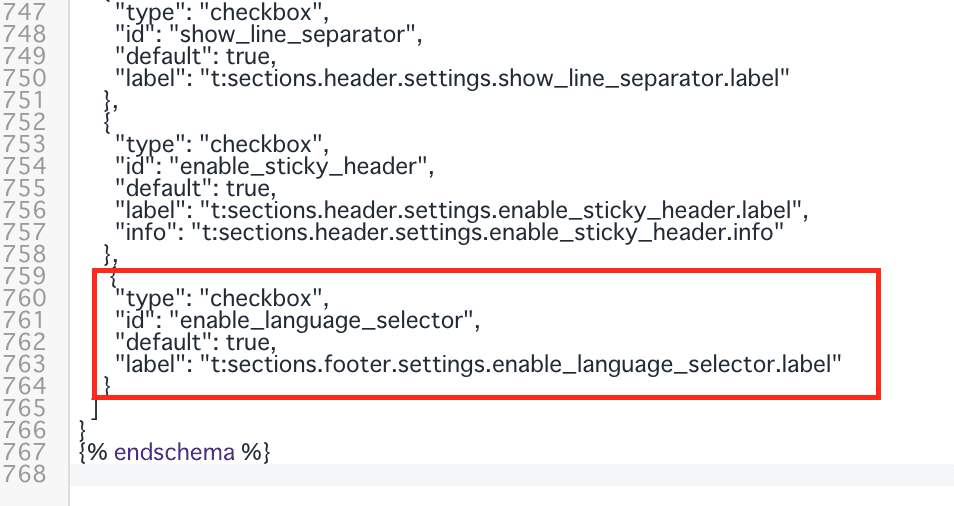
SchemeのSectionないならどこでもOKです。今回はデフォルトSchemeの続きに設置。
以上で完了です!
✔️フルコード
ここからは、手順1で作成したスニペット内のCSS入りコードファイルとHeaderファイルのをお見せします。
※返金&サポートはしておりません
※対象テーマはDawnです。
※コピペで使用できます。
※コードのご紹介のみで解説はしておりません。
ここから先は
Amazonギフトカード5,000円分が当たる
この記事が参加している募集
この記事が気に入ったらチップで応援してみませんか?