
はじめての Meta Quest 3 アプリの作成

はじめての Meta Quest 3 アプリの作成手順をまとめました。
1. Meta Quest Developer Hubの準備
はじめに、Meta Quest Developer Hubの準備を行います。
2. Unityのインストール
Unityのインストール手順は、次のとおりです。
(1)「Unity Hub」のインストール。
(2)「Unity Hub」で「Unity 2021.3」をインストール。
(3)「Add Modules」で「Android Build Support」と「Android SDK & NDK Tools」「OpenJDK」をチェック。

3. Unityのプロジェクト作成
Unityのプロジェクトの作成手順は、次のとおりです。
(1) Unityの「3D」(または「URP」)のプロジェクトの作成。
(2) メニュー「File → Build Settings」で、「Platform」に「Android」、「Texture Compression」に「ASTC」を選択し、「Switch Platform」ボタンを押下。

(3)「Asset Store」で「Oculus Integration」(57.0)をインポート。

(4) メニュー「Edit → Project Settings → Oculus」を開き、「Outstanding Issues」の「FIX All」の「Recommended Items」の「Apply All」をクリック。

4. はじめてのVRアプリの作成
VR空間に立方体を配置するだけのアプリを作成して実行します。
4-1. アプリの作成
(1) 「Main Camera」をHierarchyから削除。
(2) 「Asset/Oculus/VR/Prefabs/OVRCameraRig」をHierarchyに追加。
(3) 「+ → 3D Object → Cube」で立方体を配置し、マテリアルに赤(Red)を指定。
・Position : (0, 0, 0.5)
・Rotation : (0, 0, 0)
・Scale : (0.2, 0.2, 0.2)

4-2. アプリの実行
(1) Meta Quest 3とPCをケーブルで接続。
(2) メニュー「File → Build Settings」で、「Run Device」で「Oculus Quest 3」を選択し、「Build And Run」ボタンを押下。

(3) 「Meta Quest 3」を被ると許可ウィンドウが出るので許可。

5. はじめてのMRアプリの作成
MR空間に立方体を配置するだけのアプリを作成して実行します。
5-1. パススルーの有効化
(1) 「OVRCameraRig」の「OVRManager」で、次のように設定。
・Quest Features → General → Passthrought Support : Supported
・Insight Passthrough → Enable Passthrough : チェック (アプリ起動時にパススルーを初期化)

(2) 「OVRCameraRig」の「Add Component」で「OVRPassthroughLayer」を追加。
(3) 「OVRPassthroughLayer」で、次のように設定。
・Placement : Underlay

(5)「OVRCameraRig → TrackingSpace → CenterEyeAnchor」を選択。
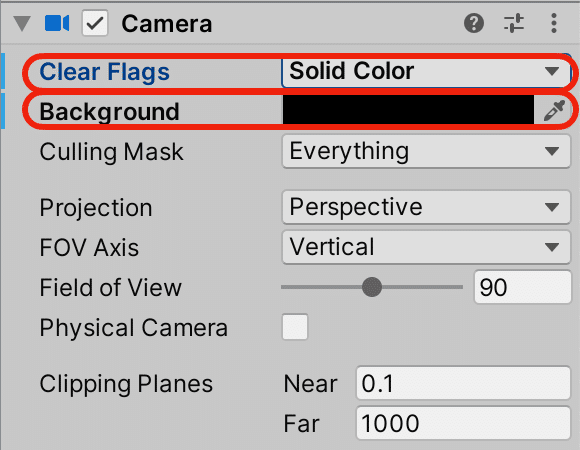
(6) 「CenterEyeAnchor」の「Camera」で、次のように設定。
・Clear Flag : Solid Color
・Backgroudn : (0, 0, 0, 0) ※黒のalpha0
5-2. アプリの実行
(1) Meta Quest 3とPCをケーブルで接続。
(2) メニュー「File → Build Settings」で、「Run Device」で「Oculus Quest 3」を選択し、「Build And Run」ボタンを押下。
