DP.13:代わりのオブジェクト経由で目的の処理をコールする - Proxyパターン -【Python】

【1】Proxyパターン
Proxyパターンでは
『起動したいプログラム・オブジェクトを直接コール使用しない。代わりに「Proxyオブジェクト(別名:Surrogate:サロゲート オブジェクト)」を経由してからコールする』
これにより利用したいプログラムやオブジェクトの実行前に、「前処理として差し込みたい処理(例:認証処理など)」を組み込みやすくなる可能性がある。
【2】Proxyの種類:
Proxyは大体4つに分類される。
(a):remote proxy
(b):virtual proxy
(c):protection / protective proxy
(d):smart (reference) proxy
少し長くなるが以下4つをざっとまとめておく。
ーーーーーーーー
【a】remote proxy:
実際には別のドメイン(IPアドレスなど)空間にあるデータについて、手元の端末で取得する際には接続先を意識せずに取り扱えるようにするオブジェクト。
(図1:remote proxyがない場合)

▲remote proxyがない場合、メインプログラムを書き換えて宛先を切り変える必要がある。
(図2:remote proxyを挟む場合)

▲ 例えば、メインプログラム側はgettext()などのような関数をコールするだけにできる。
remote proxy側が設定に従ってメモリ上やディスク上、あるいはクラウド上にあるかもしれないデータを取得し、メインプログラム側に返す。
remote proxyとメインプログラムを宛先変更時は、proxyオブジェクト側を書き換るだけでよくなる。
【例1:分散システム】
・分散システム
プライベートネットワーク、あるいはクラウドを利用した分散システムを構築する際に使用する、等。
例えば、分散システムでは「ローカル端末のメモリ上に存在するオブジェクトだけでなく、別の端末のメモリ上にオブジェクトが存在する」といったことになる。
このような違いをクライアントコード側に影響させたくない場合に「remote proxy」が利用できる。「remote proxy」を用意することで、クライアントコード側にはローカルホスト/リモートホストの違いを隠すことができる、カプセル化できる、といったプログラムの作りにできる
【例2:ORM:(オブジェクトリレーショナルマッピング)】
・ORM:(オブジェクトリレーショナルマッピング)
DjangoなどのWebフレームワークではDBへのアクセスにORMを使うことができる。
ORMを使用することで、ローカルサーバだろうがリモートサーバであろうが、ORMの設定を変えるだけでDBの接続先を切り替えることができる。
DBのデータを取得するメインコード自体は変えなくてよくなる。
ーーーーーーーー
【b】virtual proxy:
計算負荷の高いオブジェクトの生成について、必要になるまで処理は引き延ばしておく。(簡単に言うと遅延初期化を使用する)
【例3:ゲーム画面へのキャラクタ表示】
「何らかのゲーム」で敵キャラ・モブキャラなどについて大量にデータを保有する場合、画面上に描画されないにもかかわらず、描画用のキャラクタデータ(テクスチャやスプライト画像等)を生成・保有したり、画面外なのに描画処理を実行したりするのはメモリやCPUを消費する(コストがかかる)。
そこで、ゲーム上に表示されていないオブジェクトは、「virtual proxy」を挟んで位置情報だけをもたせる等、比較的軽量なデータだけを生成・保持させる。
そして、敵キャラ・モブキャラなどが画面上に映りこむときになってからキャラクタデータなどのオブジェクトを生成・保持するという「遅延初期化」を仕込む。
図3:何らかのダンジョンを探索するゲーム
(マップは「https://watabou.itch.io/one-page-dungeon」で適当に生成)


「virtual proxy」を使用した「遅延初期化」によって、実際に必要とされるタイミングでオブジェクトを生成すれば、パフォーマンスを向上させることができる可能性が出てくる。
ーーーーーーーー
【c】protection/protective proxy:
文字通りセンシティブ情報(ID,パスワード、個人情報など)へのアクセスを保護する(アクセスコントロールする)
「protection / protective proxy」によって
・十分なアクセス権限を持っているかのチェック
・変更権限を持っているかチェック
・...等々
セキュリティに関連する領域で使われることが多い。
図4:protection/protective proxy のイメージ

ーーーーーーーー
【d】smart(reference) proxy:
「参照カウント付きポインタオブジェクト」や「スレッドセーフ(Thread-safe)のチェック」に用いられる
※Thread-safeのチェック:「共有データ」に対し「複数のスレッドによるアクセス」がある時、「一度に1つのスレッドのみ」がその「共有データ」にアクセスするようにして「安全性」を確保する、など
図5:smart proxy のイメージ

▲アプリケーション(ライブラリ、ツールキット、フレームワークなど)が複数のスレッドを使用している状況。
この時に「Thread-safe(スレッドセーフ)の負担をクライアントコード(メインプログラム)側からsmart proxy側に切り離す」。
このようにすることで、「Thread-safe(スレッドセーフ)の処理の複雑さをクライアントから隠すことができる」。
【3】例:データ追加時にprotection/protective proxyがパスワードを求めるプログラム
今回は「protection/protective proxy」について、プログラム例を挙げる。
・「SensitiveInfoオブジェクト」のデータを読み書き(read/add)する
・データの読み書き時に「protection proxyオブジェクト」を経由する
・read()時は何もせずにデータを取得して表示する
・add()時は実行するために「protection proxyオブジェクト」がパスワードを入力を求める
■イメージ図

※今回は説明のため、proxyが認証機能(passwordチェック)までやっているが、実際は認証サーバなどを用意してそっちに処理は分離するほうがいい。
■動作イメージ
$ python main.py
## read()をコールした場合
[1] read user list / [2] add user / [3] quit
choose number: 1
there are 4 users: paterson, krone, iroas, evans
-----
## add()をコールしてパスワードを間違った場合
[1] read user list / [2] add user / [3] quit
choose number: 2
type name for add : vincent
input password : a
something wrong!
-----
## add()をコールしてパスワードが正しい場合
[1] read user list / [2] add user / [3] quit
choose number: 2
type name for add : vincent
input password : abcdefg
added : vincent
-----
## 再度read()をコールしてデータが追加されていることを確認
[1] read user list / [2] add user / [3] quit
choose number: 1
there are 5 users: paterson, krone, iroas, evans, vincent
-----
[1] read user list / [2] add user / [3] quit
choose number: 3
$
【4】全体コード
# 機密情報等を格納したデータ本体
class SensitiveInfo:
   def __init__(self) -> None:
       self.users = ['paterson','krone','iroas','evans']

   def read(self):
       total = len(self.users)
       print(f"there are {total} users: {', '.join(self.users)}")


   def add(self, user):
       self.users.append(user)
       print(f"added : {user}")

# protection proxy相当のオブジェクト
class Info:

   def __init__(self):
       self.protected = SensitiveInfo()
       self.password = 'abcdefg' # サンプル用の適当なパスワード(実際は認証処理は分離する)


   # 読み取りは特に何もしない
   def read(self):
       self.protected.read()


   # データ書き込みは認証処理をいれる
   def add(self, user):
       password = input("input password : ")
       self.protected.add(user) if password == self.password else print("something wrong!")


## 動作確認
def main():
   info = Info()

   while True:
       print('[1] read user list / [2] add user / [3] quit')
       key = input('choose number: ')

       if key == '1':
           info.read()
       elif key == '2':
           name = input('type name for add : ')
           info.add(name)
       elif key == '3':
           exit()

       print("-----")

if __name__ == '__main__':
   main()
【5】おまけ:遅延初期化の練習
以下で少し触れているが、pythonには「setattr()」を使って「属性(クラス変数・クラスメソッド)を後で追加する仕組み」がある。
これを活用して遅延初期化っぽいプログラムを作成してみる。
実現するには『「存在しないクラス変数をコールした時にエラー出さずに、属性(クラス変数)を追加する」という処理を実装する』ということになる。
そこで特殊メソッド「__get__()」や「__getattr__()」を利用する。
■__get__()を使う例
▲簡単に言うと「object.xxx」みたいな感じで「クラス変数」にアクセスすると裏でこの関数が動いている。そこでこの「__get__()」の挙動を上書きする
プログラム例
#lazy property(遅延初期化)用のデコレータ定義
class LazyProperty:
   def __init__(self,method):

       self.method = method
       self.method_name = method.__name__
       print(f"function overriden: {self.method}:called from LazyProp")
       print(f'function name: {self.method_name}:called from LazyProp')
       print()


   def __get__(self,obj,cls):
       # self: LazyProperty、obj :「Testオブジェクト」、cls :「Testクラス」

       # 何らかの理由でデコレートしたオブジェクト(今回はTestオブジェクト)が存在せずコールされた時用の処理
       if not obj:
           print("Target obj is not None!")
           return None

       value = self.method(obj) # ここでTest.resource(self)メソッドがコールされる

       print(f'value {value}')

       setattr(obj, self.method_name, value)
       print(self.__dict__)
       print()
       return value


class Test:
   def __init__(self):
       self.x = 'foo'
       self.y = 'bar'
       self._resource = None


   # 初回だけこれが動く。
   # 以降はsetattrでresourceメンバが追加されるので使われない
   @LazyProperty
   def resource(self):

       print(f'initializing self._resource, now value is : {self._resource}')
       print()
       self._resource = tuple(range(5))

       return self._resource


def main():
   t = Test()
   print(t.x)
   print(t.y)

   print("------------------")
   print(t.__dict__) # Test内の属性(クラス変数やクラス関数)を出力:x,y,_resource
   print(t.resource) # こっちは初回なので「デコレータされた関数」が呼ばれてる

   print("------------------")

   print(t.__dict__) # メンバ変数にresourceが追加されている
   print(t.resource) # こっちはメンバ変数resourceをつかっている。

if __name__ == '__main__':
   main()
[#実行結果例]
function overriden: <function Test.resource at 0x0000012E88694310>:called from LazyProp
function name: resource:called from LazyProp
foo
bar
------------------
{'x': 'foo', 'y': 'bar', '_resource': None}
initializing self._resource, now value is : None
value (0, 1, 2, 3, 4)
{'method': <function Test.resource at 0x0000012E88694310>, 'method_name': 'resource'}
(0, 1, 2, 3, 4)
------------------
{'x': 'foo', 'y': 'bar', '_resource': (0, 1, 2, 3, 4), 'resource': (0, 1, 2, 3, 4)}
(0, 1, 2, 3, 4)
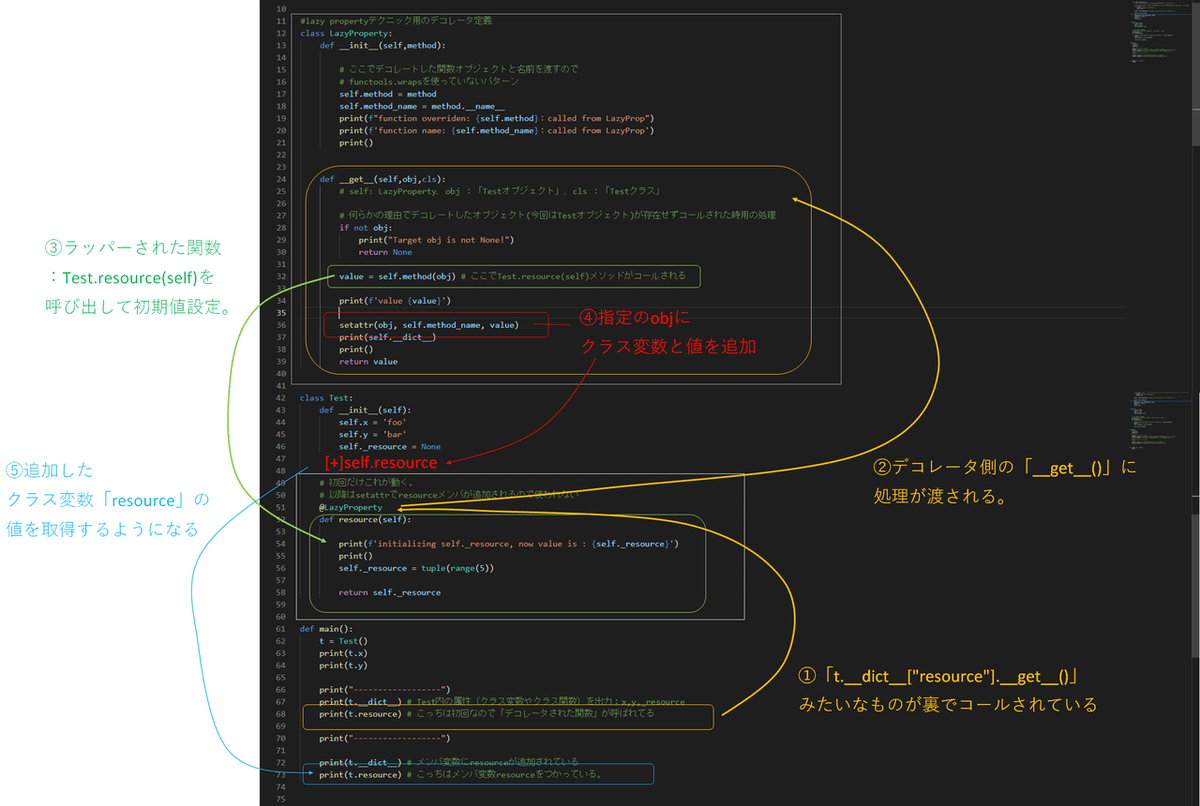
▲「__get__()」を使った場合のプログラムの流れ。
■__getattr__()を使う例
▲簡単に言うとクラス変数(属性)がないときにコールされるもの
プログラム例
class Test:
   def __init__(self):
       self.x = 'foo'
       self.y = 'bar'


   def __getattr__(self,name):
       value = tuple(range(5))
       setattr(self,name, value) # クラス変数と初期値追加
       return value


def main():
   t = Test()
   print(t.x)
   print(t.y)

   print("------------------")
   print(t.__dict__) # Test内の属性(クラス変数やクラス関数)を出力:x,y,_resource
   print(t.resource) # 存在しないクラス変数 ⇒ _getattr__()がコールされる

   print("------------------")


   print(t.__dict__) # メンバ変数にresourceが追加されている
   print(t.resource) # こっちはメンバ変数resourceの値を呼び出している


if __name__ == '__main__':
   main()
[# 実行結果]
foo
bar
------------------
{'x': 'foo', 'y': 'bar'}
(0, 1, 2, 3, 4)
------------------
{'x': 'foo', 'y': 'bar', 'resource': (0, 1, 2, 3, 4)}
(0, 1, 2, 3, 4)
いいなと思ったら応援しよう!