進捗報告 / phina.js事始め

とりあえず、Tips集上巻からの流れを読みつつ写経っぽく書いてみる。
<!doctype html>

<html>
  <head>
    <meta charset='utf-8' />
    <title>My Test | phina.js</title>
  </head>
  <body>
  </body>
</html>


<script src='https://cdn.jsdelivr.net/gh/phi-jp/phina.js@0.2.3/build/phina.js'></script>
<script>

// グローバルに展開
phina.globalize();


//アセットの定義
    var ASSETS = {
    //画像
        image: {
		'tomapiko': 'https://cdn.jsdelivr.net/gh/phi-jp/phina.js@0.2.3/assets/images/tomapiko.png',
	},
    //サウンド
        sound: {
		'se1': 'https://cdn.jsdelivr.net/gh/phi-jp/phina.js@0.2.3/assets/sounds/lo_002.mp3',
	},
    };

/*
 * TitleScene
 */
phina.define('TitleScene', {
  superClass: 'DisplayScene',

  init: function() {
	  this.superInit();
	  this.backgroundColor = '#464';

          // ラベルを生成
          var label = Label('TITLE !!').addChildTo(this);
          label.x = this.gridX.center(); // x 軸
          label.y = this.gridY.center(); // y 軸
          label.fill = '#eee';  // 塗りつぶし色

	  var self = this;

	  this.onpointstart = function() {
		  self.exit();
	  };
  },
});

/*
 * メインシーン
 */
phina.define('MainScene', {
  // 継承
  superClass: 'DisplayScene',

  // 初期化
  init: function() {
    // super init
    this.superInit();

    // 背景色
    this.backgroundColor = '#444';

    //グループを登録する
    var group1 = DisplayElement().addChildTo(this);
    // グループの中心座標
    group1.setPosition(320, 780);
    //シェイプを作ってグループに配置する
    RectangleShape({fill: 'green'}).addChildTo(group1).setPosition(0, 50);
    RectangleShape({fill: 'green'}).addChildTo(group1).setPosition(0, -50);
    RectangleShape({fill: 'green'}).addChildTo(group1).setPosition(50, 0);
    RectangleShape({fill: 'green'}).addChildTo(group1).setPosition(-50, 0);
    //グループ全体を動かす
	  group1.update = function() {
		  group1.rotation++;
	  };

    //シェイプの表示
    var shape1 = Shape().addChildTo(this);
    var shape2 = Shape().addChildTo(this);
	  shape2.backgroundColor = 'red';
    var shape3 = Shape({
	    x:150,
	    y:580
            }).addChildTo(this);
    var shape4 = Shape({
	    x:500,
	    y:580,
	    backgroundColor:'yellow'
            }).addChildTo(this);
    //シェイプの位置指定
	  shape1.x = 320;
	  shape1.y = 480;

          shape1.setPosition(320, 320);
          shape1.setSize(128, 128);
	  shape1.setRotation(45);
    //シェイプを動かす
	  shape1.update = function() {
		  shape1.rotation++;
	  };
    //シェイプ2を動かす
          shape2.on('enterframe', function() {
	  shape2.moveBy(2,2);
	  });
          shape2.on('enterframe', function() {
	  shape2.rotation += 2;
	  });
    //シーンにタッチイベントを登録する
	  this.onpointstart = function(e) {
		  //タッチされた座標を調べる
		  var tx = e.pointer.x;
		  var ty = e.pointer.y;
		  //タッチされた座標にshape2を移動
		  shape2.setPosition(tx, ty);
	  };

     //シェイプ3をタッチイベント有効にする
	  shape3.setInteractive(true);
     //シェイプ3にタッチイベントを登録する
          shape3.on('pointstart', function() {
		  alert('You touch me!');
	  });
	  shape3.on('pointstart', function() {
		  shape3.backgroundColor = 'blue';
	  });

    //シェイプ4に音イベントを設定する
    	  shape4.setInteractive(true);
          shape4.on('pointend', function() {
    	  SoundManager.play('se1');
    	  });

    //スプライト(画像)の表示
    var sprite = Sprite('tomapiko').addChildTo(this);
	  sprite.setPosition(320, 580);

    // ラベルを生成
    var label = Label('Hello, world!').addChildTo(this);
    label.x = this.gridX.center(); // x 軸
    label.y = this.gridY.center(); // y 軸
    label.fill = '#eee';  // 塗りつぶし色

    //自作クラスCarを定義する
	  phina.define("Car", {
		  // 初期化
		  init: function(maker, name) {
			  //クラスメンバ
			  this.maker = maker;
			  this.name = name;
		  },
	  });
    //自作クラスCarのインスタンスを作る
	  var car1 = Car('Honda', 'City');
	  var car2 = Car('Toyota', 'Crown');
    //クラスを確認する
	  console.log(car1.maker);
	  console.log(car1.name);


  },
});

/*
 * メイン処理
 */
phina.main(function() {
  // アプリケーションを生成
  var app = GameApp({
  //startLabel: 'splash',
  startLabel: 'title',
  //startLabel: 'main', // MainScene から開始
  //startLabel: 'result',
    //アセットの読み込み
    assets: ASSETS,
  });

  app.enableStats();

  // 実行
  app.run();
});

</script>
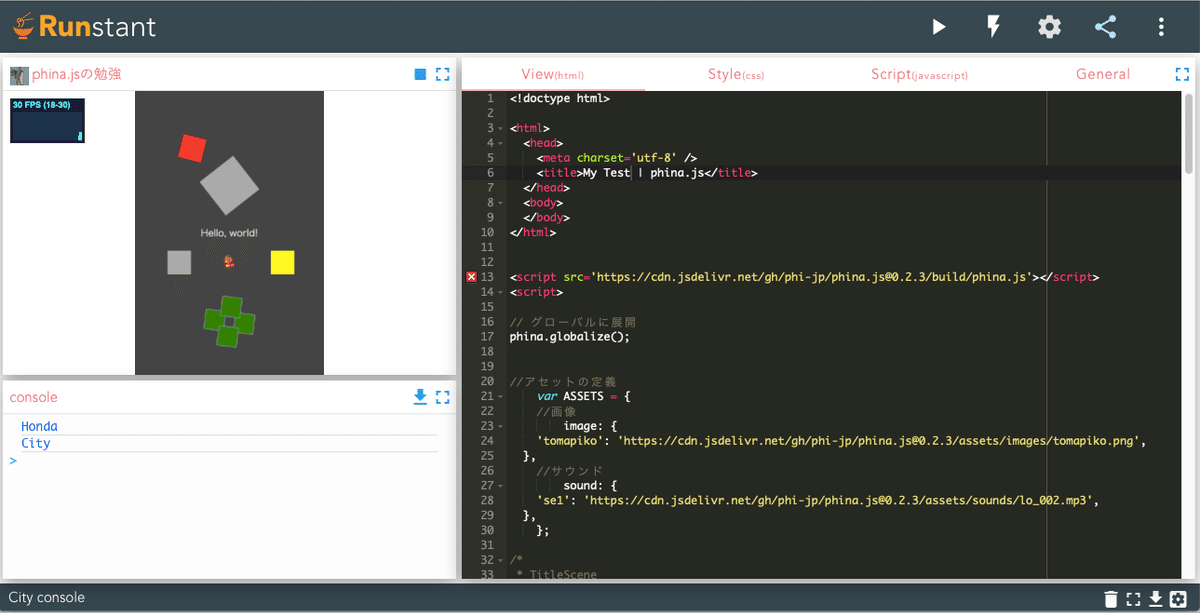
Runstantで実行してみたりしました。