【Python】Amazon Linux 2023にPython 3.11 + Selenium環境を構築する(前編)

はじめに
Amazon EC2の代表的なOSであるAmazon Linux 2のサポート期限(EOL)が2025年6月30日までのため、今回は次世代のAmazon Linux 2023のインスタンスを作成し、Python 3.11.5とSelenium 4.13(+その他)をインストールする手順を記述します。
そろそろ移行を考えていた方の参考になればと思います。
Amazon Linux 2023のインスタンス作成
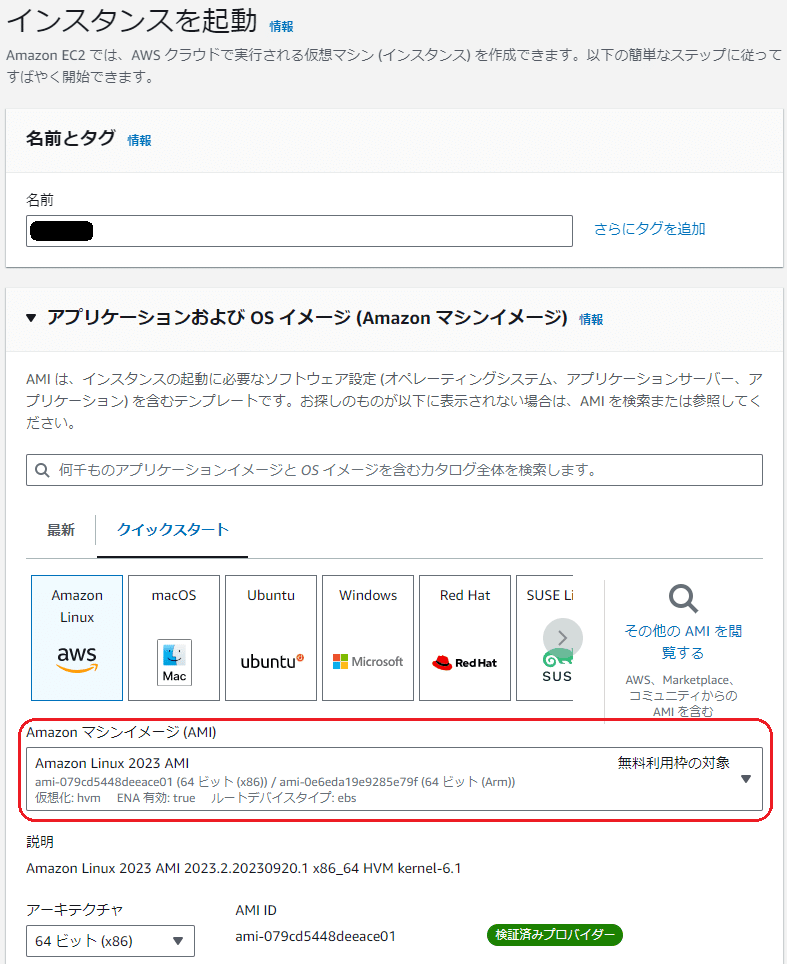
1. EC2のインスタンス起動画面を開き、名前は任意のインスタンス名を入力し、AMIは「Amazon Linux 2023 AMI」を選択します。
※執筆時のAMIは「Amazon Linux 2023 AMI 2023.2.20230920.1 x86_64 HVM kernel-6.1」
その他の必須項目等を選択して、「インスタンスを起動」を押します。
2. 作成したEC2インスタンスに接続します。
下のコマンドでは、コマンドプロンプトからSSH接続してec2-userでログインしています。
※選択したセキュリティグループのインバウンドルールでポート22が空いていることが前提です。
> ssh -i yyy.pem ec2-user@xxx.xxx.xxx.xxx(パブリックIPv4アドレス)Amazon Linux 2023の初期設定
1. sshd_configの110行目付近でSSH接続のタイムアウト値を変更してsshdを再起動します。
$ sudo vi /etc/ssh/sshd_config
ClientAliveInterval 60   # 追記(設定値はお好みで)
ClientAliveCountMax 3000 # 追記(設定値はお好みで)

$ sudo systemctl restart sshd
2. システムロケールを日本語に変更します。SSH再接続後「ja_JP.UTF-8」と表示されればOKです。
$ sudo sed -i "s/C\.UTF-8/ja_JP\.UTF-8/g" /etc/locale.conf

$ echo $LANG
ja_JP.UTF-8
3. サーバー時間を日本時間に変更します。
$ sudo timedatectl set-timezone Asia/Tokyo

$ sudo timedatectl status
               Local time: 土 2023-09-30 21:18:53 JST
           Universal time: 土 2023-09-30 12:18:53 UTC
                 RTC time: 土 2023-09-30 12:18:53
                Time zone: Asia/Tokyo (JST, +0900)
System clock synchronized: yes
              NTP service: active
          RTC in local TZ: no
4. ネットワーク時刻同期の設定をします。(上のコマンド実行結果ではactiveになっているが、 systemd-timesyncdがactiveになっていないため)
$ systemctl status systemd-timesyncd
○ systemd-timesyncd.service - Network Time Synchronization
     Loaded: loaded (/usr/lib/systemd/system/systemd-timesyncd.service; disabled; preset: disabled)
     Active: inactive (dead)
       Docs: man:systemd-timesyncd.service(8)

$ sudo vi /etc/systemd/timesyncd.conf
NTP=ntp.nict.jp # 追記

$ sudo systemctl enable systemd-timesyncd

$ sudo systemctl start systemd-timesyncd

$ systemctl status systemd-timesyncd
● systemd-timesyncd.service - Network Time Synchronization
     Loaded: loaded (/usr/lib/systemd/system/systemd-timesyncd.service; enabled; preset: disabled)
     Active: active (running) since Sat 2023-09-30 21:29:09 JST; 15s ago
       Docs: man:systemd-timesyncd.service(8)
(略)
Python 3.11のインストール
インストール前の確認
Amazon Linux 2023では既にPython 3.9がインストールされています。
これで十分な方はPython 3.11のインストールは不要ですが、自分はPython 3.11を使う必要があるため、pyenvでインストールします。
$ python3 -V
Python 3.9.16
ちなみに、/usr/bin/python3のシンボリックリンクをインストールしたPython 3.11に変更すると、OSのコア機能が動かなくなる恐れがあるとのことなのでご注意ください。
Multiple versions of Python can be installed simultaneously on AL2023. While /usr/bin/python3 will always be Python 3.9, each version of python is namespaced and can be found by its version number. For example, if python3.11 is installed, then /usr/bin/python3.11 will exist alongside /usr/bin/python3.9 and the /usr/bin/python3 symlink to /usr/bin/python3.9.
Note
Do not change what the /usr/bin/python3 symlink points to. Doing so may break core functionality of AL2023.
また、Python 3.11をインストールするためにはOpenSSL 1.1.1以降が必須ですが、Amazon Linux 2023では既にOpenSSL 3.0.8がインストールされていました。
$ openssl version
OpenSSL 3.0.8 7 Feb 2023 (Library: OpenSSL 3.0.8 7 Feb 2023)
pyenvのインストール
1. pyenvのインストールに必要なパッケージをインストールします。
Suggested build environment
Amazon Linux 2:
yum install gcc make patch zlib-devel bzip2 bzip2-devel readline-devel sqlite sqlite-devel openssl11-devel tk-devel libffi-devel xz-devel
pyenv 公式WikiのAmazon Linux 2を参考に、以下を実行します。
$ sudo dnf install gcc zlib-devel bzip2-devel readline-devel sqlite sqlite-devel openssl-devel tk-devel libffi-devel xz-devel2. pyenvをインストールします。
$ sudo dnf install -y git

$ curl https://pyenv.run | bash
(略)
Resolving deltas: 100% (11/11), done.

WARNING: seems you still have not added 'pyenv' to the load path.

# Load pyenv automatically by appending
# the following to
~/.bash_profile if it exists, otherwise ~/.profile (for login shells)
and ~/.bashrc (for interactive shells) :

export PYENV_ROOT="$HOME/.pyenv"
command -v pyenv >/dev/null || export PATH="$PYENV_ROOT/bin:$PATH"
eval "$(pyenv init -)"

# Restart your shell for the changes to take effect.

# Load pyenv-virtualenv automatically by adding
# the following to ~/.bashrc:

eval "$(pyenv virtualenv-init -)"
3. pyenvインストール後の警告通りに、環境変数を設定します。
$ echo 'export PYENV_ROOT="$HOME/.pyenv"' >> ~/.bashrc

$ echo 'command -v pyenv >/dev/null || export PATH="$PYENV_ROOT/bin:$PATH"' >> ~/.bashrc

$ echo 'eval "$(pyenv init -)"' >> ~/.bashrc
※上記コマンド実行後、シェルを再起動します。(exec $SHELL -lコマンドでも可)
Python 3.11.5のインストール
1. pyenvでインストールできるバージョンを確認します。
$ pyenv install -l | grep '3.11\.'2. Python 3.11.5をグローバルインストールします。
$ pyenv install 3.11.5
Downloading Python-3.11.5.tar.xz...
-> https://www.python.org/ftp/python/3.11.5/Python-3.11.5.tar.xz
Installing Python-3.11.5...
Installed Python-3.11.5 to /home/ec2-user/.pyenv/versions/3.11.5

$ pyenv global 3.11.5

$ pyenv rehash
3. インストール完了後、バージョンを確認します。
$ pyenv versions
  system
* 3.11.5 (set by /home/ec2-user/.pyenv/version)

$ python -V
Python 3.11.5
以上でPython 3.11のインストールが完了しました。Seleniumや他のインストールは別途記載します。
もし参考になりましたら、♡(スキ)をクリックしてもらえると励みになります。