rayshaderでDEM+GPSデータ可視化 #3

前回までの続き。
いまのままだとどう考えても味気ないため、オープンストリートマップ(OSM)の画像を張り付けようと思う。ゆくゆくは任意の画像を張り付けるべく、その前段階として試してみる。
以下のサイトを見つけたため、自分のデータを持っている部分で試してみようと思う。
目指すこと
3D表示させる部分のOSMの画像をダウンロードし、3D表示の上に張り付ける。
手順
基本的には表記HPをなぞる。
ダウンロード範囲の指定
上で紹介したサイトでは人が指定をしている。しかし、パッケージ:rayshaderanimateをインストールしていればGPXデータから自動で計算してくれる。
library(rayshaderanimate)
gpx_path <- "path.gpx"
#緯度経度高度時間+追加情報のリストを作る。自分の場合、追加情報には心拍数データが入った。
gpx_table <- rayshaderanimate::get_table_from_gpx(gpx_path)
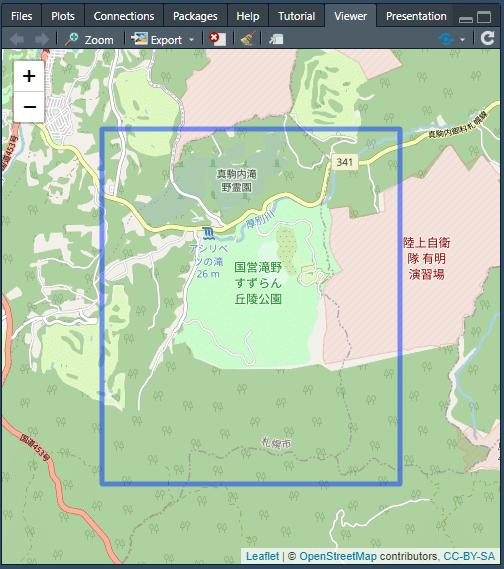
bbox <- get_bbox_from_gpx_table(gpx_table)ここで、サイトに紹介されていた形式に変換する。
bbox <- list(
  p1 = list(long = bbox[1,1], lat = bbox[2,1]),
  p2 = list(long = bbox[1,2], lat = bbox[2,2])
)
そして、leafletパッケージで描画。こんな感じになった。
標高データはすでに入手ずみなのでスキップ。
画像サイズを指定
HPのコードをそのまま実行。
画像を取得
ここで大変行き詰った。
まずは
get_arcgis_map_imageをgithubのコードを実行して定義。その後以下の実行すると無限にエラーが出た。
# fetch overlay image
overlay_file <- "images/sf-map.png"
get_arcgis_map_image(bbox, map_type = "World_Topo_Map", file = overlay_file,
                     width = image_size$width, height = image_size$height,
                     sr_bbox = 4326)
overlay_img <- png::readPNG(overlay_file)

##Error in file(con, "wb") : cannot open the connection
これの解決にすごい時間がかかった…。いろいろ他のパッケージを調べてみたりしたけれど結局方法を見つけられず。
ほとんど諦めかけたとき、HP作者のgithubを見るとやはりisuueで報告があることに気づいた。原因は、overlay_fileにあるらしく、これはgithubに解決策が書かれていたので、その通りに実行したらあっさりと解決した。。。
overlay_file <- file.path("D:/map", "sf-map.png")
get_arcgis_map_image(bbox, map_type = "World_Topo_Map", file = overlay_file,
                     width = image_size$width, height = image_size$height,
                     sr_bbox = 4326)
overlay_img <- png::readPNG(overlay_file)
重ね合わせる
あとはサンプルコードを実行。
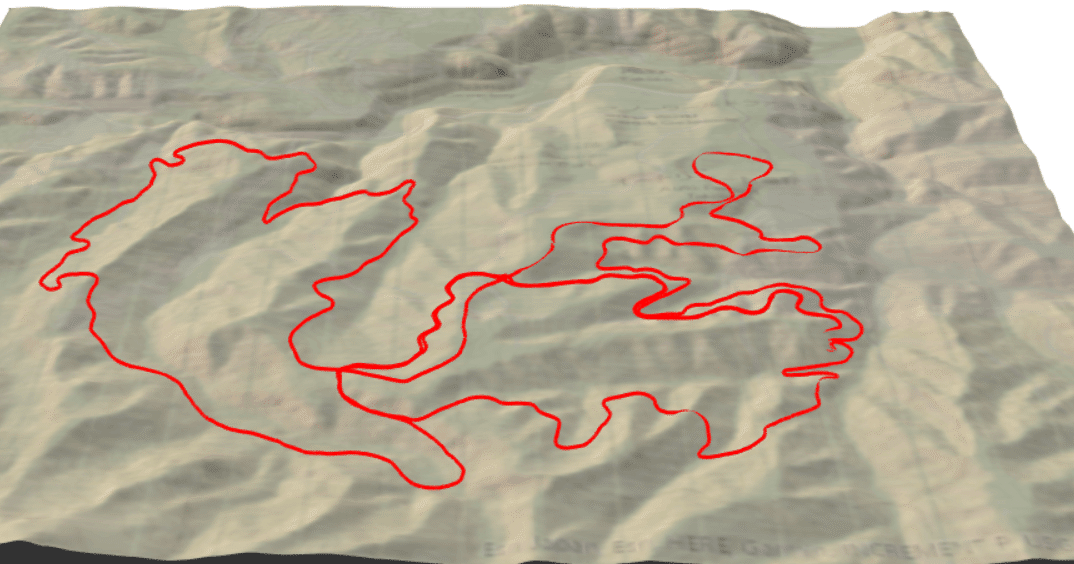
するとこんな感じになった。
正直微妙だが、やりたいことはできた。