
視野計算 概要と細部

セル単位視野の計算方法を解説します。可視化の話はしません。
実装・解説に C# を使いましたが、図だけを見ても十分だと思います。
実装は ここ です。
列座標系の設定
円形の視野を計算するためには、まず円を八等分します。

それぞれの 8 分円に対して視野計算をすれば、 360 度分の視野が得られます。
8 分円の走査には、 (row, col) 座標系を使います。たとえば、上図の 8 分円 B は、以下のように row, column の基底を取っています。

同様にして、 (row, col) → (x, y) の変換を 8 通り用意すれば、全ての 8 分円に対する走査ができます。
(row, col) は (x', y') と読み替えてもいいです。
列座標系と型定義
まず 8 分円 (Octant) を列挙します。
/// <summary> Clockwise from zero o'clock </summary>
public enum Octant {
    A, B, C, D, E, F, G, H,
}
基底ベクトルの定義に先立ち、ベクトル型を作ります。
public struct Vec2i {
   public int x;
   public int y;

   public int len => (int) Math.Sqrt(x * x + y * y);

   public Vec2i(int x, int y) {
       this.x = x;
       this.y = y;
   }
   public static Vec2i fromTuple((int, int) t) => new Vec2i(t.Item1, t.Item2);
   public override string ToString() => $"({x}, {y})";

   public static Vec2i operator *(Vec2i v, int c) => new Vec2i(v.x * c, v.y * c);
   public static Vec2i operator +(Vec2i v1, Vec2i v2) => new Vec2i(v1.x + v2.x, v1.y + v2.y);
   public static Vec2i operator -(Vec2i v1, Vec2i v2) => new Vec2i(v1.x - v2.x, v1.y - v2.y);
}
(row, col) → (x, y) の変換のため、 8 分円ごとに基底ベクトルを用意します。
public static class OctantExt {
    public static(Vec2i, Vec2i) toUnitVecs(this Octant self) {
        return unitVecs[(int) self];
    }

    /// <summary> [(row, col)] </summary>
    static(Vec2i, Vec2i) [] unitVecs = new [] {
            ((0, -1), (1, 0)),
            ((1, 0), (0, -1)),
            ((1, 0), (0, 1)),
            ((0, 1), (1, 0)),
            ((0, 1), (-1, 0)),
            ((-1, 0), (0, 1)),
            ((-1, 0), (0, -1)),
            ((0, -1), (-1, 0)),
        }
        .Select(vs => (
            Vec2i.fromTuple(vs.Item1),
            Vec2i.fromTuple(vs.Item2)))
        .ToArray();
}
Scanner の定義
先に、視野計算に使う interface を定義します。
public interface iOpacityMap {
    bool isOpaeue(int x, int y); // 不透明?
    bool contains(int x, int y); // マップ内?
}

public interface iFovWrite {
    void onRefresh(int radius, int originX, int originY); // 更新前に呼ぶ
    void light(int x, int y);    // 視野内である
}
円形視野の Scanner は、 8 分円 (Octant) ごとに OctantScanner を作って走らせます。
public static class Scanner<TFov, TMap>
        where TFov : iFovWrite
        where TMap : iOpacityMap {

    /// <summary> Shared input among <c>OctantScanner</c>s </summary>
    class ScanContext {
        public TMap map;     // マップ
        public TFov fov;     // 視野 (field of view)
        public Vec2i origin; // 原点 (の offset)
        public int radius;   // 半径
        public Vec2i l2w(Vec2i local) {
            return local + this.origin;
        }
    }

    public static void refresh(
            TFov fov,
            TMap map,
            int originX,
            int originY,
            int radius) {
        fov.onRefresh(radius, originX, originY);

        // 原点を視野に含める
        fov.light(originX, originY);

        var cx = new ScanContext {
              map = map,
              fov = fov,
              origin = new Vec2i(originX, originY),
              radius = radius,
        };

        // それぞれの 8 分円 (Octant) に対して
        for (int i = 0; i < 8; i++) {
            // OctantScanner を作って走らせる
            new OctantScanner((Octant) i).scanOctant(cx);
        }
    }

    // 定義は後ほど
    struct OctantScanner {
        // ~
    }
}
OctantScannerの定義の前に、もう少し考えることがあります。
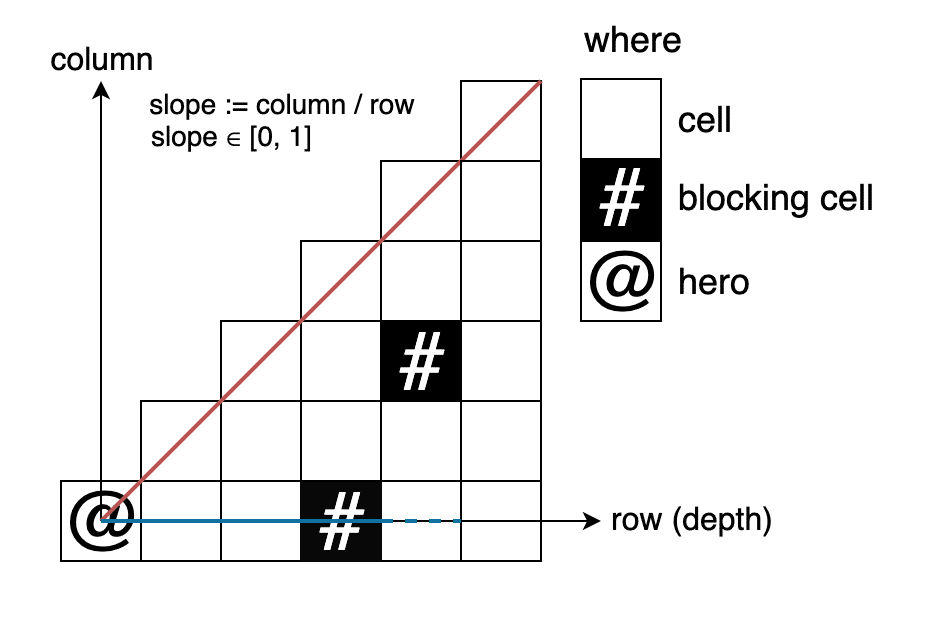
傾きと視野内判定
slope := column / row として傾きを定義すると、
slope ∈ [0, 1] が8 分円の視野範囲です。
壁に遮られるなどすると、走査の視野範囲は狭くなります。
この図において、視野範囲を可視化すると、

視野をセル単位にすると、

ただし、走査範囲がセルの中心を含む場合、そのセルは視野内であるとしました。
走査の分割と走査状態
OctantScanner は、 8 分円を 1 列 (1 row もしくは 1 depth) ずつ走査します。

上図では、矢印が走査を表します。
図が悪いので(ごめんなさい)、ちょっと説明に付き合ってください。
@ の位置を (row, col) = (0, 0) とします。
row = 4 を走査するとき、 OctantScanner は 2 つに分かれました。
・赤色矢印は、 (row, col) = (4, 2) 以前のセルを走査します
・黄色矢印は、 (row, col) = (4, 2) 以降のセルを走査します
もしも、 (row, col) = (4, 3) も壁であったとすると、黄色矢印の範囲が変化します。
・赤色矢印は、 (row, col) = (4, 2) 以前のセルを走査します
・黄色矢印は、 (row, col) = (4, 3) 以降のセルを走査します
つまり、 一般化すると、
・直前のセルが透明 かつ 今見たセルが不透明
→ 赤色矢印の生成 (splitScan)
・直前のセルが不透明 かつ 今見たセルが透明
→ 黄色矢印の生成 (updateStartSlope)
というアクションと対応させることができます。
ここで再掲:

ところで、 row = 3 の走査に関しては、最初の壁を無視しています。
これは、直前のセルが無かった(この row 最初のセルだった) 場合とみなすことができます。
まとめると、状態は 3 つがあり、その次のセルに応じてアクションを取ります。
・直前のセルは無かった → 次(最初)のセルは無視
・直前のセルが透明だった → 次のセルが不透明ならspitScan
・直前のセルが不透明だった → 次のセルが透明なら updateStartSlope
なお、状態遷移図としては、

もしくは、状態遷移表にまとめると
previous \ next || opaque cell  | transparent cell
----------------||--------------|-----------------
Initial         || (none)       | (none)
WasTransparent  || splitScan    | (none)
WasOpaque       || (none)       | updateStartSlope
OctantScanner
もう一踏ん張りです。 8 分円を走査する型を作ります。
僕は貼るだけです!
struct OctantScanner {
   Vec2i rowUnit;
   Vec2i colUnit;
   float startSlope; // 開始傾き ∈ [0, 1] <= endSlope
   float endSlope;   // 終了傾き ∈ [0, 1]

   public OctantScanner(Octant octant) : this(octant, 0f, 1f) { }
   public OctantScanner(Octant octant, float startSlope, float endSlope) {
       (this.rowUnit, this.colUnit) = octant.toUnitVecs();
       this.startSlope = startSlope;
       this.endSlope = endSlope;
   }
   public OctantScanner(Vec2i rowUnit, Vec2i colUnit, float startSlope, float endSlope) {
       this.colUnit = colUnit;
       this.rowUnit = rowUnit;
       this.startSlope = startSlope;
       this.endSlope = endSlope;
   }

   public void scanOctant(ScanContext cx, int startRow = 1) {
       // それぞれの row に対して
       for (int row = startRow; row <= cx.radius; row++) {
           // scanRow を実行
           if (this.scanRow(row, cx)) break;
       }
   }

   enum RowScanState {
       Initial,
       WasOpaque,
       WasTransparent,
   }

   // 赤色矢印の生成と対応
   OctantScanner splitScan(float endSlope) {
       return new OctantScanner(this.rowUnit, this.colUnit, this.startSlope, endSlope);
   }

   bool scanRow(int row, ScanContext cx) {
       var rowVec = this.rowUnit * row;

       // Rule クラスは後述 (傾きに関する計算を行います)
       (int fromCol, int toCol) = Rule.colRangeForRow(row, cx.radius, this.startSlope, this.endSlope);

       // finish the scan if the view is completely blocked
       if (toCol - fromCol < 0) return true;
       { // finish the scan if the row is out of the map
           var initPos = cx.l2w(rowVec);
           if (!cx.map.contains(initPos.x, initPos.y)) return true;
       }

       // scan through the row
       var state = RowScanState.Initial;
       for (int col = fromCol; col <= toCol; col++) {
           var pos = cx.l2w(rowVec + this.colUnit * col);

           // skip points out of the map
           if (!cx.map.contains(pos.x, pos.y)) return false;

           // scan the cell and may take an action based on the state transition:
           // state \ found  | opaque cell  | transparent cell
           //
           // Initial        | (none)       | (none)
           // WasTransparent | splitScan    | (none)
           // WasOpaque      | (none)       | updateStartSlope
           if (cx.map.isOpaeue(pos.x, pos.y)) {
               if (state == RowScanState.WasTransparent) {
                   this.splitScan(Rule.updateEndSlope(col, row))
                       .scanOctant(cx, row + 1);
               }
               state = RowScanState.WasOpaque;
           } else {
               if (state == RowScanState.WasOpaque) {
                   this.startSlope = Rule.updateStartSlope(col, row);
               }
               state = RowScanState.WasTransparent;
           }
           cx.fov.light(pos.x, pos.y);
       }

       // finish the scan if we ended with an opaque cell
       return state != RowScanState.WasTransparent;
   }
}
また、 (slope, row, column) の対応を計算する Rule クラスは、
static class Rule {
    public static(int, int) colRangeForRow(
            int row, int radius, float startSlope, float endSlope) {
        int from = (int) Math.Ceiling(startSlope * row);
        int to = Math.Min(
            (int) Math.Floor(endSlope * row),
            Rule.maxColForRow(row, radius));
        return (from, to);
    }
    static int maxColForRow(int row, int radius) {
        return (int) Math.Sqrt((radius + 0.5) * (radius + 0.5) - row * row);
    }

    // [rectangle block model]
    /// <summary> Called after scanning opaque cells </summary>
    /// <remark> Minimum to 1f is required to consider positions such as (1, 1) </remark>
    public static float updateStartSlope(int col, int row) => Math.Min(1f, (col + 0.5f) / (row - 0.5f));
    /// <summary> Called when splitting a scan </summary>
    public static float updateEndSlope(int col, int row) => (col - 0.5f) / (row + 0.5f);

    // [diagnonal block model]
    // /// <summary> Called after scanning opaque cells </summary>
    // public static float updateStartSlope(int col, int row) => (col - 0.5f) / row;
    // /// <summary> Called when splitting a scan </summary>
    // public static float updateEndSlope(int col, int row) => (col - 0.5f) / row;

}
壁が◇形であるとみなす場合は、 [diagonal block model] の方の式を使います。
Polish
実は、もうひと磨き必要です。現状の視野は、次のようになると思います。

これが issue です。

説明がいい加減になって来ました!
そこで、 OctantScanner.scanRow の直前に、壁に対する寛容な走査を入れます。
bool scanRow(int row, ScanContext cx) {
    // ~~

    // scan an opaque cell that was not scanned, but whose vertex may hide cells behind of it
    var permissiveCol = Rule.colForSlopePermissive(this.endSlope, row, cx.radius);
    if (permissiveCol > toCol && state != RowScanState.WasOpaque) {
        var pos = cx.l2w(rowVec + this.colUnit * permissiveCol);
        if (!cx.map.contains(pos.x, pos.y)) {
            // here, we filtered points out of the map
        } else if (cx.map.isOpaeue(pos.x, pos.y)) {
            // light the opaque cell as an artifact
            cx.fov.light(pos.x, pos.y);
            // and update the range of the slopes
            this.endSlope = Rule.updateEndSlope(permissiveCol, row);
            // we do not update `state` here
        } else {
            // transparent cells are ignored
        }
    }

    // finish the scan if we ended with an opaque cell
    return state != RowScanState.WasTransparent;
} // OctantScanner.scanR
このとき、 Rule クラスに以下の関数を追加しました。
public static int colForSlopePermissive(float slope, int row, int radius) {
   return Math.Min(
       Rule.maxColForRow(row, radius),
       (int) Math.Ceiling(slope * (row + 0.5) - 0.500001f));
   // We reduced (0.5f + small_amount) not to include a vertex on an `endSlope` e.g. (row, col) = (1, 1),
}
これで走らせてみると……

ヤッター!
まとめ
視野計算は状態遷移に基づいて実装でき、得られる結果はダイレクトに視覚へ影響します。しかし、実際に組もうとすると、様々な細部が問題となります。したがって、一度くらいは自分で組んでみるのもアリだと思います。
note 初投稿でした。少しずつ、ローグライク周りの日本語記事を蓄積したいと思います。
付録
この記事の 実装 は、以下の記事に基づきました。
・FOV using recursive shadowcasting - RogueBasin
・FOV using recursive shadowcasting - improved - RogueBasin
このアルゴリズムには recursive shadow casting という名前が与えられていますが、むしろ recursive scanning ではないかと思います。
視野計算を実装した人が、次にやるとしたら
・視野の可視化
・視野アニメーション
・影の形を滑らかにする
・"未探索領域" を暗くする(Fog of War を実装する)
ただ、 note に書くのは一般的な話に留めようと思います。