SwiftUIのTabViewでインタラクティブなタブインジケーターを作る

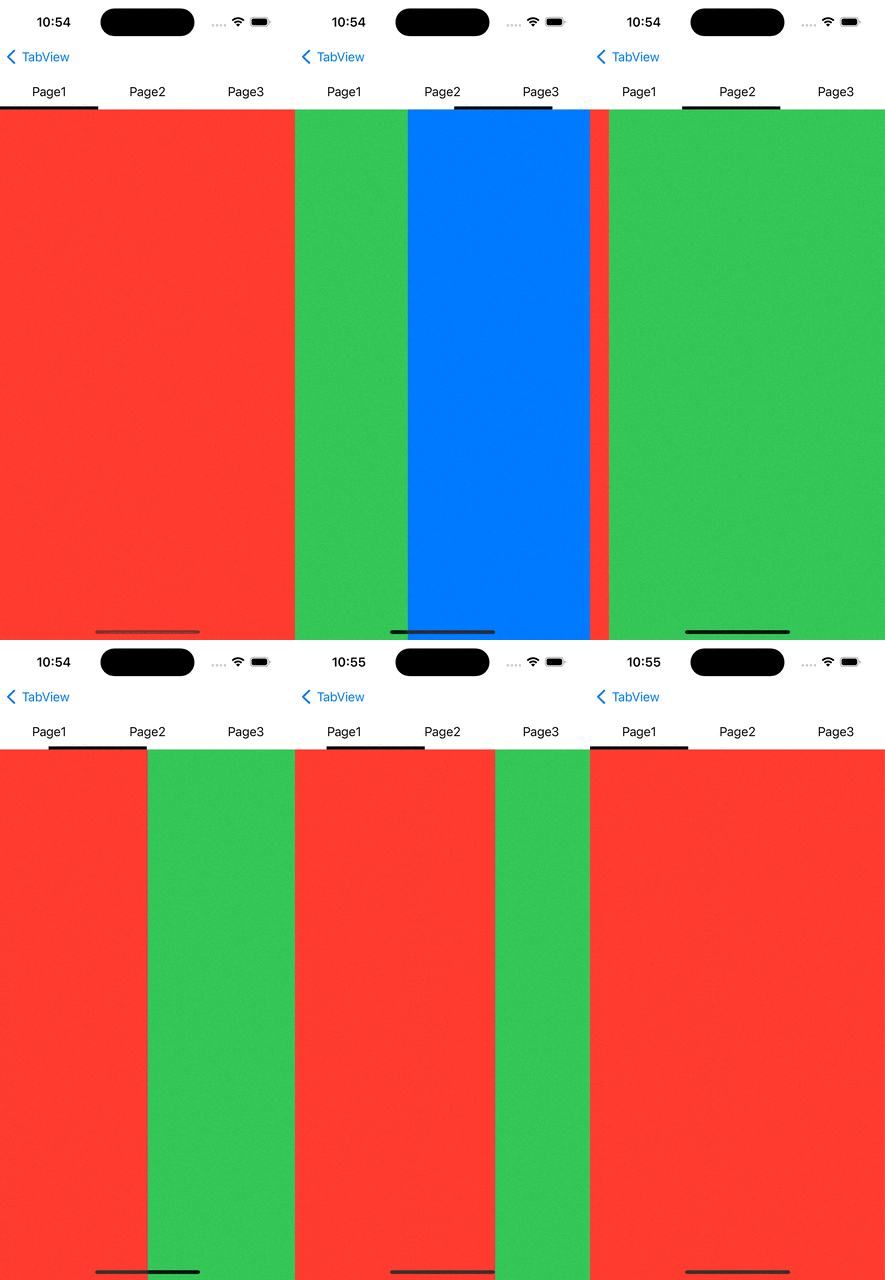
今回はこちらの記事で紹介したTabViewでのスワイプページングの改善として、スワイプ操作に追従して上タブのインジケーターがインタラクティブに動くようにしてみた。このようなUIはTwitterやTikTokなどでもよく見かける。
前回の記事では、TabViewと上タブに決めうちでページやタブを並べたが、今回はタブのデータモデルを定義して、データ数に応じてタブ表示が増減できるようにした。
/// タブコンテンツのデータモデル
struct SlideTabContent<Content: View>: Identifiable {
    /// タブID (ForEachで必要)
    var id: Int
    /// タブタイトル
    var title: String
    /// タブコンテンツ (任意のView)
    var content: Content
}
上記のデータモデルから表示するタブのコンテンツを作成して、SlideTabViewに渡すだけで簡単にインタラクティブなタブインジケーターを表示できるようにしている。
struct CustomSampleView: View {
    @State var tabContents = [
        SlideTabContent(id: 0, title: "Page1", content: PageView(color: .red)),
        SlideTabContent(id: 1, title: "Page2", content: PageView(color: .green)),
        SlideTabContent(id: 2, title: "Page3", content: PageView(color: .blue))
    ]

    var body: some View {
        SlideTabView(tabContents: tabContents)
            .ignoresSafeArea(edges: .bottom)
    }
}
SlideTabViewの構成
TabView部分
タブコンテンツのデータをForEachで表示して、PageTabViewStyleを指定すればスワイプページングはできるが、今回の肝となるインタラクティブなタブインジケーターは次のように実装する。
まずそれぞれのタブコンテンツにおいて、GeometryReaderでproxyを取得し、proxy.frame(in: .global)を使ってグローバル座標に変換する。さらにこれに対してonChangeで値の変化を監視し、変化があった時にスワイプの操作量をもとにインジケーター位置を計算して更新すればよい。
struct SlideTabView<Content: View>: View {
    @State var tabContents: [SlideTabContent<Content>]
    @State var selection: Int = 0
    @State private var indicatorPosition: CGFloat = 0

    var body: some View {
        GeometryReader { geometry in
            let screenWidth = geometry.size.width
            let safeAreaInsetsLeading = geometry.safeAreaInsets.leading

            VStack(spacing: 0) {
                SlideTabBarView(tabBars: tabContents.map{( $0.id, $0.title )},
                                color: .black,
                                selection: $selection,
                                indicatorPosition: $indicatorPosition)
                .frame(height: 48)

                TabView(selection: $selection) {
                    ForEach(tabContents) { tabContent in
                        tabContent.content
                            .tag(tabContent.id)
                            .overlay {
                                GeometryReader{ proxy in
                                    Color.clear
                                        .onChange(of: proxy.frame(in: .global), perform: { value in
                                            // 表示中のタブをスワイプした時のみ処理する
                                            guard selection == tabContent.id else { return }

                                            // 対象タブのスワイプ量をTabBarの比率に変換して、インジケーターのoffsetを計算する
                                            let offset = -(value.minX - safeAreaInsetsLeading - (screenWidth * CGFloat(selection))) / tabCount

                                            if selection == tabContents.first?.id {
                                                // 最初のタブの場合、offsetが0以上の時のみ位置を更新する
                                                if offset >= 0 {
                                                    indicatorPosition = offset
                                                } else {
                                                    return
                                                }
                                            }

                                            if selection == tabContents.last?.id {
                                                // 最後のタブの場合、offsetがscreenWidth以下の時のみ位置を更新する
                                                if offset + screenWidth/tabCount <= screenWidth {
                                                    indicatorPosition = offset
                                                } else {
                                                    return
                                                }
                                            }

                                            indicatorPosition = offset
                                        })
                                }
                            }
                    }
                }
                .tabViewStyle(.page(indexDisplayMode: .never))
                .animation(.easeInOut, value: selection)
            }
        }
    }

    private var tabCount: CGFloat {
        CGFloat(tabContents.count)
    }
}
上タブ
SlideTabBarViewでは、タブコンテンツのデータからIDとタイトルを受け取ってタブを表示し、上で計算されたインジケーター位置を受け取って、インジケーターの表示位置を更新している。
なお、Buttonにしているのはタップ時にselectionを更新して、タブ切り替えができるようにしているため。
struct SlideTabBarView: View {
    let tabBars: [(id: Int, title: String)]
    let color: Color
    @Binding var selection: Int
    @Binding var indicatorPosition: CGFloat

    var body: some View {
        GeometryReader { geometry in
            HStack(spacing: 0) {
                ForEach(tabBars, id: \\.id) { tabBar in
                    Button {
                        selection = tabBar.id
                    } label: {
                        Text(tabBar.title)
                            .frame(maxWidth: .infinity, maxHeight: .infinity)
                            .foregroundColor(color)
                            .padding(8)
                    }
                }
            }
            .overlay(alignment: .bottomLeading) {
                Rectangle()
                    .foregroundColor(color)
                    .frame(width: geometry.size.width / tabBarCount, height: 4)
                    .offset(x: indicatorPosition, y: 0)
            }
        }
    }

    private var tabBarCount: CGFloat {
        CGFloat(tabBars.count)
    }
}
