フロントエンドからコントラクトを実行する

この記事では、フロントエンドからHardhatのローカル環境でコントラクトを実行する方法を紹介します。
過去の記事で作成したポイントを取得とポイントを付与するコントラクトをフロントエンドに繋げていきます。
QuizApp.sol
// SPDX-License-Identifier: MIT
pragma solidity ^0.8.19;

contract QuizApp {
    // ユーザーごとのポイント
    mapping(address => uint256) public points;

    // ポイント追加のイベント
    event PointsAdded(address indexed user, uint256 amount);

    // ポイントを取得
    function getPoints(address user) public view returns (uint256) {
        return points[user];
    }

    // ポイントを追加
    function addPoints(address user, uint256 amount) public {
        points[user] += amount;

        emit PointsAdded(user, amount);
    }
}
作成したコントラクトは、以下の記事からHardhatローカルにデプロイできます。
デプロイして出力されたABIファイルをフロントエンドに配置する必要があります。
記事に沿って、local_deployを実行するとartifactsフォルダーにQuizApp.jsonが出力されました。
- artifacts
 - contracts
  - QuizApp.sol
   - QuizApp.json
続いてフロントエンドを実装していきます。
フロントエンドは、ウォレットを認証するコードを追加した記事の続きとなります。
Reactで作成したフロントエンドにutilsフォルダーを作成して出力されたQuizApp.jsonのAPIファイルを配置します。
- frontend
 - src
  - app
   - utils
    - QuizApp.json
page.tsxにデプロイしたコントラクトアドレスとabiを変数に入れて読み込みます。
const contractAddress = "0x5FbDB2315678afecb367f032d93F642f64180aa3";
const contractABI = abi.abi;
取得したポイントを保持するための状態変数を定義します。
const [point, setPoint] = useState<number>(0);続いてコントラクトのポイントを取得するコードを追加します。
フロントに配置したABIファイルのgetPoints関数を実行して、pointを更新します。
この処理によりコントラクトにあるポイントを取得して、画面に表示します。
const getPoints = async () => {
  try {
    const { ethereum } = window as any;
    if (ethereum) {
      const provider = new ethers.BrowserProvider(ethereum);
      const signer = await provider.getSigner();
      /* ABIを参照する */
      const quizApp = new ethers.Contract(
        contractAddress,
        contractABI,
        signer
      );

      // signerから現在のユーザーのアドレスを取得
      const userAddress = await signer.getAddress();
      console.log("Retrieved user address...", userAddress);
      let points = await quizApp.getPoints(userAddress);
      console.log("Retrieved total echo count...", Number(points));
      setPoint(Number(points));
    } else {
      console.log("Ethereum object doesn't exist!");
    }
  } catch (error) {
    console.log(error);
  }
};
続いて、ポイントを追加する関数を追加します。
ポイント取得と同じようにABIにあるaddPoints関数を実行して、コントラクトのポイントを追加します。
addPointsを実行する際に、gasLimitを設定してガス代の上限を決めます。
追加したポイントを更新して、画面に表示します。
  const addPoints = async () => {
    try {
      const { ethereum } = window as any;
      if (ethereum) {
        const provider = new ethers.BrowserProvider(ethereum);
        const signer = await provider.getSigner();
        /* ABIを参照する */
        const quizApp = new ethers.Contract(
          contractAddress,
          contractABI,
          signer
        );

        // signerから現在のユーザーのアドレスを取得
        const userAddress = await signer.getAddress();
        console.log("Retrieved user address...", userAddress);
        console.log(userAddress, inputPoint);
        let pointsContract = await quizApp.addPoints(userAddress, inputPoint, {
          gasLimit: 300000,
        });
        console.log("Mining...", pointsContract.hash);
        await pointsContract.wait();
        console.log("Mined -- ", pointsContract.hash);
        // let points = await quizApp.getPoints(userAddress);
        console.log("Retrieved total echo count...", signer);
        // setPoint(Number(points));
      } else {
        console.log("Ethereum object doesn't exist!");
      }
    } catch (error) {
      console.log(error);
    }
  };
追加するポイントを入力するための、フォームを追加します。
<TextField
  id="outlined-basic"
  label="追加するポイント"
  sx={{ my: 3, backgroundColor: '#f5f5f5', borderRadius: 2 }}
  onChange={(e) => setInputPoint(Number(e.target.value))}
/>

<Box sx={{ my: 3, fontSize: '1.2rem', color: 'white' }}>
 現在のポイント:{point.toString()}
</Box>
ポイントを追加するコントラクトを実行するボタンを設置します。
<Button
 onClick={() => addPoints()}
  variant="contained"
  color="secondary"
  size="large"
  sx={{ flex: 1 }}
>
  ポイント追加
</Button>
これで完成です!
npm run devで画面を起動します。
追加したいポイントを入力して、ポイント追加ボタンを押します。
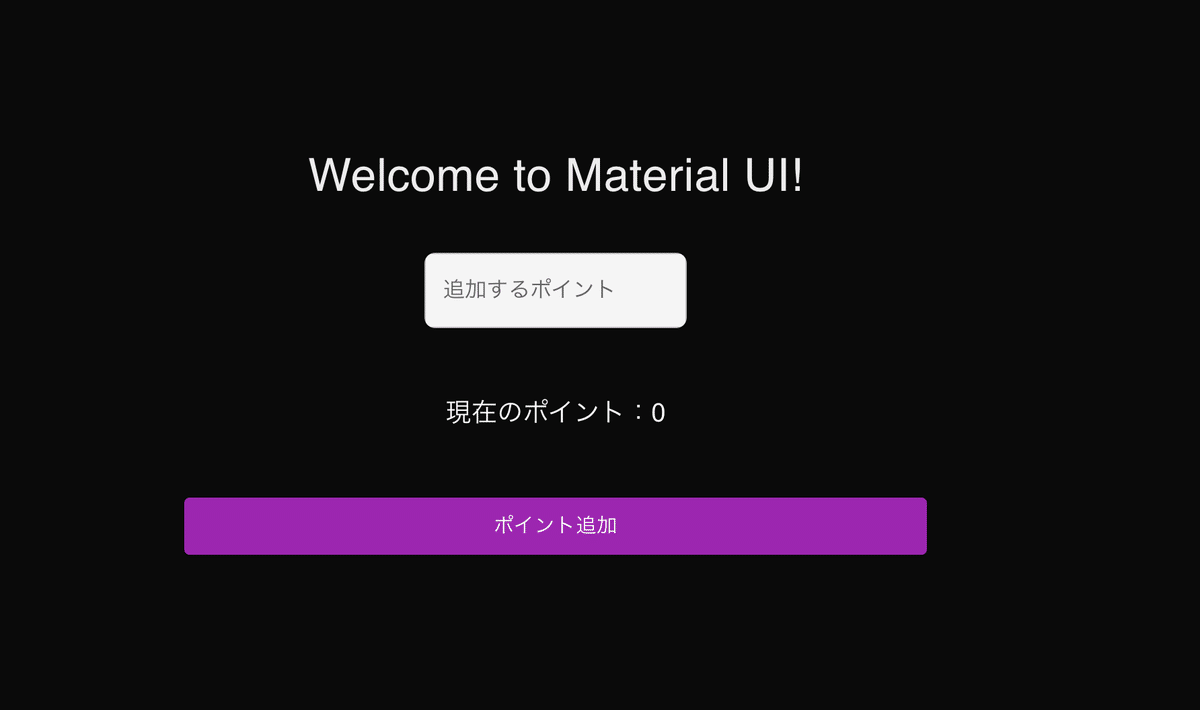
ウォレットからの実行を許可すると入力したポイントが追加されました!

実行できない場合は、メタマスクのチェーンがHardhatのローカルチェーンになっていることを確認してください!