Niantic Lightship ARDK セマンティック セグメンテーションを使って空に映像を映し出す方法
おさらい
Niantic Lightship ARDK や セマンティック セグメンテーションについて、以下の記事でまとめております。
今回は...
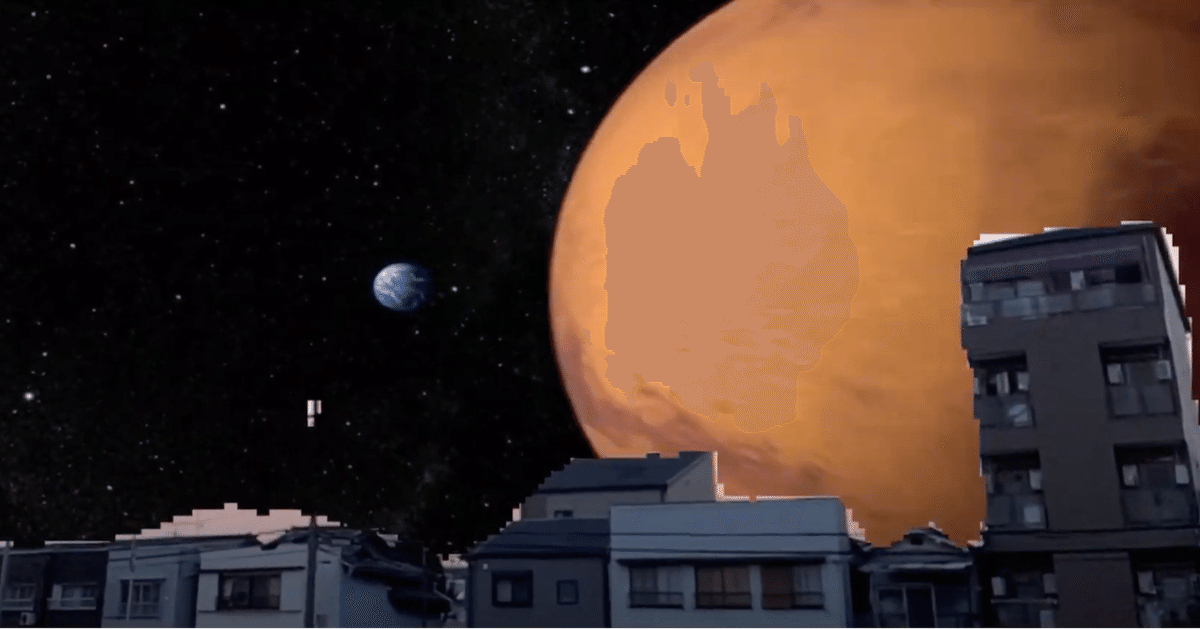
セマンティック セグメンテーションの機能を使い、空に映像を映し出すサンプルアプリケーションを作成します。
1. Niantic Lightship ARDK ダウンロード
以下から入手してください。今回、使用しているバージョンはv1.1.0になります。入手する際、Niantic Lightshipのアカウント登録が必要です。
2. Niantic Lightship ARDK インポート
UnityEditor のメニューにあるAssets → Import Package → Custom Package...を選び、ダウンロードした ardk-1.1.0.unitypackage をインポートします。
3. 新規でSceneを作成とMain Cameraの削除
新規でSceneを作成後、Main Cameraを削除します。
4. ARSceneManagerをヒエラルキーに追加

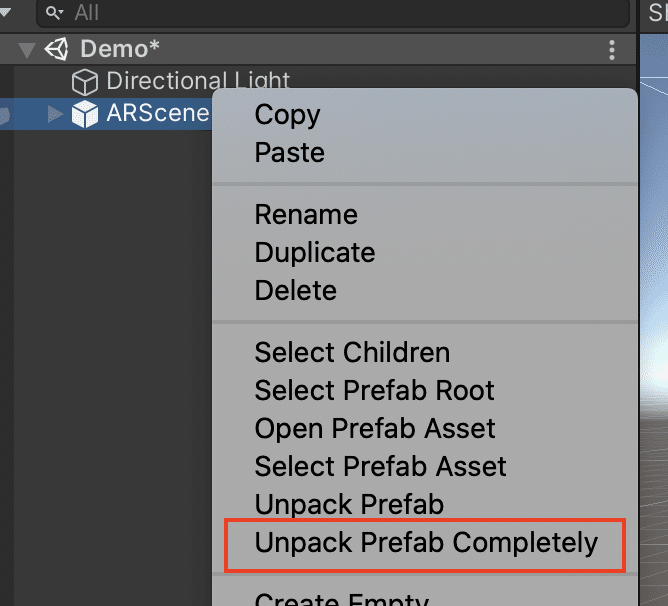
5. ARSceneManagerをUnpack Prefab Completely

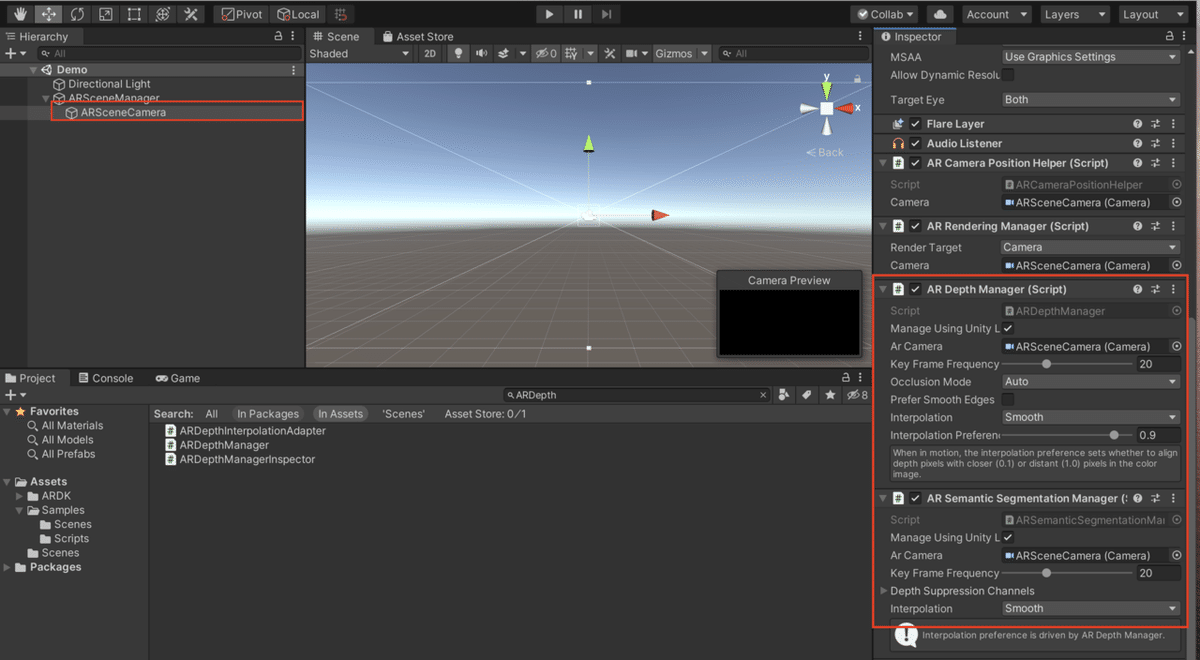
6. ARDepth Manager と ARSemanticSegmentationManager の追加

ARSceneManagerの子コンポーネント、ARSceneCameraにARDepthManager と ARSemanticSegmentationManager のスクリプトを追加。
7. 動画素材の用意
以下の動画をダウンロードします。
https://www.pexels.com/ja-jp/video/854278/

動画ファイルをAssets配下にドラッグ&ドロップ。(ここではVideoフォルダを作成し、Videoフォルダに動画ファイルを格納しています。)
8. 動画用のテクスチャ作成
動画用のテクスチャを作成します。Projectビュー内で 右クリック > Create > Render Texture で作成します。


ここではTextureというフォルダを作成し、作成したRender Textureを格納しています。また、Render Textureの名前をVideo Render Textureに変更しています。Sizeは動画サイズに合わせてます。Depth Bufferは無効にしています。
9. Video Playerの作成
ダウンロードしたビデオを作成するVideo Playerを作成します。

Video PlayerのGame Objectを作成。Video Playerのコンポーネントを追加。Video Clipには動画ファイルを指定。Target Textureには作成したRender Textureを指定。ビデオ再生を繰り返したいためLoopにチェックを入れます。
10. 空のテクスチャ情報を動画のテクスチャに置き換えるためスクリプトを作成
Project上で右クリックでメニューを表示。Create→ C# Scriptを選択。スクリプトのファイル名をSemanticSampleとします。(ここではScriptというフォルダを作成を行い、フォルダにスクリプトを格納しています。)その後、以下のスクリプトに書き換えます。
using UnityEngine;
using Niantic.ARDK.AR;
using Niantic.ARDK.Extensions;
using Niantic.ARDK.AR.ARSessionEventArgs;
using Niantic.ARDK.AR.Awareness;
using Niantic.ARDK.AR.Awareness.Semantics;

public class SemanticSample : MonoBehaviour
{
   public Material _shaderMaterial;

   Texture2D _semanticTexture;

   public ARSemanticSegmentationManager _semanticManager;

   void Start()
   {
       _semanticManager.SemanticBufferUpdated += OnSemanticsBufferUpdated;
       ARSessionFactory.SessionInitialized += OnSessionInitialized;
   }

   private void OnSessionInitialized(AnyARSessionInitializedArgs args)
   {
       Resolution resolution = new Resolution();
       resolution.width = Screen.width;
       resolution.height = Screen.height;
       ARSessionFactory.SessionInitialized -= OnSessionInitialized;

   }

   private void OnSemanticsBufferUpdated(ContextAwarenessStreamUpdatedArgs<ISemanticBuffer> args)
   {

       ISemanticBuffer semanticBuffer = args.Sender.AwarenessBuffer;
       int channel = semanticBuffer.GetChannelIndex("sky");
       semanticBuffer.CreateOrUpdateTextureARGB32(
               ref _semanticTexture, channel
           );
   }

   void OnRenderImage(RenderTexture source, RenderTexture destination)
   {
       _shaderMaterial.SetTexture("_SemanticTex", _semanticTexture);
       _shaderMaterial.SetMatrix("_semanticTransform", _semanticManager.SemanticBufferProcessor.SamplerTransform);
       Graphics.Blit(source, destination, _shaderMaterial);
   }
}
スクリプトはARSceneCameraに追加します。Semantic ManagerはARSceneCameraに追加したAR Semantic Segmentation Managerを指定。
11. 空のテクスチャ情報を動画のテクスチャに置き換えるためシェーダーを作成
Project上で右クリックでメニューを表示。Create→ Shaderを選択。Shaderで複数の形式がメニューで表示されますが、ひとまずStandard Surface Shaderを選択します。シェーダーをCustom/SemanticShとします。(ここではShaderというフォルダを作成を行い、フォルダにシェーダーを格納しています。)その後、以下のシェーダーに書き換えます。
Shader "Custom/SemanticSh"
{
   Properties
   {
       _MainTex ("Texture", 2D) = "white" {}
       _SemanticTex("_SemanticTex", 2D) = "red" {}
       _ReplaseTex("_ReplaceTex", 2D) = "white" {}
   }
   SubShader
   {
       // No culling or depth
       Cull Off ZWrite Off ZTest Always

       Pass
       {
           CGPROGRAM
           #pragma vertex vert
           #pragma fragment frag

           #include "UnityCG.cginc"

           struct appdata
           {
               float4 vertex : POSITION;
               float2 uv : TEXCOORD0;
           };

           struct v2f
           {
               float2 uv : TEXCOORD0;
               float4 vertex : SV_POSITION;
               //storage for our transformed depth uv
               float3 semantic_uv : TEXCOORD1;
           };

           // Transforms used to sample the context awareness textures
           float4x4 _semanticTransform;

           v2f vert (appdata v)
           {
               v2f o;
               o.vertex = UnityObjectToClipPos(v.vertex);
               o.uv = v.uv;

               o.semantic_uv = mul(_semanticTransform, float4(v.uv, 1.0f, 1.0f)).xyz;
               return o;
           }

           //our texture samplers
           sampler2D _MainTex;
           sampler2D _SemanticTex;
           sampler2D _ReplaseTex;

           fixed4 frag (v2f i) : SV_Target
           {
               //our semantic texture, we need to normalise the uv coords before using.
               float2 semanticUV = float2(i.semantic_uv.x / i.semantic_uv.z, i.semantic_uv.y / i.semantic_uv.z);
               //read the semantic texture pixel
               float4 semanticCol = tex2D(_SemanticTex, semanticUV);

               //unity scene
               float4 mainCol = tex2D(_MainTex, i.uv);
               float4 replaceCol = tex2D(_ReplaseTex, i.uv);
               float semanticRGBSum = semanticCol.r + semanticCol.g + semanticCol.b;
               return (semanticRGBSum == 3.0f) ? replaceCol : mainCol;
           }
           ENDCG
       }
   }
}
frag関数内でSemantic Segmentationのテクスチャカラーがホワイトの場合、検出されたテクスチャカラーとみなし、置き換え用のテクスチャカラーを返すようにしています。(置き換え用のテクスチャーは動画テクスチャーになります。)
12. 空のテクスチャ情報を動画のテクスチャに置き換えるためマテリアルを作成
Project上で右クリックでメニューを表示。Create→ Materialを選択。マテリアルの名前をVideo Materialとします。(ここではMaterialというフォルダを作成を行い、フォルダにマテリアルを格納しています。)

Video Material の Shader に 先程、作成したCustom/SemanticShを選択します。Custom/SemanticShの_ReplaceTexに作成したVideo Render Textureを指定します。
13. スクリプトにマテリアルを指定

ARSceneCameraに追加したSemanticSampleスクリプトのShader MaterialにVideo Materialを指定します。
14. ビルド&実行

スマホのカメラを空にかざすと空をスクリーンになり、映像が流れます。
参考
最後に
OnePlanet XR
OnePlanet XR はAR/MR技術に専門特化したコンサルティングサービスです。豊富な実績を元に、AR/MR技術を活用した新たな事業の立ち上げ支援や、社内業務のデジタル化/DX推進など、貴社の必要とするイノベーションを実現いたします。
ご相談から受け付けております。ご興味ございましたら弊社までお問い合わせください。
OnePlanet Tech Magazine
様々な技術記事を定期的に投稿しています。
