
【GASでIoT】GASで「ラズパイ Pico W」から、Googleスプレッドシートへ の読み書きにトライ!(補足~マルチカラーLEDのNeoPixcelを試す~)

プログラム可能なWiFi機能を持ったマイコン「ラズパイ Pico W」を使って、Googleスプレッドシートの読み書きを行うトライをした記事シリーズです。
以下がテスト用のスプレッドシートを用意して、PicoWとの通信を試した中核部分の記事です。
テスト用スプレッドシートとGASの解説はこちら。
ArduinoIDEによるラズベリーパイPico Wのプログラム解説はこちら。
ここで通信トライの一連の記事は終わりですが、最終的には、PicoWを使って、LEDなどの物理的なデバイスとスプレッドシートをリンクさせたいと考えています。
そこで、この記事シリーズの補足としてLEDデバイスの例としてフルカラー&個別指定で発光できる「NeoPixel(ネオ・ピクセル)」という製品の操作に挑戦してみることにします。
「NeoPixel」については、以下を参照ください。(記事は、「ラズベリーパイ Zero WH」を使ったものです)
この記事は、一介のアマチュアが、断片的な手がかりを寄せ集め、試行錯誤しならがら行った記録です。
失念による「手順の記載もれ」、たまたま上手くできた条件を見逃している「前提条件の未記載」、誤認や理解の浅さによる「誤り」を含んでいる可能性が大いにあります。
うまく再現できない場合があることをご了承頂き、自己責任、自己解決を前提にお読み頂くことをお願いします。
「Arduino IDE」では「PicoW」用のプログラムは少ない
「Arduino IDE」で、「PicoW」の開発をすることの課題
この記事シリーズでは、MycroPythonでうまく行かなかったため、「Arduino IDE」で「ラズベリーパイPico W」のプログラムを開発しています。
ところが、本来この環境は「Arduino 」シリーズのマイコンの開発環境ですので、サンプルプログラムやライブラリは、大半はArduino用のもので、「ラズベリーパイPico W」については、これらは非常に限定されています。
特に、外部のライブラリについては、使えそうなものでも、殆どが「Arduino」でしか動かないはずです。
「Arduino IDE」用に、「NeoPixcel」を制御するライブラリは多数公開されていますが、ArduinoIDEでは、これらが「Pico W」で動くかどうか、コンパイルするまで良く判らないという課題があります。
「PicoW」で今回利用したボードマネージャ「Arduino Mbed OS RP2040 Boards」と「Raspberry Pi Pico/Rp2040」にはサンプルプログラムが比較的豊富にありますが、残念ながら「NeoPixel」のプログラム例はありませんので、別途探してくる必要があります。
ボードマネージャの導入はこちらを参照ください。
「NeoPixel」用のライブラリの検索と導入
「Arduino IDE」で、「NeoPixcel」を扱うライブラリを検索してインストールします。
結果からいうと、メーカーの「Adafruit(エイダ・フルーツ)」社が発行している公式ライブラリを選択することで、無事Pico Wで動くプログラムを作る事ができました。
本来は多くのライブラリが、コンパイルまでできても、PicoWでは動かないはずなので、かなり幸運だったと言えるでしょう。
ライブラリの検索は以下の様にします。
「Arduino IDE」のサイドバーの上から3つめ、本の背表紙の様なアイコンをクリックします。

ここでは、「NeoPixcel」と「Adafruit」を検索窓に入力しました。
すると、以下の「Adafruit NeoPixcel by Adafruit」というライブラリが見つかりますので、インストールします。

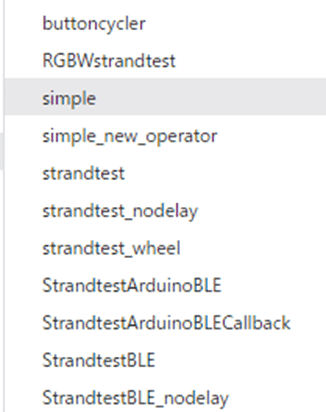
スケッチ例の追加を確認
インストールが済んだら、「ファイル」から「スケッチ例」を見て見ます。
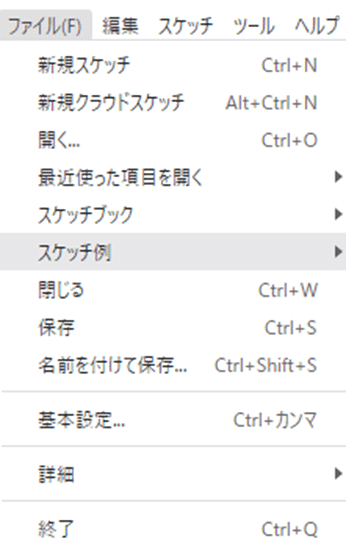
「NeoPixcel」用のスケッチ例「Adafruit NeoPixcel」が追加されていました。

ここを更にクリックします。いくつかスケッチ例がありますが、以下の「simple」という短いスケッチを引用する事にしました。
「Pico W」に対応したライブラリか?
このライブラリの参考URLを辿ってみます。
ライブラリとしてインストールされるフォルダ群が表示されています。

その中に、「rp2040_pio.h」というフォルダがあります。

RP2040は「Pico W」のコアチップですので、このライブラリが「Pico W」に対応してそうな事が予想できます。
とはいえ、可否は最終的にコンパイルして動かしてみるまでは判りません。(幸い、今回は動きました)
デバイスの準備
プログラムを試す前に、「NeoPixcel」を用意します。
以下が「Pico W」ですが、今回使用する端子は、アース(GRD)とGP01です。USBソケット近くの端子ですが、端子の役割は基盤の裏側に小さく印字されているので、ご確認ください。
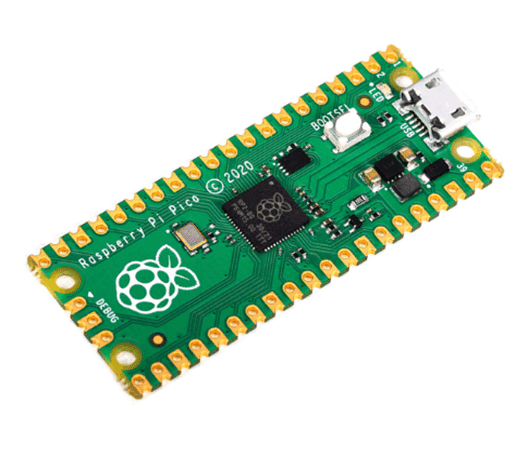
ここに、NeoPixcelを以下の様に接続します。

NeoPixelは端部にケーブルが3本ありますので、中央の信号線(緑色などが多い)をGP01に、アース線(黒色などが多い)をGRDに接続します。
電源線(赤色が多い)は、PicoWの5Vピンにつないでも良いのですが、安全のため、上図の様に別の5V電源から取った方が良いでしょう。
NeoPixcelは、LED素子数が自由に選べるのですが、3ケ以上あればOKです。
以上でデバイスの用意は完了です。
プログラムの修正
先回の記事で作成したプログラムに、NeoPixcelの記述を3ヵ所加えます。
冒頭の#include部分
冒頭の#includeの最後に、以下の「NeoPixcel」とコメントがある部分を、サンプルスケッチ「simpe」からコピーします。
そして、★素子の数を3に修正します。(数は何でも良いのですが、何らかの大電流による故障を避けて少数にしておきます)
これで、ライブラリの引用や初期の変数定義が完了します。
実質上意味があるのはは以下の1行です。
#include <Adafruit_NeoPixel.h>
#include <Arduino.h>
#include <WiFi.h>
#include <HTTPClient.h>

//==↓==↓==↓==↓==↓==↓==↓==↓NeoPixel↓==↓==↓==↓====↓==↓==↓==↓

// NeoPixel Ring simple sketch (c) 2013 Shae Erisson
// Released under the GPLv3 license to match the rest of the
// Adafruit NeoPixel library

//-------------------------------------

#include <Adafruit_NeoPixel.h>
#ifdef __AVR__
 #include <avr/power.h> // Required for 16 MHz Adafruit Trinket
#endif

// Which pin on the Arduino is connected to the NeoPixels?
#define PIN        1 // On Trinket or Gemma, suggest changing this to 1

// How many NeoPixels are attached to the Aorduino?
★素子の数を3に修正
#define NUMPIXELS 3 // Popular NeoPixel ring size

// When setting up the NeoPixel library, we tell it how many pixels,
// and which pin to use to send signals. Note that for older NeoPixel
// strips you might need to change the third parameter -- see the
// strandtest example for more information on possible values.
Adafruit_NeoPixel pixels(NUMPIXELS, PIN, NEO_GRB + NEO_KHZ800);

#define DELAYVAL 500 // Time (in milliseconds) to pause between pixels
//=↑==↑==↑==↑==↑==↑==↑NeoPixel↑==↑==↑==↑====↑==↑==↑=
setup()モジュール部
中段の void setup( ) {~で始まるモジュール部には、以下を挿入します。
ループモジュールに入る前の初期設定となります。
内容のある部分は、以下の1行のみです。
pixels.begin();
void setup() {

//==↓==↓==↓==↓==↓==↓==↓==↓NeoPixel↓==↓==↓==↓====↓==↓==↓==↓
  // These lines are specifically to support the Adafruit Trinket 5V 16 MHz.
  // Any other board, you can remove this part (but no harm leaving it):
#if defined(__AVR_ATtiny85__) && (F_CPU == 16000000)
  clock_prescale_set(clock_div_1);
#endif
  // END of Trinket-specific code.

  pixels.begin(); // INITIALIZE NeoPixel strip object (REQUIRED)
//=↑==↑==↑==↑==↑==↑==↑NeoPixel↑==↑==↑==↑====↑==↑==↑=


}
loop()モジュール部
最後に、loopモジュール部には、以下を挿入します。
実質上は以下の3行のみです。
設定のクリア
pixels.clear();
各LED素子の発光状況を設定
pixels.setPixelColor(素子番号, pixels.Color(赤輝度, 緑輝度, 青輝度));
本プログラム例では、以下の様にループ文でiケ目を指定し、発光は、緑色で輝度150を指定しています。(値は255までで指定)
(pixels.setPixelColor(i, pixels.Color(0, 150, 0));
デバイスに信号を送って実行
pixels.show();
void loop() {
//==↓==↓==↓==↓==↓==↓==↓==↓NeoPixel↓==↓==↓==↓====↓==↓==↓==↓
  pixels.clear(); // Set all pixel colors to 'off'

  // The first NeoPixel in a strand is #0, second is 1, all the way up
  // to the count of pixels minus one.
  for(int i=0; i<NUMPIXELS; i++) { // For each pixel...

    // pixels.Color() takes RGB values, from 0,0,0 up to 255,255,255
    // Here we're using a moderately bright green color:
    pixels.setPixelColor(i, pixels.Color(0, 150, 0));

    pixels.show();   // Send the updated pixel colors to the hardware.

    delay(DELAYVAL); // Pause before next pass through loop
  }
//=↑==↑==↑==↑==↑==↑==↑NeoPixel↑==↑==↑==↑====↑==↑==↑=

}
実行
以下の様に光りましたでしょうか!

補足:スケッチ内容
ArduinoIDEから、「BasicHttpsClient」というスケッチを呼び出して修正したコードを上げます。
ただし、他者のプログラムを改編しての再配布は控えるべき事ですので、完全な形では公開せず、抜粋という形で以下に挙げます。
・・・・中略・・・とある部分は、省略しています。
試される方は、この記事と以下の記事を辿って、お手元で修正過程を再現してください。(改変結果はお手元で楽しむに留めおきください)
試される場合は、実機では、さまざまな理由によりうまく再現できない場合があることをご了承頂き、自己責任、自己解決を前提にお願いします。
コードの複写部
//==↓==↓My Repeat for Read↓==↓==↓
この部分
//=↑==↑My Repeat for Read↑==↑=
コードの打ち替え部
#define STASSID "★WiFiのSSID★"
#define STAPSK "★WiFiのPassWord★"
//==↓==↓My code↓==↓==↓
この部分
//=↑==↑==↑My code↑==↑==↑=
-----BEGIN CERTIFICATE-----
・・・
・・・
・・・
★ルート認証★
・・・
・・・
・・・
-----END CERTIFICATE-----
NeoPixcelの記述挿入部
//==↓==↓NeoPixel↓==↓==↓
この部分
//=↑==↑==↑NeoPixel↑==↑==↑=
NeoPixcelの記述確認・修正部
プログラムの前の方、
// Which pin on the Arduino is connected to the NeoPixels?
#define PIN        1 // ★On Trinket or Gemma, suggest changing this to 1

// How many NeoPixels are attached to the Arduino?
#define NUMPIXELS 3 // ★Popular NeoPixel ring size
GPIOピンは1を選択しています。
LED素子数は3としています。
スケッチ修正結果(抜粋)
/**
   BasicHTTPSClient.ino

    Created on: 20.08.2018

*/


#include <Arduino.h>
#include <WiFi.h>
#include <HTTPClient.h>

//==↓==↓==↓==↓==↓==↓==↓==↓NeoPixel↓==↓==↓==↓====↓==↓==↓==↓

// NeoPixel Ring simple sketch (c) 2013 Shae Erisson
// Released under the GPLv3 license to match the rest of the
// Adafruit NeoPixel library

//-------------------------------------

#include <Adafruit_NeoPixel.h>
#ifdef __AVR__
 #include <avr/power.h> // Required for 16 MHz Adafruit Trinket
#endif

// Which pin on the Arduino is connected to the NeoPixels?
#define PIN        1 // ★On Trinket or Gemma, suggest changing this to 1

// How many NeoPixels are attached to the Arduino?
#define NUMPIXELS 3 // ★Popular NeoPixel ring size

// When setting up the NeoPixel library, we tell it how many pixels,
// and which pin to use to send signals. Note that for older NeoPixel
// strips you might need to change the third parameter -- see the
// strandtest example for more information on possible values.
Adafruit_NeoPixel pixels(NUMPIXELS, PIN, NEO_GRB + NEO_KHZ800);

#define DELAYVAL 500 // Time (in milliseconds) to pause between pixels
//=↑==↑==↑==↑==↑==↑==↑NeoPixel↑==↑==↑==↑====↑==↑==↑=

#ifndef STASSID
#define STASSID "★WiFiのSSID★"
#define STAPSK "★WiFiのPassWord★"
#endif

const char *ssid = STASSID;
const char *pass = STAPSK;

WiFiMulti WiFiMulti;

void setup() {

  Serial.begin(115200);

・・・★<<中略>>★・・・

  WiFi.mode(WIFI_STA);
  WiFiMulti.addAP(ssid, pass);

//==↓==↓==↓==↓==↓==↓==↓==↓NeoPixel↓==↓==↓==↓====↓==↓==↓==↓
  // These lines are specifically to support the Adafruit Trinket 5V 16 MHz.
  // Any other board, you can remove this part (but no harm leaving it):
#if defined(__AVR_ATtiny85__) && (F_CPU == 16000000)
  clock_prescale_set(clock_div_1);
#endif
  // END of Trinket-specific code.

  pixels.begin(); // INITIALIZE NeoPixel strip object (REQUIRED)
//=↑==↑==↑==↑==↑==↑==↑NeoPixel↑==↑==↑==↑====↑==↑==↑=


}

const char *jigsaw_cert = R"EOF(
-----BEGIN CERTIFICATE-----
・・・
・・・
・・・
★ルート認証★
・・・
・・・
・・・
-----END CERTIFICATE-----
)EOF";

static int cnt = 0;

void loop() {
  // wait for WiFi connection
  if ((WiFiMulti.run() == WL_CONNECTED)) {
    HTTPClient https;
    switch (cnt) {
      case 0:
・・・★<<中略>>★・・・
      default:
        Serial.println("[HTTPS] not setting any SSL verification settings, will fail");
        cnt = 0;
    }

    Serial.print("[HTTPS] begin...\n");
    //==↓==↓==↓==↓==↓==↓My Code↓==↓==↓==↓====↓==↓==↓==↓
    if (https.begin("https://script.google.com/macros/s/★GASのデプロイID★/exec?data=X")) {  // HTTPS
    //=↑==↑==↑==↑==↑==↑==↑My Code↓↑==↑==↑==↑====↑==↑==↑=

      Serial.print("[HTTPS] GET...\n");
      // start connection and send HTTP header
      int httpCode = https.GET();

      // httpCode will be negative on error
      if (httpCode > 0) {
        // HTTP header has been send and Server response header has been handled
        Serial.printf("[HTTPS] GET... code: %d\n", httpCode);

        // file found at server
        if (httpCode == HTTP_CODE_OK || httpCode == HTTP_CODE_MOVED_PERMANENTLY) {
          String payload = https.getString();

         //==↓==↓==↓==↓==↓==↓My Code↓==↓==↓==↓====↓==↓==↓==↓
          payload = payload.substring(payload.indexOf("▼▼▼▼"),payload.indexOf("●●●●"));
          //Serial.println(payload);
          Serial.println(payload.substring(12));
        //=↑==↑==↑==↑==↑==↑==↑My Code↓↑==↑==↑==↑====↑==↑==↑=

        }
      } else {
        Serial.printf("[HTTPS] GET... failed, error: %s\n", https.errorToString(httpCode).c_str());
      }

      https.end();
    } else {
      Serial.printf("[HTTPS] Unable to connect\n");
    }
  }

  //==↓==↓==↓==↓==↓==↓My Code↓==↓==↓==↓====↓==↓==↓==↓
  Serial.println("Wait 10s before next round_Read...");
  //=↑==↑==↑==↑==↑==↑==↑My Code↓↑==↑==↑==↑====↑==↑==↑=
  delay(10000);

//==↓==↓==↓==↓==↓==↓My Repeat for Read↓==↓==↓==↓====↓==↓==↓==↓
  // wait for WiFi connection
  if ((WiFiMulti.run() == WL_CONNECTED)) {
    HTTPClient https;
    switch (cnt) {
      case 0:
・・・★<<中略>>★・・・
      default:
        Serial.println("[HTTPS] not setting any SSL verification settings, will fail");
        cnt = 0;
    }

    Serial.print("[HTTPS] begin...\n");
  //==↓==↓==↓==↓==↓==↓My Code↓==↓==↓==↓====↓==↓==↓==↓
    if (https.begin("https://docs.google.com/spreadsheets/d/e/★スプレッドシートの公開WEBページID★/pub?gid=0&single=true&range=A1")) {  // HTTPS
  //=↑==↑==↑==↑==↑==↑==↑My Code↓↑==↑==↑==↑====↑==↑==↑=

      Serial.print("[HTTPS] GET...\n");
      // start connection and send HTTP header
      int httpCode = https.GET();

      // httpCode will be negative on error
      if (httpCode > 0) {
        // HTTP header has been send and Server response header has been handled
        Serial.printf("[HTTPS] GET... code: %d\n", httpCode);

        // file found at server
        if (httpCode == HTTP_CODE_OK || httpCode == HTTP_CODE_MOVED_PERMANENTLY) {
          String payload = https.getString();

          //==↓==↓==↓==↓==↓==↓My Code↓==↓==↓==↓====↓==↓==↓==↓
          payload = payload.substring(payload.indexOf("▼▼▼▼"),payload.indexOf("●●●●"));
          Serial.println(payload.substring(12));
          //=↑==↑==↑==↑==↑==↑==↑My Code↓↑==↑==↑==↑====↑==↑==↑=
        }
      } else {
        Serial.printf("[HTTPS] GET... failed, error: %s\n", https.errorToString(httpCode).c_str());
      }

      https.end();
    } else {
      Serial.printf("[HTTPS] Unable to connect\n");
    }
  }

  //==↓==↓==↓==↓==↓==↓My Code↓==↓==↓==↓====↓==↓==↓==↓
  Serial.println("Wait 10s before next round_Write...");
  //=↑==↑==↑==↑==↑==↑==↑My Code↓↑==↑==↑==↑====↑==↑==↑=
  delay(10000);

//=↑==↑==↑==↑==↑==↑==↑My Repeat for Read↑==↑==↑==↑====↑==↑==↑=

//==↓==↓==↓==↓==↓==↓==↓==↓NeoPixel↓==↓==↓==↓====↓==↓==↓==↓
  pixels.clear(); // Set all pixel colors to 'off'

  // The first NeoPixel in a strand is #0, second is 1, all the way up
  // to the count of pixels minus one.
  for(int i=0; i<NUMPIXELS; i++) { // For each pixel...

    // pixels.Color() takes RGB values, from 0,0,0 up to 255,255,255
    // Here we're using a moderately bright green color:
    pixels.setPixelColor(i, pixels.Color(0, 150, 0));

    pixels.show();   // Send the updated pixel colors to the hardware.

    delay(DELAYVAL); // Pause before next pass through loop
  }
//=↑==↑==↑==↑==↑==↑==↑NeoPixel↑==↑==↑==↑====↑==↑==↑=

}

以下は、はじめてGAS(Goole Apps Script)に触れる方への参考資料のご紹介です。
GASで「WEBアプリ」を実装する手順を、以下の本にまとめました。
スマートフォンなどデバイスを選ばず使用できるWEBアプリは便利なものですが、GASの解説でこの部分だけにフォーカスした解説本はまだ少ないと思います。
手順を通しでご確認したい方はご参考にどうぞ。
手間賃程度の値段を付けさせて頂いておりますが、アマゾン読み放題(Amazon UnLimited) のサービス加入中の方は無料で読めます。
コードの解説はこちらです。
本書で実装する、表計算シートをそのまま映し出す「テーブル形式フォーム」(自称している呼称です)は、Googleフォームなどの単票形式のフォームと違った、多様に応用がきく便利なフォームです。そのコードの内容を解説しています。
コードのダウンロードが上手くできないご指摘があり(デバイスによる様です)、別途のダウンロード先も追加しました。
なお、日本語についての個人的な思いから、IT関連の本ではめずらしい、縦書きにしています。目次は以下をご参照ください。
Google Apps Script(GAS)でWEBアプリを作る事で、日常のちょっとした効率化が可能です。
サーバレスかつ無料のサービスですので、アマチュアでも手軽に始められます。
用例の一つとして、スケジュール調整アプリの様な意見集約にうってつけかと思い、以下を本にしてみました。
チームの意見集約を、メールに代わってWEBアプリでやってみませんか、というご提案です。
こちらは、テーブル形式フォームを進化させ、エクセル風テーブルにしたWEBアプリの解説です。ちょっとしたプログラムで、スマートフォンなどから「まるでエクセル」が使える感動を是非!
宜しければどうぞ。