第10話 希望時間帯の選択メッセージ作成
こんにちは!Kenです。
前回は来店希望日のメッセージをリプライしました。
今回は、希望時間帯の選択ができるメッセージを作りたいと思います。
来店希望日選択のイベントデータ
前回は日付選択までできるようになりましたね。

では、日付選択→送信すると帰ってくるイベントデータはどんなものかを見てみましょう。次のようなJSONデータが返ってきます。
ev: {
    type: 'postback',
    replyToken: 'xxxxxxxxxxxxxxxxxx',
    source: { userId: 'yyyyyyyyyyyyyyyyyy', type: 'user' },
    timestamp: 1601191757256,
    mode: 'active',
    postback: { data: 'date&0', params: {date: '2020-09-30' } }
}
今回もイベントタイプはpostbackで返ってきましたね。
そして注目すべきはpostback内のdataとparamsです。dataは'date&0'となっており、dateは日時選択アクションからの返りイベントであること、0は最初に選択したメニューが0であることを意味してます。&はただのつなぎ文字です。(後でsplit('&')で分割しやすいようにしてるだけです。)
handlePostbackEvent関数の編集
postbackイベントで返ってきているため、handlePostbackEvent関数内で処理コードを書きます。
現状のコードです。
const handlePostbackEvent = async (ev) => {
   const profile = await client.getProfile(ev.source.userId);
   const data = ev.postback.data;
   const splitData = data.split('&');

   if(splitData[0] === 'menu'){
       const orderedMenu = splitData[1];
       askDate(ev,orderedMenu);
   }
}
■splitData[0]= 'date'である
■postback.params(=日付)の処理
に考慮して次のようにプログラムを更新しました。
const handlePostbackEvent = async (ev) => {
   const profile = await client.getProfile(ev.source.userId);
   const data = ev.postback.data;
   const splitData = data.split('&');

   if(splitData[0] === 'menu'){
       const orderedMenu = splitData[1];
       askDate(ev,orderedMenu);
   }else if(splitData[0] === 'date'){
       const orderedMenu = splitData[1];
       const selectedDate = ev.postback.params.date;
       askTime(ev,orderedMenu,selectedDate);
   }
}
d前回と同じパターンですね。過去に選択した回答(メニュー、日付)を引数として次の質問を投げる関数(askTime)に渡してあげるというパターンです。
Flex Messageの作成(希望時間を聞く)
希望時間帯を問う関数askTimeについて実装していきましょう。
本来であれば、askTime関数の中で予約が入っていない時間帯を計算し、予約可能な時間帯をお客様に示すということをしたいのですが、まずは予約が完了するところまでを通しで進めることにします。
デフォルトでLINEに装備されている時間選択がめっちゃ使いにくいので、自分で実装することにしました。実際、使ってみてください。お年寄りは絶対わからんだろって仕様です(泣泣。datetimepickerアクションのmodeをtimeにすれば使えますよ〜。
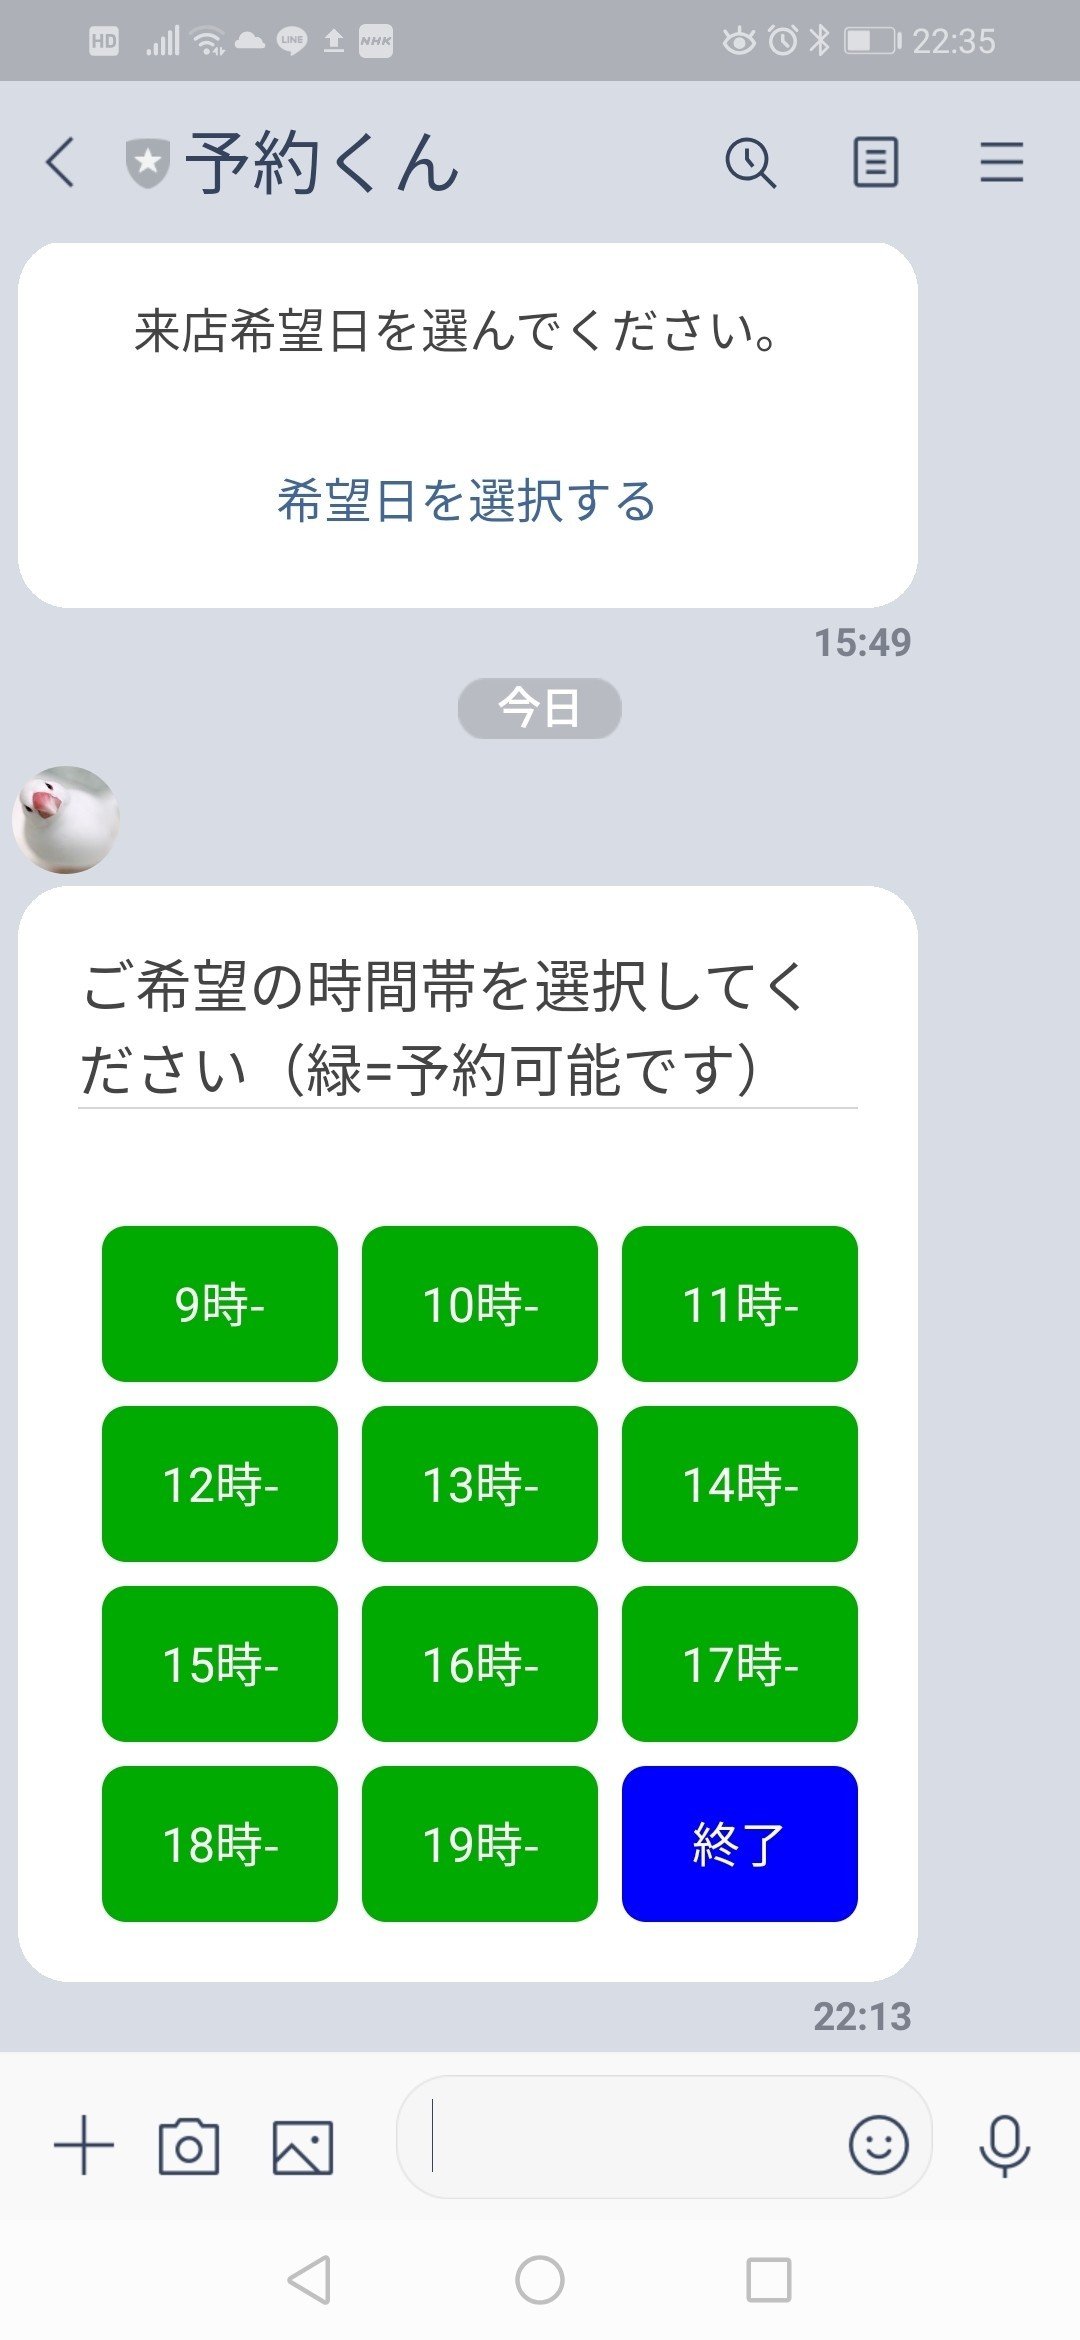
さて今回は、こんなFlex Messageにしたいです。

1時間単位で時間を選べるようにしてます。
ここは3時間単位とか、午前・午後くらいの感じでも良いかもしれませんが、今回は粒度は細かく、難易度高めにあえて挑戦。
またお客様に予約可能な時間帯をお示ししたいので、最終的には、予約可能な時間→緑色ボタン、予約不可→赤ボタンとしたいと思います。
こんなイメージです。

赤いボタンの時間帯はすでに予約が埋まっていることを意味します。
今回は予約が何も入っておらず、全て緑色ボタンのメッセージを返すことを目的とします。
ではいつものごとくFlex Message Simulatorを開きましょう。
もはや詳しくは解説しません。私のと同じでなくとも、個性を出すのは大事ですし、私のよりももっとかっこいいの作ってくださいね!!
こんな感じで作れればOKです。
dataの中身は後でいじるので今はテキトーで大丈夫です。

askTime関数を実装する
今は引数をもらってリプライするだけの関数ですが、こんな感じです。
const askTime = (ev,orderedMenu,selectedDate) => {
   return client.replyMessage(ev.replyToken,{
       "type":"flex",
       "altText":"予約日選択",
       "contents":
       {
           "type": "bubble",
           "header": {
             "type": "box",
             "layout": "vertical",
             "contents": [
               {
                 "type": "text",
                 "text": "ご希望の時間帯を選択してください(緑=予約可能です)",
                 "wrap": true,
                 "size": "lg"
               },
               {
                 "type": "separator"
               }
             ]
           },
           "body": {
             "type": "box",
             "layout": "vertical",
             "contents": [
               {
                 "type": "box",
                 "layout": "horizontal",
                 "contents": [
                   {
                     "type": "button",
                     "action": {
                       "type": "postback",
                       "label": "9時-",
                       "data":`time&${orderedMenu}&${selectedDate}&0`
                     },
                     "style": "primary",
                     "color": "#00AA00",
                     "margin": "md"
                   },
                   {
                     "type": "button",
                     "action": {
                       "type": "postback",
                       "label": "10時-",
                       "data": `time&${orderedMenu}&${selectedDate}&1`
                     },
                     "style": "primary",
                     "color": "#00AA00",
                     "margin": "md"
                   },
                   {
                     "type": "button",
                     "action": {
                       "type": "postback",
                       "label": "11時-",
                       "data": `time&${orderedMenu}&${selectedDate}&2`
                     },
                     "style": "primary",
                     "color": "#00AA00",
                     "margin": "md"
                   }
                 ]
               },
               {
                 "type": "box",
                 "layout": "horizontal",
                 "contents": [
                   {
                     "type": "button",
                     "action": {
                       "type": "postback",
                       "label": "12時-",
                       "data": `time&${orderedMenu}&${selectedDate}&3`
                     },
                     "style": "primary",
                     "color": "#00AA00",
                     "margin": "md"
                   },
                   {
                     "type": "button",
                     "action": {
                       "type": "postback",
                       "label": "13時-",
                       "data": `time&${orderedMenu}&${selectedDate}&4`
                     },
                     "style": "primary",
                     "color": "#00AA00",
                     "margin": "md"
                   },
                   {
                     "type": "button",
                     "action": {
                       "type": "postback",
                       "label": "14時-",
                       "data": `time&${orderedMenu}&${selectedDate}&5`
                     },
                     "style": "primary",
                     "color": "#00AA00",
                     "margin": "md"
                   }
                 ],
                 "margin": "md"
               },
               {
                 "type": "box",
                 "layout": "horizontal",
                 "contents": [
                   {
                     "type": "button",
                     "action": {
                       "type": "postback",
                       "label": "15時-",
                       "data": `time&${orderedMenu}&${selectedDate}&6`
                     },
                     "style": "primary",
                     "color": "#00AA00",
                     "margin": "md"
                   },
                   {
                     "type": "button",
                     "action": {
                       "type": "postback",
                       "label": "16時-",
                       "data": `time&${orderedMenu}&${selectedDate}&7`
                     },
                     "style": "primary",
                     "color": "#00AA00",
                     "margin": "md"
                   },
                   {
                     "type": "button",
                     "action": {
                       "type": "postback",
                       "label": "17時-",
                       "data": `time&${orderedMenu}&${selectedDate}&8`
                     },
                     "style": "primary",
                     "color": "#00AA00",
                     "margin": "md"
                   }
                 ],
                 "margin": "md"
               },
               {
                 "type": "box",
                 "layout": "horizontal",
                 "contents": [
                   {
                     "type": "button",
                     "action": {
                       "type": "postback",
                       "label": "18時-",
                       "data": `time&${orderedMenu}&${selectedDate}&9`
                     },
                     "style": "primary",
                     "color": "#00AA00",
                     "margin": "md"
                   },
                   {
                     "type": "button",
                     "action": {
                       "type": "postback",
                       "label": "19時-",
                       "data": `time&${orderedMenu}&${selectedDate}&10`
                     },
                     "style": "primary",
                     "color": "#00AA00",
                     "margin": "md"
                   },
                   {
                     "type": "button",
                     "action": {
                       "type": "postback",
                       "label": "終了",
                       "data": "end"
                     },
                     "style": "primary",
                     "color": "#0000ff",
                     "margin": "md"
                   }
                 ],
                 "margin": "md"
               }
             ]
           }
         }
   });
}
重要なポイントはただ1つ。
dataの中身です。
前回も述べたように、予約するための問答はいくつかに及びます。そのため、以前に回答した内容を記録していかなければなりません。玄人の方はお分かりかと思いますが、その記録する場所がグローバル変数であってはならないのです。
さて、dataの中身の構造は以下のようなものです。
time&[選んだメニュー]&[選んだ日付]&[選んだ時間帯を表す数字]
・&はただのつなぎ文字(のちにsplitするため)
・time→次のhandlePostbackEvent関数にてaskTimeから返ってきたdataと判別
・メニューは0〜6が各メニューに対応
・日付は2020-09-03みたいな形式
・時間帯は0〜10の整数。0は9時に対応
選んだメニューと選んだ日付は引数として関数に渡されているので、それをそのまま使ってます。
希望日を選択したら、返信が来ましたか??
今回も最後までお読みいただきありがとうございました!!
MENTA でLINEBOT開発サポートをしております。お気軽にご相談ください。

