
【究極版】LINEチャットボットでサブスクの作り方

GPT-4と2人で力を合わせて実現した軌跡です。GPTを使ってもてこずったこと中心にまとめてあるので、素人でGPTを使ってやろうという方には役に立つのではないかと思います。
環境:
windows WLS2 ubuntu22.04
・決済:Heroku, LIFF, stripe
・チャットボット:Heroku (+ postgre), LINE messaging api, python
目次を見ていただくとわかりますが、記憶も入っているし、system promptも入れてあるので、ちゃんと動くところまでコピーできたら、キャラ付けなどもアレンジできると思います。
全般的なコツ
Herokuでディプロイすると次のような画面になることがあります。
「なにー!!!」とビビるんだけど、たいていは、コメントアウト戻すときに戻しちゃいけないところまでもとしちゃったとか、修正するときに "," や "}" をつけ忘れたという単純なミスなので、まずはそれを確認すべき。色々とガチャガチャ変更した後にそれに気づくと悲しくなる。
ディプロイはこまめに
上と同じですが、たくさん変更した後にディプロイでうまくいかないと、どこが引っかかってるのかわからなくなるので、こまめにした方がいいです。
特に、ひと段落ついて、いらないコメントアウトを複数のファイルで削除したりして、動かなくなると絶望です。コードの整理なら、ファイル1つずつで、念のため動くか確認しましょう。
古いコードは残しておく
ディプロイをこまめにもそうですが、ちょっと前にまともに動いた古いコードをちゃんと残しておくことも重要です。ガチャガチャやっているうちになぜか動かなくなるので、そんな時は、振り出しに戻します。特にGPTは(GPT-4でも)、その場のノリで適当なことを言うので、うまくいくときもあれば、全然めちゃくちゃになるときもあります。なんか変なことを言っているなと思ったら言うことを聞かない方がいいし、反論した方がいいです。変なことに気づけたらいいんですが、気づけない時もあるので、古いコードを取っておいて、そこからやり直すとうまくいくこともあります。
上手くいかなかったらログを出しまくる
とにかく、loggingで、いろんな部分のログを出して確認すると、GPTが直し方を教えてくれます。
ウェブアプリは、ブラウザのコンソールログも確認「F12」
少なくともChromeだとF12でブラウザのコンソールのログが確認できるので、そこでエラーが見つかることもあります。
それでは、さっそく中身に入っていきましょう!
キャッシュには気を付けて
キャッシュのせいで、コード変えたのに反映されないとかよくある。それに気づかずどんどんコードをいじると大変なことになる。キャッシュ削除し辺り、新しくブラウザを開いてやる方がいいことが多い。
1. LIFFとstripeを連携する
アカウントの準備とローカルへのクローン
基本はこちらのブログにある通りです。
GithubのREADMEのが分かりやすいかも。
基本はこれをローカルにクローンして、Herokuにあげるだけです。
LIFFアプリ、stripeサブスク商品も作ります(まずはテストモードで)。
URLの設定がわかりにくいですね。LIFFアプリのエンドポイントURLはHerokuのアプリの公開URLです。
Herokuの環境変数に入れるDOMAINは、決済後に飛ぶ先を指定するserver.jsのstripe.checkoutの下記のコードで使われます。
success_url: `${domainURL}/success.html?session_id={CHECKOUT_SESSION_ID}`,
cancel_url: `${domainURL}/cancel.html`,つまり、自分の管理しているウェブサイトに例えば、https://example.com/stripe-success/やhttps://example.com/stripe-cancel/というページを作って、環境変数のDOMAINにはhttps://example.comを登録するという感じです。さらにこの場合は、server.jsを次のように変更する必要がありますね。(Githubにあげた後の方がやりやすいかも)
success_url: `${domainURL}/stripe-success/?session_id={CHECKOUT_SESSION_ID}`,
cancel_url: `${domainURL}/stripe-cancel/`,
clientフォルダにsucsess.htmlとcansel.htmlがあるので、DOMAINは使わず、そちらにつなぐという手もあります。私はこちらで設定。
※app-nameは、Herokuのアプリの名前、つまり、前半はHerokuのアプリのURLです。LINEのエンドポイントに設定したのと一緒
success_url: `https://app-name.herokuapp.com/success.html?session_id={CHECKOUT_SESSION_ID}`,
cancel_url: `https://app-name.herokuapp.com/cancel.html`,
stripeの審査がなかなか通らなかったのですが、概要に「決済は即時です」と入れて、ウェブサイトに「特定商取引法に基づく表記」を入れたらすぐに通りました。
.envの編集は私はnanoを使いましたが、他でもいいと思います。
私はローカルで試験するのが面倒だったので、すぐにHerokuに挙げてしまいました。そうすると開発中にHerokuを回しまくるのでお金がかかります。私はログインまでで0.3ドルかかりました。
Herokuにpush
Herokuに挙げる手順としては、ローカルからHerokuにプッシュして、次に、Githubのリポジトリを作ってそこにもプッシュして、HerokuアプリをGithubのリポジトリに同期してという流れです。
ローカルのHeroku CLIからHerokuへの接続はIDとトークンで行う方法とSSHを使う方法で2種類あります。途中、トークンで接続がうまくいかなくなり、SSHに切り替えたらすぐにできました。
Herokuへのプッシュの仕方はこちらにありますね。
githubへのプッシュは先にリポジトリを作る必要がある。コマンドからはうまくいかず、ブラウザでからのリポジトリを作って、そこにプッシュした。
ローカルからHerokuへの接続は、複数の端末を使っていたりすると頻繁に使うので、こちらにも掲載しておきます。
【Ubuntu】

アプリの作成:
heroku create -a アプリ名

接続の確認:
※Heroku ~ と出てくればOK
git remote -v

すでにあるアプリへの接続:
※HerokuにSSH接続していないと、権限の問題を指摘されるかも
heroku git:remote -a アプリ名
Hirokuのアプリの管理画面のDeploy→Deployment methodでgithubを選び、githubに上げたリポジトリを選択する。
Github上で調整
あとはHerokuのDeployのDeploy Branchして、エラーを消していく。
なんとなくポートを3000に変えたりしています。絶対に必要なのは、.envをHerokuの環境設定に移行することです。
一度あげてしまえば、Github上でserver.js や client/index.jsを編集できるので楽です。編集→ディプロイの繰り返しです。実際に決済を行う必要があるので、stripeはテストモードで。
Deployタブの下部、Deploy Branchを押すとすぐDeployできます。これをしないとコードを編集して登録しないと反映されないので、初めは引っかかってました。
とりあえず、server.js にget-liff-idのエンドポイントを追加する必要がありますね。
app.get("/get-liff-id", (req, res) => {
  res.send({
    liffId: process.env.LIFF_ID,
  });
});
決済時にstripeにLINEのアカウント情報を送る
ログインの設定で一番大変だったのは、LINEのIDとstripeのアカウントの接続です。stripe.checkout からmetadataとして送ることになっていますが、stripeの決済に反映されません。
始めはまったく理由がわからなかったんですが、"xxx"を飛ばしたり、userId+"xxx"を飛ばしたりして、stripeのイベントデータの部分にはmetadata: ["line_user": "~"]として飛んでいることがわかりました!
ただ、内容は、undefined!
Ubuntuのコマンドからheroku logs --app アプリ名 でログを確認して(ログの出力の仕方はGPTが教えてくれます)、id tokenが期限切れになっていることがわかりました。
そこで、再ログインをさせたのですが、今度は、購入→再ログインのループに。
一応、再ログイン後にキャッシュを削除させるようにしたけど、だめ。
// 再ログイン後に古いトークンを使わないようにキャッシュの回避
app.use(function(req, res, next) {
    res.setHeader('Cache-Control', 'no-cache, no-store, must-revalidate');
    res.setHeader('Pragma', 'no-cache');
    res.setHeader('Expires', '0');
    next();
});
client/index.jsをこんな感じに変更して、再ログイン後に新しいトークンを取得しろと明記したがだめ。
.then(function (response) {
        if (response.status === 401) { // 401 is the status code for unauthorized
            return response.json().then(data => {
                if (data.action === "relogin") {
                  alert("セッションがタイムアウトしました。再度ログインしてください。");
                  liff.login({ redirectUri: location.href }).then(() => {
                    if (liff.isLoggedIn()) {
                      // 新しいIdTokenをサーバーから取得する
                      fetch("/get-new-idtoken")
                        .then(response => response.json())
                        .then(data => {
                          if (data.token) {
                            lineIdToken = data.token;
                          }
                        });
                    }
                  });
                }
                throw new Error(data.error);
            });
        }
        return response.json();
    });
server.js に次の通りエンドポイントを追加。
app.get("/get-new-idtoken", (req, res) => {
  // LINE APIを使用して新しいIdTokenを取得するロジックをここに書きます。
  res.json({ token: idToken });
});
なぜかここで突然うまくいくが、後日試したらダメ。
※何らかの操作で、ブラウザが切り替わったことで、トークンがリフレッシュされたよう。
結局、これはダメみたい。頑張ったけど、直らないので、あきらめる…もしかするといろいろ変更する必要なく、元のclient/index.js のままでよかったのかも。
↓のやり取りによると、「一度getIDTokenを実行すると、localstorageにidTokenが保持され、次回以降のgetIDTokenではlocalstorageからidTokenを取得しているようです。」とのこと。LINEの仕様なのかな。
アプリからやるとか、ブラウザを開きなおして再度ログインすれば問題ないです。
とりあえず、ログインアプリ完成!
server.js はこんな感じ
const express = require("express");
const app = express();
const { resolve } = require("path");
const PORT = process.env.PORT || 3000;

// 再ログイン後に古いトークンを使わないようにキャッシュの回避
app.use(function(req, res, next) {
    res.setHeader('Cache-Control', 'no-cache, no-store, must-revalidate');
    res.setHeader('Pragma', 'no-cache');
    res.setHeader('Expires', '0');
    next();
});

const stripe = require("stripe")(process.env.STRIPE_SECRET_KEY);

// エンドポイント追加
app.get("/", (req, res) => {
  const path = resolve(process.env.STATIC_DIR + "/index.html");
  res.sendFile(path);
});

app.get("/get-liff-id", (req, res) => {
  res.send({
    liffId: process.env.LIFF_ID,
  });
});

app.post("/get-new-idtoken", (req, res) => {
  const newIdToken = req.body.token;
  if (newIdToken) {
    currentIdToken = newIdToken; // 新しいIDトークンを保存
    res.json({ success: true });
  } else {
    res.json({ success: false, error: "Token not provided." });
  }
});

// Checkout Session の結果を取得
app.get("/checkout-session", async (req, res) => {
  const { sessionId } = req.query;
  const session = await stripe.checkout.sessions.retrieve(sessionId);
  res.send(session);
});

// Checkout Sessionを開始する
app.post("/create-checkout-session", async (req, res) => {
  // req.bodyが存在するかどうかチェック
  if (!req.body) {
    return res.status(400).send("Request body is missing");
  }
  console.log("Received request for /create-checkout-session with body:", req.body);
  const priceId = process.env.SUBSCRIPTION_PRICE_ID;
  const productId = process.env.DONATION_PRODUCT_ID;
  const domainURL = process.env.DOMAIN;
  const channelId = process.env.CHANNEL_ID;
  const donation = req.body.donation;
  const idToken = req.body.token;
  // console.log("Received ID Token:", idToken);
  let userId;

  // LINEのIDトークン検証
  const request = require('request');
  const options = {
    uri: "https://api.line.me/oauth2/v2.1/verify",
    form: {
      "id_token": idToken,
      "client_id": channelId
    }
  };

  request.post(options, async function (err, response, body) {
    // 応答を全てログ出力
    console.log("LINE API Response:", body);

    // 応答のJSONをパース
    const parsedBody = JSON.parse(body);

    // 応答ボディにエラーが含まれる場合
    if (parsedBody.error) {
      console.error("Error from LINE API:", parsedBody.error_description || parsedBody.error);

    // IDトークンが期限切れの場合
    if (parsedBody.error_description === "IdToken expired.") {
      res.status(401).send({
        error: "IdToken expired. Please login again.",
        action: "relogin"
      });
      return;
    }

    // その他のエラーの場合
    res.status(400).send({ error: parsedBody.error_description || parsedBody.error });
      return;
    }

    userId = parsedBody.sub;
    console.log("Extracted LINE userId:", userId);

    // userId = JSON.parse(response.body).sub;
    // console.log("Extracted LINE userId:", userId);

    const lineItems = [
      {
        price: priceId,
        quantity: 1,
      },
    ];

    if (donation) {
      lineItems.push({
        quantity: 1,
        price_data: {
          product: productId,
          unit_amount: donation * 100,
          currency: "jpy",
        }
      });
    }

    const session = await stripe.checkout.sessions.create({
      payment_method_types: ["card"],
      mode: "subscription",
      line_items: lineItems,
      success_url: `https://app-name.herokuapp.com/success.html?session_id={CHECKOUT_SESSION_ID}`,
      cancel_url: `https://app-name.herokuapp.com/cancel.html`,
      allow_promotion_codes: true,
      // メタデータにLINEのuserIdをセット
      subscription_data: {
        metadata: {
          line_user: userId
        }
      },
      // clientReferenceId: userId,
      metadata: {
        line_user: userId
      }
    });

    res.send({
      checkoutSessionId: session.id,
    });
  });
});

app.get("/publishable-key", (req, res) => {
  res.send({
    publishableKey: process.env.STRIPE_PUBLISHABLE_KEY,
  });
});

app.listen(PORT, () => console.log(`Node server listening on port ${PORT}!`));
index.jsはこんな感じ。jsは記載の順番が重要らしい。GPTに言われて何度か直しました。
let liffId;
let lineIdToken;
let stripe;

var createCheckoutSession = function (donation) {
  // lineIdTokenやliffIdがまだセットされていない場合は、エラーを出すか早期リターン
  if (!lineIdToken || !liffId) {
    console.error("Not ready to trigger createCheckoutSession");
    return;
  }
    return fetch("/create-checkout-session", {
        method: "POST",
        headers: {
            "Content-Type": "application/json",
        },
        body: JSON.stringify({
            donation: donation * 100,
            token: lineIdToken,
            liffid: liffId
        }),
    })
      .then(function (response) {
        if (response.status === 401) { // 401 is the status code for unauthorized
            return response.json().then(data => {
                if (data.action === "relogin") {
                  alert("セッションがタイムアウトしました。再度ログインしてください。");
                  liff.login({ redirectUri: location.href }).then(() => {
                    if (liff.isLoggedIn()) {
                      // 新しいIdTokenをサーバーから取得する
                      fetch("/get-new-idtoken")
                        .then(response => response.json())
                        .then(data => {
                          if (data.token) {
                            lineIdToken = data.token;
                          }
                        });
                    }
                  });
                }
                throw new Error(data.error);
            });
        }
        return response.json();
    });
 };


function initializeLiff() {
  // Initialize LIFF app
  liff.init({
    liffId: liffId
  })
    .then(() => {
      if (liff.isLoggedIn()) {
        // 既にログインしている場合
        lineIdToken = liff.getIDToken();
        triggerCheckoutSession();  // 新しいIdTokenを使用してcheckout-sessionをトリガーする
      } else if (!liff.isInClient()) {
        window.alert("LINEアカウントにログインしてください。");
        liff.login({ redirectUri: location.href });
      }
    })
    .catch((err) => {
      console.log('LIFFアプリの初期化に失敗しました', err);
    });
}


function triggerCheckoutSession() {
  // 既存のcreate-checkout-session呼び出し処理をここに再利用
  var donation = document.querySelector('.donation.selected');
  var donationAmount = donation ? donation.dataset.amount : 0;
  createCheckoutSession(donationAmount).then(function (response) {
    stripe
      .redirectToCheckout({
        sessionId: response.checkoutSessionId,
      })
      .then(function (result) {
        if (result.error) {
          console.log(result.error.message);
        }
      })
      .catch(function (err) {
        console.log(err);
      });
  });
}


fetch("/get-liff-id")
  .then(response => response.json())
  .then(data => {
    // console.log("Fetched LIFF ID:", data.liffId); // デバッグ用
    liffId = data.liffId;
    initializeLiff(); // LIFFの初期化関数を呼び出す
  })
  .catch(error => console.error("Error fetching LIFF ID:", error));


// After LIFF init
liff.ready.then(() => {
  console.log("LIFF is ready to be used");
  var stripe;

  var setupElements = function () {
    return fetch("/publishable-key", {
      method: "GET",
      headers: {
        "Content-Type": "application/json",
      },
    })
    .then(function (result) {
      return result.json();
    })
    .then(function (data) {
      stripe = Stripe(data.publishableKey);
    });
  };

  setupElements().then(() => {
    // stripe の初期化が完了した後の処理をここに記述する
    document.querySelector("#submit").addEventListener("click", function (evt) {
      evt.preventDefault();

      // Initiate payment
      var donation = document.querySelector('.donation.selected');
      var donationAmount = donation ? donation.dataset.amount : 0;

      createCheckoutSession(donationAmount).then(function (response) {
        stripe
          .redirectToCheckout({
            sessionId: response.checkoutSessionId,
          })
          .then(function (result) {
            if (result.error) {
              console.log(result.error.message);
            }
          })
          .catch(function (err) {
            console.error('There was a problem with the fetch operation:', err.message);
            alert('エラーが発生しました。しばらくしてから再試行してください。'); // ユーザー向けのエラーメッセージ
          });
      });
    });
  });
});
実際の運用には、決済画面(や決済後、キャンセル後のページ)をHTMLで作る必要があります。
2. LINEボットをHerokuで作る
こちらのアプリを使おうと思ったが、難しすぎた!
まずこちらで…
先に、LINEのmessaging APIを作って、チャンネルアクセストークンとチャンネルシークレットを取得しておく必要があります。
ついでにwebhookを有効にして、webhookURL 設定してもいいけれど、ディプロイ後に変更になるかも。
https://<自分のアプリケーション名>.herokuapp.com/callback
あと、ボットにする場合は、チャットと応答メッセージはオフ。
ローカルで必要なファイルを作るときは、nanoなど適当に使って。まずは、mkdir アプリ名で、ディレクトリを作ってからnano ファイル名で、nanoで編集できます。
herokuとgithubにpushするのはログインアプリと一緒。
herokuの既存のアプリへの接続
【コマンドライン】
すでにあるアプリへの接続:
heroku git:remote -a アプリ名
Hirokuのアプリの管理画面のDeploy→Deployment methodでgithubを選び、githubに上げたリポジトリを選択する。
あとはHerokuのDeployのDeploy Branchして、エラーを消していく。
何度かソフトのバージョンで怒られたので、githubを編集してDeploy Branchしてとやりました。
Deployはできたけど、openappすると、開けない!
Flaskのバージョンを最新にしたら、Hello Worldと表示された!
しかし、コマンドからログを確認してGPTに送ると、いくつか気になるエラーが…
GPT-4の指示に従って
- requirements.txtにgunicorn==21.2.0を追加
- Procfileにweb: gunicorn main:appを追加
無事に「Flaskの内蔵開発サーバーは、本番環境では使用するべきではありません。」というエラーは消えた。
さて、LINEの方へ。
Webhook URLを入れ直す。
HerokuのSettingsのページにDomainsというのがあり、"Your app can be found at”の後にURLが書かれている。
しかし!
Webhookに使う場合は、最後に "callback" を足さないといけないので、お忘れなく。
3. LINEボットにGPTを接続する
Discordのぼっと作成ですが、こちらが参考になります。
上で作成したLINEボットにこれを入れていきます。
OpenAIのアカウントは作っておいてください。
- requirements.txtにopenai, aiohttpを追加
- 環境変数の設定(SettingsのConfig VarsのReveal Config Varsから):
KEYにOPENAI_API_KEY, VALUEは自分のOpenAIのAPIキー
- runtime.txtのpython-3.11.0へ
main.pyを修正
davinciはこれでいけたはず。
from flask import Flask, request, abort
import os
import openai

from linebot import (
    LineBotApi, WebhookHandler
)
from linebot.exceptions import (
    InvalidSignatureError
)
from linebot.models import (
    MessageEvent, TextMessage, TextSendMessage,
)

app = Flask(__name__)

# 環境変数取得
YOUR_CHANNEL_ACCESS_TOKEN = os.environ["YOUR_CHANNEL_ACCESS_TOKEN"]
YOUR_CHANNEL_SECRET = os.environ["YOUR_CHANNEL_SECRET"]
OPENAI_API_KEY = os.environ["OPENAI_API_KEY"]

line_bot_api = LineBotApi(YOUR_CHANNEL_ACCESS_TOKEN)
handler = WebhookHandler(YOUR_CHANNEL_SECRET)
openai.api_key = OPENAI_API_KEY

@app.route("/")
def hello_world():
    return "hello world!"

@app.route("/callback", methods=['POST'])
def callback():
    # get X-Line-Signature header value
    signature = request.headers['X-Line-Signature']

    # get request body as text
    body = request.get_data(as_text=True)
    app.logger.info("Request body: " + body)

    # handle webhook body
    try:
        handler.handle(body, signature)
    except InvalidSignatureError:
        abort(400)

    return 'OK'

@handler.add(MessageEvent, message=TextMessage)
def handle_message(event):
    # OpenAIのAPIを使って応答を生成
    response = openai.Completion.create(
      engine="davinci",
      prompt=event.message.text,
      max_tokens=150
    )
    generated_response = response.choices[0].text.strip()

    # LINEに応答を送信
    line_bot_api.reply_message(
        event.reply_token,
        TextSendMessage(text=generated_response)
    )

if __name__ == "__main__":
    port = int(os.getenv("PORT", 5000))
    app.run(host="0.0.0.0", port=port)
ちなみに、GPT-4を使う場合は、こちらを参考に。
gpt-3.5-turboとgpt-4は↓
from flask import Flask, request, abort
import os
import openai
from linebot import (
    LineBotApi, WebhookHandler
)
from linebot.exceptions import (
    InvalidSignatureError
)
from linebot.models import (
    MessageEvent, TextMessage, TextSendMessage,
)
import requests

app = Flask(__name__)

# 環境変数取得
YOUR_CHANNEL_ACCESS_TOKEN = os.environ["YOUR_CHANNEL_ACCESS_TOKEN"]
YOUR_CHANNEL_SECRET = os.environ["YOUR_CHANNEL_SECRET"]
OPENAI_API_KEY = os.environ["OPENAI_API_KEY"]

line_bot_api = LineBotApi(YOUR_CHANNEL_ACCESS_TOKEN)
handler = WebhookHandler(YOUR_CHANNEL_SECRET)
openai.api_key = OPENAI_API_KEY
GPT4_API_URL = 'https://api.openai.com/v1/chat/completions'

@app.route("/")
def hello_world():
    return "hello world!"

@app.route("/callback", methods=['POST'])
def callback():
    signature = request.headers['X-Line-Signature']
    body = request.get_data(as_text=True)
    app.logger.info("Request body: " + body)
    try:
        handler.handle(body, signature)
    except InvalidSignatureError:
        abort(400)
    return 'OK'

def generate_gpt4_response(prompt):
    headers = {
        'Content-Type': 'application/json',
        'Authorization': f'Bearer {OPENAI_API_KEY}'
    }
    data = {
        'model': "gpt-4",
        'messages': [
            {"role": "system", "content": "You are a helpful assistant."},
            {"role": "user", "content": prompt}
        ]
    }

    response = requests.post(GPT4_API_URL, headers=headers, json=data)
    response_json = response.json()
    # return response_json['choices'][0]['message']['content'].strip()
    # Add this line to log the response from OpenAI API
    app.logger.info("Response from OpenAI API: " + str(response_json))

    try:
        response = requests.post(GPT4_API_URL, headers=headers, json=data)
        response.raise_for_status()  # Check if the request was successful
        response_json = response.json()
        return response_json['choices'][0]['message']['content'].strip()
    except requests.RequestException as e:
        app.logger.error(f"OpenAI API request failed: {e}")
        return "Sorry, I couldn't understand that."
@handler.add(MessageEvent, message=TextMessage)
def handle_message(event):
    text = event.message.text
    reply_text = generate_gpt4_response(text)
    line_bot_api.reply_message(
        event.reply_token,
        TextSendMessage(text=reply_text)
    )

if __name__ == "__main__":
    port = int(os.getenv("PORT", 5000))
    app.run(host="0.0.0.0", port=port)
4. LINEボットの挙動をstripeの顧客情報に基づいて制御する
メッセージを送った人のLINEのidを取得
やりたいのはこちら。
LINEのMessaging apiからwebhookへの情報にはid情報が含まれています。これを取る!
GPT-4にこの情報を送るとコードを出してくれます。しかしすぐにはうまくいかず、とりあえずwebhookに送られてきた情報すべてログに出して溶かしました。
最終的にできた!参照するのが "user_id" とか反則やろ!
@handler.add(MessageEvent, message=TextMessage)
def handle_message(event):
    # Webhookデータをログに出力
    logging.info(f"Received webhook data: {request.data.decode('utf-8')}")

    # event.sourceオブジェクトの属性とその値をログに出力
    for attr in dir(event.source):
        logging.info(f"Attribute: {attr}, Value: {getattr(event.source, attr)}")

    # ユーザーからのイベントの場合、ユーザーIDを出力
    userId = getattr(event.source, 'user_id', None)
    if userId:
        logging.info(f"Received message from user ID: {userId}")
    else:
        logging.info("No userId attribute found in source.")

    # LINEから受信したテキストメッセージを処理
    text = event.message.text
    reply_text = generate_gpt4_response(text)
    line_bot_api.reply_message(
        event.reply_token,
        TextSendMessage(text=reply_text)
    )
stripeの顧客情報からサブスクのステイタスを確認
stripe apiの情報はこちら
顧客情報にはメタデータが入っていないなくて、サブスクの方に入っていた!
サブスク情報のうち、所定の商品に関する情報を抜いてくる。メッセージの送り主のline_idを持つ人の当該サブスクのステータスがactiveなら返信。非アクティブなら返信しない。
from flask import Flask, request, abort
import os
import openai
from linebot import (
    LineBotApi, WebhookHandler
)
from linebot.exceptions import (
    InvalidSignatureError
)
from linebot.models import (
    MessageEvent, TextMessage, TextSendMessage,
)
import requests

import logging
logging.basicConfig(level=logging.INFO)
logger = logging.getLogger(__name__) # stripeの情報の確認

import stripe

app = Flask(__name__)

# 環境変数取得
YOUR_CHANNEL_ACCESS_TOKEN = os.environ["YOUR_CHANNEL_ACCESS_TOKEN"]
YOUR_CHANNEL_SECRET = os.environ["YOUR_CHANNEL_SECRET"]
line_bot_api = LineBotApi(YOUR_CHANNEL_ACCESS_TOKEN)
handler = WebhookHandler(YOUR_CHANNEL_SECRET)

OPENAI_API_KEY = os.environ["OPENAI_API_KEY"]
GPT4_API_URL = 'https://api.openai.com/v1/chat/completions'

stripe.api_key = os.environ["STRIPE_SECRET_KEY"]
STRIPE_PRICE_ID = os.environ["SUBSCRIPTION_PRICE_ID"]

...

# LINEからのメッセージを処理し、必要に応じてStripeの情報も確認します。
@handler.add(MessageEvent, message=TextMessage)
def handle_line_message(event):
    # event.sourceオブジェクトの属性とその値をログに出力
    for attr in dir(event.source):
        logging.info(f"Attribute: {attr}, Value: {getattr(event.source, attr)}")

    # ユーザーからのイベントの場合、ユーザーIDを出力
    userId = getattr(event.source, 'user_id', None)
    if userId:
        logging.info(f"Received message from user ID: {userId}")
        status = check_subscription_status(userId)
        if status == "negative": # この部分を実際のステータスに合わせて調整してください
            text = event.message.text
            reply_text = generate_gpt4_response(text)
            line_bot_api.reply_message(event.reply_token, TextSendMessage(text=reply_text))
        else:
            # サブスクリプションがactiveでない場合、以下のメッセージを返す
            reply_text = "利用回数の上限に達しました。明日以降またお待ちしています。"
            line_bot_api.reply_message(event.reply_token, TextSendMessage(text=reply_text))
    else:
        logging.info("No userId attribute found in source.")

# stripeの情報を参照
def get_subscription_status_for_user(userId, STRIPE_PRICE_ID):
    subscriptions = stripe.Subscription.list(limit=10)
    for subscription in subscriptions.data:
        if subscription["items"]["data"][0]["price"]["id"] == STRIPE_PRICE_ID and subscription["metadata"].get("line_user") == userId:
            return subscription["status"]
    return None

# Stripeの情報を確認する関数
def check_subscription_status(userId):
    return get_subscription_status_for_user(userId, STRIPE_PRICE_ID)

if __name__ == "__main__":
    port = int(os.getenv("PORT", 5000))
    app.run(host="0.0.0.0", port=port)
5. Herokuのデータベースに接続し、1日のやり取りの回数をカウント
参考になるブログ
コマンドラインから
pip install psycopg2これがうまくいかず、GPTに助けられた。先に↓をやったらできた。
sudo apt-get update
sudo apt-get install libpq-dev
しかし、結局うまくいかず…
sudo apt-get update
sudo apt-get install postgresql-client
sudo apt-get install postgresql

heroku pg:psql -a <アプリケーション名>
なんとかデータベースに入れた!そのあとは…次のコードでテーブル作成。is_activeは基本TRUEと入る列で、記憶の処理に使う。
【アプリケーション名::DATABASE=>】
CREATE TABLE line_bot_logs (timestamp TIMESTAMP, sender TEXT, lineId TEXT, stripeId TEXT, message TEXT, is_active BOOLEAN DEFAULT TRUE);
その他のコマンド
【アプリケーション名::DATABASE=>】
- 削除:
DROP TABLE テーブル名;

- 一覧表示:
\dt

- 構造を表示
\d テーブル名

- データ挿入
INSERT INTO テーブル名 (カラム1, カラム2) VALUES ('値1', '値2');

- データの選択
SELECT*FROM テーブル名;

- データの更新
UPDATE テーブル名 SET カラム名 = '新しい値' WHERE 条件;

- データの削除
DELETE FROM テーブル名 WHERE 条件;

- 列を追加
ALTER TABLE テーブル名 ADD COLUMN 列名 列の型;

- psqlからの退出:
\q
requirements.txtにpsycopg2==2.8.1を追加。ではうまくいかず、psycopg2-binaryに変更。
main.pyは次の通り変更。
import psycopg2

def get_connection():
    dsn = f"host={os.environ['DB_HOST']} " \
          f"port=5432 " \
          f"dbname={os.environ['DB_NAME']} " \
          f"user={os.environ['DB_USER']} " \
          f"password={os.environ['DB_PASS']}"
    return psycopg2.connect(dsn)
データベースに入れるデータを取るために、次も修正。
# stripeの情報を参照
def get_subscription_details_for_user(userId, STRIPE_PRICE_ID):
    subscriptions = stripe.Subscription.list(limit=100)
    for subscription in subscriptions.data:
        if subscription["items"]["data"][0]["price"]["id"] == STRIPE_PRICE_ID and subscription["metadata"].get("line_user") == userId:
            return {
                'status': subscription["status"],
                'stripeId': subscription["customer"]
            }
    return None
データをdbに入れる関数
# データをdbに入れる関数
def log_to_database(timestamp, sender, userId, stripeId, message):
    connection = get_connection()
    cursor = connection.cursor()
    try:
        query = """
        INSERT INTO line_bot_logs (timestamp, sender, lineId, stripeId, message)
        VALUES (%s, %s, %s, %s, %s);
        """
        cursor.execute(query, (timestamp, sender, userId, stripeId, message))
        connection.commit()
    except Exception as e:
        print(f"Error: {e}")
        connection.rollback()
    finally:
        cursor.close()
        connection.close()
LINEからのメッセージの処理を変更。こちらは大幅に変更して、履歴をデータベースに保存し、サブスクしていない人に対しては、1日の返信回数を数えて、上限に達したらGPTの返信は打ち止め。かつ、サブスク決裁への誘導を送る。
import datetime

# LINEからのメッセージを処理し、必要に応じてStripeの情報も確認します。
@handler.add(MessageEvent, message=TextMessage)
def handle_line_message(event):
    # event.sourceオブジェクトの属性とその値をログに出力
    for attr in dir(event.source):
        logging.info(f"Attribute: {attr}, Value: {getattr(event.source, attr)}")

    # ユーザーからのイベントの場合、ユーザーIDを出力
    userId = getattr(event.source, 'user_id', None)

    # 現在のタイムスタンプを取得
    current_timestamp = datetime.datetime.now()

    # stripeIdを取得 (userIdが存在しない場合も考慮しています)
    stripe_id = None
    if userId:
        subscription_details = get_subscription_details_for_user(userId, STRIPE_PRICE_ID)
        stripe_id = subscription_details['stripeId'] if subscription_details else None
        subscription_status = subscription_details['status'] if subscription_details else None

        # LINEからのメッセージをログに保存
        log_to_database(current_timestamp, 'user', userId, stripe_id, event.message.text)

        # ステータスがactiveなら、利用回数の制限を気にせずに応答
        if subscription_status == "active":
            reply_text = generate_gpt4_response(event.message.text)
        else:
            response_count = get_system_responses_in_last_24_hours(userId)
            if response_count < 2:
                reply_text = generate_gpt4_response(event.message.text)
            else:
                reply_text = "利用回数の上限に達しました。24時間後に再度お試しください。"
    else:
        reply_text = "エラーが発生しました。"

    # メッセージをログに保存
    log_to_database(current_timestamp, 'system', userId, stripe_id, reply_text)

    line_bot_api.reply_message(event.reply_token, TextSendMessage(text=reply_text))
え?まじでできた…
HerokuのDataclips
HerokuのDataclipsを使うと、データベースがきれいに見られて、CSVやjsonでダウンロードできるので、感動します。
Resources→Heroku Postgres→Dataclips→Create Dataclip
dataclip titleを入れて、"SELECT * FROM テーブル名"をコードに入れて、Save&Runするだけ。
6. 記憶の実装
参考にした記事
会話履歴を集めて新しいメッセージと合わせる関数
def get_conversation_history(userId):
    connection = get_connection()
    cursor = connection.cursor()
    conversations = []

    try:
        query = """
        SELECT sender, message FROM line_bot_logs
        WHERE lineId=%s AND timestamp > NOW() - INTERVAL '12 HOURS'
        ORDER BY timestamp DESC LIMIT 5;
        """
        cursor.execute(query, (userId,))
        results = cursor.fetchall()
        for result in results:
            role = 'user' if result[0] == 'user' else 'assistant'
            conversations.append({"role": role, "content": result[1]})
    except Exception as e:
        print(f"Error: {e}")
    finally:
        cursor.close()
        connection.close()

    # 最新の会話が最後に来るように反転
    return conversations[::-1]
GPTに渡す部分を生成する
def generate_gpt4_response(prompt, userId):
    sys_prompt = "You are a helpful assistant."

    headers = {
        'Content-Type': 'application/json',
        'Authorization': f'Bearer {OPENAI_API_KEY}'
    }

    # 過去の会話履歴を取得
    conversation_history = get_conversation_history(userId)
    conversation_history.append({"role": "user", "content": prompt})

    data = {
        'model': "gpt-4",
        'messages': conversation_history,
        'temperature': 1
    }

    # ... (以降のコードは変更なし)
条件ごとに応答文を生成する部分も変える。
reply_text = generate_gpt4_response(event.message.text, userId)記憶を消す方法:
ユーザが「キャンセル」と送ると、当該ユーザのデータベースのis_activeがFALSEとなる。記憶を取得するときに、TRUEだけ持ってくる。
記憶を消す関数:
def deactivate_conversation_history(userId):
    connection = get_connection()
    cursor = connection.cursor()
    try:
        query = """
        UPDATE line_bot_logs SET is_active=FALSE
        WHERE lineId=%s;
        """
        cursor.execute(query, (userId,))
        connection.commit()
    except Exception as e:
        print(f"Error: {e}")
        connection.rollback()
    finally:
        cursor.close()
        connection.close()
メッセージの処理やデータベースの処理の変更
# ... [前のコードは省略]

@handler.add(MessageEvent, message=TextMessage)
def handle_line_message(event):
    userId = getattr(event.source, 'user_id', None)

    if event.message.text == "キャンセル" and userId:
        deactivate_conversation_history(userId)
        reply_text = "記憶を消しました"
    else:
        # 現在のタイムスタンプを取得
        current_timestamp = datetime.datetime.now()

        if userId:
            subscription_details = get_subscription_details_for_user(userId, STRIPE_PRICE_ID)
            stripe_id = subscription_details['stripeId'] if subscription_details else None
            subscription_status = subscription_details['status'] if subscription_details else None

            log_to_database(current_timestamp, 'user', userId, stripe_id, event.message.text, True)  # is_activeをTrueで保存

            if subscription_status == "active":
                reply_text = generate_gpt4_response(event.message.text, userId)
            else:
                response_count = get_system_responses_in_last_24_hours(userId)
                if response_count < 2:
                    reply_text = generate_gpt4_response(event.message.text, userId)
                else:
                    reply_text = "利用回数の上限に達しました。24時間後に再度お試しください。"
        else:
            reply_text = "エラーが発生しました。"

        log_to_database(current_timestamp, 'system', userId, stripe_id, reply_text, True)  # is_activeをTrueで保存

    line_bot_api.reply_message(event.reply_token, TextSendMessage(text=reply_text))

# ... [その他の関数は以前と同じ]

def log_to_database(timestamp, sender, userId, stripeId, message, is_active=True):
    connection = get_connection()
    cursor = connection.cursor()
    try:
        query = """
        INSERT INTO line_bot_logs (timestamp, sender, lineId, stripeId, message, is_active)
        VALUES (%s, %s, %s, %s, %s, %s);
        """
        cursor.execute(query, (timestamp, sender, userId, stripeId, message, is_active))
        connection.commit()
    except Exception as e:
        print(f"Error: {e}")
        connection.rollback()
    finally:
        cursor.close()
        connection.close()

def deactivate_conversation_history(userId):
    connection = get_connection()
    cursor = connection.cursor()
    try:
        query = """
        UPDATE line_bot_logs
        SET is_active = FALSE
        WHERE lineId=%s;
        """
        cursor.execute(query, (userId,))
        connection.commit()
    except Exception as e:
        print(f"Error: {e}")
        connection.rollback()
    finally:
        cursor.close()
        connection.close()

# ... [残りのコードは省略]
main.pyの最終版
from flask import Flask, request, abort
import os
from linebot import (
    LineBotApi, WebhookHandler
)
from linebot.exceptions import (
    InvalidSignatureError
)
from linebot.models import (
    MessageEvent, TextMessage, TextSendMessage,
)
import requests
import logging
logging.basicConfig(level=logging.INFO)
logger = logging.getLogger(__name__) # stripeの情報の確認
import stripe
import psycopg2
import datetime

app = Flask(__name__)

# 環境変数取得
YOUR_CHANNEL_ACCESS_TOKEN = os.environ["YOUR_CHANNEL_ACCESS_TOKEN"]
YOUR_CHANNEL_SECRET = os.environ["YOUR_CHANNEL_SECRET"]
line_bot_api = LineBotApi(YOUR_CHANNEL_ACCESS_TOKEN)
handler = WebhookHandler(YOUR_CHANNEL_SECRET)

OPENAI_API_KEY = os.environ["OPENAI_API_KEY"]
GPT4_API_URL = 'https://api.openai.com/v1/chat/completions'

stripe.api_key = os.environ["STRIPE_SECRET_KEY"]
STRIPE_PRICE_ID = os.environ["SUBSCRIPTION_PRICE_ID"]

# db接続
def get_connection():
    dsn = f"host={os.environ['DB_HOST']} " \
          f"port=5432 " \
          f"dbname={os.environ['DB_NAME']} " \
          f"user={os.environ['DB_USER']} " \
          f"password={os.environ['DB_PASS']}"
    return psycopg2.connect(dsn)

@app.route("/")
def hello_world():
    return "hello world!"

@app.route("/callback", methods=['POST'])
def callback():
    signature = request.headers['X-Line-Signature']
    body = request.get_data(as_text=True)
    app.logger.info("Request body: " + body)
    try:
        handler.handle(body, signature)
    except InvalidSignatureError:
        abort(400)
    return 'OK'

def generate_gpt4_response(prompt, userId):
    sys_prompt = """
        You are a helpful supporter.
        """

    headers = {
        'Content-Type': 'application/json',
        'Authorization': f'Bearer {OPENAI_API_KEY}'
    }
    # 過去の会話履歴を取得
    conversation_history = get_conversation_history(userId)
    # sys_promptを会話の最初に追加
    conversation_history.insert(0, {"role": "system", "content": sys_prompt})
    # ユーザーからの最新のメッセージを追加
    conversation_history.append({"role": "user", "content": prompt})

    data = {
        'model': "gpt-4",
        'messages': conversation_history,
        'temperature': 1
    }
    # ここでconversation_historyの内容をログに出力
    app.logger.info("Conversation history sent to OpenAI: " + str(conversation_history))

    try:
        response = requests.post(GPT4_API_URL, headers=headers, json=data)
        response.raise_for_status()  # Check if the request was successful
        response_json = response.json() # This line has been moved here
        # Add this line to log the response from OpenAI API
        app.logger.info("Response from OpenAI API: " + str(response_json))
        return response_json['choices'][0]['message']['content'].strip()
    except requests.RequestException as e:
        app.logger.error(f"OpenAI API request failed: {e}")
        return "Sorry, I couldn't understand that."


def get_system_responses_in_last_24_hours(userId):
    # この関数の中でデータベースにアクセスして、指定されたユーザーに対する過去24時間以内のシステムの応答数を取得します。
    # 以下は仮の実装の例です。
    connection = get_connection()
    cursor = connection.cursor()
    try:
        query = """
        SELECT COUNT(*) FROM line_bot_logs
        WHERE sender='system' AND lineId=%s AND timestamp > NOW() - INTERVAL '24 HOURS';
        """
        cursor.execute(query, (userId,))
        result = cursor.fetchone()
        return result[0]
    except Exception as e:
        print(f"Error: {e}")
        return 0
    finally:
        cursor.close()
        connection.close()

def deactivate_conversation_history(userId):
    connection = get_connection()
    cursor = connection.cursor()
    try:
        query = """
        UPDATE line_bot_logs SET is_active=FALSE
        WHERE lineId=%s;
        """
        cursor.execute(query, (userId,))
        connection.commit()
    except Exception as e:
        print(f"Error: {e}")
        connection.rollback()
    finally:
        cursor.close()
        connection.close()

# LINEからのメッセージを処理し、必要に応じてStripeの情報も確認します。
@handler.add(MessageEvent, message=TextMessage)
def handle_line_message(event):
    userId = getattr(event.source, 'user_id', None)

    if event.message.text == "キャンセル" and userId:
        deactivate_conversation_history(userId)
        reply_text = "記憶を消しました"
    else:
        # 現在のタイムスタンプを取得
        current_timestamp = datetime.datetime.now()

        if userId:
            subscription_details = get_subscription_details_for_user(userId, STRIPE_PRICE_ID)
            stripe_id = subscription_details['stripeId'] if subscription_details else None
            subscription_status = subscription_details['status'] if subscription_details else None

            log_to_database(current_timestamp, 'user', userId, stripe_id, event.message.text, True)  # is_activeをTrueで保存

            if subscription_status == "active":
                reply_text = generate_gpt4_response(event.message.text, userId)
            else:
                response_count = get_system_responses_in_last_24_hours(userId)
                if response_count < 2:
                    reply_text = generate_gpt4_response(event.message.text, userId)
                else:
                    reply_text = "利用回数の上限に達しました。24時間後に再度お試しください。"
        else:
            reply_text = "エラーが発生しました。"

        # メッセージをログに保存
        log_to_database(current_timestamp, 'system', userId, stripe_id, reply_text, True)  # is_activeをTrueで保存

    line_bot_api.reply_message(event.reply_token, TextSendMessage(text=reply_text))

# stripeの情報を参照
def get_subscription_details_for_user(userId, STRIPE_PRICE_ID):
    subscriptions = stripe.Subscription.list(limit=100)
    for subscription in subscriptions.data:
        if subscription["items"]["data"][0]["price"]["id"] == STRIPE_PRICE_ID and subscription["metadata"].get("line_user") == userId:
            return {
                'status': subscription["status"],
                'stripeId': subscription["customer"]
            }
    return None

# Stripeの情報を確認する関数
def check_subscription_status(userId):
    return get_subscription_details_for_user(userId, STRIPE_PRICE_ID)

# データをdbに入れる関数
def log_to_database(timestamp, sender, userId, stripeId, message, is_active=True):
    connection = get_connection()
    cursor = connection.cursor()
    try:
        query = """
        INSERT INTO line_bot_logs (timestamp, sender, lineId, stripeId, message, is_active)
        VALUES (%s, %s, %s, %s, %s, %s);
        """
        cursor.execute(query, (timestamp, sender, userId, stripeId, message, is_active))
        connection.commit()
    except Exception as e:
        print(f"Error: {e}")
        connection.rollback()
    finally:
        cursor.close()
        connection.close()

# 会話履歴を参照する関数
def get_conversation_history(userId):
    connection = get_connection()
    cursor = connection.cursor()
    conversations = []

    try:
        query = """
        SELECT sender, message FROM line_bot_logs
        WHERE lineId=%s AND is_active=TRUE
        ORDER BY timestamp DESC LIMIT 5;
        """
        cursor.execute(query, (userId,))

        results = cursor.fetchall()
        for result in results:
            role = 'user' if result[0] == 'user' else 'assistant'
            conversations.append({"role": role, "content": result[1]})
    except Exception as e:
        print(f"Error: {e}")
    finally:
        cursor.close()
        connection.close()

    # 最新の会話が最後に来るように反転
    return conversations[::-1]

if __name__ == "__main__":
    port = int(os.getenv("PORT", 5000))
    app.run(host="0.0.0.0", port=port)
できた!疲れた…1週間ただひたすらのめりこんだ。
とりあえずアプリ作成はここまで。あとはシステムプロンプトを改善して…
7. ローンチに向けて
セキュリティ対策
現状clientフォルダが公開になっていて、そこのindex.htmlを読み込んで決済の導入ページにしています。決済後とキャンセル後のページも同じようにしたいと思います。
そこで、次のようなセキュリティ対策を考えます。
1. 必要最小限のファイルのみを公開: 不必要なファイルは公開ディレクトリから除く。
2. セキュリティヘッダーの設定: 例えば、Content-Security-Policy ヘッダーを設定して、クロスサイトスクリプティング(XSS)などの攻撃を防ぐ。
3. 適切なキャッシュ設定: Cache-Control ヘッダーを適切に設定する。
pakage.jsonを編集:
{
  "name": "stripe-recipe-demo",
  "version": "1.0.0",
  "description": "A Stripe demo",
  "main": "index.js",
  "scripts": {
    "start": "node server.js",
    "test": "echo \"Error: no test specified\" && exit 1"
  },
  "author": "stripe-demos",
  "license": "ISC",
  "dependencies": {
    "body-parser": "^1.19.0",
    "dotenv": "^8.0.0",
    "express": "^4.17.1",
    "request": "^2.88.2",
    "stripe": "^8.5.0",
    "react": "^17.0.0",
    "react-dom": "^17.0.0",
    "helmet": "^4.6.0"  // こちらを追加
  }
}
server.js に次のコードを追加:
const helmet = require('helmet'); // helmetを要求

app.use((req, res, next) => {
  const liffId = process.env.LIFF_ID; // 環境変数からLIFF_IDを取得
  const cspConfig = {
    directives: {
      defaultSrc: ["'self'", /* ... */],
      styleSrc: ["'self'", "'unsafe-inline'", /* ... */],
      scriptSrc: [
        "'self'",
        "'unsafe-inline'",
        , /* ... */
        "https://js.stripe.com/",
        "https://static.line-scdn.net/",
        "https://checkout.stripe.com",
        "https://js.stripe.com/",
        "https://static.line-scdn.net/"
      ],
      imgSrc: [
        "'self'",
        "https://*.stripe.com",
        "data:",
        "https://q.stripe.com",
        "https://picsum.photos/",
        "https://fastly.picsum.photos/",
        "https://storage.googleapis.com/"
      ],
      frameSrc: ["https://checkout.stripe.com", "https://js.stripe.com/"],
      connectSrc: ["'self'", "https://checkout.stripe.com", "https://app.name.herokuapp.com/", "https://api.line.me/", "https://liffsdk.line-scdn.net/"]
    },
  };

  helmet.contentSecurityPolicy(cspConfig)(req, res, next);
});

const oneDay = 86400000; // 1日(ミリ秒単位)
app.use(express.static(process.env.STATIC_DIR, {
  maxAge: oneDay,
  setHeaders: function (res, path, stat) {
    res.set('Cache-Control', 'public, max-age=86400'); // 1日キャッシュ
  }
}));

app.use(express.json());

const stripe = require("stripe")(process.env.STRIPE_SECRET_KEY);

// 以下同じ
stripeの部分は、GPT-4に聞きつつ、stripeのドキュメントを参照。
その他は、ブラウザのコンソールのエラーをGPTに渡して修正していきました。
二重決済の防止
こんなのもあるらしいんですが、stipeの顧客IDを決済前に取得するのは今回のやり方だと難しいので、一旦パス。ただ、LINE IDを使って、二重決済自体を防止する方法は、決済ページに入れたいと思います。。
決済画面の準備
ということで、決済画面のsubmitボタンで、stripeの決済ページに飛ぶ前に、stripeの検索をして、LINE ID を検索して、サブスクの状況がactiveなら決済後ページに飛ぶようにする。単純に条件を付けてリダイレクトするだけかと思ったら結構大変だった。index.js側がjsonでの返信を求めていたから、それに合わせてjsonで返して、かつ、index.js側でリダイレクト処理をしないといけなかった。
server.jsの変更
// 既存の関数でサブスクリプションの詳細を取得
async function getSubscriptionDetailsForUser(userId, STRIPE_PRICE_ID) {
  try {
    const subscriptions = await stripe.subscriptions.list({limit: 100});

    console.log("Fetched subscriptions from Stripe:", subscriptions);  // 追加

    for (const subscription of subscriptions.data) {
      const priceId = subscription.items.data[0].price.id;
      const lineUser = subscription.metadata.line_user;

      if (priceId === STRIPE_PRICE_ID && lineUser === userId) {
        console.log("Matching subscription found:", subscription);  // 追加
        return {
          status: subscription.status,
        };
      }
    }
    console.log("No matching subscription found for user:", userId);  // 追加
    return null;
  } catch (error) {
    console.error("Error fetching subscriptions:", error);
    return null;
  }
}

// Checkout Sessionを開始する
app.post("/create-checkout-session", async (req, res) => {

以下同じ

    // その他のエラーの場合
    res.status(400).send({ error: parsedBody.error_description || parsedBody.error });
      return;
    }

    userId = parsedBody.sub;
    console.log("Extracted LINE userId:", userId);

    // Stripeでサブスクリプション情報をチェック
    const subscriptionDetails = await getSubscriptionDetailsForUser(userId, process.env.SUBSCRIPTION_PRICE_ID);
    console.log('Before checking subscriptionDetails'); // リダイレクト前のログ

    if (subscriptionDetails && subscriptionDetails.status === 'active') {
      // 既にアクティブなサブスクリプションがある場合は別のURLにリダイレクト
      res.redirect('https://app.neme.herokuapp.com/success.html');
      console.log('After redirect'); // リダイレクト後のログ
     return;
    }
    console.log('No active subscription found, proceeding...'); // アクティブなサブスクリプションが見つからなかった場合のログ

    const lineItems = [
      {
        price: priceId,
        quantity: 1,
      },
    ];

以下同じ
index.jsは、stripeの初期化をグローバルで行わせるなど、全面的に改定…
let liffId;
let lineIdToken;
let stripe;

async function setupElements() {
  const res = await fetch("/publishable-key", {
    method: "GET",
    headers: {
      "Content-Type": "application/json",
    },
  });
  const data = await res.json();
  stripe = Stripe(data.publishableKey);
}

async function initializeApp() {
  // LIFFの初期化
  try {
    await liff.init({ liffId });
    if (liff.isLoggedIn()) {
      lineIdToken = liff.getIDToken();
    } else {
      window.alert("LINEアカウントにログインしてください。"); // ここに追加
      liff.login({ redirectUri: location.href });
    }
  } catch (err) {
    console.log('LIFF Initialization failed', err);
    return;
  }

  // Stripeの初期化
  try {
    await setupElements();
  } catch (err) {
    console.log('Stripe setup failed', err);
  }
}

// イベントリスナを設定
document.querySelector("#submit").addEventListener("click", handleButtonClick);

function handleButtonClick(evt) {
  evt.preventDefault();
  const donation = document.querySelector('.donation.selected');
  const donationAmount = donation ? donation.dataset.amount : 0;
  createCheckoutSession(donationAmount).then(function (response) {
  if (response.redirectUrl) { // レスポンスがURLならリダイレクト
      window.location.href = response.redirectUrl;
      return;
    }
    stripe
      .redirectToCheckout({
        sessionId: response.checkoutSessionId,
      })
      .then(function (result) {
        if (result.error) {
          console.log(result.error.message);
        }
      })
      .catch(function (err) {
        console.error('There was a problem with the fetch operation:', err.message);
        alert('エラーが発生しました。しばらくしてから再試行してください。');
      });
  });
}

var createCheckoutSession = function (donation) {
  if (!lineIdToken || !liffId) {
    console.error("Not ready to trigger createCheckoutSession");
    return;
  }
  return fetch("/create-checkout-session", {
      method: "POST",
      headers: {
          "Content-Type": "application/json",
      },
      body: JSON.stringify({
          donation: donation * 100,
          token: lineIdToken,
          liffid: liffId
      }),
  })
  .then(function (response) {
      if (response.status === 401) {
          return response.json().then(data => {
              if (data.action === "relogin") {
                alert("セッションがタイムアウトしました。再度ログインしてください。");
                liff.login({ redirectUri: location.href });
              }
              throw new Error(data.error);
          });
      }
      return response.json();
  });
};

// LIFF IDを取得して初期化処理を行う
fetch("/get-liff-id")
  .then(response => response.json())
  .then(data => {
    liffId = data.liffId;
    initializeApp();
  })
  .catch(error => console.error("Error fetching LIFF ID:", error));
なお、本番時はログの出力をコメントアウトするのを消すのをお忘れなく!
決済画面には規約へのリンク、キャンセルのURL、一応無料体験への誘導ボタンも載せます。
キャンセルリンクは、シンプルには、stripeからカスタマーポータルを有効化して、リンクを貼ればいいと思います。
毎回(テストから本番に移行するたびに)HTMLを編集するのが面倒であれば、server.jsにappを記載して、index.jsで、index.htmlのクリックをきっかけに環境変数を参照して、リンク先を開かせてという方法もありますが、今のところ、その気力はありません…
規約・プライバシーポリシーについては、index.htmlに直接次のように記載することで、チェックしなければsubmitが押せないようになります。
<label class="sr-checkbox-label"><br><input id="agree-terms" type="checkbox"><br>利用規約とプライバシーポリシーに同意する<br></label>
<br>
<button id="submit" disabled="disabled">購入する</button>

<script>
    const checkbox = document.getElementById('agree-terms');
    const submitButton = document.getElementById('submit');

    checkbox.addEventListener('change', function() {
        if (this.checked) {
            submitButton.disabled = false;
        } else {
            submitButton.disabled = true;
        }
    });
</script>
決済後、キャンセル後画面の準備
決済後画面は、通常決済後に行きますが、activeなのに購入ボタンを押した人も行くことになります。そこで、「サブスクは有効です」という表示と、アプリへの誘導、キャンセルURLへの誘導を載せたいと思います。
キャンセル画面はサブスクをキャンセルした後に行く画面です。利用へのお礼とアプリ(無料利用)への誘導としたいと思います。
利用規約・プライバシーポリシーの整備
利用規約とプライバシーポリシーは、index.htmlの中に入れちゃいました!
アクセスのしやすさを考えるとNotionなんかを使うのもありですね。
LINE公式アカウントのリッチメニューの設定
最後の最後、LINE公式アカウントのリッチメニューを設定しましょう。
最低2つのボタンで、1つはサブスク・利用規約、もう一つはリセットボタンでしょうか。
この辺りが参考になります。
テキスト入りの画像づくりは、やはりcanvaかと思います。
また、デフォルトのメニューバーの「メニュー▽」って、わかりづらいですよね。「ここをタップ」とかにすると、自然とタップしてくれていいと思います。もしくは、「👈トークは⌨から」とか。
Stripeのキーを変える
ここで3時間ぐらい溶かしました。Stripeは、価格IDだけじゃなく、パブリックキーとシークレットキーも、テスト環境と本番環境で違います。価格IDだけ変えて、よし本番だ!と思ったら全然動かない…しかも、jsonファイルが適切な形じゃないというエラーで、全然気づきませんでした。たまたまHerokuのログを出したら、テストモードではその価格IDはないと言われて気づいた。つらかった…
8. 倫理面の配慮
一応、当社の専門は心理学なので、「心理支援」に関わる倫理面の配慮についても触れておきます。
まず、大前提として、LINEボットは、通常は専門的な心理支援の提供を目的としているものではありません。試験的にそのような取り組みも行われてきていますが、あくまで試験的に、細心の注意を払って、専門家の監修のもと進められるべきだと思います。
LINEを用いた同期型のチャット相談については、徐々に専門的な支援のチャンネルとして認められてきていますが、それとは別物であるという認識が必要であり、利用者に専門的な支援を受けられると誤認させるような説明は避けるべきです。
日本心理学会の遠隔心理支援に関する情報はこのページから確認できます。
専門的な心理支援を提供しないと伝えても、リスクのある方の利用を完全に妨げることはできません。理想的には、チャットボットの仕組みとして特定のキーワードや内容を探知し、アラート出したり、専門機関への相談を勧めるような仕組みが備わっているといいと思います。
最後に
ご購入いただきありがとうございました!ご満足いただけていれば幸いです。技術的なサポートは難しいですが、ご質問などありましたら、できるだけお答えさせていただきます。専門の方からのコメントも大歓迎です!
おまけ
Discordボットの作り方
OpenAI 最新モデルへの対応2023年11月
※これは一般的な話です。なんと、当LINEボットは、APIエンドポイントに直接投げているせいか、下記の修正不要で、モデル名を "gpt-4-1106-preview" に変えるだけでいけました!
プロジェクトディレクトリに移動
【ローカルのコマンド】

cd path/to/your/project
まずはGithubから最新版をプル
【ローカルのコマンド】

git pull origin master
※masterはmainの場合も
コードの更新→Githubへプッシュ
【ローカルのコマンド】

pip install --upgrade openai
openai migrate

git push heroku master
ちなみに今はmainが主流のようで、masterをmainに変えたいなら次のようにする。
【ローカルのコマンド】

git branch -m master main
git push heroku main
結局、どんな修正があったかというと、こんな感じ
1. import openai を from openai import OpenAI に変更
2. client = OpenAI(api_key=openai_api_key)
※Herokuの場合は、openai_api_key = getenv('OPENAI_API_KEY')をこの前に加える必要がある
3. openai.ChatCompletion.create は client.chat.completions.create に変更
※あと、runtime.txt を python-3.10.13 に変えないと動きませんでした!
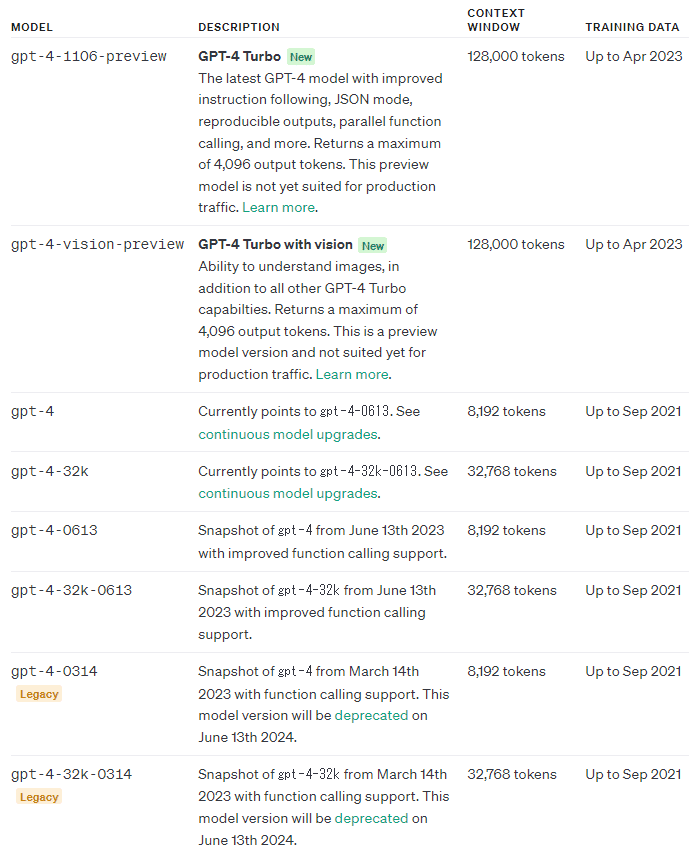
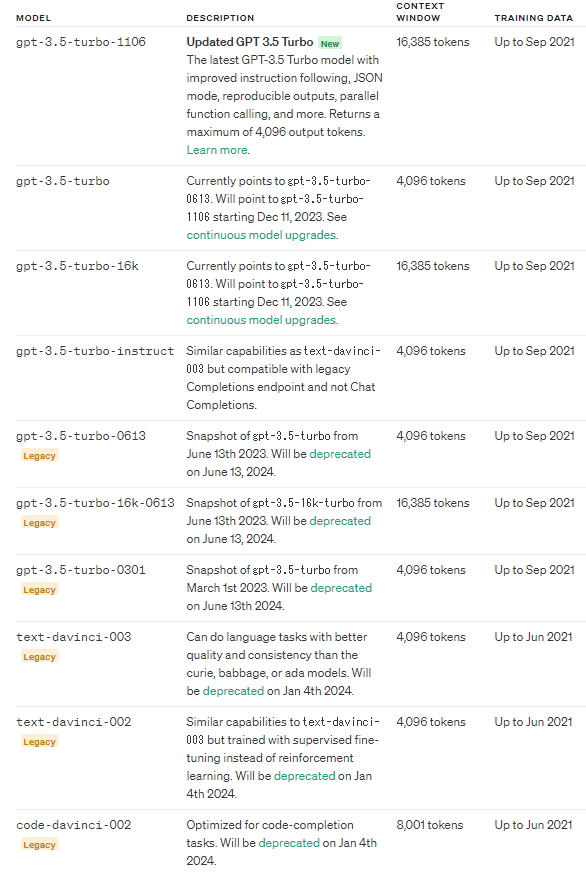
ついでにモデルも最新版に変えましょう!
https://platform.openai.com/docs/models/gpt-4-and-gpt-4-turbo
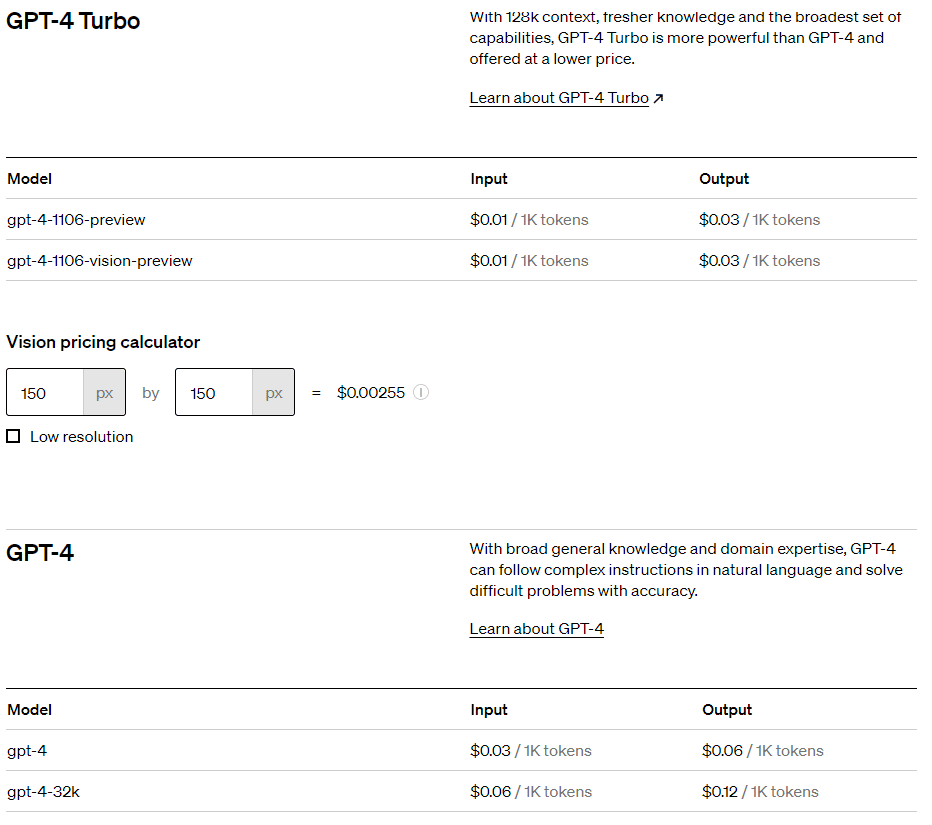
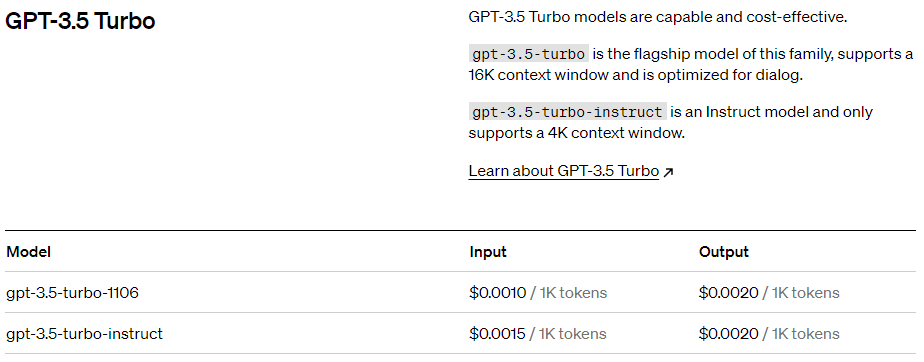
値段
ここから先は

(同)実践サイコロジー研究所は、心理学サービスの国内での普及を目指しています! 『適切な支援をそれを求めるすべての人へ』