
React Native の React Nativation の使い方

「React Native」の「React Navigation」の使い方をまとめました。
前回
1. React Navigation
「React Navigation」は、「React Native」アプリの画面遷移を実装するためのライブラリです。
・Stack : 画面を積み上げて画面遷移。
・Drawer : 画面端のスライドメニューの項目選択で画面遷移。
・BottomTab : 画面下部にタブバーの項目選択で画面遷移。
1. Stackの使い方
「Stack」の使い方は、次のとおりです。
1-1. プロジェクトの作成
(1) プロジェクトの作成。
npx react-native init my_app
cd my_app
(2) パッケージのインストール。
npm install @react-navigation/native @react-navigation/stack
npm install react-native-screens react-native-safe-area-context
npm install react-native-gesture-handler
1-2. iOSのセットアップ
(1) podのインストール。
cd ios
pod install
cd ..
(2) workspaceを開き、署名し、iPhoneにインストールできることを確認。
1-3. Stackの使い方
今回の「画面構成」とコードの構成は、次のとおりです。

・App.tsx : アプリルート
・Main : Stack[2]
・index.tsx : Mainの画面構成
・home.tsx : Home画面
・detail.tsx : Detail画面
(1) コードの編集。
「App.tsx」を編集し、「Main」フォルダを作成し、「index.tsx」「home.tsx」「detail.tsx」を追加します。
・App.tsx
import React from 'react';
import { NavigationContainer } from '@react-navigation/native';
import Main from './Main';

// アプリ
function App() {
  return (
    <NavigationContainer>
      <Main/>
    </NavigationContainer>
  );
}

export default App;
・Main/index.tsx
import React from 'react';
import { createStackNavigator, CardStyleInterpolators } from '@react-navigation/stack';
import HomeScreen from './home';
import DetailScreen from './detail';

// Stackの準備
const Stack = createStackNavigator();

// Mainの画面構成
function Main() {
  return (
    <>
      <Stack.Navigator
        initialRouteName="Home画面"
        screenOptions={{
          cardStyleInterpolator: CardStyleInterpolators.forHorizontalIOS,
        }}>
        <Stack.Screen name="Home画面" component={HomeScreen} />
        <Stack.Screen name="Detail画面" component={DetailScreen} />
      </Stack.Navigator>
    </>
  );
}

export default Main;
・Main/home.tsx
import { View, Text, Button } from 'react-native';

// Home画面
// @ts-ignore
function HomeScreen({ navigation }) {
  return (
    <View style={{ flex: 1, alignItems: 'center', justifyContent: 'center' }}>
      <Text>Home画面</Text>
      <Button
        title='Detail画面に遷移'
        onPress={() => navigation.navigate('Detail画面')}
      />
    </View>
  );
}

export default HomeScreen;
・Main/detail.tsx
import { View, Text, Button } from 'react-native';

// Detail画面
// @ts-ignore
function DetailScreen({ navigation }) {
  return (
    <View style={{ flex: 1, alignItems: 'center', justifyContent: 'center' }}>
      <Text>Detail画面</Text>
      <Button
        title='Home画面に戻る'
        onPress={() => navigation.goBack()}
      />
    </View>
  );
}

export default DetailScreen;
(2) 実行。
npm start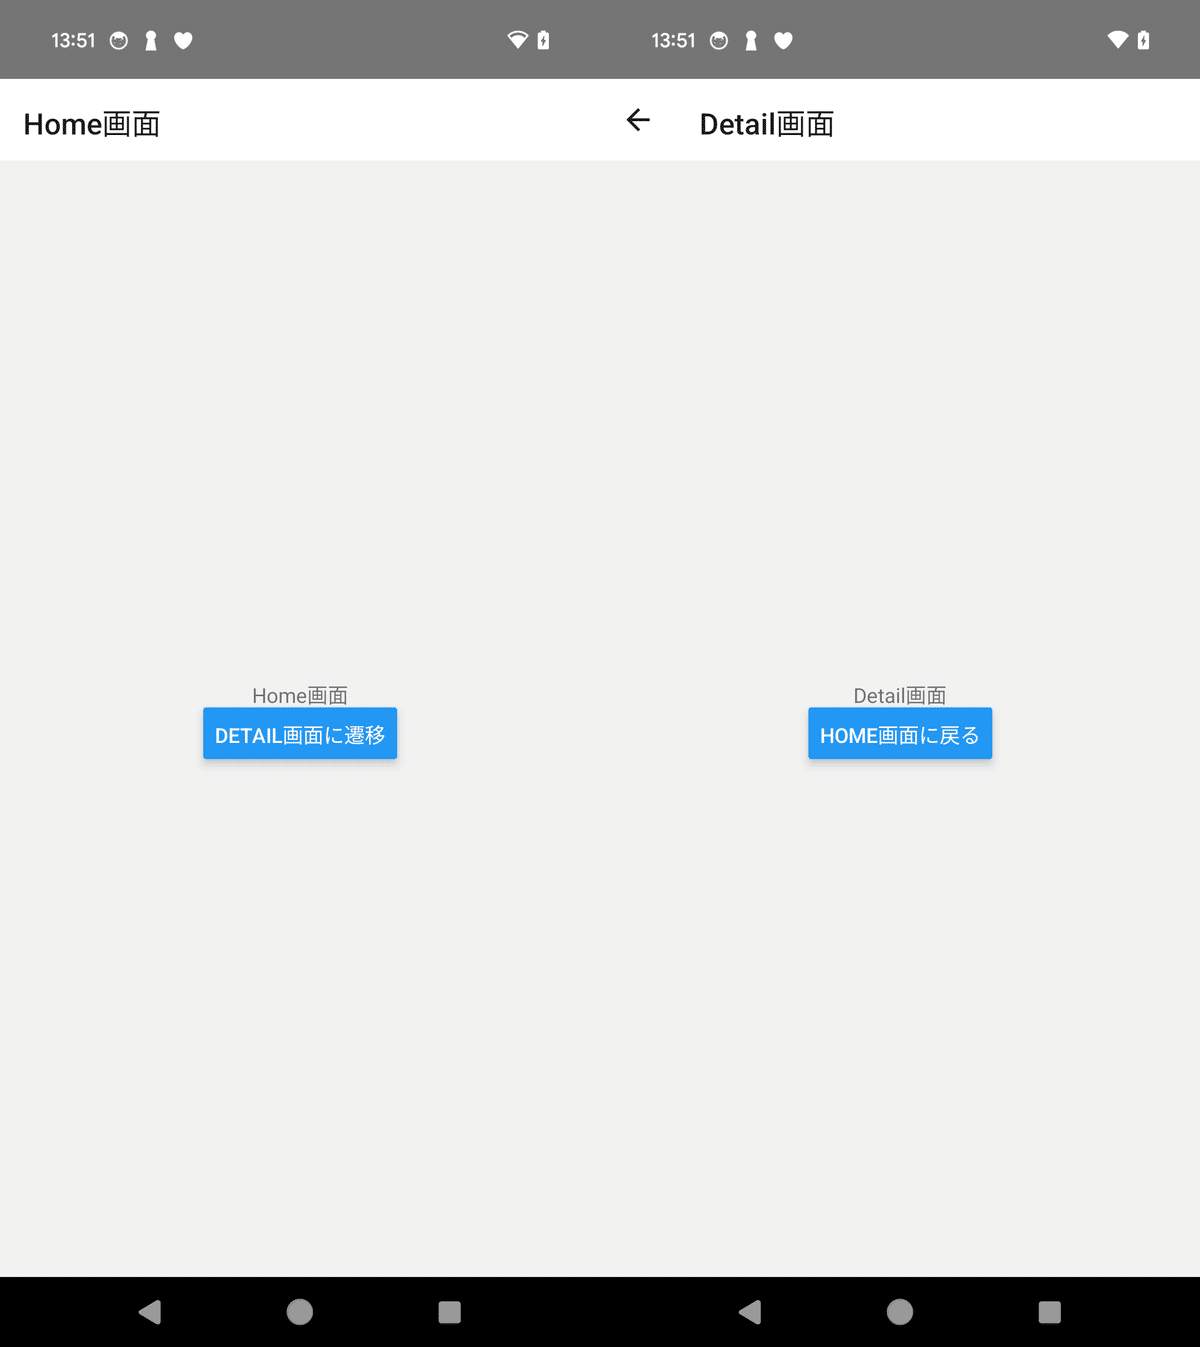
2. Drawerの使い方
「Drawer」の使い方は、次のとおりです。
2-1. プロジェクトの作成
(1) プロジェクトの作成。
npx react-native init my_app
cd my_app
(2) パッケージのインストール。
npm install @react-navigation/native @react-navigation/stack
npm install react-native-screens react-native-safe-area-context
npm install react-native-gesture-handler

npm install @react-navigation/drawer
npm install react-native-reanimated
(3) 「babel.config.js」に以下の設定を追加。
「Babel」はJavaScriptのコードを変換して、様々な環境で動作するようにするツールです。今回は、「React Native Reanimated」で、アニメーションに関するコードを最適化するプラグインを追加しています。
・babel.config.js
module.exports = {
  presets: ['module:@react-native/babel-preset'],
  plugins: [
    'react-native-reanimated/plugin', // これを追加
  ],
};
2-2. iOSのセットアップ
(1) podのインストール。
cd ios
pod install
cd ..
(2) workspaceを開き、署名し、iPhoneにインストールできることを確認。
2-3. Drawerの使い方
今回の「画面構成」とコードの構成は、次のとおりです。
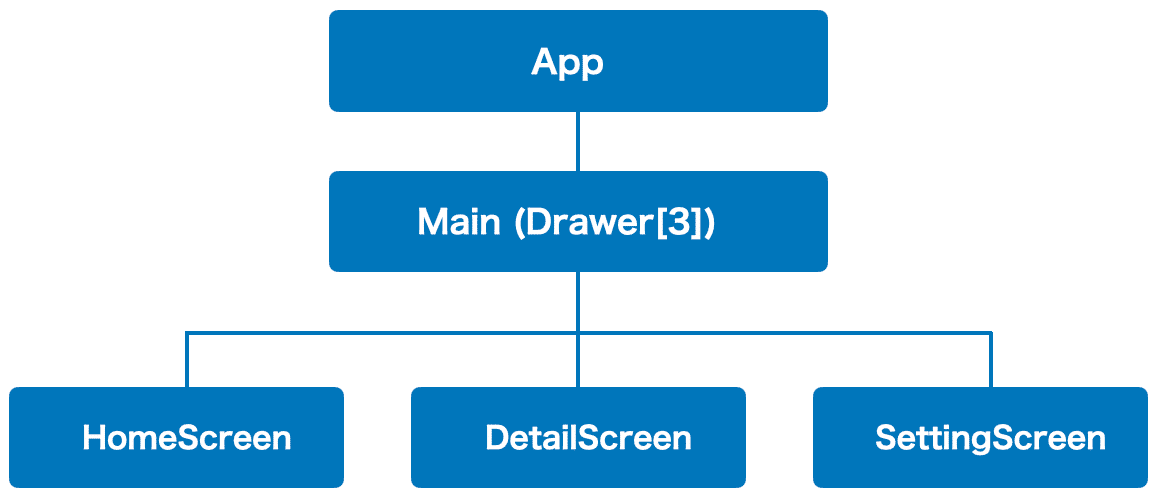
・App.tsx : アプリルート
・Main : Drawer[3]
・index.tsx : Mainの画面構成
・home.tsx : Home画面
・detail.tsx : Detail画面
・setting.tsx : Setting画面
(1) コードの編集。
「App.tsx」を編集し、「Main」フォルダを作成し、「index.tsx」「home.tsx」「detail.tsx」「setting.tsx」を追加します。
・App.tsx
import React from 'react';
import { NavigationContainer } from '@react-navigation/native';
import Main from './Main';

// アプリ
function App() {
  return (
    <NavigationContainer>
      <Main/>
    </NavigationContainer>
  );
}

export default App;
・Main/index.tsx
import React from 'react';
import { createDrawerNavigator } from '@react-navigation/drawer';
import HomeScreen from './home';
import DetailScreen from './detail';
import SettingScreen from './setting';

// Drawerの準備
const Drawer = createDrawerNavigator();

// Mainの画面構成
function Main() {
  return (
    <>
      <Drawer.Navigator initialRouteName="Home画面">
        <Drawer.Screen name="Home画面" component={HomeScreen} />
        <Drawer.Screen name="Detail画面" component={DetailScreen} />
        <Drawer.Screen name="Setting画面" component={SettingScreen} />
      </Drawer.Navigator>
    </>
  );
}

export default Main;
・Main/home.tsx
import { View, Text } from 'react-native';

// Home画面
// @ts-ignore
function HomeScreen({ navigation }) {
  return (
    <View style={{ flex: 1, alignItems: 'center', justifyContent: 'center' }}>
      <Text>Home画面</Text>
    </View>
  );
}

export default HomeScreen;
・Main/detail.tsx
import { View, Text } from 'react-native';

// Detail画面
// @ts-ignore
function DetailScreen({ navigation }) {
  return (
    <View style={{ flex: 1, alignItems: 'center', justifyContent: 'center' }}>
      <Text>Detail画面</Text>
    </View>
  );
}

export default DetailScreen;
・Main/setting.tsx
import { View, Text } from 'react-native';

// Setting画面コンポーネント
// @ts-ignore
function DetailScreen({ navigation }) {
  return (
    <View style={{ flex: 1, alignItems: 'center', justifyContent: 'center' }}>
      <Text>Setting画面</Text>
    </View>
  );
}

export default DetailScreen;
(2) コードの実行。
npm start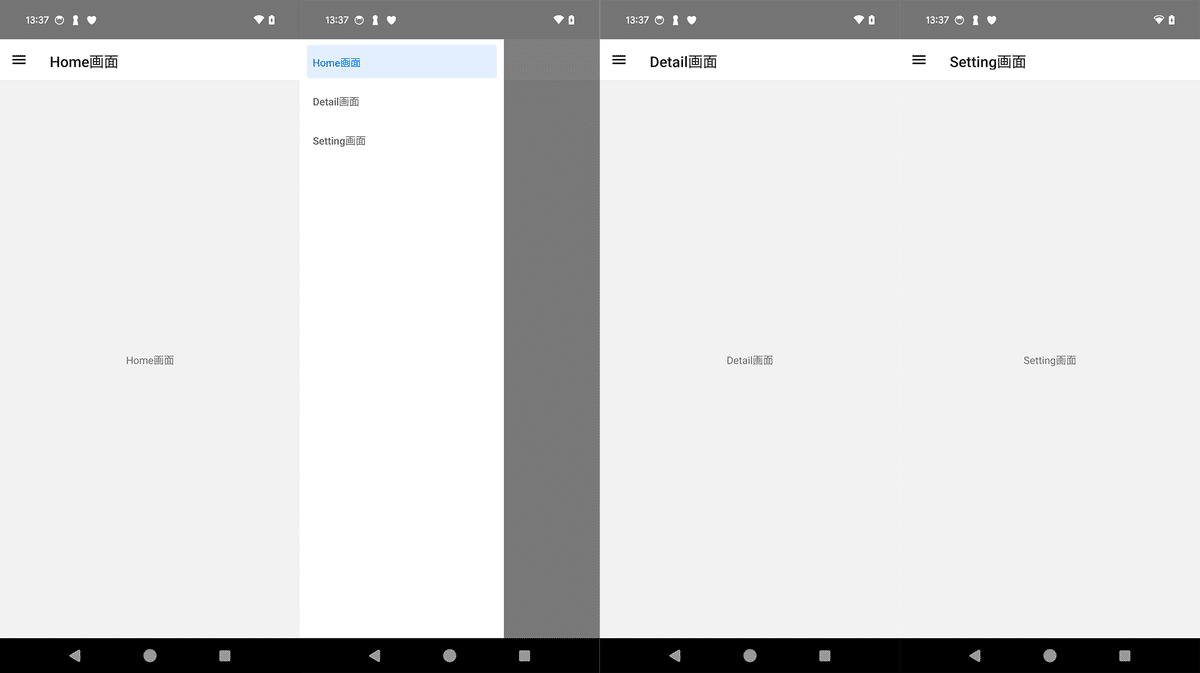
3. BottomTab の使い方
「BottomTab」の使い方は、次のとおりです。
3-1. プロジェクトの準備
(1) プロジェクトの作成。
npx react-native init my_app
cd my_app
(2) パッケージのインストール。
npm install @react-navigation/native @react-navigation/stack
npm install react-native-screens react-native-safe-area-context
npm install react-native-gesture-handler

npm install @react-navigation/bottom-tabs
npm install react-native-vector-icons
npm install --save-dev @types/react-native-vector-icons
3-2. Androidのセットアップ
(1) android/app/build.gradle(NOT android/build.gradle)に以下の設定を追加。
apply from: file("../../node_modules/react-native-vector-icons/fonts.gradle")3-3. iOSのセットアップ
(1) podのインストール。
cd ios
pod install
cd ..
(2) workspaceを開き、署名し、iPhoneにインストールできることを確認。
(3) 「Info.plist」に以下の項目を追加。
<key>UIAppFonts</key>
<array>
  <string>AntDesign.ttf</string>
  <string>Entypo.ttf</string>
  <string>EvilIcons.ttf</string>
  <string>Feather.ttf</string>
  <string>FontAwesome.ttf</string>
  <string>FontAwesome5_Brands.ttf</string>
  <string>FontAwesome5_Regular.ttf</string>
  <string>FontAwesome5_Solid.ttf</string>
  <string>FontAwesome6_Brands.ttf</string>
  <string>FontAwesome6_Regular.ttf</string>
  <string>FontAwesome6_Solid.ttf</string>
  <string>Foundation.ttf</string>
  <string>Ionicons.ttf</string>
  <string>MaterialIcons.ttf</string>
  <string>MaterialCommunityIcons.ttf</string>
  <string>SimpleLineIcons.ttf</string>
  <string>Octicons.ttf</string>
  <string>Zocial.ttf</string>
  <string>Fontisto.ttf</string>
</array>
3-4. BottomTab の使い方
今回の「画面構成」とコードの構成は、次のとおりです。
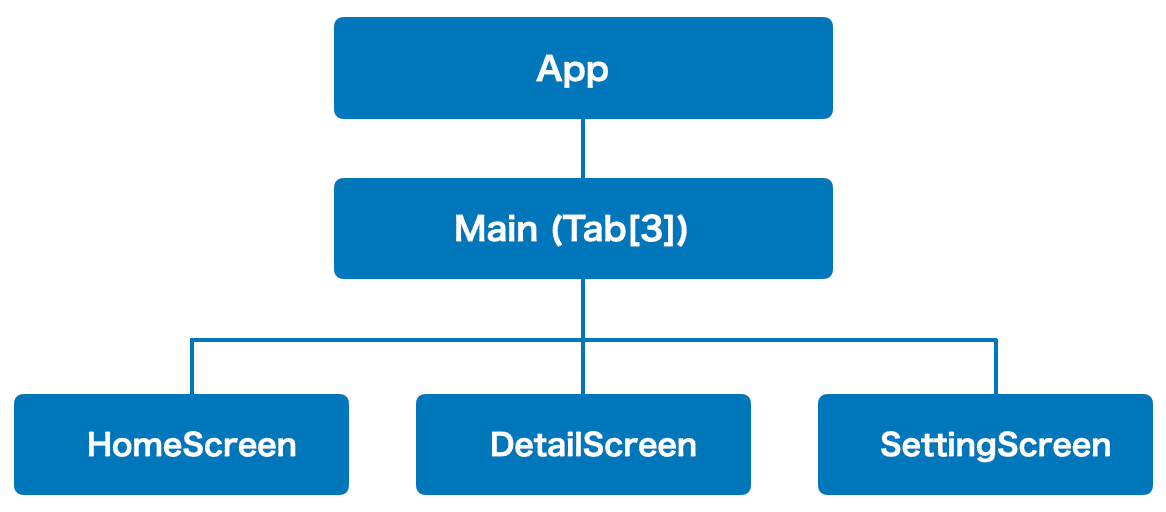
・App.tsx : アプリルート
・Main : Tab[3]
・index.tsx : Mainの画面構成
・home.tsx : Home画面
・detail.tsx : Detail画面
・setting.tsx : Setting画面
(1) コードの編集。
「App.tsx」を編集し、「Main」フォルダを作成し、「index.tsx」「home.tsx」「detail.tsx」「setting.tsx」を追加します。
・App.tsx
import React from 'react';
import { NavigationContainer } from '@react-navigation/native';
import Main from './Main';

// アプリ
function App() {
  return (
    <NavigationContainer>
      <Main/>
    </NavigationContainer>
  );
}

export default App;
・Main/index.tsx
import React from 'react';
import { createBottomTabNavigator } from '@react-navigation/bottom-tabs';
import Icon from 'react-native-vector-icons/Ionicons';
import HomeScreen from './home';
import DetailScreen from './detail';
import SettingScreen from './setting';

// Tabの準備
const Tab = createBottomTabNavigator();

// Mainの画面構成
function Main() {
  return (
    <>
      <Tab.Navigator
        initialRouteName="Home画面"
        screenOptions={({ route }) => ({
          tabBarIcon: ({ focused, color, size }) => {
            const icons: any = {
              'Home画面': 'home',
              'Detail画面': 'notifications',
              'Setting画面': 'albums'
            };
            const iconName = `${icons[route.name]}${focused ? '' : '-outline'}`;
            return <Icon name={iconName} size={size} color={color} />;
          },
        })}
      >
        <Tab.Screen name="Home画面" component={HomeScreen} />
        <Tab.Screen name="Detail画面" component={DetailScreen} />
        <Tab.Screen name="Setting画面" component={SettingScreen} />
      </Tab.Navigator>
    </>
  );
}

export default Main;
アイコンの種類は以下を参照。
・Main/home.tsx
import { View, Text } from 'react-native';

// Home画面コンポーネント
// @ts-ignore
function HomeScreen({ navigation }) {
  return (
    <View style={{ flex: 1, alignItems: 'center', justifyContent: 'center' }}>
      <Text>Home画面</Text>
    </View>
  );
}

export default HomeScreen;
・Main/detail.tsx
import { View, Text } from 'react-native';

// Detail画面コンポーネント
// @ts-ignore
function DetailScreen({ navigation }) {
  return (
    <View style={{ flex: 1, alignItems: 'center', justifyContent: 'center' }}>
      <Text>Detail画面</Text>
    </View>
  );
}

export default DetailScreen;
・Main/option.tsx
import { View, Text } from 'react-native';

// Setting画面コンポーネント
// @ts-ignore
function DetailScreen({ navigation }) {
  return (
    <View style={{ flex: 1, alignItems: 'center', justifyContent: 'center' }}>
      <Text>Setting画面</Text>
    </View>
  );
}

export default DetailScreen;
(2) コードの実行。
npm start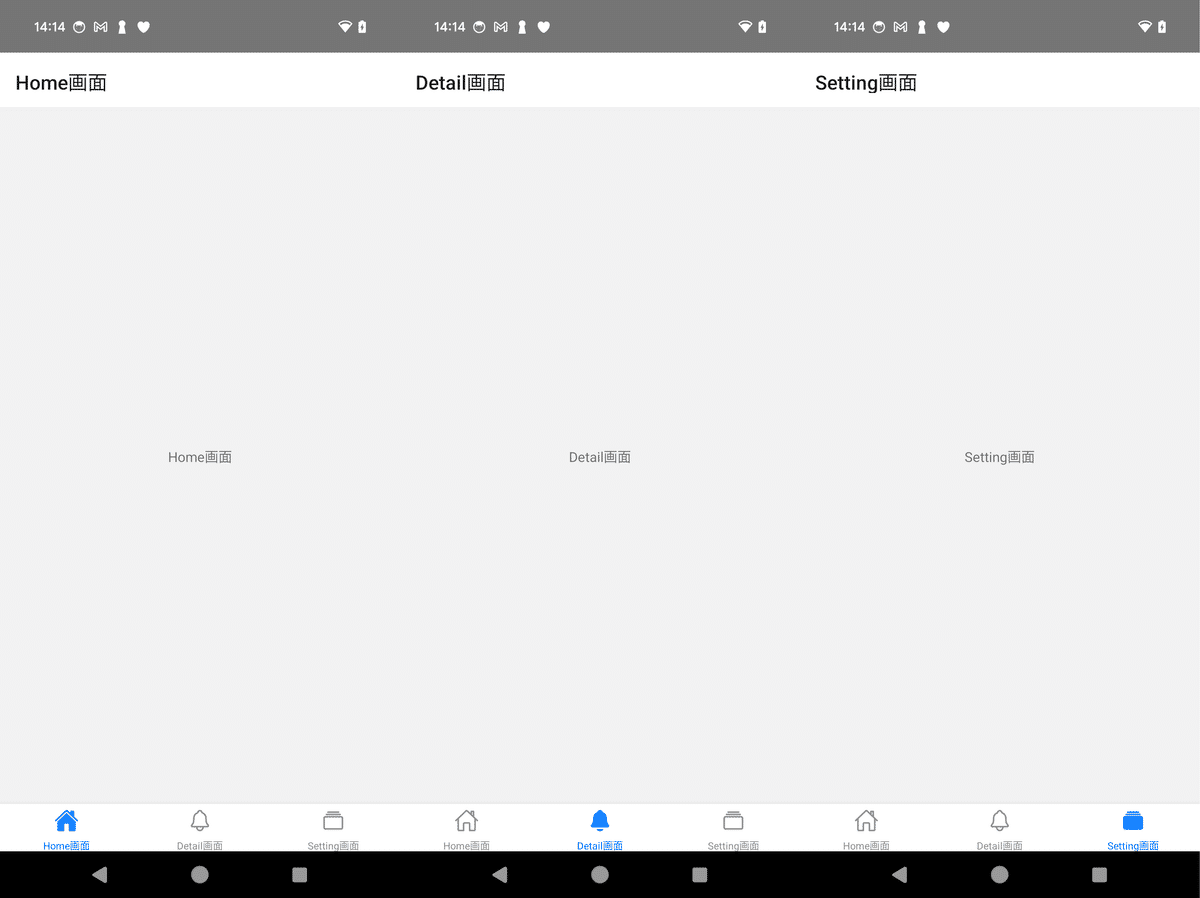
4. Stack + Drawer + BottomTab の使い方
今回の「画面構成」とコードの構成は、次のとおりです。
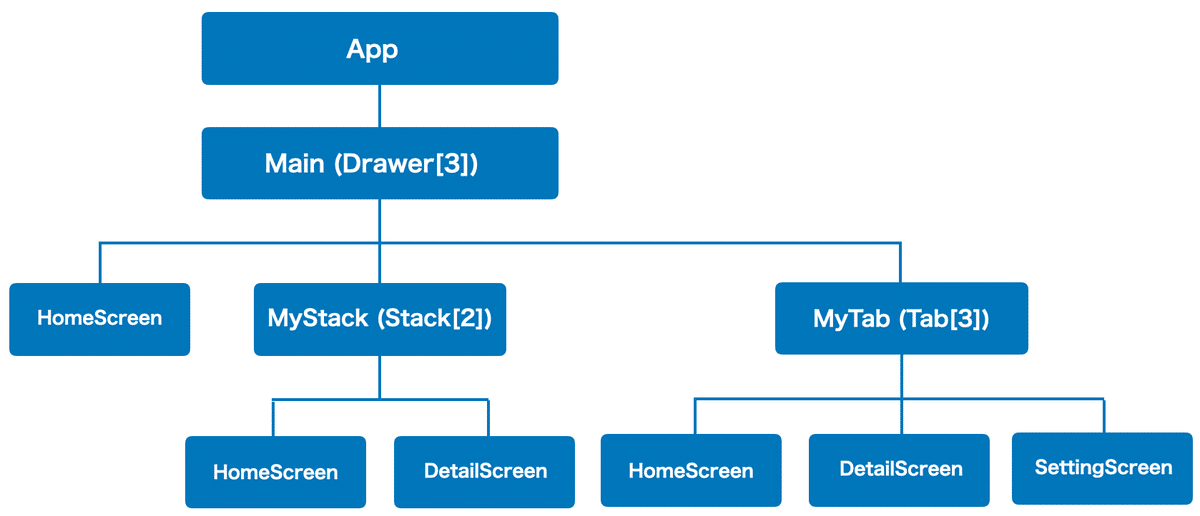
・App.tsx : アプリルート
・Main : Drawer[3]
・index.tsx : Mainの画面構成
・home.tsx : Home画面
・MyStack : Stack[2]
・index.tsx : MyStackの画面構成
・home.tsx : Home画面
・detail.tsx : Detail画面
・MyTab : Tab[3]
・index.tsx : MyStackの画面構成
・home.tsx : Home画面
・detail.tsx : Detail画面
・setting.tsx : Setting画面
(1) 「App.tsx」と「Main」フォルダのコードの編集。
・App.tsx
import React from 'react';
import { NavigationContainer } from '@react-navigation/native';
import Main from './Main';

// アプリ
function App() {
  return (
    <NavigationContainer>
      <Main/>
    </NavigationContainer>
  );
}

export default App;
・Main/index.tsx
import React from 'react';
import { createDrawerNavigator } from '@react-navigation/drawer';
import HomeScreen from './home';
import MyStack from './MyStack';
import MyTab from './MyTab';

// Drawerの準備
const Drawer = createDrawerNavigator();

// Mainの画面構成
function Main() {
  return (
    <>
      <Drawer.Navigator initialRouteName="Home画面">
        <Drawer.Screen name="Home画面" component={HomeScreen} />
        <Drawer.Screen name="MyStack" component={MyStack} />
        <Drawer.Screen name="MyTab" component={MyTab} />
      </Drawer.Navigator>
    </>
  );
}

export default Main;
・Main/home.tsx
import { View, Text } from 'react-native';

// Home画面コンポーネント
// @ts-ignore
function HomeScreen({ navigation }) {
  return (
    <View style={{ flex: 1, alignItems: 'center', justifyContent: 'center' }}>
      <Text>Home画面</Text>
    </View>
  );
}

export default HomeScreen;
(2) 「MyStack」フォルダのコードの編集。
・Main/MyStack/index.tsx
import React from 'react';
import { createStackNavigator, CardStyleInterpolators } from '@react-navigation/stack';
import HomeScreen from './home';
import DetailScreen from './detail';

// Stackの準備
const Stack = createStackNavigator();

// MyStackの画面構成
function MyStack() {
  return (
    <>
      <Stack.Navigator
        initialRouteName="Home画面"
        screenOptions={{
          cardStyleInterpolator: CardStyleInterpolators.forHorizontalIOS,
        }}>
        <Stack.Screen name="Home画面" component={HomeScreen} />
        <Stack.Screen name="Detail画面" component={DetailScreen} />
      </Stack.Navigator>
    </>
  );
}

export default MyStack;
・Main/MyStack/home.tsx
import { View, Text, Button } from 'react-native';

// Home画面
// @ts-ignore
function HomeScreen({ navigation }) {
  return (
    <View style={{ flex: 1, alignItems: 'center', justifyContent: 'center' }}>
      <Text>Home画面</Text>
      <Button
        title='Detail画面に遷移'
        onPress={() => navigation.navigate('Detail画面')}
      />
    </View>
  );
}

export default HomeScreen;
・Main/MyStack/detail.tsx
import { View, Text, Button } from 'react-native';

// Detail画面
// @ts-ignore
function DetailScreen({ navigation }) {
  return (
    <View style={{ flex: 1, alignItems: 'center', justifyContent: 'center' }}>
      <Text>Detail画面</Text>
      <Button
        title='Home画面に戻る'
        onPress={() => navigation.goBack()}
      />
    </View>
  );
}

export default DetailScreen;
(3) 「MyTab」フォルダのコードの編集。
・Main/MyTab/index.tsx
import React from 'react';
import { NavigationContainer } from '@react-navigation/native';
import { createBottomTabNavigator } from '@react-navigation/bottom-tabs';
import Icon from 'react-native-vector-icons/Ionicons';
import HomeScreen from './home';
import DetailScreen from './detail';
import SettingScreen from './setting';

// Tabの準備
const Tab = createBottomTabNavigator();

// MyTabの画面構成
function MyTab() {
  return (
    <>
      <Tab.Navigator
        initialRouteName="Home画面"
        screenOptions={({ route }) => ({
          tabBarIcon: ({ focused, color, size }) => {
            const icons: any = {
              'Home画面': 'home',
              'Detail画面': 'notifications',
              'Setting画面': 'albums'
            };
            const iconName = `${icons[route.name]}${focused ? '' : '-outline'}`;
            return <Icon name={iconName} size={size} color={color} />;
          },
        })}
      >
        <Tab.Screen name="Home画面" component={HomeScreen} />
        <Tab.Screen name="Detail画面" component={DetailScreen} />
        <Tab.Screen name="Setting画面" component={SettingScreen} />
      </Tab.Navigator>
    </>
  );
}

export default MyTab;
・Main/MyTab/home.tsx
import { View, Text } from 'react-native';

// Home画面
// @ts-ignore
function HomeScreen({ navigation }) {
  return (
    <View style={{ flex: 1, alignItems: 'center', justifyContent: 'center' }}>
      <Text>Home画面</Text>
    </View>
  );
}

export default HomeScreen;
・Main/MyTab/detail.tsx
import { View, Text } from 'react-native';

// Detail画面
// @ts-ignore
function DetailScreen({ navigation }) {
  return (
    <View style={{ flex: 1, alignItems: 'center', justifyContent: 'center' }}>
      <Text>Detail画面</Text>
    </View>
  );
}

export default DetailScreen;
・Main/MyTab/setting.tsx
import { View, Text } from 'react-native';

// Setting画面
// @ts-ignore
function DetailScreen({ navigation }) {
  return (
    <View style={{ flex: 1, alignItems: 'center', justifyContent: 'center' }}>
      <Text>Setting画面</Text>
    </View>
  );
}

export default DetailScreen;
(4) コードの実行。
npm start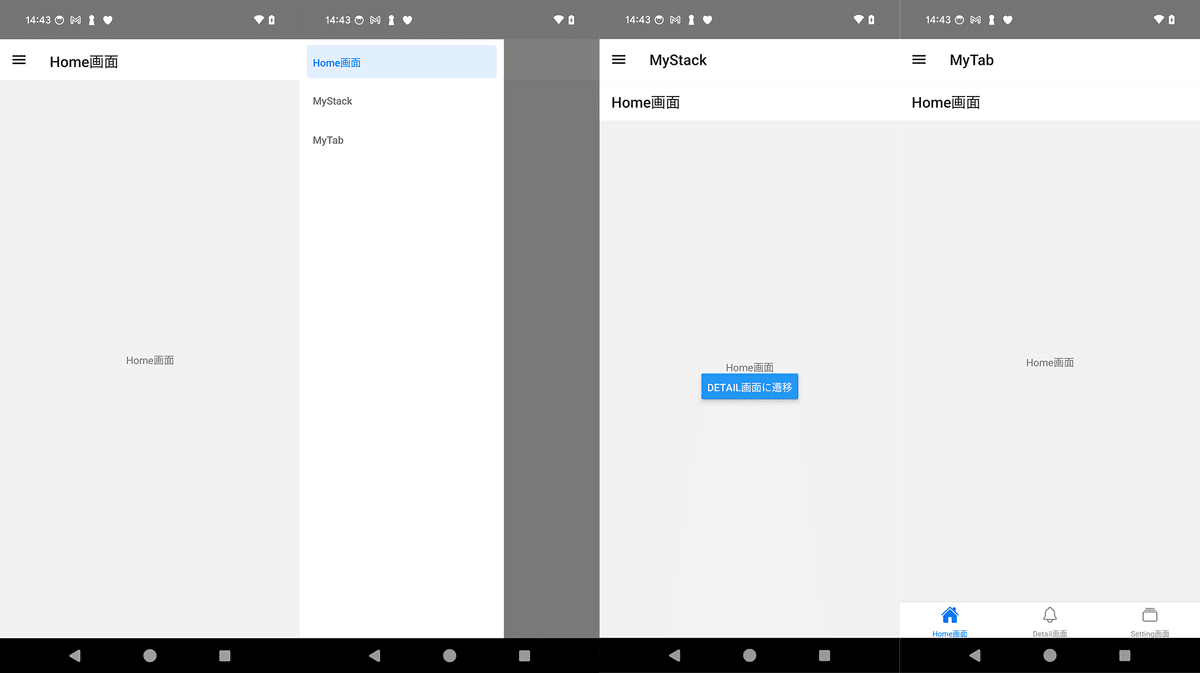
【おまけ】 キャッシュ削除とリビルド
npm start -- --reset-cachecd ios
pod install
cd ..cd android
./gradlew clean
./gradlew build
cd ..