
Google Colab で はじめる Stable Diffusion v1.4 (2) - img2img

「Google Colab」で「Stable Diffusion」のimg2imgを行う方法をまとめました。
・Stable Diffusion v1.4
・diffusers 0.3.0
前回
1. img2img
「Stable Diffusion」は、テキストから画像を生成する、高性能な画像生成AIです。テキストからだけでなく、テキストと入力画像を渡して画像を生成することもできます。
2. ライセンスの確認
以下と同様です。
3. HuggingFaceのトークンの取得
以下と同様です。
4. テキストと入力画像で画像生成
テキストと入力画像を渡して画像生成する手順は、次のとおりです。
(1) メニュー「編集→ノートブックの設定」で、「ハードウェアアクセラレータ」に「GPU」を選択。
(2) 「Stable Diffusion」のインストール。
# パッケージのインストール
!pip install --upgrade diffusers==0.3.0 transformers scipy
(3) トークン変数の準備。
以下の「<HugginFace Hubのトークン>」の部分に、HuggingFace Hubのトークンをコピー&ペーストします。
# トークン変数の準備
YOUR_TOKEN="<HugginFace Hubのトークン>"
(4) StableDiffusionImg2Imgパイプラインの準備。
import torch
from diffusers import StableDiffusionImg2ImgPipeline

# StableDiffusionImg2Imgパイプラインの準備
pipe = StableDiffusionImg2ImgPipeline.from_pretrained(
    "CompVis/stable-diffusion-v1-4",
    revision="fp16",
    torch_dtype=torch.float16,
    use_auth_token=YOUR_TOKEN
).to("cuda")
(5) 入力画像のアップロード。
現在の作業フォルダ(/content)の直下に、入力画像(input.png)をアップロードします。
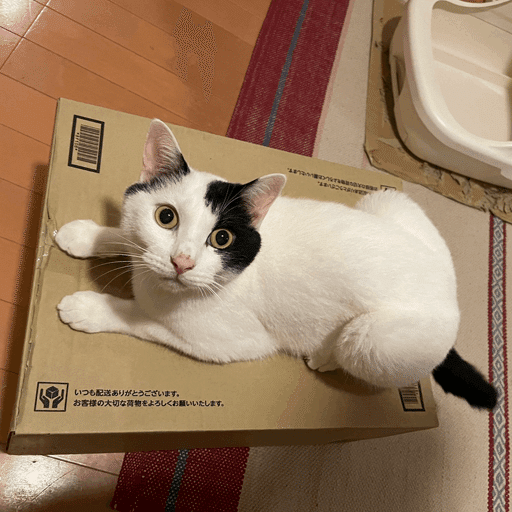
(6) テキストと入力画像を渡して出力画像を生成。
from PIL import Image
from torch import autocast
# 画像生成
init_image = Image.open("input.png").convert("RGB")
init_image = init_image.resize((512, 512))
prompt = "cat of ukiyoe style"
with autocast("cuda"):
images = pipe(
prompt=prompt, # プロンプト
init_image=init_image, # 入力画像
strength=0.75, # 入力画像と出力画像と相違度 (0.0〜1.0)
guidance_scale=7.5, # プロンプトと出力画像の類似度 (7〜11)
num_inference_steps=50, # 画像生成に費やすステップ数
).images
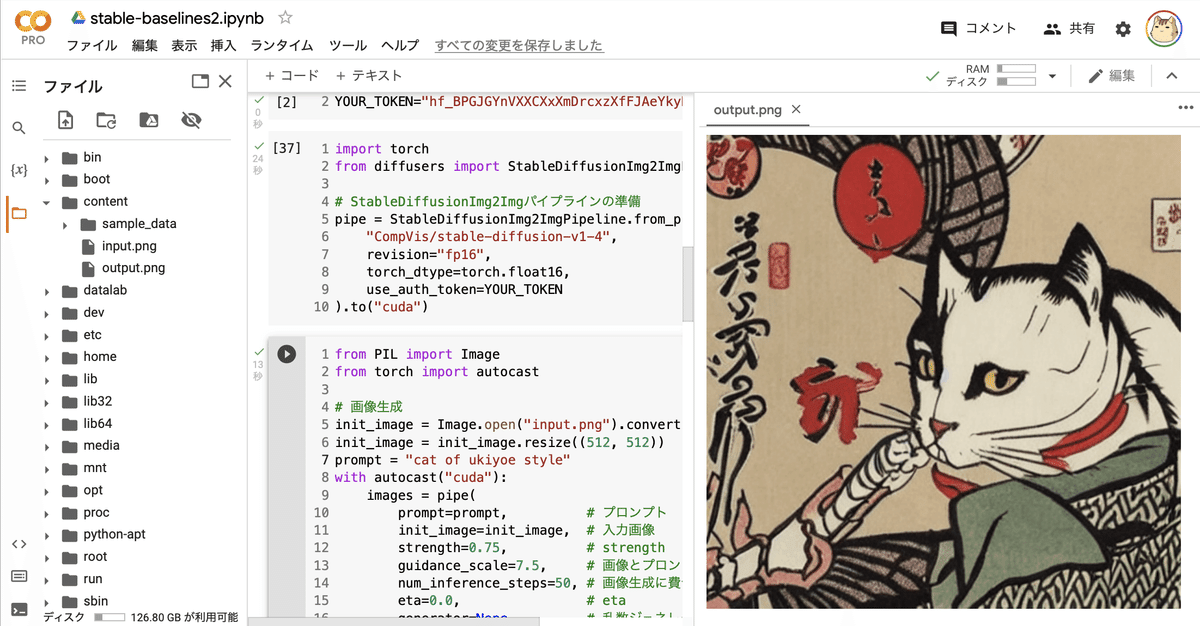
images[0].save("output.png")(7) 生成した画像の確認。
左端のフォルダアイコンでファイル一覧を表示し、output.pngをダブルクリックします。
5. テキストと入力画像とマスク画像で画像生成
テキストと入力画像とマスク画像を使って画像生成する手順は、次のとおりです。マスク画像を指定することで、画像の特定部分のみを編集できます。
(1) StableDiffusionInpaintパイプラインの準備。
import torch
from diffusers import StableDiffusionInpaintPipeline
# StableDiffusionInpaintパイプラインの準備
pipe = StableDiffusionInpaintPipeline.from_pretrained(
"CompVis/stable-diffusion-v1-4",
revision="fp16",
torch_dtype=torch.float16,
use_auth_token=YOUR_TOKEN
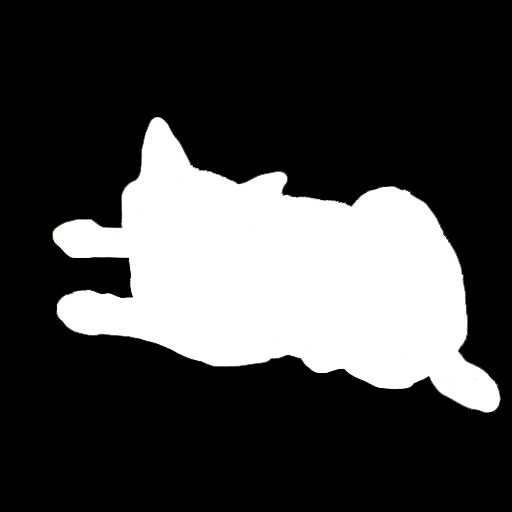
).to("cuda")(2) 入力画像とマスク画像のアップロード。
現在の作業フォルダ(/content)の直下に、入力画像(input.png)とマスク画像(mask.png)をアップロードします。
(3) テキストと入力画像とマスク画像を渡して出力画像を生成。
from PIL import Image
from torch import autocast

# 画像生成
prompt = "dog"
init_image = Image.open("input.png").convert("RGB")
init_image = init_image.resize((512, 512))
mask_image = Image.open("mask.png").convert("RGB")
mask_image = mask_image.resize((512, 512))
with autocast("cuda"):
    images = pipe(
        prompt=prompt,          # プロンプト
        init_image=init_image,  # 入力画像
        mask_image=mask_image,  # マスク画像
        strength=0.75,          # 入力画像と出力画像と相違度 (0.0〜1.0)
        guidance_scale=7.5,     # プロンプトと出力画像の類似度 (0〜20)
        num_inference_steps=50, # 画像生成に費やすステップ数 (50)
        ).images
images[0].save("output.png")
(4) 生成した画像の確認。
左端のフォルダアイコンでファイル一覧を表示し、output.pngをダブルクリックします。

【おまけ】 APIリファレンス
「StableDiffusionImg2Imgパイプライン」のpipeのパラメータは、次のとおりです。
・prompt (str or List[str]) : プロンプト
・init_image (torch.FloatTensor or PIL.Image.Image) : 開始点として使用される画像
・strength (float, optional, defaults to 0.8) : init_imageをどの程度変換するか (0〜1, 1はinit_imageを無視)
・num_inference_steps (int, optional, defaults to 50) : ノイズ除去のステップ数
・guidance_scale (float, optional, defaults to 7.5) : プロンプトに従う度合い (7〜11程度)
・eta (float, optional, defaults to 0.0) : eta (eta=0.0 は決定論的サンプリング)
・generator (torch.Generator, optional) : 乱数ジェネレータ
・output_type (str, optional, defaults to "pil") : 出力種別
・return_dict (bool, optional, defaults to True) : tupleの代わりにStableDiffusionPipelineOutputを返すかどうか
・戻り値 : tuple or StableDiffusionPipelineOutput
「StableDiffusionInpaintパイプライン」のpipeのパラメータは、上記に加えて以下が追加されます。
・mask_image (torch.FloatTensor or PIL.Image.Image) : マスクとなる白黒画像。保持すべき領域は黒。