three.js 入門 (11) - 画像テクスチャと動画テクスチャ

「three.js」で動画テクスチャを使う方法をまとめました。
前回
1. 画像テクスチャの実装
「three.js 入門 (1) - 事始め」の立方体表示のサンプルをベースに、画像をテクスチャとして貼り付けてみます。
(1) 画像テクスチャの準備
・heni.png

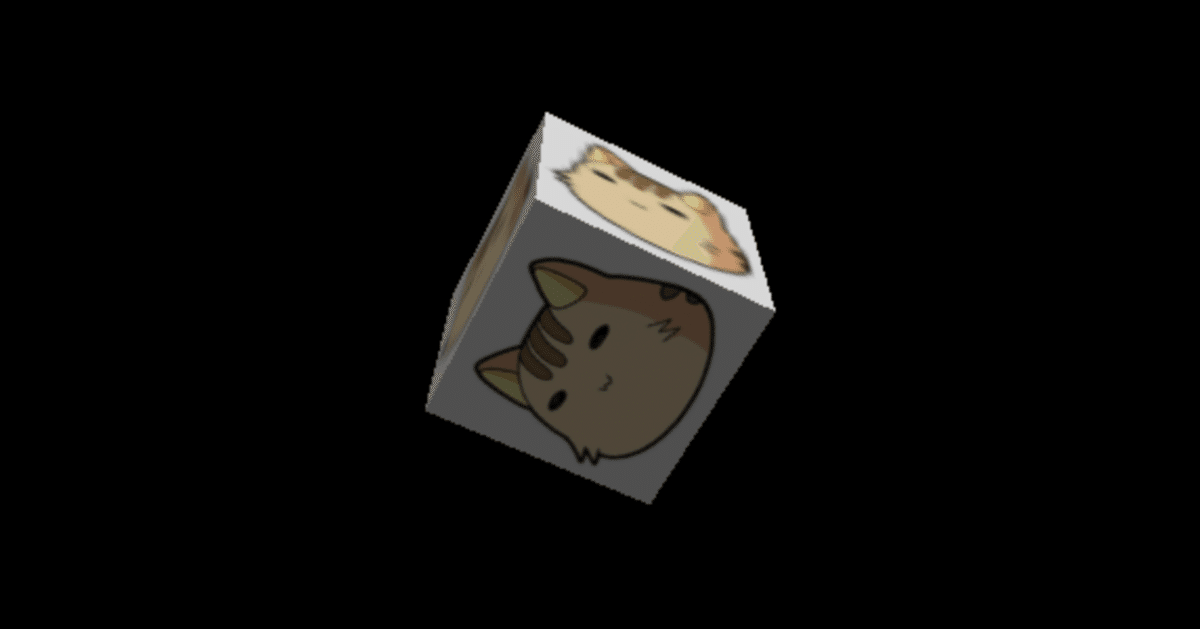
(2) 画像テクスチャのマテリアルの作成。
ImageUtils.loadTexture()で画像を読み込んで、MeshPhongMaterial()のmapでテクスチャを指定します。
const texture = THREE.ImageUtils.loadTexture('heni.png') // 画像テクスチャ
const material = new THREE.MeshPhongMaterial({map: texture}) // 画像テクスチャのマテリアル
このマテリアルを使うことで、次のような出力になります。

全ソースコードは、次のとおりです。
<!DOCTYPE html>
<html>
  <head>
    <meta charset="utf-8">
    <style>
      body { margin: 0; }
    </style>
  </head>
  <body>
    <script src="three.js"></script>
    <script>
// シーンの準備
const scene = new THREE.Scene()

// カメラの準備
const camera = new THREE.PerspectiveCamera(75, window.innerWidth/window.innerHeight, 0.1, 1000)

// レンダラーの準備
const renderer = new THREE.WebGLRenderer()
renderer.setSize(window.innerWidth, window.innerHeight)
document.body.appendChild(renderer.domElement)

// ライトの準備
const directionalLight = new THREE.DirectionalLight('#ffffff', 1)
directionalLight.position.set(0, 10, 10)
scene.add(directionalLight)

// 立方体の準備
const geometry = new THREE.BoxGeometry() // ジオメトリ
const texture = THREE.ImageUtils.loadTexture('heni.png') // 画像テクスチャ
const material = new THREE.MeshPhongMaterial({map: texture}) // 画像テクスチャのマテリアル
const cube = new THREE.Mesh(geometry, material) // メッシュ
scene.add(cube)
camera.position.z = 5

// アニメーションループの開始
function animate() {
  requestAnimationFrame(animate)
  cube.rotation.x += 0.01
  cube.rotation.y += 0.01
  renderer.render(scene, camera)
}
animate()
  </script>
</body>
</html>
2. 動画テクスチャの実装
「three.js 入門 (1) - 事始め」の立方体表示のサンプルをベースに、Webカメラ映像をテクスチャとして貼り付けてみます。
(1) <video>タグの準備。
Webカメラの映像自体は表示しないように、サイズを0x0としています。
<video style="position:absolute;left:0%;top:0%;width:0%;height:0%;"></video>(2) getUserMedia()でWebカメラの映像ストリームを取得。
// ユーザーメディアの取得
navigator.getUserMedia(
  {video: true, audio: false},

  // 成功時に呼ばれる
  function(stream) {
    // ここで映像ストリームを利用
  },

  // エラー時に呼ばれる
  function(e) {
     console.log(e)
  }
)
(3) 動画の再生開始。
// Webカメラの映像を<video>で再生
const video = document.querySelector('video')
video.srcObject = stream
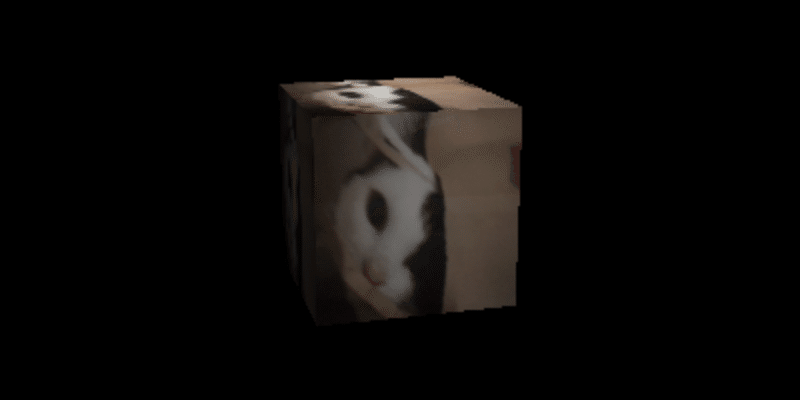
video.autoplay = true(4) 動画テクスチャのマテリアルの作成。
    const videoTexture = new THREE.VideoTexture(video) // 動画テクスチャの作成
    videoTexture.minFilter = THREE.LinearFilter
    const material = new THREE.MeshPhongMaterial({map: videoTexture}) // 動画テクスチャのマテリアルの作成
このマテリアルを使うことで、次のような出力になります。
全ソースコードは、次のとおりです。
<!DOCTYPE html>
<html>
  <head>
    <meta charset="utf-8">
    <style>
      body { margin: 0; }
    </style>
 </head>
 <body>
    <video style="position:absolute;left:0%;top:0%;width:0%;height:0%;"></video>
    <script src="three.js"></script>
    <script>
// ユーザーメディアの取得
navigator.getUserMedia(
  {video: true, audio: false},

  // 成功時に呼ばれる
  function(stream) {
    // Webカメラの映像を<video>で再生
    const video = document.querySelector('video')
    video.srcObject = stream
    video.autoplay = true

    // シーンの準備
    const scene = new THREE.Scene()

    // カメラの準備
    const camera = new THREE.PerspectiveCamera(75, window.innerWidth/window.innerHeight, 0.1, 1000)

    // レンダラーの準備
    const renderer = new THREE.WebGLRenderer()
    renderer.setSize(window.innerWidth, window.innerHeight)
    document.body.appendChild(renderer.domElement)

    // ライトの準備
    const directionalLight = new THREE.DirectionalLight('#ffffff', 1)
    directionalLight.position.set(0, 10, 10)
    scene.add(directionalLight)

    // 立方体の準備
    const geometry = new THREE.BoxGeometry() // ジオメトリ
    const videoTexture = new THREE.VideoTexture(video) // 動画テクスチャの作成
    videoTexture.minFilter = THREE.LinearFilter
    const material = new THREE.MeshPhongMaterial({map: videoTexture}) // 動画テクスチャのマテリアルの作成
    const cube = new THREE.Mesh(geometry, material) // メッシュ
    scene.add(cube)
    camera.position.z = 5

    // アニメーションループの開始
    function animate() {
      requestAnimationFrame(animate)
      cube.rotation.x += 0.01
      cube.rotation.y += 0.01
      renderer.render(scene, camera)
    }
    animate()
  },

  // エラー時に呼ばれる
  function(e) {
     console.log(e)
  }
)
  </script>
</body>
</html>