Google Colab で StreamDiffusion を試す

「Google Colab」で「StreamDiffusion」の「Text-to-Image」と「Image-to-Image」を試したので、まとめました。
1. StreamDiffusion
「StreamDiffusion」は、リアルタイム画像生成を実現するために最適化されたパイプラインです。従来の画像生成パイプラインと比べて飛躍的な速度向上を実現しています。
2. インストール
Colabでのインストール手順は、次のとおりです。
(1) パッケージのインストール。
T4で3分ほどかかりました。
# PyTorchとxformersのインストール
!pip install torch==2.1.0 torchvision==0.16.0 xformers --index-url https://download.pytorch.org/whl/cu121

# パッケージのインストール
!git clone https://github.com/cumulo-autumn/StreamDiffusion.git
%cd StreamDiffusion
!python setup.py develop easy_install streamdiffusion[tensorrt]
!python -m streamdiffusion.tools.install-tensorrt
(2) メニュー「ランタイム→セッションを再開する」を選択後、「StreamDiffusion」フォルダに戻る。
# セッションを再開してから戻る
%cd StreamDiffusion
3. Text-to-Image
3-1. Single Text-to-Image
テキストから画像1枚を生成する手順は、次のとおりです。
(1) ストリームの生成。
from utils.wrapper import StreamDiffusionWrapper

# ストリームの生成
stream = StreamDiffusionWrapper(
    model_id_or_path="KBlueLeaf/kohaku-v2.1",
    lora_dict=None,
    t_index_list=[0, 16, 32, 45],
    frame_buffer_size=1,
    width=512,
    height=512,
    warmup=10,
    acceleration="xformers",
    mode="txt2img",
    use_denoising_batch=False,
    cfg_type="none",
    seed=2,
)
(2) ストリームの準備と実行。
# プロンプトの準備
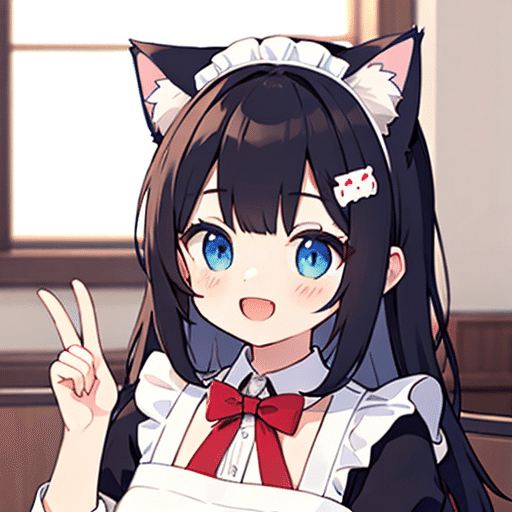
prompt = "1girl with brown dog hair, thick glasses, smiling"
# ストリームの準備
stream.prepare(
prompt=prompt,
num_inference_steps=50,
)
# ストリームの実行
output_image = stream()
output_image.save("images/outputs/output.png")「images/outputs/」に、画像1枚生成されます。
・output.png
3-2. Multi Text-to-Image
テキストから画像複数枚を生成する手順は、次のとおりです。
(1) ストリームの生成。
frame_buffer_size を 3 にしています。
from utils.wrapper import StreamDiffusionWrapper

# ストリームの生成
stream = StreamDiffusionWrapper(
    model_id_or_path="KBlueLeaf/kohaku-v2.1",
    lora_dict=None,
    t_index_list=[0, 16, 32, 45],
    frame_buffer_size=3,
    width=512,
    height=512,
    warmup=10,
    acceleration="xformers",
    mode="txt2img",
    use_denoising_batch=False,
    cfg_type="none",
    seed=2,
)
(2) ストリームの準備と実行。
# プロンプトの準備
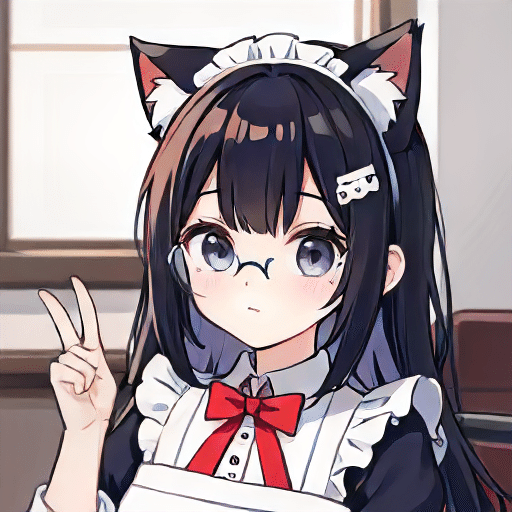
prompt = "1girl with brown dog hair, thick glasses, smiling"
# ストリームの準備
stream.prepare(
prompt=prompt,
num_inference_steps=50,
)
# ストリームの実行
output_images = stream()
for i, output_image in enumerate(output_images):
output_image.save(f"images/outputs/output{i:02}.png")「images/outputs/」に、画像複数枚生成されます。
・output00.png〜output02.png
3-3. Wrapperなしの Text-to-Image
Wrapperを使用しない実装手順は、次のとおりです。
(1) StableDiffusionのパイプラインの準備。
import torch
from diffusers import StableDiffusionPipeline

# StableDiffusionのパイプラインの準備
pipe = StableDiffusionPipeline.from_pretrained("KBlueLeaf/kohaku-v2.1").to(
    device=torch.device("cuda"),
    dtype=torch.float16,
)
(2) ストリームの生成。
from diffusers import AutoencoderTiny
from streamdiffusion import StreamDiffusion
from streamdiffusion.image_utils import postprocess_image

# ストリームの生成
stream = StreamDiffusion(
    pipe,
    t_index_list=[0, 16, 32, 45],
    torch_dtype=torch.float16,
    cfg_type="none",
)

# モデルがLCMではない場合はLCMをマージ
stream.load_lcm_lora()
stream.fuse_lora()

# TinyVAEでさらなる高速化
stream.vae = AutoencoderTiny.from_pretrained("madebyollin/taesd").to(
    device=pipe.device,
    dtype=pipe.dtype
)

# アクセラレータの有効化
pipe.enable_xformers_memory_efficient_attention()
(3) ストリームの準備と実行。
from streamdiffusion.image_utils import postprocess_image

# プロンプトの準備
prompt = "1girl with dog hair, thick frame glasses"

# ストリームの準備
stream.prepare(prompt)

# Warmup >= len(t_index_list) x frame_buffer_size
for _ in range(4):
    stream()

# ストリームの実行
x_output = stream.txt2img()
output_image = postprocess_image(x_output, output_type="pil")[0]
output_image.save("images/outputs/output.png")
「images/outputs/」に、画像1枚生成されます。
・output.png
4. Image-to-Image
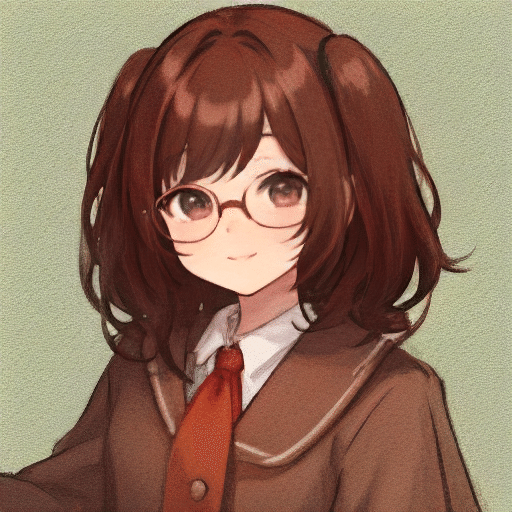
4-1. Single Image-to-Image
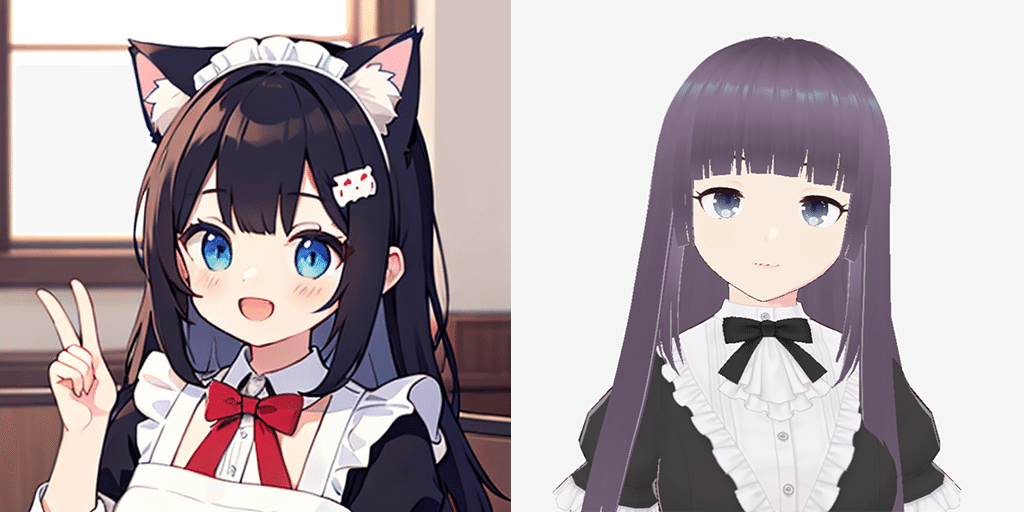
画像をもとに画像1枚を生成する手順は、次のとおりです。
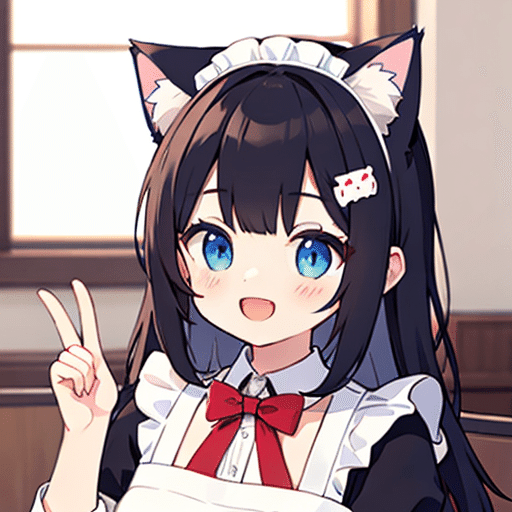
(1) 左端のフォルダアイコンから、「images/inputs/」に入力画像をアップロード。
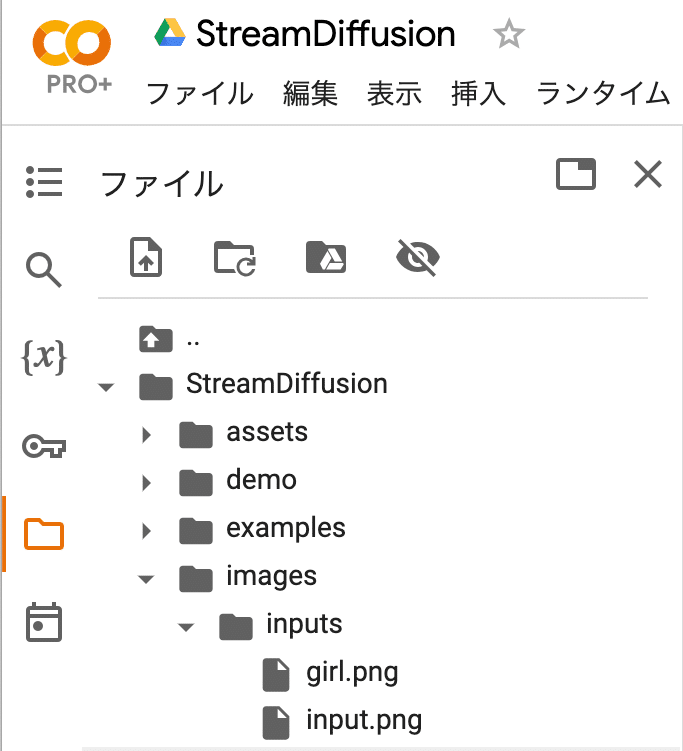
・girl.png
(2) ストリームの生成。
mode に img2img を指定しています。
from utils.wrapper import StreamDiffusionWrapper

# ストリームの生成
stream = StreamDiffusionWrapper(
    model_id_or_path="KBlueLeaf/kohaku-v2.1",
    lora_dict=None,
    t_index_list=[22, 32, 45],
    frame_buffer_size=1,
    width=512,
    height=512,
    warmup=10,
    acceleration="xformers",
    mode="img2img",
    use_denoising_batch=True,
    cfg_type="self",
    seed=2,
)
(3) ストリームの準備と実行。
# プロンプトの準備
prompt = "1girl with brown dog hair, thick glasses, smiling"
negative_prompt = "low quality, bad quality, blurry, low resolution"
image = "images/inputs/girl.png"

# ストリームの準備
stream.prepare(
    prompt=prompt,
    negative_prompt=negative_prompt,
    num_inference_steps=50,
    guidance_scale=1.2,
    delta=0.5,
)

# ストリームの準備
image_tensor = stream.preprocess_image(image)

for _ in range(stream.batch_size - 1):
    stream(image=image)

# ストリームの実行
output_image = stream(image=image_tensor)
output_image.save("images/outputs/output03.png")
「images/outputs/」に、画像1枚生成されます。
・output03.png

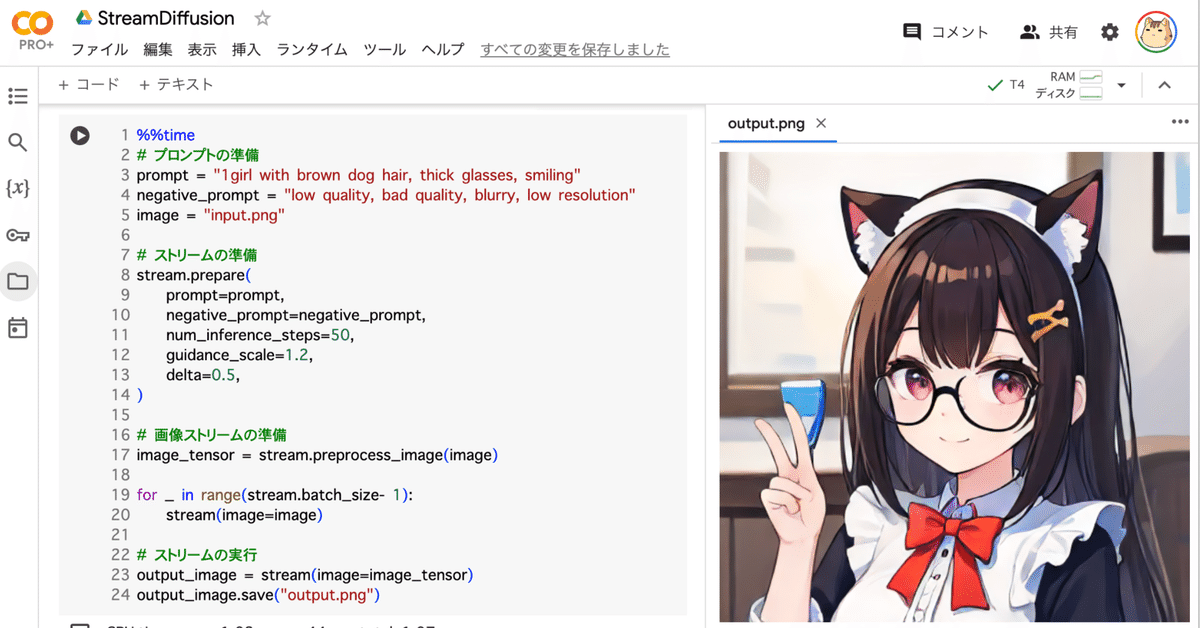
4-2. Multi Image-to-Image
画像をもとに画像複数枚を生成する手順は、次のとおりです。
(1) 「images/inputs/」に入力画像を準備。
今回はそのまま利用します。
・girl.png・input.png
(2) ストリームの生成。
from utils.wrapper import StreamDiffusionWrapper

# ストリームの生成
stream = StreamDiffusionWrapper(
    model_id_or_path="KBlueLeaf/kohaku-v2.1",
    lora_dict=None,
    t_index_list=[22, 32, 45],
    frame_buffer_size=1,
    width=512,
    height=512,
    warmup=10,
    acceleration="xformers",
    mode="img2img",
    use_denoising_batch=True,
    cfg_type="self",
    seed=2,
)
(3) ストリームの実行。
import glob
import os

# プロンプトの準備
prompt = "1girl with brown dog hair, thick glasses, smiling"
negative_prompt = "low quality, bad quality, blurry, low resolution"
images = glob.glob(os.path.join("images/inputs/", "*"))
images = images + [images[-1]] * (stream.batch_size - 1)

# ストリームの準備
stream.prepare(
    prompt=prompt,
    negative_prompt=negative_prompt,
    num_inference_steps=50,
    guidance_scale=1.2,
    delta=0.5,
)

for i in range(stream.batch_size - 1):
    stream(image=images[0])

# ストリームの実行
for image in images:
    try:
        output_image = stream(image=image)
    except Exception:
        continue

    basename = os.path.splitext(os.path.basename(image))[0]
    output_image.save(os.path.join("images/outputs/", f"{basename}.png"))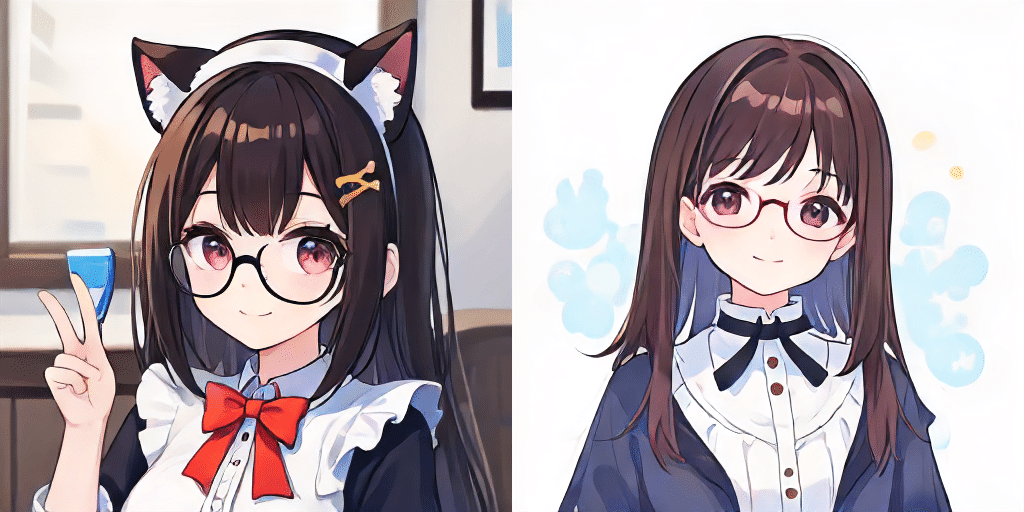
4-3. Wrapperなしの Image-to-Image
Wrapperを使用しない実装手順は、次のとおりです。
(1) 「images/inputs/」に入力画像を準備。
今回はそのまま利用します。
・girl.png
(2) StableDiffusionのパイプラインの準備。
import torch
from diffusers import StableDiffusionPipeline

# StableDiffusionのパイプラインの準備
pipe = StableDiffusionPipeline.from_pretrained("KBlueLeaf/kohaku-v2.1").to(
    device=torch.device("cuda"),
    dtype=torch.float16,
)
(3) ストリームの生成。
from diffusers import AutoencoderTiny
from streamdiffusion import StreamDiffusion
from streamdiffusion.image_utils import postprocess_image

# ストリームの生成
stream = StreamDiffusion(
    pipe,
    t_index_list=[32, 45],
    torch_dtype=torch.float16,
)

# モデルがLCMではない場合はLCMをマージ
stream.load_lcm_lora()
stream.fuse_lora()

# TinyVAEでさらなる高速化
stream.vae = AutoencoderTiny.from_pretrained("madebyollin/taesd").to(device=pipe.device, dtype=pipe.dtype)

# アクセラレータの有効化
pipe.enable_xformers_memory_efficient_attention()
(4) ストリームの準備と実行。
from diffusers.utils import load_image

# プロンプトの準備
prompt = "1girl with dog hair, thick frame glasses"

# ストリームの準備
stream.prepare(prompt)

# 画像の準備
init_image = load_image("images/inputs/girl.png").resize((512, 512))

# Warmup >= len(t_index_list) x frame_buffer_size
for _ in range(2):
    stream(init_image)

# ストリームの実行
x_output = stream(init_image)
output_image = postprocess_image(x_output, output_type="pil")[0]
output_image.save("images/outputs/output.png")
「images/outputs/」に、画像1枚生成されます。
・output.png
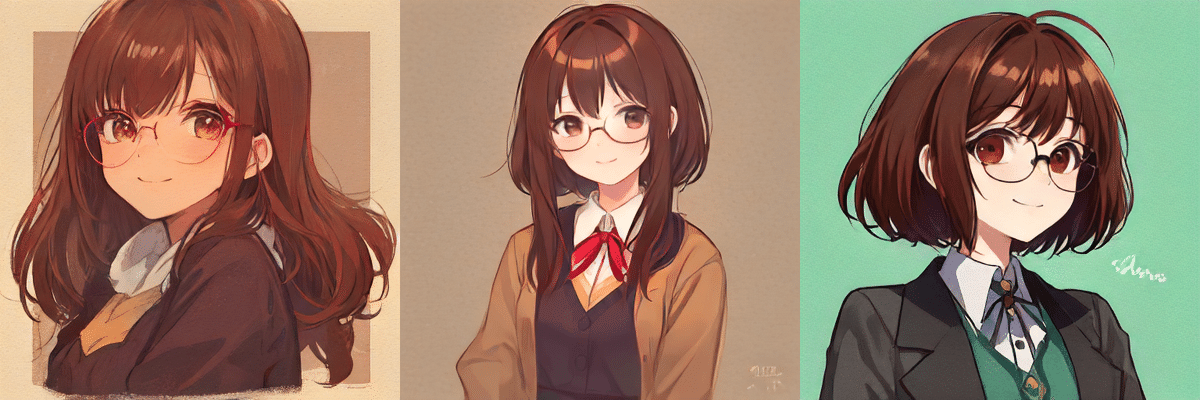
5. Video-to-Video
動画をもとに動画を生成する手順は、次のとおりです。
(1) パッケージのインストール。
# パッケージのインストール
!pip install -r examples/vid2vid/requirements.txt
(2) メニュー「ランタイム→セッションを再開する」を選択後、「StreamDiffusion」フォルダに戻る。
# セッションを再開してから戻る
%cd StreamDiffusion
(3) 動画 (mp4) をColabの「StreamDiffusion」フォルダにアップロード。
・girl.mp4
(4) 動画の準備
from torchvision.io import read_video, write_video

# 動画の準備
video_info = read_video("girl.mp4")
video = video_info[0] / 255
fps = video_info[2]["video_fps"]
scale = 1.0
width = int(video.shape[2] * scale)
height = int(video.shape[1] * scale)
(4) ストリームの生成。
from utils.wrapper import StreamDiffusionWrapper

# ストリームの生成
stream = StreamDiffusionWrapper(
    model_id_or_path="KBlueLeaf/kohaku-v2.1",
    lora_dict=None,
    t_index_list=[22, 32, 45],
    frame_buffer_size=1,
    width=width,
    height=height,
    warmup=10,
    acceleration="xformers",
    do_add_noise=False,
    mode="img2img",
    output_type="pt",
    enable_similar_image_filter=True,
    similar_image_filter_threshold=1.98,
    use_denoising_batch=True,
    seed=2,
)
(5) ストリームの準備と実行。
import torch
from tqdm import tqdm

# プロンプトの準備
prompt = "1girl with brown dog ears, thick frame"

# ストリームの準備
stream.prepare(
    prompt=prompt,
    num_inference_steps=50,
    guidance_scale=1.2
    delta=1.0,
)

# ストリームの実行
video_result = torch.zeros(video.shape[0], height, width, 3)

for _ in range(stream.batch_size):
    stream(image=video[0].permute(2, 0, 1))

for i in tqdm(range(video.shape[0])):
    output_image = stream(video[i].permute(2, 0, 1))
    video_result[i] = output_image.permute(1, 2, 0)
video_result = video_result * 255
write_video("output.mp4", video_result[2:], fps=fps)
「output.mp4」が出力されます。
StreamDiffusionでVideo-to-Videoを試す。https://t.co/YmGvUZWTQJ pic.twitter.com/IffjcRzJu1
— 布留川英一 / Hidekazu Furukawa (@npaka123) December 22, 2023
6. StreamDiffusionWrapper のパラメータ
「StreamDiffusionWrapper」のパラメータは、次のとおりです。
6-1. StreamDiffusionWrapper の基本パラメータ
・model_id_or_path : str
モデルID または パス
・t_index_list : List[int]
推論に使用するt_index_list
・lora_dict : Optional[Dict[str, float]], optional (default:None)
LoRAの辞書t。キーはLoRA名、値はLoRAスケール
例: {"LoRA_1" : 0.5 , "LoRA_2" : 0.7 ,...}
・mode : Literal["img2img", "txt2img"], optional (default:"img2img")
モード
・output_type : Literal["pil", "pt", "np", "latent"], optional (default:pil)
画像出力種別
・lcm_lora_id : Optional[str], optional (default:None)
LCM-LoRA ID
Noneの場合は、LCM-LoRA ("latent-consistency/lcm-lora-sdv1-5") を利用
・vae_id : Optional[str], optional (default:None)
VAE ID
Noneの場合は、TinyVAE ("madebyollin/taesd") を利用
・device : Literal["cpu", "cuda"], optional (default:"cuda")
推論用の device
・dtype : torch.dtype, optional (default:torch.float16)
推論用の dtype
・frame_buffer_size : int, optional (default:1)
フレームバッファサイズ
・width : int, optional (default:512)
画像の幅
・height : int, optional (default:512)
画像の高さ
・warmup : int, optional (default:10)
ウォームアップステップ数
・acceleration : Literal["none", "xformers", "tensorrt"], optional (default:"tensorrt)
アクセラレータ
・do_add_noise : bool, optional (default:True)
ノイズ除去ステップのためノイズを追加するかどうか
・device_ids : Optional[List[int]], optional (default:None)
DataParallel に使用するデバイスID
・use_lcm_lora : bool, optional (default:True)
LCM-LoRA を使用するかどうか
・use_tiny_vae : bool, optional (default:True)
TinyVAE を使用するかどうか
・use_denoising_batch : bool, optional (default:True)
ノイズ除去バッチを使用するかどうか
・seed : int, optional (default:2)
乱数シード
・use_safety_checker : bool, optional (default:False)
セーフティチェッカーを使用するかどうか
6-2. Stochastic Similarity Filter
「Stochastic Similarity Filter」は、動画入力時、前フレームからあまり変化しない時に変換処理を減らすことで、GPUの負荷を軽減するフィルタ
・enable_similar_image_filter : bool, optional (default:False)
類似画像フィルタを有効にするかどうか
・similar_image_filter_threshold : float, optional (default:0.98)
処理を休止する前フレームと現フレームの類似度の閾値
・similar_image_filter_max_skip_frame : int, optional (default:10)
休止中に変換を再開する最大の間隔
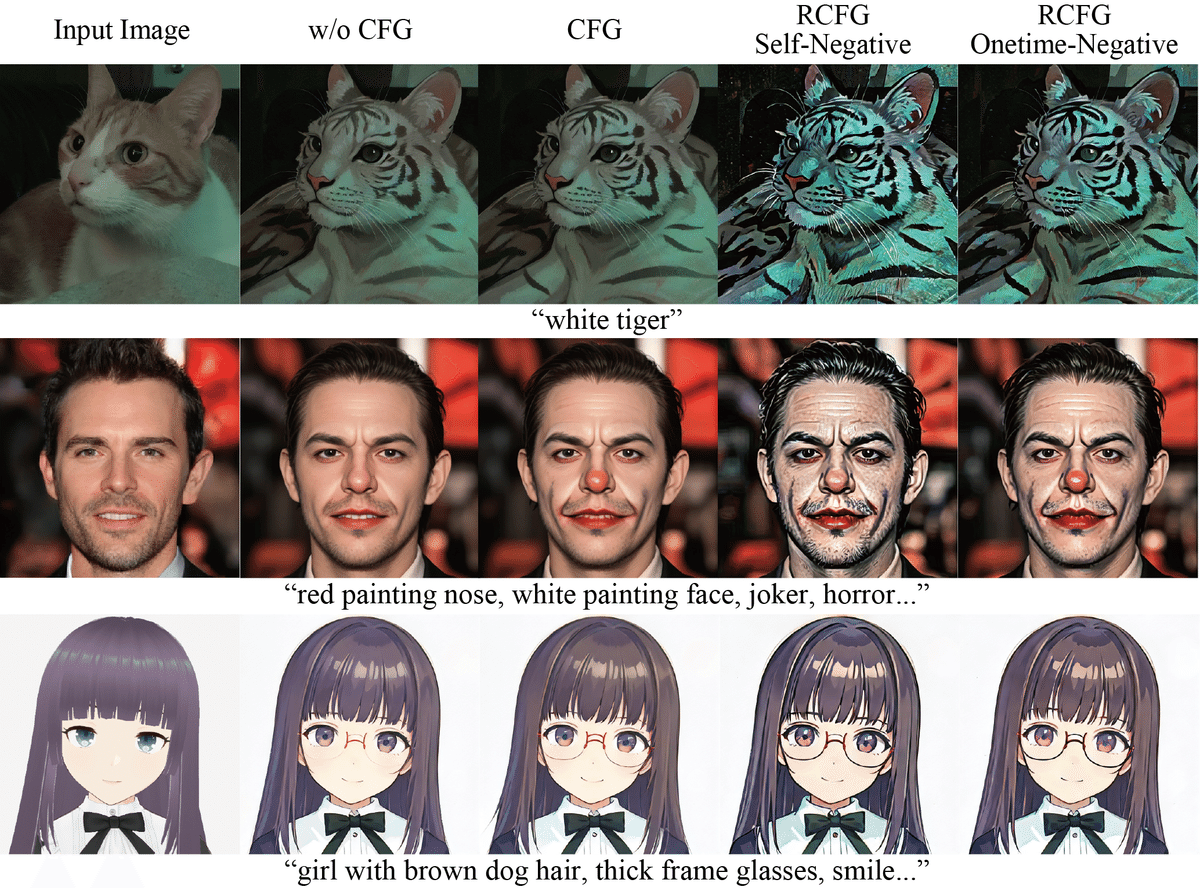
6-3. Residual CFG (RCFG)
「Residual CFG」は、「CFG」を使用しない場合と比較し、競争力のある計算量で近似的にCFGを実現させる方法です。「CFG」は、画像生成でどれだけプロンプトに従うかを決める値です。cfg_type で指定できます。
「RCFG」には、negative_promptなしの「RCFG Self-Negative」と、negative_promptを指定可能な「Onetime-Negative」があります。計算量はCFGなしの計算量をN、通常のCFGありの計算量を2Nとしたとき、RCFG Self-NegativeはN回で、Onetime-NegativeはN+1回で計算できます。
・cfg_type : Literal["none", "full", "self", "initialize"], optional (default:"self")
CFG種別 (img2imgのみ)
・none : CFGなし
・full : 通常のCFG
・self : RCFG Self-Negative
・initialize : RCFG Onetime-Negative cfg_type
6-4. stream.prepare() のパラメータ
・prompt : str
プロンプト
・negative_prompt : str
ネガティブプロンプト
・num_inference_steps : int, optional (default:50)
推論ステップ数
・guidance_scale : float, optional (default:1.2)
ガイダンススケール。生成画像がプロンプトにどの程度忠実であるべきか
・delta : float, optional (default 1.0)
仮想残留ノイズのデルタ乗数。RCFGの効きをマイルドにする