
ホモグラフィ変換を使って、選手の画像座標を2Dフィールド座標に変換
こんにちは前回はサッカーの選手動画にモザイク処理をかけました。
今回は
ホモグラフィ変換を使って、選手の画像座標を2Dフィールド座標に変換
にチャレンジします。
ホモグラフィ変換とは
ホモグラフィ変換は、カメラの視点が斜めになっている場合に必要です。これは、画像上で見えるフィールドが平行四辺形や台形のように歪んでいる場合に、実際のサッカー場の2D平面座標に変換するために使われます。ホモグラフィ行列を使うと、画像上の座標(ピクセル座標)から実際の2D座標(メートル単位)に変換できます。数学的なことは他に譲ります。
センターポイントを基準点にしたマッピング
センターポイントの中心をフィールドの中央とし、その位置を2D座標の基準点(原点)とします。次に、フィールドの右半分を縦50m、横34mに対応させて、右側のフィールドを2D平面上にマッピングできます。
1. 基準点の設定
フィールドの右半分の寸法を考慮し、基準点を以下のように設定します。
基準点実際のフィールド座標(メートル単位)
コントのセンタポイント (0, 0)
右サイドライン中央 (34, 0)
右ゴールライン中央 (34, 50)
センターサークル縦の下 (0, 50)
センターサークルの位置をフィールドの中央(原点)とし、右側に向かって横幅が34m、縦に50mの領域を2D座標にマッピングします。
2. 画像座標との対応
動画内でセンターサークルの位置を手動で取得し、その座標を原点とします。また、右サイドラインやゴールラインに基準点を設定し、それを実際のフィールド座標と対応させます。
動画の最初のフレームをイメージとして保存
import cv2

# 動画のパスを指定
video_path = '/content/drive/My Drive/Project_folder/soccer/mosaic_soccer_12sec.MP4'

# 動画を開く
cap = cv2.VideoCapture(video_path)

# 最初のフレームを取得
ret, frame = cap.read()

# 取得成功か確認
if ret:
    # 画像として保存 (例: "first_frame.jpg" という名前で保存)
    output_image_path = '/content/drive/My Drive/Project_folder/soccer/first_frame.jpg'
    cv2.imwrite(output_image_path, frame)
    print(f"最初のフレームを {output_image_path} に保存しました。")

# リソースを解放
cap.release()
first_frame.jpgが保存される
GIMPで最初のフレームを開きコートのセンターポイントの座標を取得
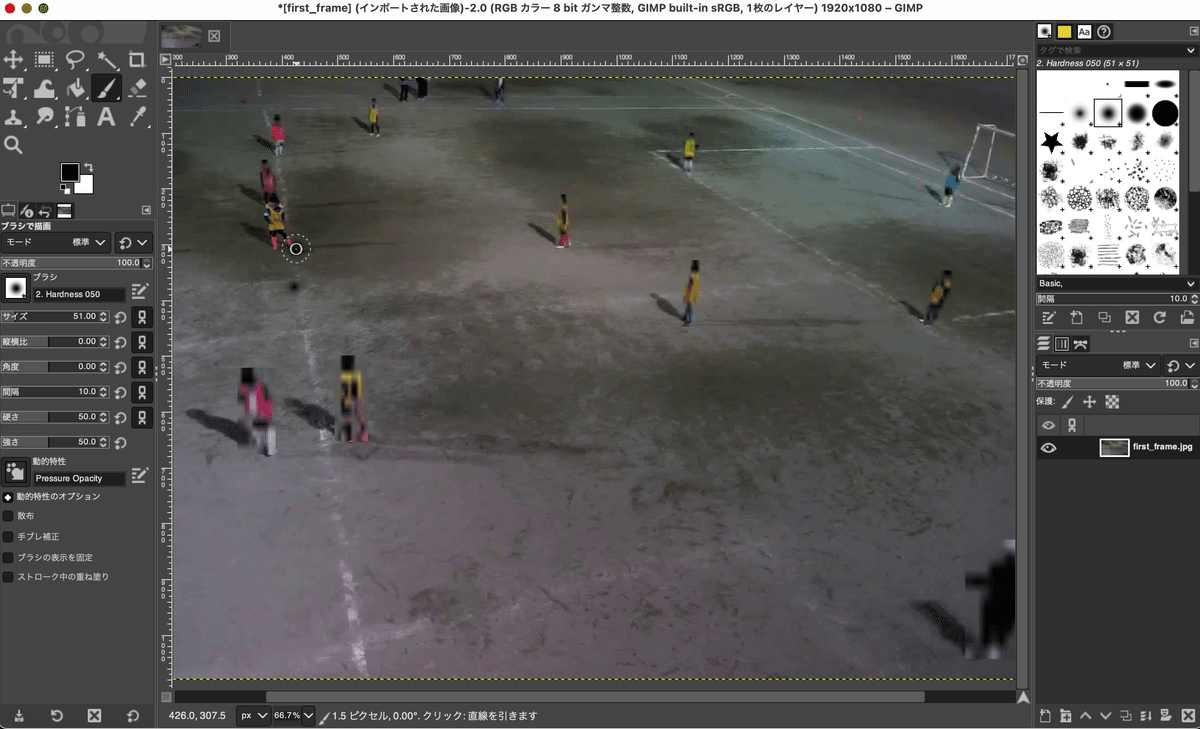
センターポイントの座標(426.0, 307.5)
基準点は一つだけなのでhomographyは使わずにこの画像見た目の位置を推定
import cv2
import numpy as np
from ultralytics import YOLO

# 画像ファイルのパス
image_path = '/content/drive/My Drive/Project_folder/soccer/first_frame.jpg'

# センターサークルの画像座標(GIMPで取得した座標)
center_circle = (426.0, 307.5)

# フィールド右半分の大きさ(メートル単位)
field_width = 34.0  # 34m
field_height = 50.0  # 50m

# 画像の読み込み
image = cv2.imread(image_path)
image_height, image_width, _ = image.shape

# ピクセルあたりのメートル単位の変換比率
meters_per_pixel_x = field_width / image_width
meters_per_pixel_y = field_height / image_height

# YOLOv8モデルをロード
model = YOLO('yolov8n.pt')

# 画像で選手を検出
results = model(image)

# 検出された選手ごとの位置を計算
for box in results[0].boxes:
    # バウンディングボックスの座標を取得
    x1, y1, x2, y2 = map(int, box.xyxy[0])

    # 選手の中心座標を計算
    center_x = (x1 + x2) // 2
    center_y = (y1 + y2) // 2

    # 基準点(センターサークル)からの距離を推定
    distance_x = (center_x - center_circle[0]) * meters_per_pixel_x
    distance_y = (center_y - center_circle[1]) * meters_per_pixel_y

    # 推定された選手の位置(メートル単位)
    player_position_meters = (distance_x, distance_y)
    print(f"選手の画像上の座標: ({center_x}, {center_y})")
    print(f"推定された選手の位置: {player_position_meters} (メートル単位)")
結果
0: 384x640 11 persons, 256.3ms
Speed: 5.7ms preprocess, 256.3ms inference, 3.0ms postprocess per image at shape (1, 3, 384, 640)
選手の画像上の座標: (1575, 397)
推定された選手の位置: (20.346875, 4.143518518518518) (メートル単位)
選手の画像上の座標: (353, 602)
推定された選手の位置: (-1.2927083333333333, 13.634259259259258) (メートル単位)
選手の画像上の座標: (1133, 385)
推定された選手の位置: (12.519791666666666, 3.587962962962963) (メートル単位)
選手の画像上の座標: (1129, 133)
推定された選手の位置: (12.448958333333334, -8.078703703703702) (メートル単位)
選手の画像上の座標: (1598, 193)
推定された選手の位置: (20.754166666666666, -5.300925925925926) (メートル単位)
選手の画像上の座標: (788, 24)
推定された選手の位置: (6.410416666666666, -13.125) (メートル単位)
選手の画像上の座標: (904, 255)
推定された選手の位置: (8.464583333333334, -2.4305555555555554) (メートル単位)
選手の画像上の座標: (525, 574)
推定された選手の位置: (1.753125, 12.337962962962962) (メートル単位)
選手の画像上の座標: (375, 186)
推定された選手の位置: (-0.903125, -5.625) (メートル単位)
選手の画像上の座標: (392, 96)
推定された選手の位置: (-0.6020833333333333, -9.791666666666666) (メートル単位)
選手の画像上の座標: (7, 284)
推定された選手の位置: (-7.419791666666667, -1.0879629629629628) (メートル単位)
ホモグラフィはなぜ4つの基準点が必要なのか?
ホモグラフィ行列は、3×3の行列で表される変換であり、8つのパラメータ(行列の9つの要素のうち、スケール要素は1に固定されるため)が必要です。私には何を言っているかわかりませんが先に進みます。
各基準点が2次元のx, y座標を持つため、1つの点につき2つの式が提供されます。したがって、4つの基準点を使用すれば、ホモグラフィ行列の8つのパラメータを計算するために十分な式が得られます。
フィールド上の基準点(4つの点)を取得: サッカー場の実際のフィールド上の座標と、画像上でその対応するピクセル座標を取得します。これには、手動で座標を取得するか、カメラの位置が分かっている場合に自動的に計算する方法があります。今回は手動で座標をつけました。
ホモグラフィ行列を計算: cv2.findHomography() を使って、画像座標からフィールド座標への変換行列を計算します。
ホモグラフィ変換を使って座標を変換: 選手やボールの位置をホモグラフィ変換を使って2D座標にマッピングします。
基準点を4点取得してチャレンジ
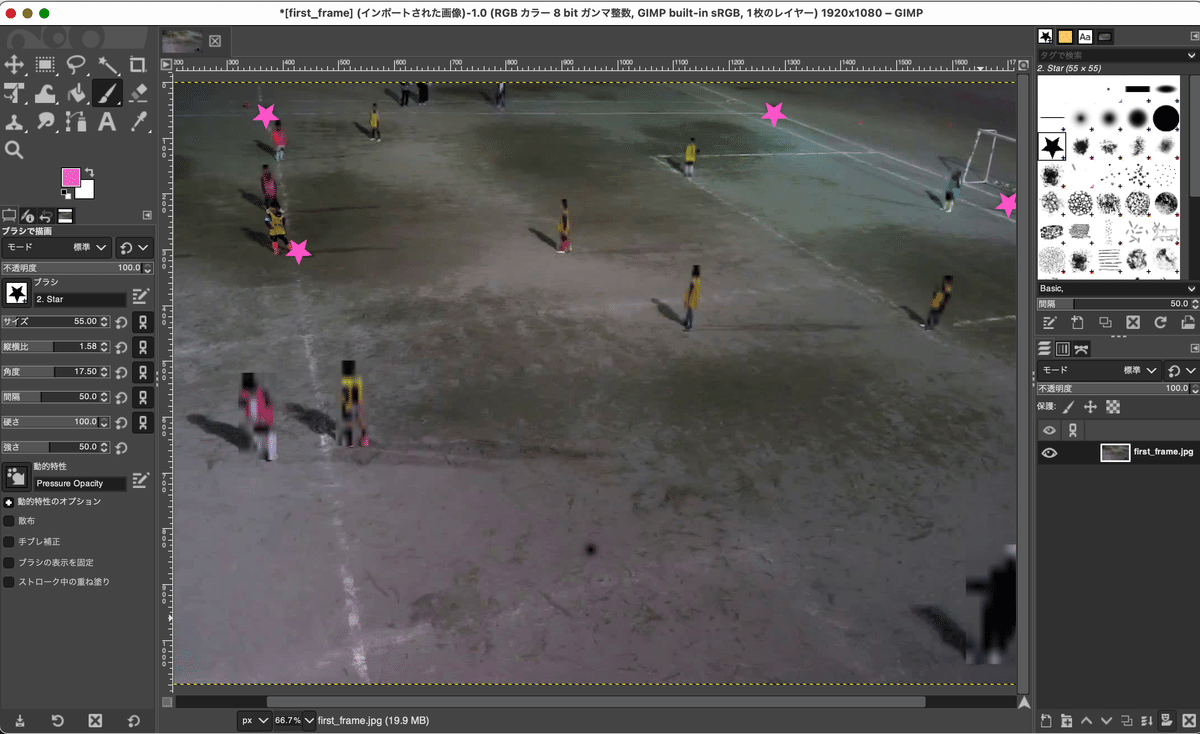
YOLOでトラッキングしてhomography_matrix関数で座標を取得
まずは最初のフレームの画像でやってみる
import cv2
import numpy as np
from ultralytics import YOLO

# 画像ファイルのパス
image_path = '/content/drive/My Drive/Project_folder/soccer/first_frame.jpg'

# 実際のフィールド上の基準点(メートル単位での座標)
# この座標はサッカー場の右半分の寸法に基づいて定義します
real_world_points = np.float32([
    [0, 17],       # 右サイドライン中央点
    [25, 17],      # 右サイドのコーナー
    [25, 0],      # ゴールライン中央
    [0, 0]      # センターライン中央
])

# 画像上の対応する基準点(取得した座標: ピクセル単位)
image_points = np.float32([
    [372.0, 57.0],      # 右サイドライン中央点
    [2779.5, 51.0],     # 右サイドのコーナー
    [1701.0, 213.0],    # ゴールライン中央
    [426.0, 307.5]      # センターライン中央
])

# ホモグラフィ行列を計算
homography_matrix, _ = cv2.findHomography(image_points, real_world_points)

# 画像の読み込み
image = cv2.imread(image_path)

# YOLOv8モデルをロード
model = YOLO('yolov8n.pt')

# 画像で選手を検出
results = model(image)

# 検出された選手ごとの位置を計算
for box in results[0].boxes:
    # バウンディングボックスの座標を取得
    x1, y1, x2, y2 = map(int, box.xyxy[0])

    # 選手の中心座標を計算
    center_x = (x1 + x2) // 2
    center_y = (y1 + y2) // 2

    # 選手の位置をホモグラフィ行列を使って変換
    player_center = np.array([[center_x, center_y]], dtype=np.float32)
    player_world_position = cv2.perspectiveTransform(np.array([player_center]), homography_matrix)

    # 変換された選手の2Dフィールド座標を表示
    print(f"選手の2Dフィールド座標: {player_world_position[0][0]} メートル")
結果
先ほどとデータがやはり違いますね。
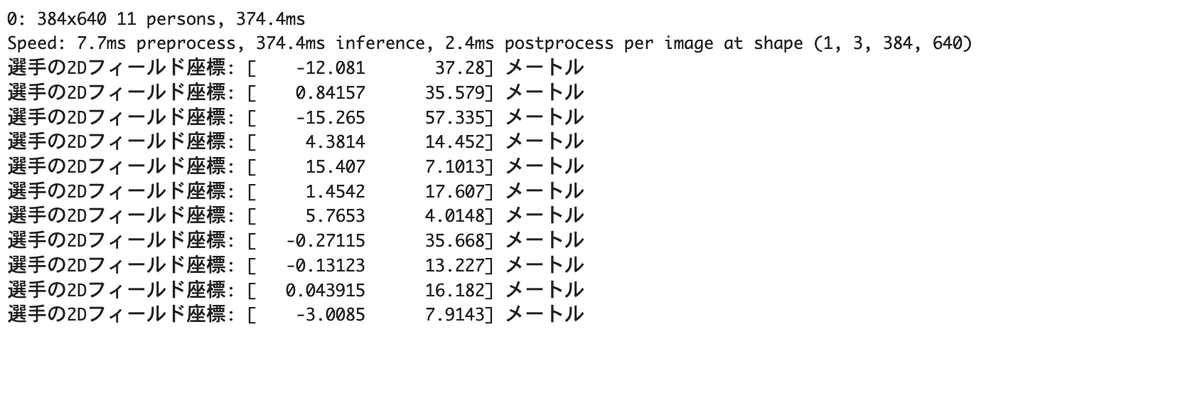
今度は動画でやってみる
import csv
import cv2
import numpy as np
from ultralytics import YOLO

# 動画ファイルのパス
video_path = '/content/drive/My Drive/Project_folder/soccer/mosaic_soccer_12sec.MP4'
csv_output_path = '/content/drive/My Drive/Project_folder/soccer/player_positions.csv'

# 実際のフィールド上の基準点(メートル単位での座標)
real_world_points = np.float32([
    [0, 17],       # 右サイドライン中央点
    [25, 17],      # 右サイドのコーナー
    [25, 0],      # ゴールライン中央
    [0, 0]        # センターライン中央
])

# 画像上の対応する基準点(取得した座標: ピクセル単位)
image_points = np.float32([
    [372.0, 57.0],      # 右サイドライン中央点
    [2779.5, 51.0],     # 右サイドのコーナー
    [1701.0, 213.0],    # ゴールライン中央
    [426.0, 307.5]      # センターライン中央
])

# ホモグラフィ行列を計算
homography_matrix, _ = cv2.findHomography(image_points, real_world_points)

# YOLOv8モデルをロード
model = YOLO('yolov8n.pt')

# 動画を開く
cap = cv2.VideoCapture(video_path)

# プレイヤーの位置データを保存するためのリスト
player_positions = []

# フレームごとの処理
frame_number = 0
while cap.isOpened():
    ret, frame = cap.read()
    if not ret:
        break

    # YOLOv8で選手を検出
    results = model(frame)

    # 各選手の位置を取得
    for box in results[0].boxes:
        # バウンディングボックスの座標を取得
        x1, y1, x2, y2 = map(int, box.xyxy[0])

        # 選手の中心座標を計算
        center_x = (x1 + x2) // 2
        center_y = (y1 + y2) // 2

        # ホモグラフィ行列を使ってフィールド上の座標に変換
        player_center = np.array([[center_x, center_y]], dtype=np.float32)
        player_world_position = cv2.perspectiveTransform(np.array([player_center]), homography_matrix)

        # フレーム番号、選手のフィールド上の座標をリストに追加
        player_positions.append([frame_number, player_world_position[0][0][0], player_world_position[0][0][1]])

    frame_number += 1

# CSVに書き出し
with open(csv_output_path, mode='w', newline='') as file:
    writer = csv.writer(file)
    writer.writerow(["Frame", "X_position", "Y_position"])
    writer.writerows(player_positions)

# リソースを解放
cap.release()

print(f"選手の位置データを {csv_output_path} に保存しました。")
player_positions.csv
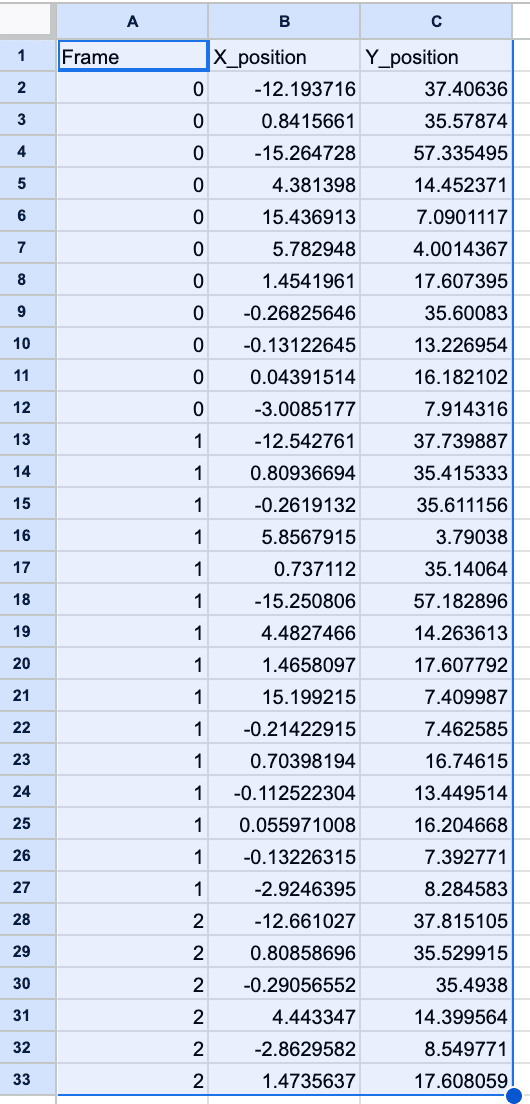
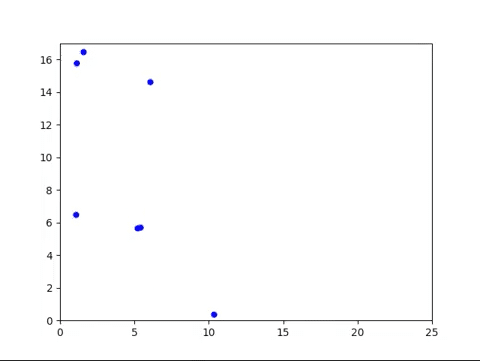
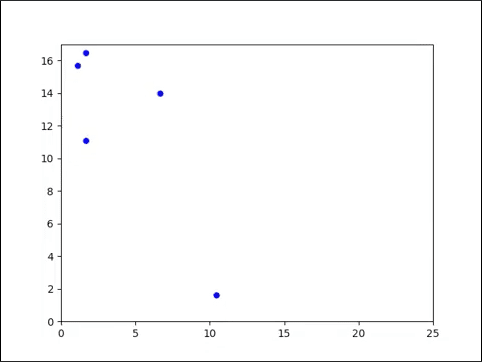
これをmatplotlibでanimation表示
import csv
import numpy as np
import matplotlib.pyplot as plt
from matplotlib.animation import FuncAnimation

# CSVファイルのパス
csv_input_path = '/content/drive/My Drive/Project_folder/soccer/player_positions.csv'
mp4_output_path = '/content/drive/My Drive/Project_folder/soccer/player_animation.mp4'

# プレイヤーの位置データを読み込む
player_positions = []

with open(csv_input_path, mode='r') as file:
    reader = csv.reader(file)
    next(reader)  # ヘッダーをスキップ
    for row in reader:
        frame = int(row[0])
        x = float(row[1])
        y = float(row[2])
        player_positions.append((frame, x, y))

# フィールドの設定(フィールドの大きさに合わせて調整)
field_width = 25  # メートル
field_height = 17  # メートル

# 2Dアニメーションのセットアップ
fig, ax = plt.subplots()
ax.set_xlim(0, field_width)
ax.set_ylim(0, field_height)

# プレイヤーの位置をプロット
points, = ax.plot([], [], 'bo', markersize=5)

# アニメーションの初期化関数
def init():
    points.set_data([], [])
    return points,

# アニメーションの更新関数
def update(frame):
    # 現在のフレームのプレイヤー位置を取得
    x_data = []
    y_data = []
    for pos in player_positions:
        if pos[0] == frame:
            x_data.append(pos[1])
            y_data.append(pos[2])

    # プロットを更新
    points.set_data(x_data, y_data)
    return points,

# 最大フレーム数を計算
max_frame = max([pos[0] for pos in player_positions])

# アニメーションを作成
ani = FuncAnimation(fig, update, frames=range(max_frame + 1), init_func=init, interval=200, blit=True)

# アニメーションをMP4ファイルとして保存
ani.save(mp4_output_path, writer='ffmpeg', fps=10)

print(f"アニメーションを {mp4_output_path} に保存しました。")
結果
できました。調整が必要だが手順は分かった!
まとめ
斜め上から撮影したサッカーの動画をホモグラフィ変換を使って、選手の画像座標を2Dフィールド座標に変換できました。
ポイントは基準点を4点決めること
YOLOで選手をトラッキングして位置座標を基準座標と距離データと比較し
平行四辺形や台形に写っている画像を底辺の位置に正しくプロットできる(できそうな)ことがわかりました。
この記事が気に入ったらサポートをしてみませんか?
