
MotionLayoutでBottomSheetの動きを真似る
こんにちは。きりたんぽ丸です。
ナビタイムジャパンでカーナビ系サービスの『ドライブサポーター』『渋滞情報マップ by NAVITIME』などのアプリの開発・運営を担当しています。
少し前になりますが、2022年11月にAndroid版『渋滞情報マップ by NAVITIME』でリリースしたハイウェイモードという機能の開発を担当させていただきました。
この機能の開発時にMotionLayoutを使ってBottomSheetのような動きを実装したので、そのお話をしようと思います。
MotionLayout自体はリリースされてから時間も経っており新しい機能という訳でもないですが、なかなか本格的に利用することもなく今回実装するにあたって手こずった箇所がいくつかあったので、それをご紹介できればと思います。
ハイウェイモードの紹介
本機能は走行している高速道路上の各種ICや施設までの距離や時間、混雑情報などが確認でき、高速道路を走行される方の走行計画を手助けする機能となっています。
カーナビを使ったことがある方なら似たような表示を見たことがあるのではないでしょうか。
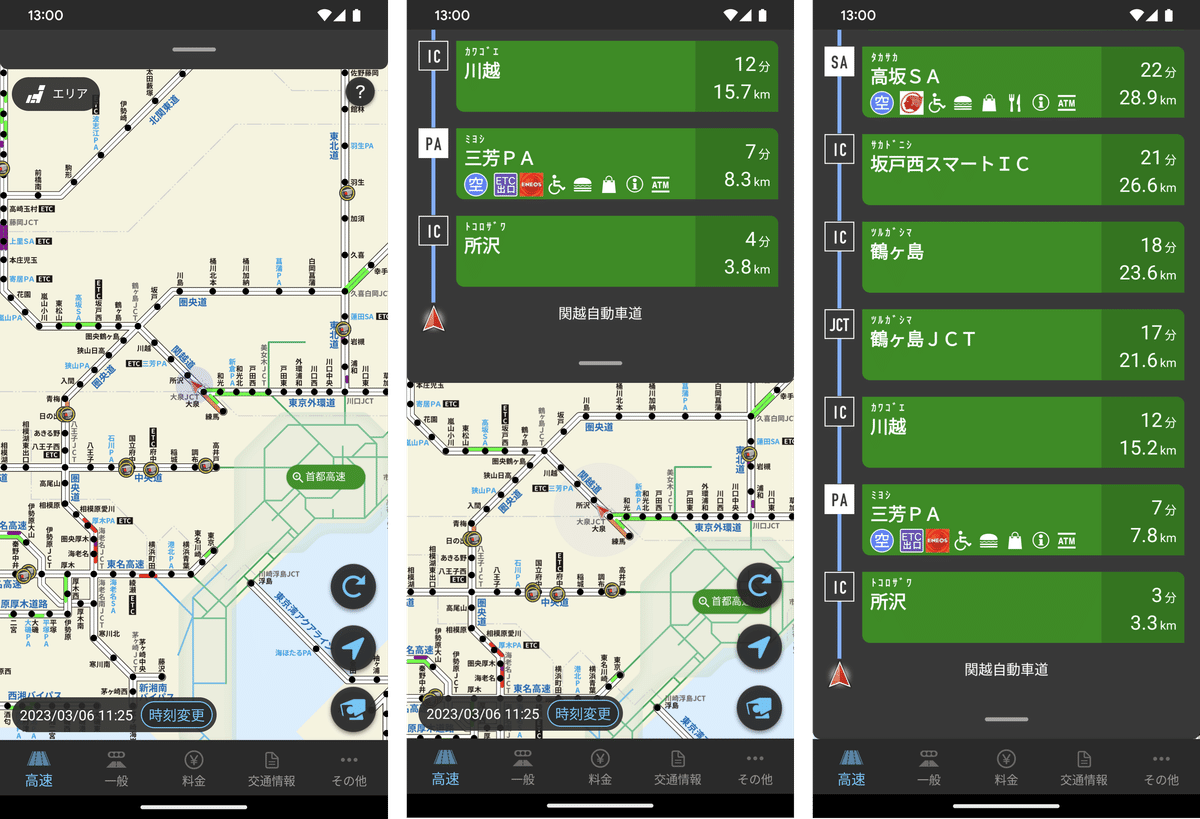
『渋滞情報マップ by NAVITIME』では「主に地図を見たい人」「主に施設情報を見たい人」「地図と施設情報をどちらも見たい人」それぞれのニーズを叶えるために、一覧の情報は3段階の表示状態を保つように作っています。
実現したかったこと
今回の要件は以下の通りです。
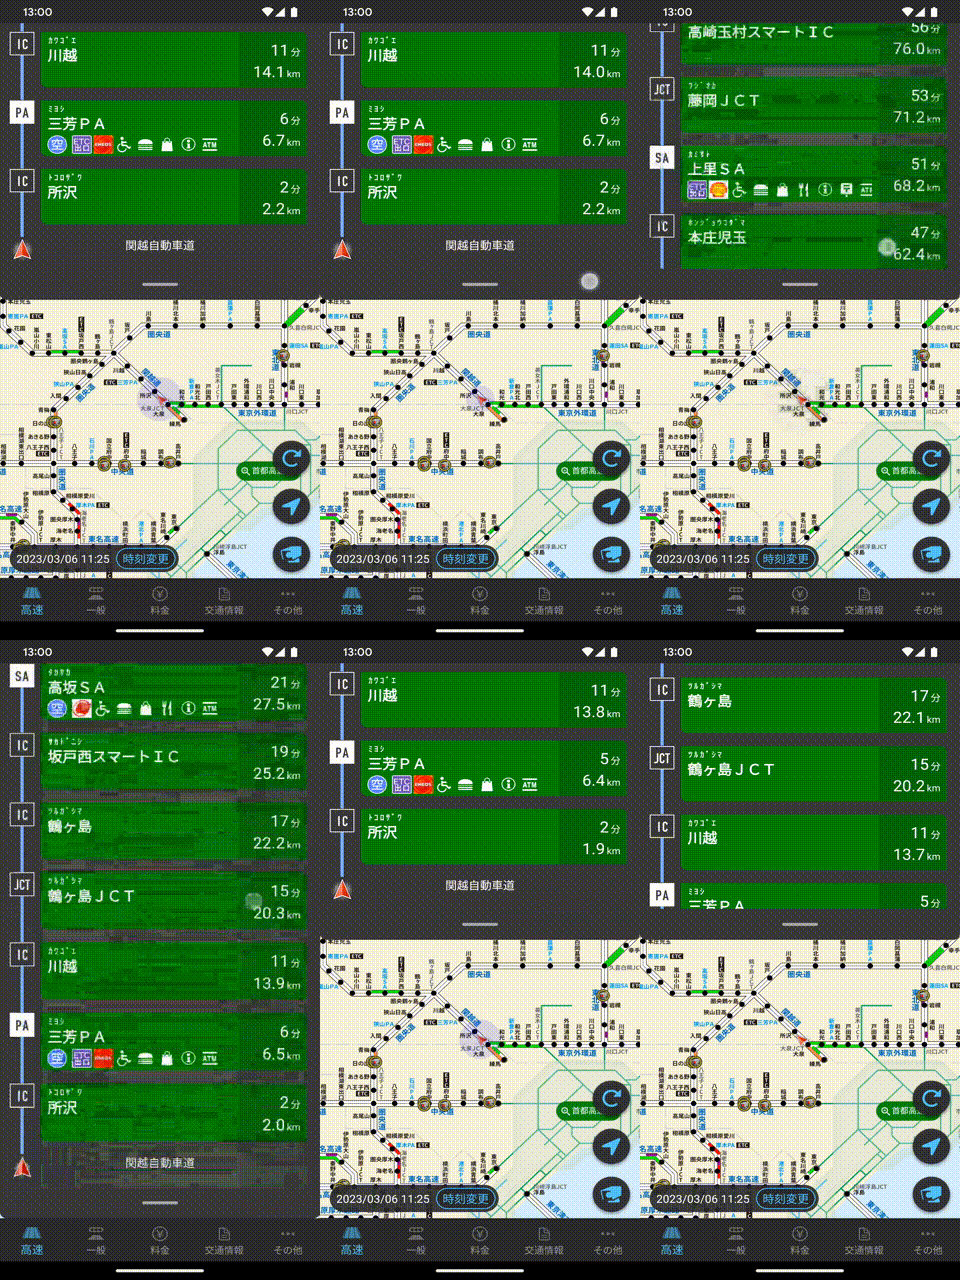
・画面上部を起点にスワイプ動作で特定のViewを上下に動かす
・Viewの状態は「折りたたみ状態」「中間状態」「最大表示状態」の3パターン
・上下するシートの中にRecyclerViewを入れて、シートの上下操作とリストのスクロール操作に競合が起きないようにする
上部を起点にした動作という点以外は、Android開発者お馴染みのBottomSheetのような動きになります。
とはいえ、BottomSheetは現状下から表示する前提のViewであり、公式のBottomSheetBehaviorのドキュメントを見てもスワイプの向きを変更するようなメソッドは公開されていないためBottomSheetを採用する案では今回の要件を満たせそうにありませんでした。
そこで、BottomSheetBehaviorをカスタマイズしているサードパーティ製のライブラリの採用や自力でのカスタマイズといった案を検討したものの、以下の理由から採用を見送りました。
・今後BottomSheetBehaviorのアップデートの恩恵を受けにくくなる
・バージョンアップによる不具合等が発生した際のメンテコストが高い
そこで別の案として目をつけたのがMotionLayoutです。
MotionLayoutとは
Androidエンジニアの方には、もはやお馴染み、アニメーションを簡単に実現できるレイアウトです。 基本的な使い方については公式ページを参考にしてください。
目をつけた理由としては
・公式のサンプル集にBottomSheetのような動きをしている例があったので応用できるのではないかと考えたこと
・Transitionを用意することで複数の状態を管理できそうだったこと
・一般的な実装の範疇で今回の表現を実現できそうだったこと
などです。
それでは実装のサンプルと注意点についてご紹介します。
実装サンプル(いくつか抜粋)
前提
下記のバージョンを利用しています。
androidx.constraintlayout:constraintlayout:2.1.3sample_root_view.xml
BottomSheetっぽい動きをさせるViewを定義している画面のレイアウトです。
地図(sample_map)の上にMotionLayoutが表示されるような構成です。
<androidx.constraintlayout.widget.ConstraintLayout
    android:layout_width="match_parent"
    android:layout_height="match_parent">

    <!-- 地図のView -->
    <View
        android:id="@+id/sample_map"
        android:layout_width="0dp"
        android:layout_height="0dp"
        app:layout_constraintBottom_toBottomOf="parent"
        app:layout_constraintEnd_toEndOf="parent"
        app:layout_constraintStart_toStartOf="parent"
        app:layout_constraintTop_toTopOf="parent" />

    <!-- BottomSheetっぽい動きをさせるMotionLayoutをラップしたView -->
    <...SampleMotionLayout
        android:layout_width="0dp"
        android:layout_height="0dp"
        app:layout_constraintBottom_toBottomOf="parent"
        app:layout_constraintEnd_toEndOf="parent"
        app:layout_constraintStart_toStartOf="parent"
        app:layout_constraintTop_toTopOf="parent"
        app:sampleViewModel="@{sampleViewModel}"/>

</androidx.constraintlayout.widget.ConstraintLayout>
SampleMotionLayout.kt
MotionLayoutを表示するためのカスタムビューです。
後述の引っかかりポイントで詳しく紹介しますが、MotionLayoutによって地図がさわれなくなってしまうので、カスタムView内でMotionLayoutを生成してaddしています。
・MotionLayoutの裏にあるViewにタッチイベントを流すかどうかを制御します
・MotionLayoutのTransitionの状態をViewModelに流したり逆に設定したりします
class SampleMotionLayout @JvmOverloads constructor(
    context: Context,
    attrs: AttributeSet? = null,
    defStyleAttr: Int = 0
) : FrameLayout(context, attrs, defStyleAttr) {

    private val binding = DataBindingUtil.inflate<SampleMotionLayoutViewBinding>(
        LayoutInflater.from(context),
        R.layout.sample_motion_layout_view,
        this,
        true
    )
    private val motionLayout = (binding.root as MotionLayout).apply {
        setTransitionListener(object : TransitionListener {
            override fun onTransitionTrigger(
                motionLayout: MotionLayout?,
                triggerId: Int,
                positive: Boolean,
                progress: Float
            ) {
            }

            override fun onTransitionStarted(
                motionLayout: MotionLayout?,
                startId: Int,
                endId: Int
            ) {
            }

            override fun onTransitionChange(
                motionLayout: MotionLayout?,
                startId: Int,
                endId: Int,
                progress: Float
            ) {
            }

            override fun onTransitionCompleted(motionLayout: MotionLayout?, currentId: Int) {
                when (currentId) {
                    R.id.collapse_state -> {
                        sampleViewModel?.changeMotionState(SampleMotionState.COLLAPSE)
                    }
                    R.id.half_expanded_state -> {
                        sampleViewModel?.changeMotionState(SampleMotionState.HALF_EXPANDED)
                    }
                    R.id.expanded_state -> {
                        sampleViewModel?.changeMotionState(SampleMotionState.EXPANDED)
                    }
                }
            }
        })
    }
    private val motionAnchorPullArea: View
    private val scrollableArea: View

    var sampleViewModel: SampleMotionLayoutViewModel? = null


    init {
        removeAllViews()
        addView(binding.root)
        motionAnchorPullArea = binding.sampleListThumb // つまみ部分
        scrollableArea = binding.sampleRecyclerViewList // リスト部分
    }

    fun setViewModel(sampleViewModel: SampleMotionLayoutViewModel) {
        this.sampleViewModel = sampleViewModel
        binding.viewModel = sampleViewModel
    }

    override fun onInterceptTouchEvent(motionEvent: MotionEvent): Boolean {
        val isInProgress = (0.0f < motionLayout.progress && motionLayout.progress < 1.0f)
        val isInTargetPullArea = touchEventInsideTargetView(motionAnchorPullArea, motionEvent)
        val isInTargetScrollableArea = touchEventInsideTargetView(scrollableArea, motionEvent)
        return if (isInProgress || isInTargetPullArea || isInTargetScrollableArea) {
            // motionLayoutにイベントを流す
            super.onInterceptTouchEvent(motionEvent)
        } else {
            // motionLayoutにイベントを流さない
            true
        }
    }

    private fun touchEventInsideTargetView(view: View, motionEvent: MotionEvent): Boolean {
        if (view.left < motionEvent.x && motionEvent.x < view.right &&
            view.top < motionEvent.y && motionEvent.y < view.bottom
        ) {
            return true
        }
        return false
    }
}

@BindingAdapter("sampleViewModel")
fun SampleMotionLayout.setSampleViewModel(sampleViewModel: SampleMotionLayoutViewModel?) {
    sampleViewModel ?: return
    this.setViewModel(sampleViewModel)
}


@BindingAdapter("sampleMotionState")
fun MotionLayout.setSampleMotionState(state: SampleMotionState?) {
    when (state) {
        SampleMotionState.COLLAPSE -> {
            transitionToState(R.id.collapse_state)
        }
        SampleMotionState.HALF_EXPANDED -> {
            transitionToState(R.id.half_expanded_state)
        }
        SampleMotionState.EXPANDED -> {
            transitionToState(R.id.expanded_state)
        }
        else -> {
            // do nothing
        }
    }
}
sample_motion_layout_view.xml
前述したSampleMotionLayout.ktで生成しているViewの中身です
MotionLayoutの定義はこちらに記載されてます。
<androidx.constraintlayout.motion.widget.MotionLayout
    android:id="@+id/sample_motion_layout"
    android:layout_width="match_parent"
    android:layout_height="match_parent"
    app:layoutDescription="@xml/sample_motion_scene"
    app:sampleMotionState="@{viewModel.motionState}">


    <!-- リスト部分 -->
    <androidx.recyclerview.widget.RecyclerView
        android:id="@+id/sample_recycler_view_list"
        android:layout_width="0dp"
        android:layout_height="0dp"
        app:layout_constraintTop_toTopOf="parent"
        app:layout_constraintStart_toStartOf="parent"
        app:layout_constraintEnd_toEndOf="parent"
        app:layout_constraintBottom_toBottomOf="parent" />

    <!-- つまみ部分 -->
    <androidx.constraintlayout.widget.ConstraintLayout
        android:id="@+id/sample_list_thumb"
        android:layout_width="0dp"
        android:layout_height="40dp"
        android:paddingVertical="8dp"
        app:layout_constraintEnd_toEndOf="parent"
        app:layout_constraintStart_toStartOf="parent"
        app:layout_constraintBottom_toBottomOf="parent">

            <ImageView
                android:id="@+id/ic_pull"
                android:layout_width="wrap_content"
                android:layout_height="8dp"
                android:src="@drawable/sample_list_thumb"
                app:layout_constraintTop_toTopOf="parent"
                app:layout_constraintBottom_toBottomOf="parent"
                app:layout_constraintStart_toStartOf="parent"
                app:layout_constraintEnd_toEndOf="parent"/>

    </androidx.constraintlayout.widget.ConstraintLayout>

</androidx.constraintlayout.motion.widget.MotionLayout>
sample_motion_scene.xml
MotionLayoutに設定するMotionSceneファイルです。
最小→中間、中間→最大の2パターンのTransitionを定義しています。
実装するまで知りませんでしたが、dragDirectionに指定する値が同じTransitionが複数共存できるみたいです。
これによってBottomSheetBehaviorの「STATE_COLLAPSED」「STATE_HALF_EXPANDED」「STATE_EXPANDED」のようなViewの3つの状態を定義しています。
<?xml version="1.0" encoding="utf-8"?>
<MotionScene xmlns:android="http://schemas.android.com/apk/res/android"
    xmlns:motion="http://schemas.android.com/apk/res-auto">

    <!-- 最小→中間 -->
    <Transition
        motion:constraintSetStart="@id/collapse_state"
        motion:constraintSetEnd="@id/half_expanded_state"
        motion:duration="100">

        <OnSwipe
            motion:dragDirection="dragDown"
            motion:touchAnchorId="@id/sample_list_thumb"
            motion:touchAnchorSide="bottom"
            motion:nestedScrollFlags="disableScroll" />

    </Transition>

    <!-- 中間→最大 -->
    <Transition
        motion:constraintSetStart="@id/half_expanded_state"
        motion:constraintSetEnd="@id/expanded_state"
        motion:duration="100">

        <OnSwipe
            motion:dragDirection="dragDown"
            motion:touchAnchorId="@id/sample_list_thumb"
            motion:touchAnchorSide="bottom"
            motion:nestedScrollFlags="disableScroll" />

    </Transition>

    <!-- 最小状態 -->
    <ConstraintSet android:id="@id/collapse_state">

        <Constraint android:id="@id/sample_recycler_view_list">
            <Layout
                android:layout_width="0dp"
                android:layout_height="0dp"
                motion:layout_constraintTop_toTopOf="parent"
                motion:layout_constraintEnd_toEndOf="parent"
                motion:layout_constraintStart_toStartOf="parent" />
        </Constraint>

        <Constraint android:id="@id/sample_list_thumb">
            <Layout
                android:layout_width="0dp"
                android:layout_height="@dimen/thumb_height"
                motion:layout_constraintTop_toTopOf="parent"
                motion:layout_constraintEnd_toEndOf="parent"
                motion:layout_constraintStart_toStartOf="parent" />
        </Constraint>

    </ConstraintSet>

    <!-- 中間状態 -->
    <ConstraintSet android:id="@id/half_expanded_state">

        <Constraint android:id="@id/sample_recycler_view_list">
            <Layout
                android:layout_width="0dp"
                android:layout_height="@dimen/half_expanded_height"
                motion:layout_constraintTop_toTopOf="parent"
                motion:layout_constraintEnd_toEndOf="parent"
                motion:layout_constraintStart_toStartOf="parent" />
        </Constraint>

        <Constraint android:id="@id/sample_list_thumb">
            <Layout
                android:layout_width="0dp"
                android:layout_height="@dimen/thumb_height"
                motion:layout_constraintTop_toBottomOf="@id/sample_recycler_view_list"
                motion:layout_constraintEnd_toEndOf="parent"
                motion:layout_constraintStart_toStartOf="parent" />
        </Constraint>

    </ConstraintSet>

    <!-- 最大状態 -->
    <ConstraintSet android:id="@id/expanded_state">

        <Constraint android:id="@id/sample_recycler_view_list">
            <Layout
                android:layout_width="0dp"
                android:layout_height="0dp"
                motion:layout_constraintTop_toTopOf="parent"
                motion:layout_constraintEnd_toEndOf="parent"
                motion:layout_constraintStart_toStartOf="parent"
                motion:layout_constraintBottom_toTopOf="@id/sample_list_thumb" />
        </Constraint>

        <Constraint android:id="@id/sample_list_thumb">
            <Layout
                android:layout_width="0dp"
                android:layout_height="@dimen/thumb_height"
                motion:layout_constraintEnd_toEndOf="parent"
                motion:layout_constraintBottom_toBottomOf="parent"
                motion:layout_constraintStart_toStartOf="parent" />
        </Constraint>
    </ConstraintSet>
</MotionScene>
引っかかりポイント
1.TransitionにOnSwipeを設定するとMotionLayoutの裏のViewが触れない
実装を始めて気づいたのですが、MotionSceneファイルのTransitionにOnSwipeを設定すると、MotionLayoutの表示されている領域全てがタッチイベントの領域になるようです。
そのため、Viewの上に覆いかぶさるように表示するBottomSheetのような表現とは相性が悪いことがわかりました。
※OnClickの場合はAnchorに指定したViewだけがタッチイベント領域として扱われるようで裏のViewも触れました。
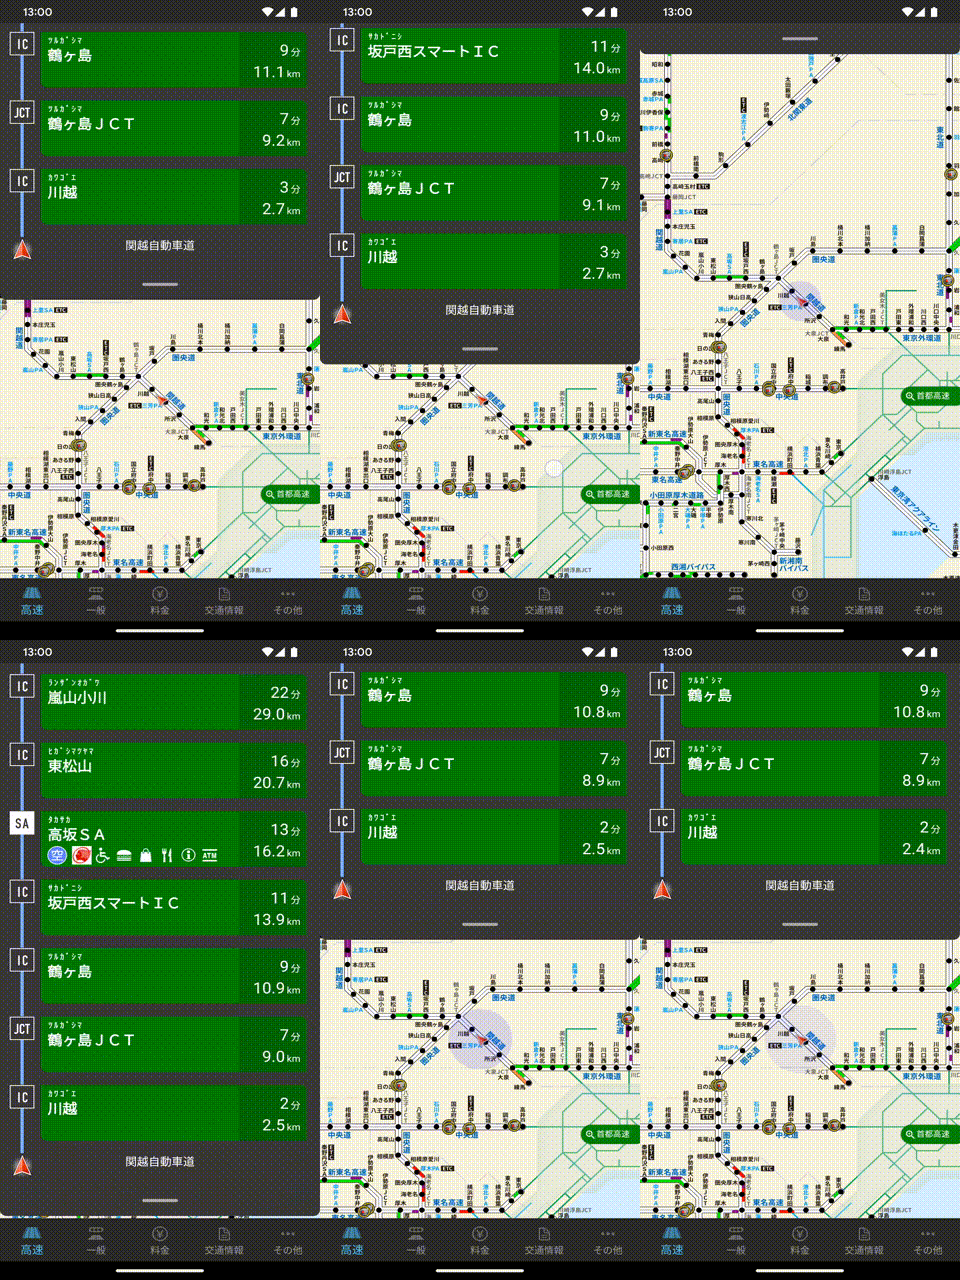
この問題については下記の記事で紹介されているonInterceptTouchEventを用いた方法を参考に回避させていただきました。
MotionLayoutで上下させたいViewを触っている時はMotionLayoutにイベントを流し、それ以外の地図部分を触っている時はMotionLayoutにイベントを流さない制御になるようにしています。
今回はシートのつまみ部分と、リスト操作をしている時にMotionLayoutにイベントを流したいので2つのViewを対象に判定をしています。
※↓前述したSampleMotionLayout.ktから抜粋
override fun onInterceptTouchEvent(motionEvent: MotionEvent): Boolean {
        val isInProgress = (0.0f < motionLayout.progress && motionLayout.progress < 1.0f)
        val isInTargetPullArea = touchEventInsideTargetView(motionAnchorPullArea, motionEvent)
        val isInTargetScrollableArea = touchEventInsideTargetView(scrollableArea, motionEvent)
        return if (isInProgress || isInTargetPullArea || isInTargetScrollableArea) {
            // motionLayoutにイベントを流す
            super.onInterceptTouchEvent(motionEvent)
        } else {
            // motionLayoutにイベントを流さない
            true
        }
    }

    private fun touchEventInsideTargetView(view: View, motionEvent: MotionEvent): Boolean {
        if (view.left < motionEvent.x && motionEvent.x < view.right &&
            view.top < motionEvent.y && motionEvent.y < view.bottom
        ) {
            return true
        }
        return false
    }
2.RecyclerViewとMotionLayoutのスクロールイベントが競合する
RecyclerViewなどスクロール可能なViewあるあるだと思うのですが、スワイプ動作を伴うViewの中で利用しようとしても親のViewのイベントに邪魔されてしまい意図した通りに動いてくれない場合があります。
MotionLayoutでも同じようで、↓のgifは何も制御していない場合の動きです。
リストの一番上までスクロールした状態でスクロールすると勝手にMotionLayoutのイベントが発生してしまいシートが隠れてしまいました。
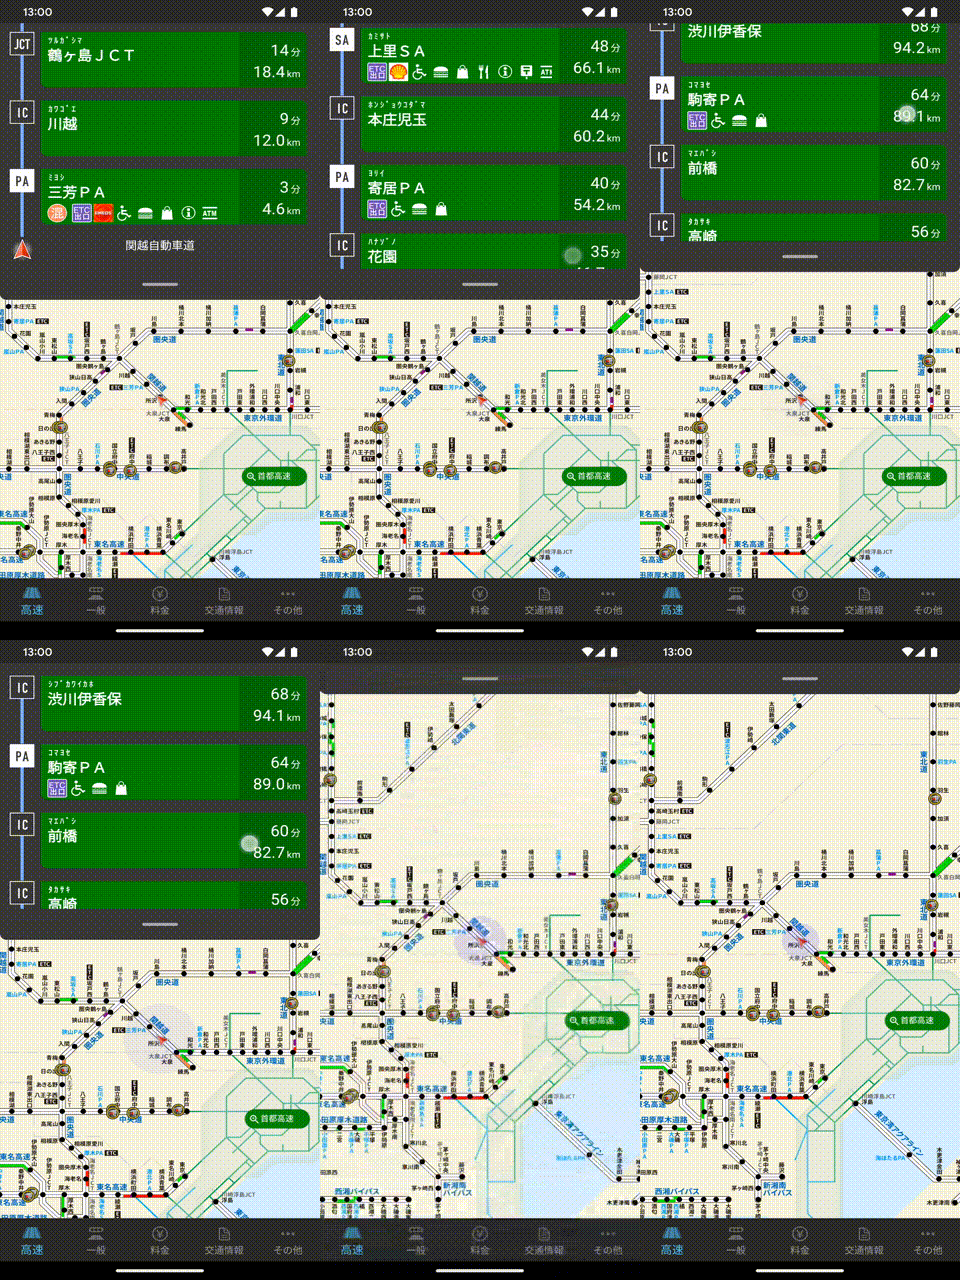
これについてはmotion:nestedScrollFlags="disableScroll"を指定することで回避できました。
FLAG_DISABLE_SCROLLはMotionLayout内のonStartNestedScrollメソッドで利用されており、指定することでメソッドの返り値がfalseになってネストされたRecyclerViewのスクロール操作だけが有効になるようです。
※↓前述したsample_motion_scene.xmlから抜粋
<OnSwipe
     motion:dragDirection="dragDown"
     motion:touchAnchorId="@id/sample_list_thumb"
     motion:touchAnchorSide="bottom"
     motion:nestedScrollFlags="disableScroll" />
BottomSheetのように使う方法
実装していると特定のTransitionの時だけ実行したい処理や、逆にコードから特定のTransitionに変更したい時があります。
MotionLayoutではそれぞれ以下のクラスを利用して実現できました。
TransitionListenerを使う
onTransitionCompletedでTransitionの変更を検知できます。
(BottomSheetでいうところのBottomSheetCallback.onStateChangedみたいに使えます)
currentIdにはMotionSceneファイルのConstraintSetで指定したIDが渡されます。そのため、現在MotionLayoutがどの状態で表示されているのかがわかります。
サンプルでは渡ってきたcurrentIdをEnumに変換してViewModel側で処理を行うようにしています。
これによりシートの状態に応じて実行したい処理を分けています。
※↓前述したSampleMotionLayout.ktから抜粋
private val motionLayout = (binding.root as MotionLayout).apply {
        setTransitionListener(object : TransitionListener {
            override fun onTransitionTrigger(
                motionLayout: MotionLayout?,
                triggerId: Int,
                positive: Boolean,
                progress: Float
            ) {
            }

            override fun onTransitionStarted(
                motionLayout: MotionLayout?,
                startId: Int,
                endId: Int
            ) {
            }

            override fun onTransitionChange(
                motionLayout: MotionLayout?,
                startId: Int,
                endId: Int,
                progress: Float
            ) {
            }

            override fun onTransitionCompleted(motionLayout: MotionLayout?, currentId: Int) {
                when (currentId) {
                    R.id.collapse_state -> {
                        sampleViewModel?.changeMotionState(SampleMotionState.COLLAPSE)
                    }
                    R.id.half_expanded_state -> {
                        sampleViewModel?.changeMotionState(SampleMotionState.HALF_EXPANDED)
                    }
                    R.id.expanded_state -> {
                        sampleViewModel?.changeMotionState(SampleMotionState.EXPANDED)
                    }
                }
            }
        })
    }
MotionLayout.transitionToStateを使う
MotionLayout.transitionToStateでMotionLayoutを任意の状態に変更することができます。
(BottomSheetでいうところのBottomSheetBehavior.setStateみたいに使えます)
transitionToStateにはMotionSceneファイルで指定したConstraintSetのIDを指定します。
サンプルではBindingAdapterを作成し、渡されたEnumの値に応じてMotionLayoutの状態を変更するような実装にしました。
これでViewModel側からMotionLayoutを特定の表示状態に変更することができます。
※↓前述したSampleMotionLayout.ktから抜粋
@BindingAdapter("sampleMotionState")
fun MotionLayout.setSampleMotionState(state: SampleMotionState?) {
    when (state) {
        SampleMotionState.COLLAPSE -> {
            transitionToState(R.id.collapse_state)
        }
        SampleMotionState.HALF_EXPANDED -> {
            transitionToState(R.id.half_expanded_state)
        }
        SampleMotionState.EXPANDED -> {
            transitionToState(R.id.expanded_state)
        }
        else -> {
            // do nothing
        }
    }
}
おわりに
ここまでMotionLayoutを使ったBottomSheetっぽい動きの実装について紹介してきました。
実装してみた感想ですが、単純に画面下部からシートを上げ下げするようなUIであればMotionLayoutは選択肢に入ってこないのかなと思います。(やっぱり純正のBottomSheetを使う方が圧倒的に楽です)
『渋滞情報マップ by NAVITIME』のように画面上部から引き下げるような特殊な事情があったり、アニメーションにこだわりたいと言う場合は選択肢にも入ってくるかもしれません。
本記事が同じような壁に直面した方の参考になりますと幸いです。
