杉玉を作ってみた / DIY Sugitama

造り酒屋さんの入り口に吊るされている緑の球状の物体を見たことがありますか?杉玉と言い、奈良県にある大神(おおみわ)神社の神体山にある杉の木から作られるものとされています。
この習慣は江戸時代中期には全国に広がったようですが、起源はよくわかっておらず、古くは杉の葉を束ねて吊るし酒箒や酒林などと呼んでいました。それが時代と共に球状に成長し、現在の杉玉(酒林ともいう)の形になったというわけですね。
今回お世話になっている酒蔵の杉玉を新調するにあたり、DIYさせていただけることになりせっかくなので記録を記事にしました。
Have you ever seen a green ball often hung at the entrance of a sake brewery? It is called Sugitama(杉玉; a cedar ball) and was traditionally made of cedar trees on the sacred mountain of the Omiwa Shrine in Nara Prefecture. This custom spread throughout Japan by the middle of the Edo period (1603-1868), but its origin is not well-known. In the old days, cedar leaves were bundled and hung, and people called Sakabayashi(酒林; a sake forest) or Sakabouki(酒箒; a sake broom). Over time, it became a spherical shape, the form of today's Sugitama (also called Sakabayashi). Since the sake brewery I work for decided to renew Sugitama, I got this opportunity to DIY it, so I wrote an article about it.
杉玉はなぜ必要? / Why Sugitama?
青々とした杉玉が酒蔵に吊るされると「新酒」ができたサイン、1年経って秋口頃枯れた色になってくると「ひやおろし」がでてくる頃と目安にもなっています。
他にも昔は酒が腐ることも多く、防腐剤代わりに吊るしていたという説もあります。
A fresh green Sugitama hanging in a sake brewery tells that "Shinshu(新酒; newly brewed sake)" has been brewed. The ball turns a withered color around the beginning of fall when "Hiyaoroshi(ひやおろし; sake matured over the summer)" is ready. It is said that breweries hung a Sugitama for a preservative purpose because sake often got spoiled in the old days.
杉玉の作り方 / How to make a Sugitama
作り方についてはさまざまなサイトで分かりやすく説明されているので、ここではコツに重点を置いて説明します。
また核になる部分は本来、竹を使って作られますが残念ながらそんな高等技術は持ち合わせておらず、初心者でも取り組みやすい針金を使う方法を採用しました。
Since various websites provide easy-to-understand explanations of how to make a Sugitama, I focused on writing only tips and tricks here. Usually, bamboo is used in the core of a Sugitama, but I do not have such an advanced technique, unfortunately. So I used wire instead, which is easy for beginners.
材料と道具(今回使ったもの) / Materials and Tools
<杉玉の核>
針金2種(太・盆栽用 3.0mm、細・盆栽用 1.0mm)、金網(穴のサイズ 18 x 26mm)、麻紐、ラジオペンチ
<杉玉の外側>
杉の葉(杉の枝にして10本分くらい)、剪定ハサミ、刈込用剪定ハサミ、ブルーシート
<The core part> 2 kinds of wire (3.0 mm for thick bonsai, 1.0 mm for thin bonsai), wire mesh (hole size 18 x 26 mm), hemp cord, radio pliers
<External part> Cedar leaves (about 10 cedar branches), pruning shears, pruning shears for trimming, blue sheet

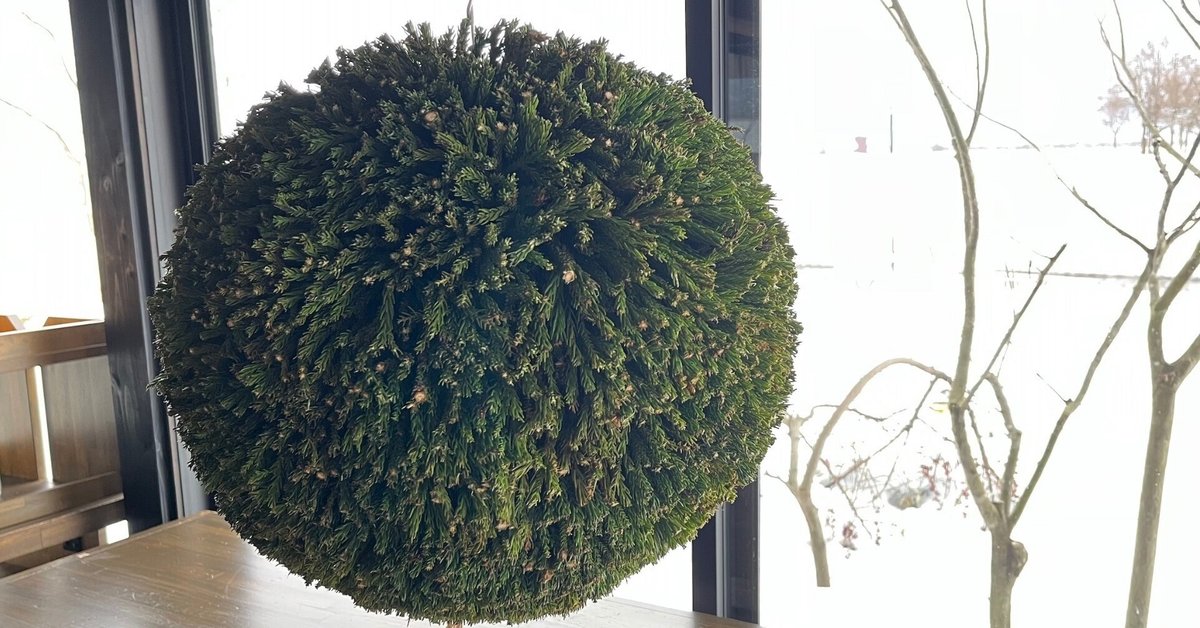
スペック / Spec
大きさ:直径約40cm
杉の葉:新潟県某山林の産出
Size: approx. 40 cm in diameter
Cedar leaf: Produced in a certain mountain forest in Niigata Prefecture
手順 / Steps
Step1. 杉の葉を調達しておきます。
杉玉作成に1日ほどかかるのでその前日までに用意しましょう。今回は全く伝手がなかったので、市役所に相談し近くの森林組合を紹介していただきました。知り合いから譲ってもらえるなどあれば尚良いですし、あとは杉の伐採業者なども調達に応じてくれるかもしれません。
Step 1: Procure cedar leaves.
It usually takes about one day to make a Sugitama, so I recommend acquiring cedar leaves the day before. We had no idea where we could get leaves, so we consulted the city office, and they introduced us to a nearby forest owners' association. It would be better if you could get them from someone you know. A cedar logging company may also be able to help you.

Step2. 杉玉の核を作成します。
完成形は核の2〜3倍の大きさになります。今回はそれを見越して直径20cmくらいのサイズとしました。まずは太い針金で核の直径のサイズの輪を3つ作り球状に組み立て、細い針金で接合部を補強し骨組みを作成します。太い針金はビニールテープでくっつけて輪にするという方法もあるようです。
Step 2: Create the care part of Sugitama the sugitama.
The final size of a sugitama will be two to three times the core. Anticipating this, I make the core with a 20 cm in diameter. First, I made three rings of the same diameter as the core using thick wire and assembled them into a sphere, then reinforced the joints with a thin wire to make a framework. Alternatively, you can use vinyl tape to attach the tick wire to the rings.

Step3. 核の骨組みに金網を巻き付けます。
細い針金で固定していきますが、最終的に杉の葉で固められるので核接合部あたりに軽く止めてあれば大丈夫です。併せて天辺に吊り下げるための麻紐を結んで延ばしておきます。紐の長さは完成形サイズ+吊り下げたい長さ分が最低限必要です。
Step 3: Wrap the wire mesh around the core framework.
The wire mesh is secured with a thin wire, but it is fine if it is lightly fastened around the core junction, as it will eventually be hardened with cedar leaves. Tie and extend the hemp cord for hanging the top. The cord's minimum length should be the size of the sugitama and the length you wish to hang it from.

Step4. 使用する杉の葉を枝から切り離します。
調達できた葉の具合にもよりますが、今回はひとつひとつの枝振りが大きかったので使用できる小枝に分解します。この時、完成形でカットする位置に葉がしっかり高い密度で残るような小枝で構成することがコツです。写真のうちどちらが完成時に見栄えがするか…おわかりですね。
雌花もかさ張るので先にカットしておくと作りやすいです。
Step 4: Cut the cedar leaves from the branches.
This step may not be necessary, depending on the condition of the cedar leaves. The trick is to use twigs that will leave a high density of leaves where they will be cut in the finished form. You can see which of the photos looks better when finished. Female flowers are also bulky, so I recommend you to cut them off first.

Step5. 本丸、杉の葉を核に下部から挿していきます。
核部分を天井の梁などから吊り下げ、金網の穴という穴に目一杯杉の枝を詰めこみます。しかし、先に下部の密度だけを濃くしすぎると後で上部に枝が入りきらなくなってしまいます。一度下から上にかけてバランスよく挿したあと、補強する方が良いでしょう。
Step 5: Insert cedar leaves into the core from the bottom.
Hang the core from a ceiling beam or something like that, and insert cedar branches into the holes in the wire mesh as much as you can. However, if the density of the lower part is too high, the upper part will not be able to hold enough branches. It would be better to insert the branches once from the bottom to the top in a balanced manner and then reinforce them.

Step6. 杉玉をカットします。
上部まで杉の枝を挿し込むと某万博で見たモ◯ゾーのような姿になります。そうなったら目標のサイズまで刈込用剪定ハサミで刈込み開始です。万が一刈り込み過ぎた、もしくは密度の低い場所が見つかったなどがあっても心配いりません。写真のように追加で枝を挿し、同じようにカットしていけば大丈夫です。
Step 6: Cut the cedar ball.
If you insert the cedar branches up to the top, it will look like Mo??zo you saw at a certain Expo. Then, start trimming with pruning scissors to the target size. Don't worry if you find a place where you have trimmed too much or too little. Just insert additional branches as shown in the photo and cut in the same way.

Step7. 完成!
遠くから見ても球状になるように剪定ハサミを駆使して最終調整をします。重力のせいか下部が面長になりがちなので真横だけでなく下から上からもよく見てください。円形の作成が難しいという方は段ボールなどであらかじめ型を用意し、当てながらカットするという方法もあるようです。
Step7. completed!
Make final adjustments using pruning scissors so that the tree will look spherical from a distance. The bottom part tends to be elongated due to gravity, so please look at it carefully not only from the side but also from the bottom and top. If you find it difficult to create a circular shape, you can prepare a mold in advance using cardboard, and cut it while applying the mold.
注意点 / Note
葉をカットすると強い杉の香りが漂います。室内で行う場合は換気の良い場所で行った方が良いでしょう。
同時に杉のエキスで辺りがベタつきます。ブルーシート上で行うことと道具の最後の手入れは念入りに行った方が良いです。
核に針金を使用しています。廃棄の際はお焚き上げ等のBoxにそのまま放り込むのはやめた方が良いと思います。分解して各自治体の廃棄方法に従いましょう。
Cutting the leaves will give off a strong cedar aroma. If you do this indoors, it is best to do it in a well ventilated area.
At the same time, the area will be sticky with cedar extract. It is better to do it on a blue sheet and to take care of the tools at the end.
Wire is used for a core part. When disposing of it, you should not throw it directly into a box for burning (at least in Japan). Disassemble it and follow the disposal method of each municipality.
杉玉小話 / Additional stories with cedar
殺菌効果について / About sterilizing effect
森の中にある木々はそれぞれフィトンチッド/Phyton cide という作用を持っており、「殺菌」「抗酸化作用」「消臭効果」を得られます。「殺菌」は微生物を殺し、「抗酸化作用」は酸化により腐敗することを防ぎ、「消臭効果」は虫や動物の死体などの腐臭を抑えます。Phyton=植物、cide=殺すというやや恐ろしめのワードですが、これは微生物や虫から自身を守る木々の防衛策であり森林でさまざまな生き物と共存するため術だったのです。
杉はテルペン類という化学物質によって殺菌を行い、アルコールと混合するとより殺菌作用が高まるという研究結果もあるようです。これより昔の人が防腐剤として酒林とか酒箒とかにして杉の葉を蔵に持ち込んだのは、納得のいくお話ですね。
またこのテルペン類にはヒトをリラックスさせる効果もあるそうです。
ちなみによく聞く滅菌、殺菌、抗菌の言葉の違いについては、「滅菌」は
存在するあらゆる菌を根こそぎ殺すこと、「殺菌」は量は問わずただ菌を殺すこと(残る場合もある)、「抗菌」は菌を増殖させないことという意味合いがあります。「除菌」は「殺菌」と同じ意味ですが、医療品や洗剤等の商品に使われています。
Each tree in the forest has its own phytoncide, which has sterilizing, antioxidant, and deodorizing effects. Phytoncide" kills microorganisms, "antioxidant" prevents oxidation and decomposition, and "deodorant" controls the smell of rotting insects and animal corpses, etc. Although the words "phytoncide" are somewhat scary, they are the trees' defense measures to protect themselves from microorganisms and insects and to coexist with various creatures in the forest. It was a way to coexist with various creatures in the forest. Cedar is sterilized by chemicals called terpenes, and some studies have shown that when mixed with alcohol, the sterilizing effect is enhanced. It makes sense that people in the past brought cedar leaves into warehouses to use as antiseptic agents in sake forests and sake brooms. These terpenes are also said to have a relaxing effect on people.
Let's talk about the difference between "sterilization," "disinfection," and "antibacterial". Starting with "sterilization", it means to kill all existing bacteria, "disinfection" means simply to kill bacteria, regardless of the amount (some may remain), and "antibacterial" means not to allow bacteria to multiply. Frequently "Sanitization" is used as the same meaning as "disinfection," but it's used basically in products such as medical products and detergents in Japan.