ComfyUI上でFLUX.1を使用するための補足(NF4,GGUF対応ほか)

※ Last update 9-7-2024
※ (9-7) 分かりづらい場所があったので修正しました。
※ (8-15) XのGrokに搭載されたFLUX.1の生成機能についての記事を書きました。ご参考まで。
※ 主に「分割されたモデル(1.~2.参照)」「NF4モデル(3.参照)」「GGUFモデル(4.参照)」を使用するための情報を記載しています。「起動オプション(6.参照)」も載せてあります。
■ 0. 概要
▼ 0-0. 本記事について
本記事は、既に公開中の解説記事の追加情報を中心に記載しています。
上記の記事
1つのファイルに統合されたFP8版のモデルと、それに合わせて設計されたワークフローを使用するための解説。本記事
ファイルが分割されたモデル(FP16版とFP8版がある)と、それに合わせて設計されたワークフローを使用するための補足。参考まで、統合されたモデルについても記載。
さらに、後から登場したNF4モデル、GGUFモデルへの対応方法も説明。
▼ 0-1. 参考
モデルについては、下記の記事(と、そこからリンクされたさらに古い記事)を参照してください。
■ 1. 分割されたモデルのダウンロード
初出のオリジナルを含む、CLIP、UNET、VAEが統合されていないモデルです。こちらを用いるワークフローを使用する場合は、それぞれのファイルをダウンロードして、適切なディレクトリに設置しておく必要があります。
▼ 1-1. ComfyUI\models\clip\ に設置するファイル
URLとダウンロードするファイルは、下記のとおりです。メインRAMが32GB以上の場合はt5xxl_fp16がおすすめとのことです。
https://huggingface.co/comfyanonymous/flux_text_encoders/tree/main
clip_l.safetensors (234MB)
t5xxl_fp16.safetensors (9.11GB)
または
t5xxl_fp8_e4m3fn.safetensors (4.55GB)
▼ 1-2. ComfyUI\models\vae\ に設置するファイル
URLとダウンロードするファイルは、下記のとおりです。
▼ 1-3a. ComfyUI\models\unet\ に設置するファイル
FLUX.1 [schnell] を使用する場合、URLとダウンロードするファイルは、下記のとおりです。FLUX.1 [dev] の場合は次項を参照してください。
https://huggingface.co/black-forest-labs/FLUX.1-schnell/tree/main
flux1-schnell.sft (22.1GB)
FP8に剪定(精度を落として容量を削減)したモデルも配布されています。占有GPUメモリ(VRAM)の使用量の削減と、読み込み時間の短縮がメリットかもしれません。
https://huggingface.co/Kijai/flux-fp8/tree/main
flux1-schnell-fp8.safetensors (11.0GB)
▼ 1-3b. FLUX.1 [dev] を使用する場合(参考)
FLUX.1 [schnell] ではなく FLUX.1 [dev] を使用する場合は、ダウンロード先が異なります。
https://huggingface.co/black-forest-labs/FLUX.1-dev/tree/main
flux1-dev.sft (22.1GB)
FP8に剪定(精度を落として容量を削減)したモデルも配布されています。占有GPUメモリ(VRAM)の使用量の削減と、読み込み時間の短縮がメリットかもしれません。
https://huggingface.co/Kijai/flux-fp8/tree/main
flux1-dev-fp8.safetensors (11.0GB)
■ 2. ワークフローのダウンロード
本項に掲載したワークフローは4種類あります。
先に書いておくと、執筆時点では「分割モデル用のワークフロー(schnell)」が古いの内容のままなので(更新し忘れ?)、「分割モデル用のワークフロー(Dev)」の使用をおすすめします。
▼ 2-1. ComfyUI公式のワークフロー
ComfyUI側が公開した、分割モデルに対応したワークフローをダウンロードします。まずは下記のURLへアクセスしてください。
Flux Examples (ComfyUI_examples)
https://comfyanonymous.github.io/ComfyUI_examples/flux/
▼ 2-2. 分割モデル用のワークフロー(Dev)
「Flux Examples > Regular Full Version > Flux Dev」に掲載された画像を任意の場所にダウンロードして、ComfyUIの画面にドラッグ&ドロップすると使用できます。

ワークフローの初期状態は下記の画像のとおりです。「weight_dtype」を変更して、モデルをFP8の精度で使用することもできます。なお、FP8版のモデルを使用する場合は「default」のままで構いません。
こちらのワークフローでSchnell版のモデルを使用する場合は、stepsを4に変更することを忘れないでください。

▼ 2-3. 分割モデル用のワークフロー(Schnell)
「Flux Examples > Regular Full Version > Flul Schnell」に掲載された画像を任意の場所にダウンロードして、ComfyUIの画面にドラッグ&ドロップすると使用できます。

確認したところ、こちらは古い内容のままでした。現在でも使用することはできますが、Dev版のワークフローの方がおすすめです。

▼ 2-4. 統合モデル用のワークフロー(Dev)
参考まで、統合モデル用のワークフローも掲載しておきます。
「Flux Examples > Simple to use FP8 Checkpoint version > Flux Dev」に掲載された画像を任意の場所にダウンロードして、ComfyUIの画面にドラッグ&ドロップすると使用できます。

統合モデル用のワークフローはシンプルな作りになっています。

▼ 2-5. 統合モデル用のワークフロー(Schnell)
「Flux Examples > Simple to use FP8 Checkpoint version > Flux Schnell」に掲載された画像を任意の場所にダウンロードして、ComfyUIの画面にドラッグ&ドロップすると使用できます。

Dev版との違いは初期値のみです。

■ 3. NF4モデルへの対応
▼ 3-1. NF4について
Stable Diffusion WebUI ForgeがFLUX.1に対応するのと同時に、従来のFP16やFP8とは異なるNF4という形式を提唱したことが話題になっています。詳細については下記のトピックを確認してください。
[Major Update] BitsandBytes Guidelines and Flux #981
https://github.com/lllyasviel/stable-diffusion-webui-forge/discussions/981
NF4のモデルが既に複数出ているため、こちらを使用して生成できるようにします。下記の記事を参考にさせていただきました。
▼ 3-2. ComfyUIの準備
下記URLの拡張機能をインストールして、必要なパッケージを導入します。念のため、先にComfyUIをアップデートしておいてください。
コマンドプロンプトを開いてから「ComfyUI\custom_nodes」へ移動して、下記のコマンドを実行します。
git clone https://github.com/comfyanonymous/ComfyUI_bitsandbytes_NF4続いて、必要なパッケージをインストールします。下記のコマンドはポータブル版の場合です。
..\..\python_embeded\python.exe ..\..\python_embeded\Scripts\pip.exe install -r ComfyUI_bitsandbytes_NF4\requirements.txt通常版(ComfyUIのインストール先にvenvディレクトリがある)の場合は、下記のコマンドを順に実行してください。
..\venv\Scripts\activate
pip install -r ComfyUI_bitsandbytes_NF4\requirements.txt
deactivate
下記のような表示で実行を終了していれば成功です。コマンドプロンプトを閉じてください。
(略)
Requirement already satisfied: MarkupSafe>=2.0 in d:\aiwork\comfyui_windows_portable\python_embeded\lib\site-packages (from jinja2->torch->bitsandbytes>=0.43.0->-r ComfyUI_bitsandbytes_NF4\requirements.txt (line 1)) (2.1.5)
Requirement already satisfied: mpmath<1.4,>=1.1.0 in d:\aiwork\comfyui_windows_portable\python_embeded\lib\site-packages (from sympy->torch->bitsandbytes>=0.43.0->-r ComfyUI_bitsandbytes_NF4\requirements.txt (line 1)) (1.3.0)
Using cached bitsandbytes-0.43.3-py3-none-win_amd64.whl (136.5 MB)
Installing collected packages: bitsandbytes
Successfully installed bitsandbytes-0.43.3
▼ 3-3. モデルのダウンロードと設置
下記のURLよりファイルをダウンロードして、「ComfyUI\models\checkpoints\」へ移動してください。動作確認が取れている他のモデルは後述します。
https://huggingface.co/lllyasviel/flux1-dev-bnb-nf4
flux1-dev-bnb-nf4.safetensors (10.7GB)
または
flux1-dev-bnb-nf4-v2.safetensors (11.2GB)
(後者は調整を行ったバージョンで、こちらがおすすめ)
▼ 3-4. ワークフローの入手と読み込み
下記のURLへアクセスして画像をダウンロードしてください。保存場所は任意です。このワークフローはNF4モデル専用のようです。
ComfyUIを起動して、ワークフローを読み込みます。「Load」ボタンからも読み込めます。
▼ 3-5. 生成の実行
ここまでの手順が正しければ、画像の生成ができるはずです。

筆者の環境(Ryzen 5 3600、DDR4-3200_32GB、GeForve RTX 3060_12GB)にて、解像度1024x1024での生成時間は下記のとおりでした。同じStepsでも、NF4がFP8に比べて高速に生成できているのがわかります(リソース不足が改善したことが理由かもしれません)。
4 Steps - NF4 (flux1-bitte-guidance-bnb-nf4.safetensors)
16 秒4 Steps -FP8 (比較のための参考)
35 秒程度20 Steps - NF4 (flux1-dev-bnb-nf4.safetensors)
78 秒程度20 Steps - FP8 (比較のための参考)
145 秒程度
▼ 3-6. 他の利用可能なNF4モデル
確認したところ、bnb-nf4のモデルであれば利用できるようです。
flux1-nf4-weights
https://huggingface.co/silveroxides/flux1-nf4-weights/tree/main
flux1-bitte-bnb-nf4.safetensors
flux1-bitte-guidance-bnb-nf4.safetensors
flux1-salto-v***-bnb-nf4.safetensors
flux1-schnell-bnb-nf4.safetensors
flux1-schnell-nf4.safetensors (*)
(*) Cannot be loaded on the ComfyUI
■ 4. GGUFモデルへの対応
▼ 4-1. GGUFについて
GGUFは主にLLMで用いられているフォーマットです。パラメーター数増加に伴ってモデルが巨大化しているので、この形式で量子化かつビット数を下げることで、VRAM等の少ない環境でも手軽に利用できるようになります。
▼ 4-2. GGUF形式への対応方法
ComfyUIがGGUF形式に対応するためには、拡張ノードと必要なパッケージの両方をインストールする必要があります。下記はNF4対応の手順を置き換えたものなので、もし誤りがあればすみません。
下記URLの拡張機能をインストールして、必要なパッケージを導入します。念のため、先にComfyUIをアップデートしておいてください。
コマンドプロンプトを開いてから「ComfyUI\custom_nodes」へ移動して、下記のコマンドを実行します。
git clone https://github.com/city96/ComfyUI-GGUF続いて、必要なパッケージをインストールします。下記のコマンドはポータブル版の場合です。
..\..\python_embeded\python.exe ..\..\python_embeded\Scripts\pip.exe install -r ComfyUI-GGUF\requirements.txt通常版(ComfyUIのインストール先にvenvディレクトリがある)の場合は、下記のコマンドを順に実行してください。
..\venv\Scripts\activate
pip install -r ComfyUI-GGUF\requirements.txt
deactivate
手順が完了したらコマンドプロンプトを閉じます。「deactivate」の後で何も行わずに閉じる場合、deactivateは行わなくても構いません。
▼ 4-3. モデルのダウンロードと設置
下記のURLよりファイルをダウンロードして、「ComfyUI\models\unet」へ移動してください。
どれが良いかは環境にもよりますが、既にFP8とNF4が存在するため、利用のメリットがあるのはQ4以下ではないかと思います。十分にリッチな環境であれば、Q5以上やQ8、F16も選択肢に入ります。
[GGUF/unet] FLUX.1 Dev
https://huggingface.co/city96/FLUX.1-dev-gguf
flux1-dev-Q2_K.gguf (3.8GB)
flux1-dev-Q3_K_S.gguf (4.9GB)
flux1-dev-Q4_0.gguf (6.3GB)
~[GGUF/unet] FLUX.1 Schnell
https://huggingface.co/city96/FLUX.1-schnell-gguf
flux1-schnell-Q2_K.gguf (3.7GB)
flux1-schnell-Q3_K_S.gguf (4.9GB)
flux1-schnell-Q4_0.gguf (6.3GB)
~
低Stepsで生成できるモデル「Flux Fusion DS」にもGGUF版があるので、紹介しておきます。
Flux-Fusion-DS-merge-gguf-nf4-fp4-fp8-fp16
https://huggingface.co/Anibaaal/Flux-Fusion-DS-merge-gguf-nf4-fp4-fp8-fp16
gguf/FusionDS_v0_Q4.gguf (6.3GB)
gguf/FusionDS_v0_Q5.gguf (7.7GB)
gguf/FusionDS_v0_Q8.gguf (11.8GB)
▼ 4-4. ワークフローの作成
GGUF形式のモデルに対応したワークフローが無ければ、自分で用意する必要があります。ComfyUI側が公開した、分割モデルに対応したワークフローを改造します。まずは下記のURLへアクセスしてください。
Flux Examples (ComfyUI_examples)
https://comfyanonymous.github.io/ComfyUI_examples/flux/
「Regular Full Version > Flux Dev」に掲載された画像を任意の場所にダウンロードして、ComfyUIの画面にドラッグ&ドロップします。

ワークフローを読み込んだら、左上にある「Load Diffusion Model」のノードの上でクリックしてからDeleteを押すか、右クリックして「Remove」を選択すると、モデルを読み込むノードが消えます。

ノードを残しておきたい場合は、つながっている先の点を何も無いところまでドラッグ&ドロップするか、つながっている線の中央にある点をクリックして「Delete」を選択すると接続が切れます。

次は、何も無いところでダブルクリックをして「gguf」を検索すると、「Unet Loader (GGUF)」が見つかるので名前をクリックするとノードが追加されます。

追加したノードの「MODEL」のところにある点から、「ModelSamplingFlux」のノードにある「model」のところまでドラッグ&ドロップして線をつなげてください。これでワークフローは完成です。

▼ 4-5. GGUFモデルで画像を生成
準備ができたので生成を試してみます。念のためにワークフローを保存したい場合はメニューの「Save」から行ってください。
まず、ローダーにファイルを設定します。左右の矢印で選択するか、設定が表示された欄をダブルクリックして一覧から選択します。

ここまでで問題が無ければ、下記画面のようにGGUFモデルで画像の生成ができます。CLIPとVAEの設定がデフォルトと現状で異なる場合があるので、エラーが発生したら確認してください。

最後にGGUFモデルの比較をします。「flux1-dev-Q4_0.gguf」では特に問題は無さそうです。

次は「flux1-dev-Q3_K_S.gguf」です。まだ一応大丈夫そうですが、さらに調べてみると違いがあるかもしれません。

最後は「flux1-dev-Q2_K.gguf」です。雑になっているように見えます。

■ 5. おまけ
▼ 5-1. おまけ画像
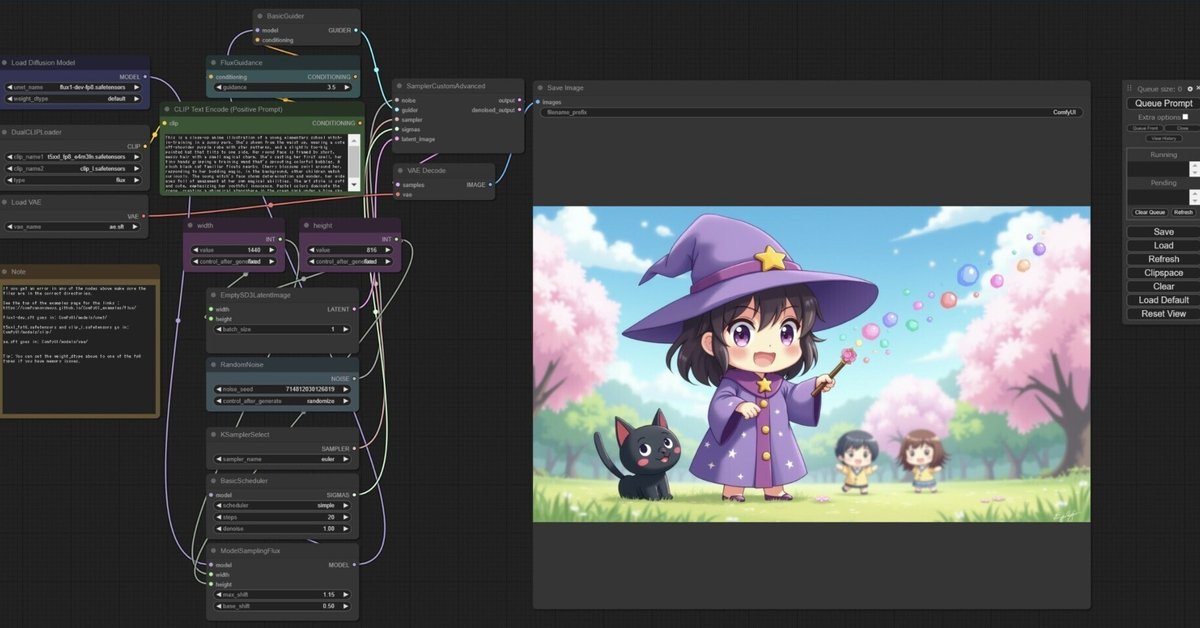
FP8版の FLUX.1 [dev] を使用して、20 Stepsで生成しています。サイズは 1440x816 です。筆者の環境では生成に125~140 秒程度かかります(モデルの読み込み時間を除く)。プロンプトは自由にご利用ください(改造等を含む)。

■ 6. 起動オプション
▼ 6-1. 起動オプションの一覧
ComfyUIの起動オプションは、「python main.py -h」で表示されます。参考まで、8-19-2024現在の出力を掲載します。
usage: main.py [-h] [--listen [IP]] [--port PORT] [--tls-keyfile TLS_KEYFILE]
               [--tls-certfile TLS_CERTFILE] [--enable-cors-header [ORIGIN]]
               [--max-upload-size MAX_UPLOAD_SIZE]
               [--extra-model-paths-config PATH [PATH ...]]
               [--output-directory OUTPUT_DIRECTORY]
               [--temp-directory TEMP_DIRECTORY]
               [--input-directory INPUT_DIRECTORY] [--auto-launch]
               [--disable-auto-launch] [--cuda-device DEVICE_ID]
               [--cuda-malloc | --disable-cuda-malloc]
               [--force-fp32 | --force-fp16]
               [--bf16-unet | --fp16-unet | --fp8_e4m3fn-unet | --fp8_e5m2-unet]
               [--fp16-vae | --fp32-vae | --bf16-vae] [--cpu-vae]
               [--fp8_e4m3fn-text-enc | --fp8_e5m2-text-enc | --fp16-text-enc | --fp32-text-enc]
               [--force-channels-last] [--directml [DIRECTML_DEVICE]]
               [--disable-ipex-optimize]
               [--preview-method [none,auto,latent2rgb,taesd]]
               [--cache-classic | --cache-lru CACHE_LRU]
               [--use-split-cross-attention | --use-quad-cross-attention | --use-pytorch-cross-attention]
               [--disable-xformers]
               [--force-upcast-attention | --dont-upcast-attention]
               [--gpu-only | --highvram | --normalvram | --lowvram | --novram | --cpu]
               [--default-hashing-function {md5,sha1,sha256,sha512}]
               [--disable-smart-memory] [--deterministic]
               [--dont-print-server] [--quick-test-for-ci]
               [--windows-standalone-build] [--disable-metadata]
               [--disable-all-custom-nodes] [--multi-user] [--verbose]
               [--front-end-version FRONT_END_VERSION]
               [--front-end-root FRONT_END_ROOT]

options:
  -h, --help            show this help message and exit
  --listen [IP]         Specify the IP address to listen on (default:
                        127.0.0.1). If --listen is provided without an
                        argument, it defaults to 0.0.0.0. (listens on all)
  --port PORT           Set the listen port.
  --tls-keyfile TLS_KEYFILE
                        Path to TLS (SSL) key file. Enables TLS, makes app
                        accessible at https://... requires --tls-certfile to
                        function
  --tls-certfile TLS_CERTFILE
                        Path to TLS (SSL) certificate file. Enables TLS, makes
                        app accessible at https://... requires --tls-keyfile
                        to function
  --enable-cors-header [ORIGIN]
                        Enable CORS (Cross-Origin Resource Sharing) with
                        optional origin or allow all with default '*'.
  --max-upload-size MAX_UPLOAD_SIZE
                        Set the maximum upload size in MB.
  --extra-model-paths-config PATH [PATH ...]
                        Load one or more extra_model_paths.yaml files.
  --output-directory OUTPUT_DIRECTORY
                        Set the ComfyUI output directory.
  --temp-directory TEMP_DIRECTORY
                        Set the ComfyUI temp directory (default is in the
                        ComfyUI directory).
  --input-directory INPUT_DIRECTORY
                        Set the ComfyUI input directory.
  --auto-launch         Automatically launch ComfyUI in the default browser.
  --disable-auto-launch
                        Disable auto launching the browser.
  --cuda-device DEVICE_ID
                        Set the id of the cuda device this instance will use.
  --cuda-malloc         Enable cudaMallocAsync (enabled by default for torch
                        2.0 and up).
  --disable-cuda-malloc
                        Disable cudaMallocAsync.
  --force-fp32          Force fp32 (If this makes your GPU work better please
                        report it).
  --force-fp16          Force fp16.
  --bf16-unet           Run the UNET in bf16. This should only be used for
                        testing stuff.
  --fp16-unet           Store unet weights in fp16.
  --fp8_e4m3fn-unet     Store unet weights in fp8_e4m3fn.
  --fp8_e5m2-unet       Store unet weights in fp8_e5m2.
  --fp16-vae            Run the VAE in fp16, might cause black images.
  --fp32-vae            Run the VAE in full precision fp32.
  --bf16-vae            Run the VAE in bf16.
  --cpu-vae             Run the VAE on the CPU.
  --fp8_e4m3fn-text-enc
                        Store text encoder weights in fp8 (e4m3fn variant).
  --fp8_e5m2-text-enc   Store text encoder weights in fp8 (e5m2 variant).
  --fp16-text-enc       Store text encoder weights in fp16.
  --fp32-text-enc       Store text encoder weights in fp32.
  --force-channels-last
                        Force channels last format when inferencing the
                        models.
  --directml [DIRECTML_DEVICE]
                        Use torch-directml.
  --disable-ipex-optimize
                        Disables ipex.optimize when loading models with Intel
                        GPUs.
  --preview-method [none,auto,latent2rgb,taesd]
                        Default preview method for sampler nodes.
  --cache-classic       Use the old style (aggressive) caching.
  --cache-lru CACHE_LRU
                        Use LRU caching with a maximum of N node results
                        cached. May use more RAM/VRAM.
  --use-split-cross-attention
                        Use the split cross attention optimization. Ignored
                        when xformers is used.
  --use-quad-cross-attention
                        Use the sub-quadratic cross attention optimization .
                        Ignored when xformers is used.
  --use-pytorch-cross-attention
                        Use the new pytorch 2.0 cross attention function.
  --disable-xformers    Disable xformers.
  --force-upcast-attention
                        Force enable attention upcasting, please report if it
                        fixes black images.
  --dont-upcast-attention
                        Disable all upcasting of attention. Should be
                        unnecessary except for debugging.
  --gpu-only            Store and run everything (text encoders/CLIP models,
                        etc... on the GPU).
  --highvram            By default models will be unloaded to CPU memory after
                        being used. This option keeps them in GPU memory.
  --normalvram          Used to force normal vram use if lowvram gets
                        automatically enabled.
  --lowvram             Split the unet in parts to use less vram.
  --novram              When lowvram isn't enough.
  --cpu                 To use the CPU for everything (slow).
  --default-hashing-function {md5,sha1,sha256,sha512}
                        Allows you to choose the hash function to use for
                        duplicate filename / contents comparison. Default is
                        sha256.
  --disable-smart-memory
                        Force ComfyUI to agressively offload to regular ram
                        instead of keeping models in vram when it can.
  --deterministic       Make pytorch use slower deterministic algorithms when
                        it can. Note that this might not make images
                        deterministic in all cases.
  --dont-print-server   Don't print server output.
  --quick-test-for-ci   Quick test for CI.
  --windows-standalone-build
                        Windows standalone build: Enable convenient things
                        that most people using the standalone windows build
                        will probably enjoy (like auto opening the page on
                        startup).
  --disable-metadata    Disable saving prompt metadata in files.
  --disable-all-custom-nodes
                        Disable loading all custom nodes.
  --multi-user          Enables per-user storage.
  --verbose             Enables more debug prints.
  --front-end-version FRONT_END_VERSION
                        Specifies the version of the frontend to be used. This
                        command needs internet connectivity to query and
                        download available frontend implementations from
                        GitHub releases. The version string should be in the
                        format of: [repoOwner]/[repoName]@[version] where
                        version is one of: "latest" or a valid version number
                        (e.g. "1.0.0")
  --front-end-root FRONT_END_ROOT
                        The local filesystem path to the directory where the
                        frontend is located. Overrides --front-end-version.
■ 7. その他
私が書いた他の記事は、メニューよりたどってください。
noteのアカウントはメインの@Mayu_Hiraizumiに紐付けていますが、記事に関することはサブアカウントの@riddi0908までお願いします。