
Stable Diffusionでプロンプトとシードを画像に出力|Google Colab

Stable Diffusionで出力する画像にプロンプト(呪文)とシード(乱数)も加え、Googleドライブに保存するお話です。環境はGoogle Colabです。
▍ことの背景
ちょっとしたイラストはStable Diffusionでまかなってしまおうと、呪文詠唱を練習中です。
同じ呪文でも画像が異なることも多く、「さっきの画像をベースに調整したい」なんてことがあります。そんなときには、「さっきの画像」と同じシード(乱数)を指定します。呪文と乱数を保存しておけば再現できるわけです。
そんなこんなで、Stable Diffusionで出力する画像に、呪文と乱数も加えました。といっても難しいことはなく、単にmatplotlibで出力しているだけです。Google Colab上で動かし、Googleドライブにファイル出力します。
▍手順
〜パイプラインの準備(公式通り)
ベースはStable Diffusionの公式手順で、「Stable Diffusion Pipeline」セクションの途中でパイプラインをGPUに移動する箇所(以下のコード)までは公式手順と同じです。
pipe = pipe.to("cuda")Googleドライブをマウント
Googleドライブにファイル出力するため、Googleドライブをマウントし、カレントディレクトリも移動しています。
from google.colab import drive
drive.mount("/content/drive")

# ここではマイドライブ直下の「images」フォルダに移動
path_export = "/content/drive/MyDrive/images"
%cd $path_export
関数を定義
必要となるライブラリをインポートします。
import datetime
import random
import matplotlib.pyplot as plt
関数を定義します。特徴は次のとおりです。
出力する画像の枚数や各パラメータなどは引数で変更できるようにする
呪文の変数promptsはリストで、カンマや改行でつなげて利用する
ファイル名は現在日時で出力する
画像のタイトルに乱数を、左上にプロンプトを出力する
def generate_images(prompts, num_images = 1, num_inference_steps = 50, guidance_scale = 8.5, height = 512, width = 512, my_seed = 0):
    for i in range(0, num_images):
        # 乱数を設定(0ならランダム)
        if my_seed != 0:
            seed = my_seed
        else:
            seed = random.randint(1, 9999999999)  # 10桁までのランダムの数値を生成
        generator = torch.Generator("cuda").manual_seed(seed)
        # 画像を生成
        with autocast("cuda"):
            image = pipe(", ".join(prompts), generator=generator, num_inference_steps=num_inference_steps, guidance_scale = guidance_scale, height = height, width = width)["sample"][0]
        # 現在日時を取得
        now = datetime.datetime.now(datetime.timezone(datetime.timedelta(hours=9))).strftime("%Y%m%d_%H%M%S")
        # 画像を保存
        plt.figure(figsize=(10, 10))  # 出力する画像サイズ
        plt.title(seed, fontweight="bold")  # タイトル(乱数)
        plt.axis("off")  # 軸表示をオフ
        plt.text(0, 0, "\n".join(prompts), verticalalignment="top", bbox={"facecolor": "white", "alpha": 0.5, "edgecolor": "white"})  # 呪文を改行区切りで画像の左上に表示)
        plt.imshow(image)  # 画像を表示
        plt.savefig("{now}.png".format(now=now), bbox_inches="tight", pad_inches=0)  # 余白を削除して日時のファイル名で保存
関数の使い方
呪文はリストにしています。カンマ区切りでつなげることが多いですし、文字列だと画像上に表示した時に横に長くなってしまうので。
# 呪文を指定
prompts = [
    "Concept Art",
    "a smart black cat uses computer on the desk",
    "by Hayao Miyazaki in Studio Ghibli",
    "highly detailed, clear, color",
]

# 10枚生成
generate_images(prompts, 10)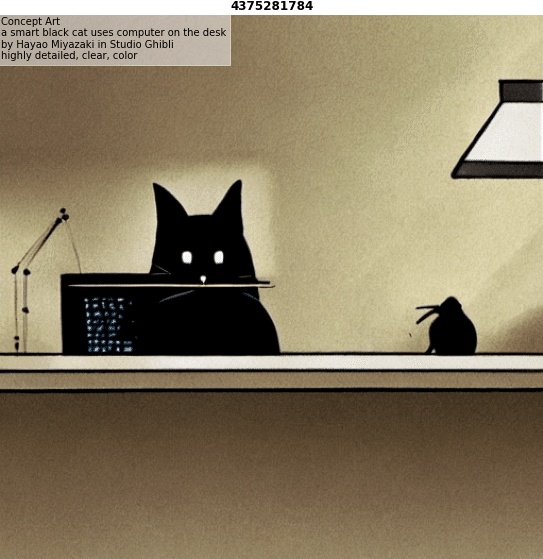
# シードを指定して生成
generate_images(prompts, my_seed=4375281784)
ほかにも、サイズなどのパラメータを変えたければ、引数に指定します。
▍おわりに
PILのImageDrawでもいけそうですが、タイトルらしい表示が欲しかったので、matplotlibで実現しました。
まだまだ上手く呪文を扱えないので、引き続き詠唱の訓練に励みます。呪文のレベルが上がったらまた共有いたしますね〜!