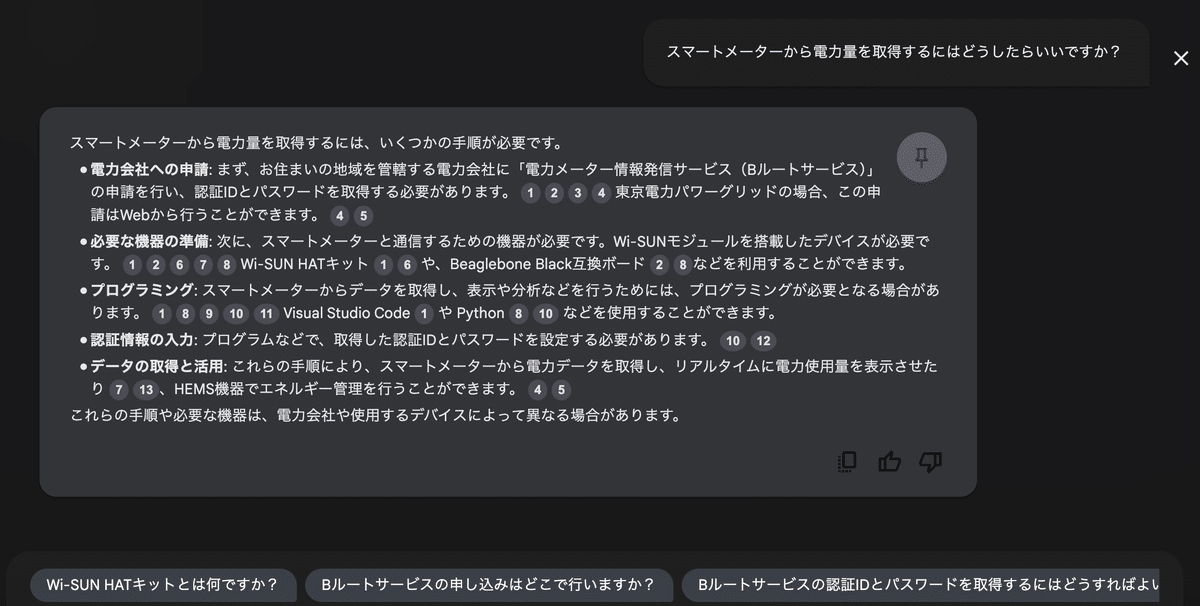
自宅のスマートメーターからBルートで電力使用データを抜いてくる。

昨年度、GoogleのNotebookLMを紹介しましたが、せっかくなら活用しながら今回は実装できればと思います。
いつもはNotionに参考記事を貼りながら、ChatGPTに都度質問しながら作業しているのですけれども、NotebookLMひとつで済むならかなり楽です。そんな甘い話ではないと思いますがとりあえずやってみます。

続いて関連記事を5個ほど読み込ませて、ここから実装の質問に答えてくれるのか。。。
なるほど、あくまで投入した記事から情報を読み取ってくれるのであって、それ以上の内容を補完してくれるようなことはないのですね。(当然と言えば当然か)
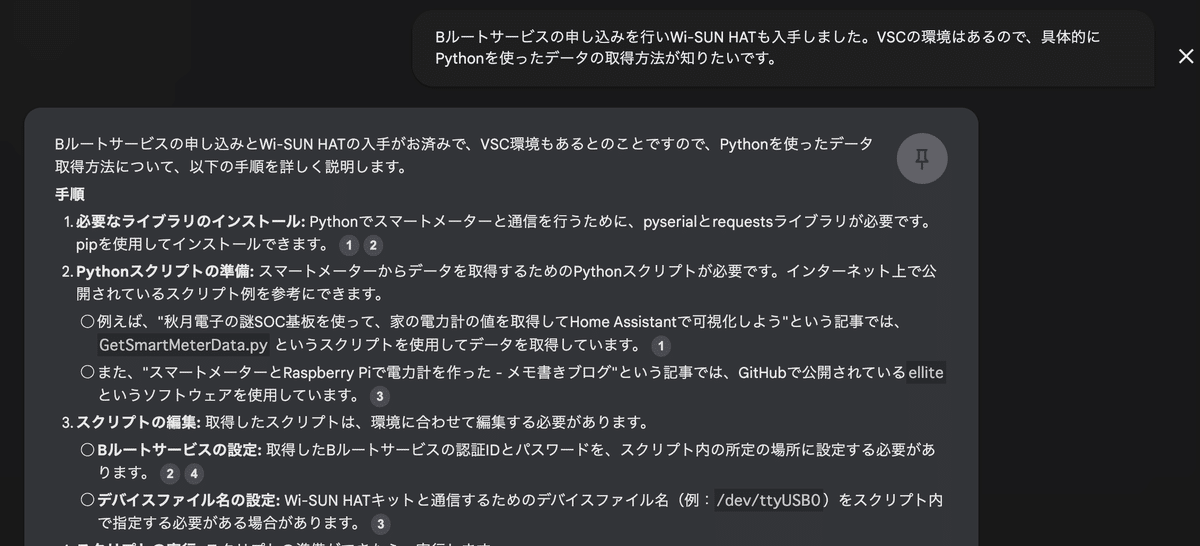
ということでいつものごとくGPT先生に教えを乞うことに。(方針転換が早い)とりあえずPythonの環境構築を求められたので対応する。加えて、シリアル通信を行うためのpyserialライブラリのインストールが必要とのこと。
で、USBポートにWi-SUNモジュールを刺したのちに下記を実行してみる。
ls /dev/tty.*/dev/tty.usbserial-DK0CB27Aというのがモジュールみたいですね。確認はできました。

で、授けていただいたファイルを実行してみたものの、エラーにもならずレスポンスもなく。。。ログを吐くようにしてもらったところ、そもそも疎通ができていないことがわかる。
通信方法を確認するためにマニュアルの内容を提供してみたところ、スマメ
のIPv6アドレスが必要とのこと。SKSCANコマンドを使用して、周囲のスマートメーターを確認しろとのご指示。
import serial
import logging

# ログ設定
logging.basicConfig(level=logging.DEBUG, format='%(asctime)s - %(levelname)s - %(message)s')

try:
    # シリアルポートの設定
    ser = serial.Serial('/dev/tty.usbserial-DK0CB27A', 115200, timeout=None)
    logging.info('Serial port opened')

    # スキャンの実行
    logging.info('Executing SKSCAN command')
    ser.write(b'SKSCAN 2 FFFFFFFF 6\r\n')

    # 応答の確認
    while True:
        response = ser.readline().decode('utf-8').strip()
        if response:
            logging.debug(f'Response received: {response}')
            if 'EPANDESC' in response:
                logging.info('PAN descriptor received, processing...')
                # スマートメーターのアドレスやPAN IDを抽出する処理をここに追加
            elif 'EVENT' in response and '0x1E' in response:
                logging.info('Scan complete')
                break

except serial.SerialException as e:
    logging.error(f'Serial error: {e}')
except KeyboardInterrupt:
    logging.info("Interrupted by user")
finally:
    if ser.is_open:
        ser.close()
        logging.info("Serial port closed")
この結果、無事に疎通が完了しIPv6アドレスが判明!と思っていたら、このIPv6アドレスが間違っていたため、このあと休日の貴重な深夜5時間を失うことになります・・・ずっと"ERROR - PANA authentication failed"と言われる時間、、つらかった。。。割愛します。詳しくは下記の記事あたりを参考にしました。
Pairing ID(Bルート認証IDの下位8桁)を用いて、スマートメーターを特定した上でIPv6アドレスを拾ってこないと、ずっと他人に話しかけ続けることになるので注意が必要です。。。
import serial
import logging

# ログ設定
logging.basicConfig(level=logging.DEBUG, format='%(asctime)s - %(levelname)s - %(message)s')

def wait_for_ok(ser, timeout=30):
    """デバイスからOKを待つ。エコーバックを無視してOKを探す"""
    ser.timeout = timeout
    while True:
        response = ser.readline().decode('utf-8').strip()
        logging.debug(f'Response received: {response}')
        if response == 'OK':
            return True
        elif response:
            logging.warning(f'Unexpected response: {response}')
        else:
            return False

try:
    # シリアルポートの設定
    ser = serial.Serial('/dev/tty.usbserial-DK0CB27A', 115200, timeout=None)
    logging.info('Serial port opened')

    # Pairing IDの設定
    pairing_id = '自宅のスマートメーターのPairing ID'
    ser.write(f'SKSREG S0A {pairing_id}\r\n'.encode())
    if not wait_for_ok(ser):
        logging.error('Failed to set Pairing ID')
        raise Exception('Failed to set Pairing ID')
    logging.info(f'Set Pairing ID: {pairing_id}')

    # SKSCANコマンドの実行
    logging.info('Executing SKSCAN command')
    ser.write(b'SKSCAN 2 FFFFFFFF 6\r\n')

    ipv6_address = None  # スマートメーターのIPv6アドレスを保存する変数

    # 応答の確認
    while True:
        response = ser.readline().decode('utf-8').strip()
        if response:
            logging.debug(f'Response received: {response}')
            if 'EPANDESC' in response:
                while True:
                    line = ser.readline().decode('utf-8').strip()
                    if line.startswith('Addr:'):
                        ipv6_address = line.split(':')[1].strip()
                        logging.info(f'Smart meter IPv6 address found: {ipv6_address}')
                    if line == '':
                        break
            elif 'EVENT 22' in response:
                logging.info('Scan complete')
                break

    if ipv6_address:
        # Pingの実行
        logging.info(f'Sending SKPING command to {ipv6_address}')
        ser.write(f'SKPING {ipv6_address}\r\n'.encode())

        # Ping応答の確認
        while True:
            response = ser.readline().decode('utf-8').strip()
            if response:
                logging.debug(f'Response received: {response}')
                if 'EPONG' in response:
                    logging.info('Ping successful: Communication with the smart meter is confirmed')
                    break
                else:
                    logging.warning(f'Unexpected response: {response}')

except serial.SerialException as e:
    logging.error(f'Serial error: {e}')
except Exception as e:
    logging.error(f'Error: {e}')
except KeyboardInterrupt:
    logging.info("Interrupted by user")
finally:
    if ser.is_open:
        ser.close()
        logging.info("Serial port closed")
一応これでPANA認証は成功しました。が、、、返却値が全く理解できないバイナリデータでお手上げという状態・・・・これは玄人向きだなあ・・・(なぜ手を出してしまったのだろう・・・)下記のECHONET Lite 通信ミドルウェア仕様書(英語版)をGPT先生にご提供してみたりする。
進んでいるような、進んでいないような時間を過ごすこと4時間・・・(休日の貴重な4時間・・・)GPT先生もだいぶ煮詰まり始める。。。もう諦めよう、もう諦めようと思いながら、あと一回だけ、あと一回だけと思いながらGPT先生に修正提案を続ける。
で、いよいよ突破できなくなって、みなさん手軽に実現していてすごいな〜などと思いつつ、ダメ元と思いながら、下記の記事のコードをGPT先生に提供して、諸々の変数を置き換えて実行してみたところ・・・
成功してしまった・・・・嘘だろ・・・なんだったんだ俺の4時間・・・

素直に喜べない部分もありつつ、やりたかったことができたので前向きです!!!わ〜これをGrafanaとかで可視化したいぞ〜というか、電力の使用量で在宅か不在か判断してルンバ動かしたりできるじゃ〜ん。みたいな前向きな話がしたい。とりあえずどこかのDBに書き込まなきゃなのかな?
みたいなことを次の記事では書いていこうか。いや〜よかったよかった。
いいなと思ったら応援しよう!