How to emulate DSiware in computer
日本語版はこっち
This artcile is almost written by Google Translator. (This sentence is not!)
*Please modify your game console at your own risk. This article does not encourage modification.
I couldn't find any comprehensive information on websites, so I set down a understandable summary.
How the modification works (including the author's thoughts)
Unlike normal ROMs, DSiware apps cannot be run on an emulator using the compressed file alone.
This is because:
1, The DSiware uses NAND
2, and runs on the BIOS of the DSi/lite.
Since emulators reproduce the operation of a real machine using code on a computer, their behave is different from a real machine running on BIOS and NAND.
This is why it seems that the DSiware cannot be run on an emulator.
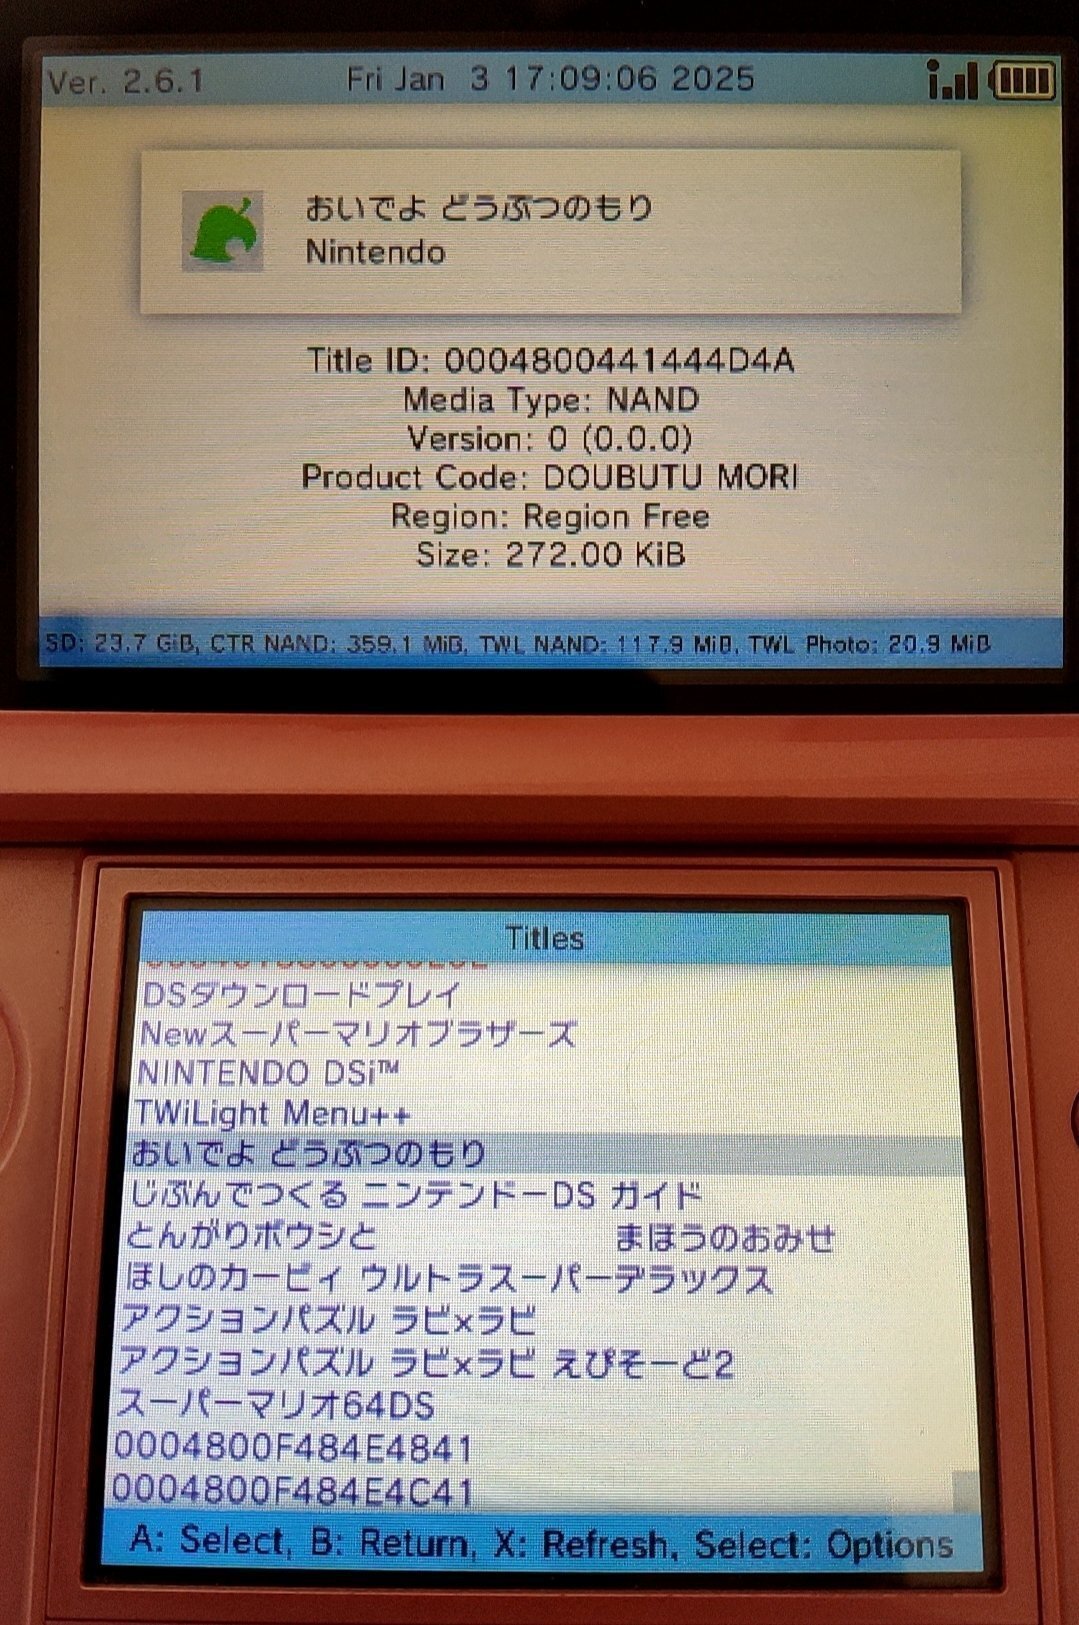
By the way, 3DS also seems that can run the DSiware because 3DS run it with DSi VC (Virtual Console) after writing it on NAND. If you already have a Luma3DS (a hacked 3DS), you can start up FBI and navigate from Title to see how the DSiware is recorded on the NAND, as shown in the image:
So what should you do in the end?
Just put the DSi NAND and BIOS into the emulator!
In other words, this is the idea to put the actual console into your PC. In this way, you can run DSiware on computer!
So, I will now introduce you to the procedure.
Following this idea, it should be possible to install DSiware from cia using the 3DS BIOS and NAND, but I haven't been able to test it yet. If you're interested, give it a try.
Modification procedure
Main flow
In this article, we will go through the following steps from top to bottom:
1, Install TWiLight menu++ on DSi
2, Dump the BIOS and NAND from DSi
3, Dump DSiware from the DSi/3DS
4, allocate the BIOS, NAND, and DSiware on the melonDS
If you have already completed a step or can complete a step, you can skip it.
*This procdure is referenced from https://dsi.cfw.guide/. Just did I modify original procedure, such as binary files downloading and file operating.
Prerequisites
According to information from reddit, it seems that modifying the DSlite is very difficult . I think that people who are willing to try it after seeing this site
must have a lot of passion. Also, DSiware is literally "DSi" ware, so it cannot run on the NDS.
If you don't have a DSi, buy one first.
If you can't afford it, give up. ;)
The terminology explanation is too much work, so let's go to another site and look it up yourself.
If you're not good at using a PC, I definitely recommend not to modify.
Also, it seems that DSiware cannot be started unless the region corresponds to the BIOS and firmware.
So, the quickest way is to extract the BIOS and firmware from a real DSi with DSiware installed. If you have DSiware installed on your 3DS, perhaps you should be sure what the region is.
0. What you need
I think it's written in sites linked by URL, but I'll summarize it just in case.
・1-2 SD cards
→Use these to exploit the DSi. If you want to dump DSiware from a 3DS that has not yet been hacked, prepare another one for the 3DS.
→Format both to FAT32 (the method is described later) . If you are worried whether the SD card is broken, you should use a tool that can check it.
→32GB or 64GB capacity is recommended. If larger than these, more time for the real machine to read the SD card will take, and greater the shock when the SD card breaks will be.
・SD card reader/writer
→ Buy a proper one.
・Necessary data (I will introduce it in the steps below.)
・Concentration and caution.
→This is important. Bricking happens so suddenly, that it will be useful to be cautious with file operations and make frequent backups.
*Note that Logical errors will occur if operations on the SD card are forcibly stopped. Do not operate in an unstable environment where the power of the PC, DSi, or 3DS is easily turned off.
*You will regret buying a cheap SD card or SD card reader/writer.
*I'm sure that anyone who has read this carefully will be able to succeed.
1. Install TWiLight menu++
In this article, we will introduce an exploit using Memory Pit.
* If you haven't already formatted your SD card to FAT32, complete the steps in the below site:
1, Put the necessary data in the root directory of the SD card . Click on the file name to start downloading. If you are worried about viruses, run a virus check. It's probably fine though.
Open the contents of TWiLight Menu++ using a zip decompression tool, and copy:
i) _nds folder
ii) BOOT.nds
to the root directory of the SD card.
*If the download does not start when you click, go to the release page and download the latest TWiLightMenu-DSi.7z.
*you should use the zip decompression tool:
Windows → 7-Zip
Mac → The Unarchiver
(Linux users! You can do it!)
Download the dsi bios dumper and copy it to the root directory of the SD card.
2, Insert the SD card and start up the DSi.
3, Launch the Nintendo DSi Camera on the real DSi console.
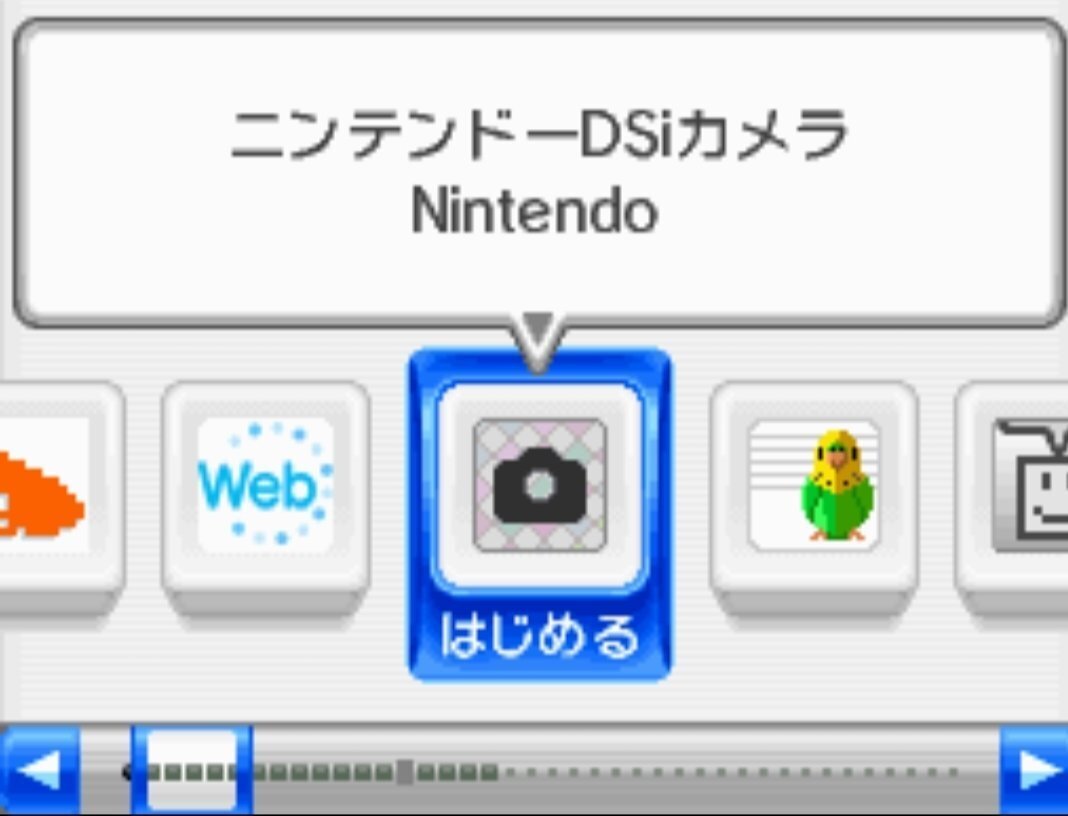
4, Once it opens and has finished loading, press the button circled in red to open the album.
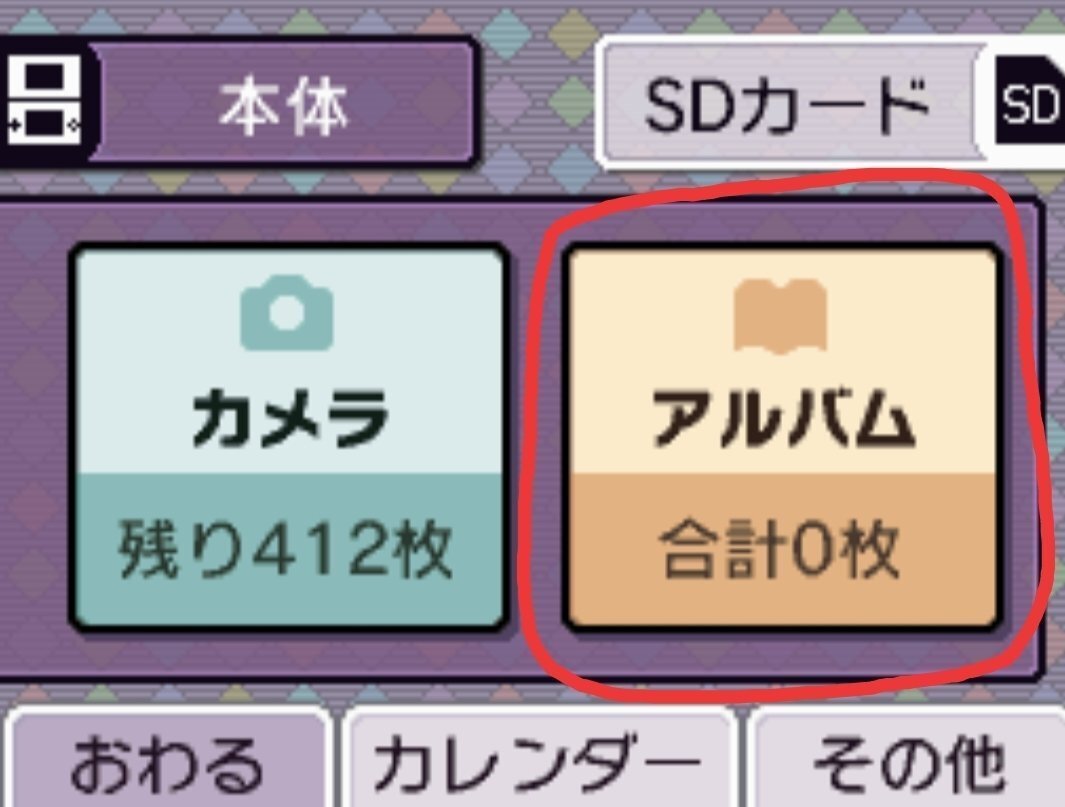
5, Remember whether there is a Facebook mark in the speech bubble, because the files you will need to install depending on whether there is a Facebook mark.
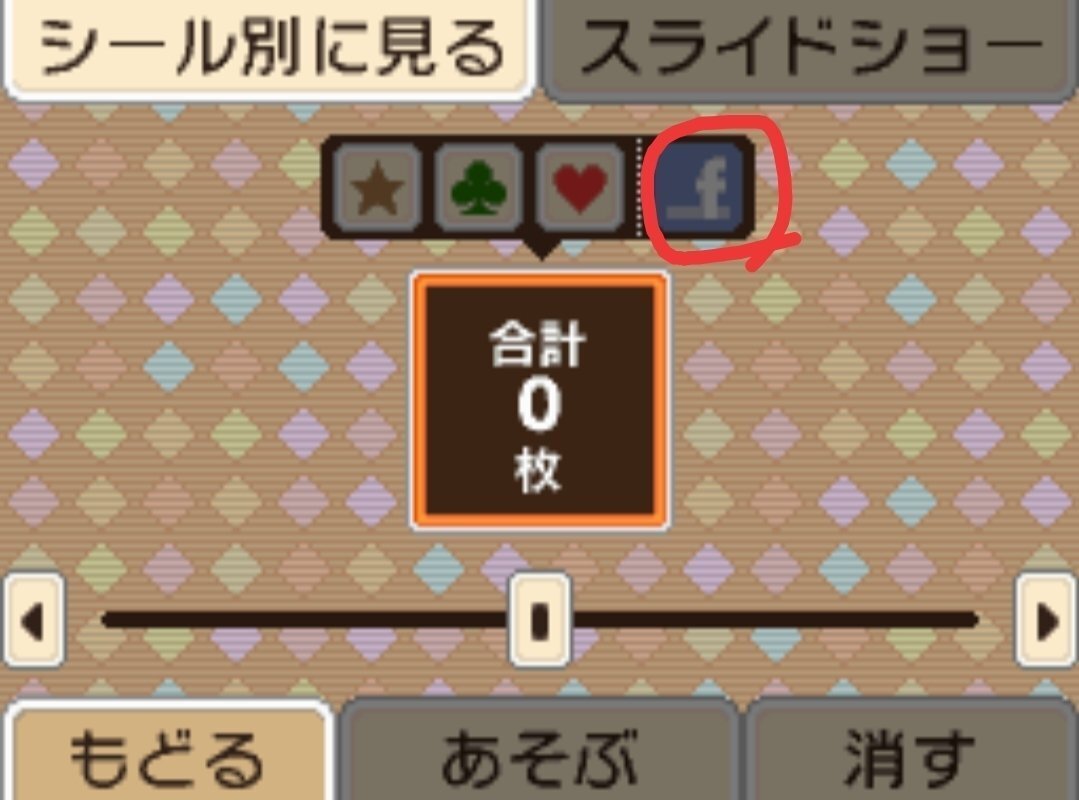
6, Press Back to return to step 4, then press the SD card button in the upper right. Wait patiently as the data will be read.
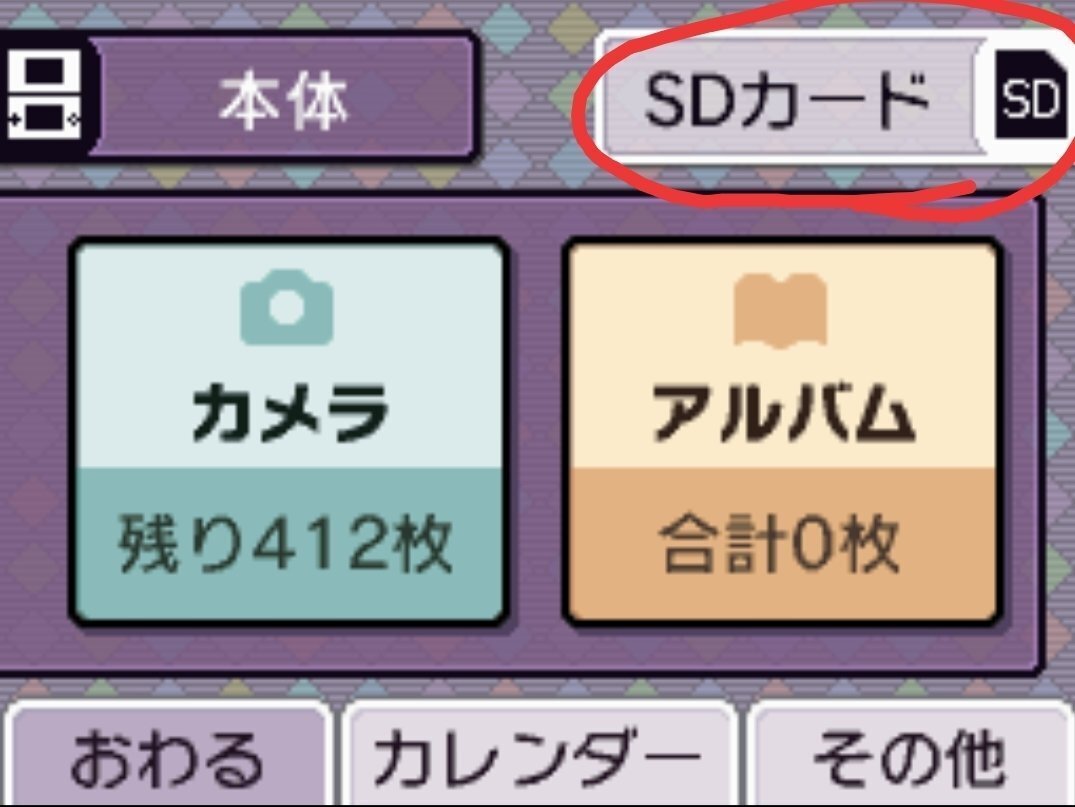
7, Turn off the device, remove the SD card, and connect it to a PC using an SD card reader/writer. Be careful of logical errors.
8, Download the necessary Memory Pit binary. Click the link to start the download.
9, From the root directory of the SD card, Navigate private → ds → app → 484E494A.
Open 484E494A and rename "pit.bin" to "tip.bin". After changing the name, leave it as it is.
10, Copy the Memory Pit downloaded in step 8 into 484E494A. If you followed the steps correctly, pit.bin and tip.bin should be in 484E494A.
11, If there is a folder called "DCIM" on the SD card, make a backup of it. If you want to make your farewell to your past memories, you don't have to make a backup. Once you have made a backup, delete the entire DCIM folder on the SD card.
12, Insert the SD card into the DSi and turn it on. Then lanch the Nintendo DSi camera and press the SD card button in the upper right.
*If an error occurs when you press the SD card button:
- If you receive a message saying your SD card isn't inserted, please use another SD card.
- If you receive a message saying that your SD card cannot be used, ensure your SD card is formatted correctly.
13, Press the album button on the right side of the screen.
Make sure you have enough battery power before pressing the button. (If the power runs out during the exploit, the device may brick.)
If the exploit is successful, the screen flashes magenta for a moment.
If unsuccessful:
- If the top screen turns green, you do not have TWiLight Menu++'s BOOT.NDS on the root of your SD card. Follow the prep work (step 1) again.
- If you enter the SD card camera album and nothing unusual happens, ensure that you downloaded the correct version of Memory Pit for your version and region, and placed it into the correct folder on your SD card (check steps 3 to 11). Also ensure that the DCIM folder does not exist on your SD card (check step 11).
- Taking photos with the Memory Pit exploit on your SD card will cause the exploit to stop working properly and you will have to copy it over again (check steps 9 to 11).
14, If you have followed the steps above successfully, the TWiLight menu++ settings screen should open. Set it as you like and enter, then you should see a screen similar to the DSi menu.
※If you want to open TWiLight menu++ again, follow steps 12 and 13. If even that is too much of a bother, you can install Unlanch yourself. I won't introduce how to install Unlanch in this article.
2. Dump the BIOS and NAND from your DSi
1, Open the icon in the image. If the icon is not there, download the dsi bios dumper and copy it to the root directory of the SD card.
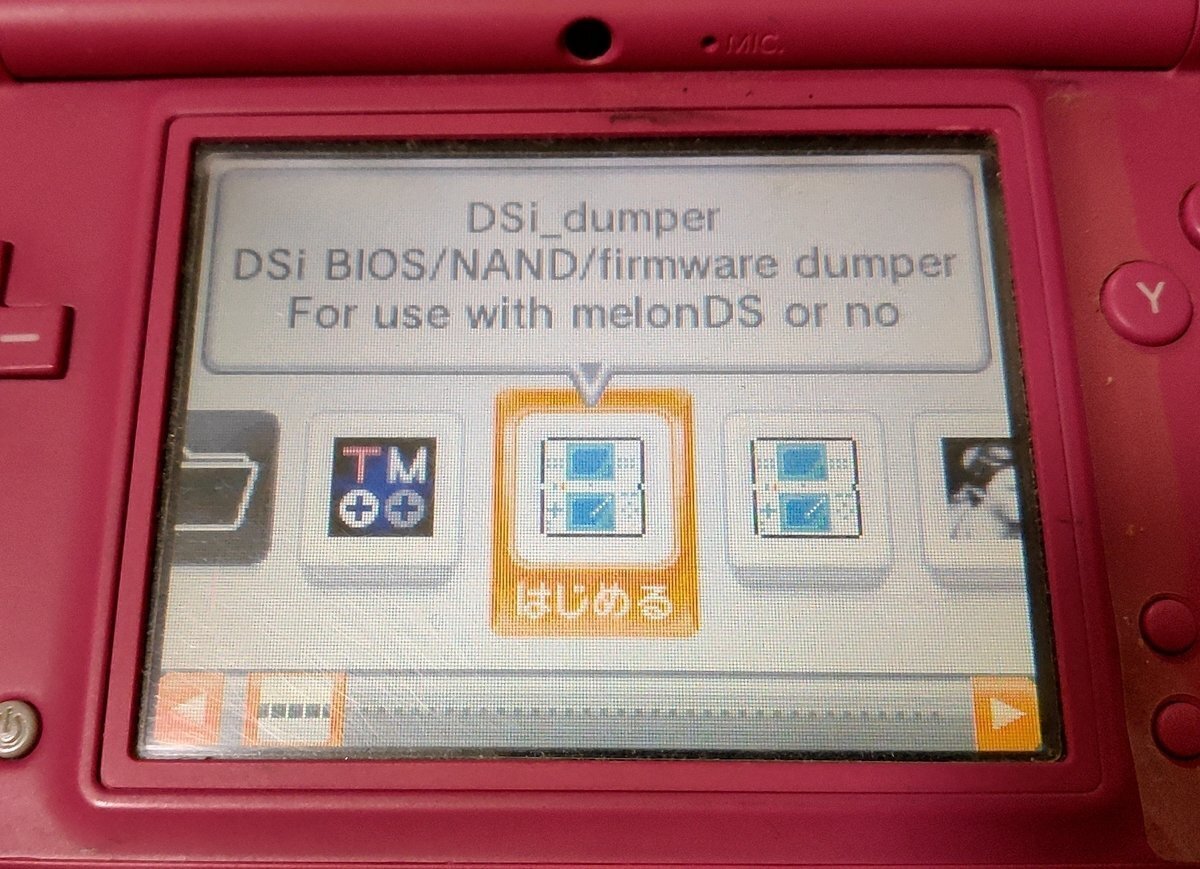
If you followed the steps correctly, only the folder icon, the icon one to the left, and the selected icon should be displayed.
2, When the screen shown in the image is displayed, press the A button to start the dump.
At this time, make sure that the battery is sufficient before performing the dump.
Also, if the battery is old, connect it to the charger before performing the dump.
(If the power runs out during the dump, there is a risk of bricking.)
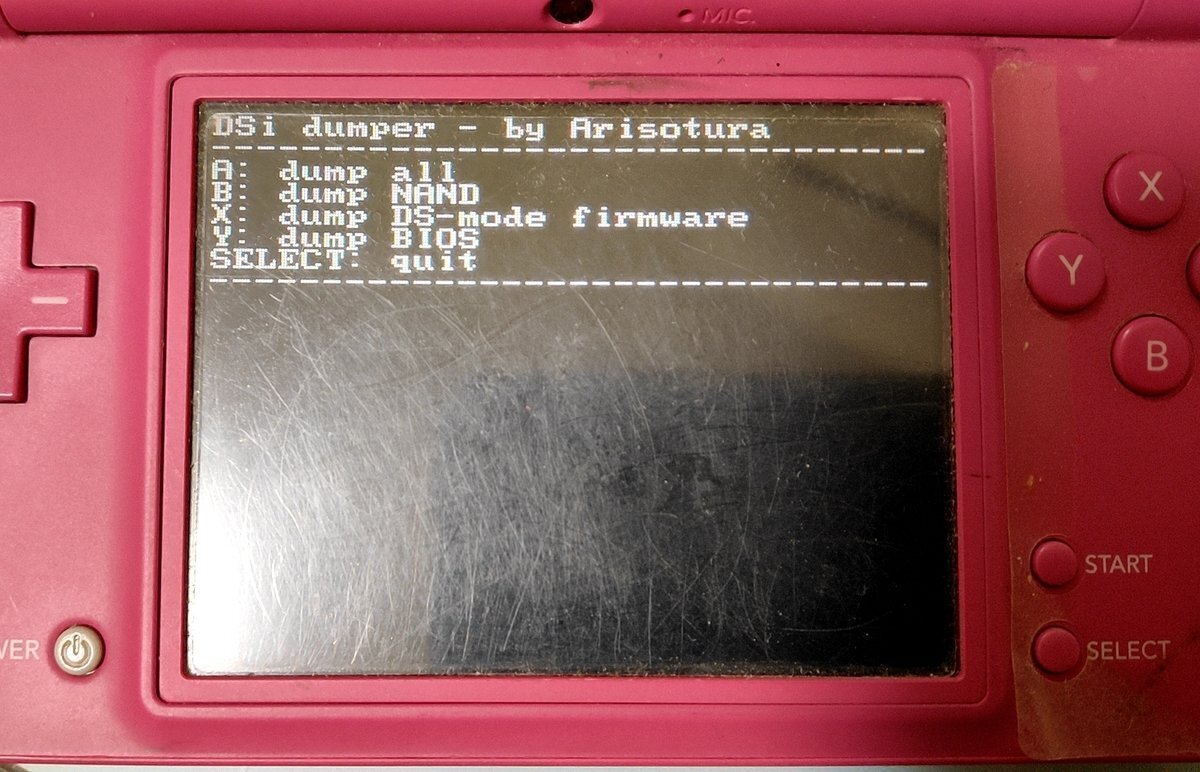
It will take about ten minutes, so please be patient.
3, Once the dump has completed, turn off the power, remove the SD card, and connect the SD card to a computer. The dsidump folder should be in the root directory of the SD card, so copy it to a folder on your computer.
3. Dump the DSiware
・Dumping DSiware from DSi
Let's take a look at this ↓ (method using GodMode9i)
(Note)
・GodMode9i can be launched from TWiLight menu++.
・When you select the title you want to dump, various things will appear on the bottom screen, but if you only want the compressed DSiware file, select "ROM", if you also want the save data, select "All".
Then follow the instructions to dump.
If you can extract the nds, go to the next step.
・Dumping DSiware from 3DS
1, Hack your 3DS by following the instructions on the website below.
2, Once you have modified your 3DS, follow the instructions on the website below. (I searched information in English which looks good, but I couldn't. Please use a translator, or search in yourself.)
3, It's much easier to convert the dumped DSiware into an nds file, so go to the URL at the bottom of the above site and follow the steps written there.
If you can extract the nds, go to the next step.
4. Setting up emulation environment with melonDS
1, Download melonDS from the site below.
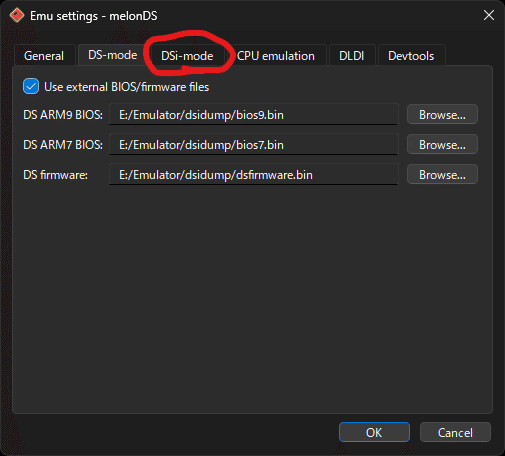
2, Start melonDS and open Config → Emu settings on the screen.
3, Set it up the same as the image and click the red circle.
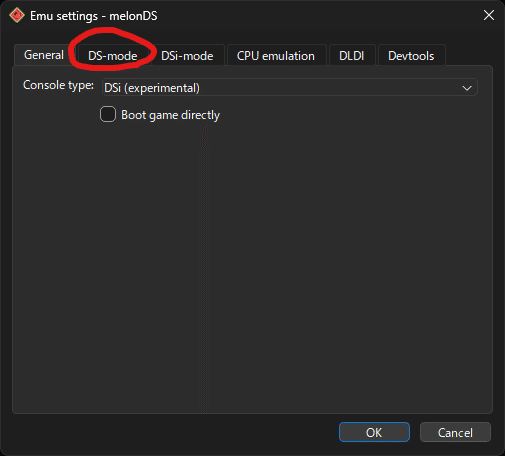
4, Allocate the path of bios7 and bios9 in dsidump . Check Use external BIOS/firmware files.
Once you've done, click on circled red.
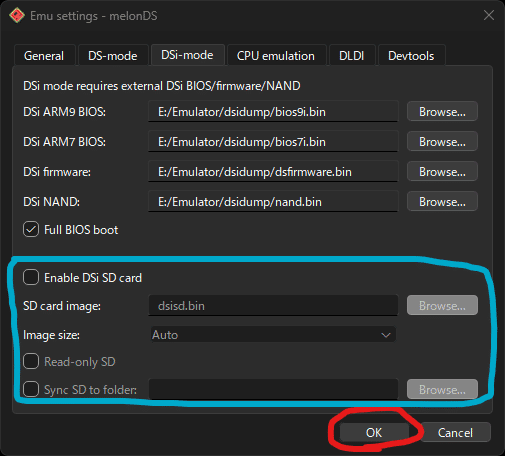
5, Allocate the path in the same way as in 4 but bios7i and bios9i for the DSi BIOS.
Check Full BIOS boot. You don't need to change anything in the blue box. Once you've finished the settings, press the OK button in the red circle.
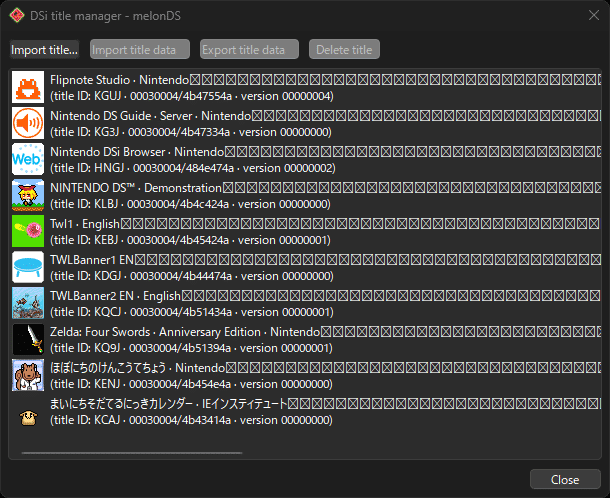
6, Open System → Manage DSi titles on the screen. If the settings are correct, the DSiware in the NAND will be loaded as shown in the image:
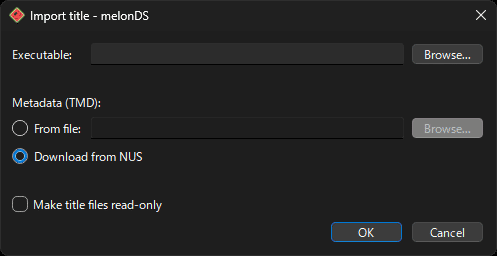
7, Click "Import title…". Then a window like the one in the image will appear, so check "Download from NUS" and enter the path of the extracted nds in "Executable".
8, If you also want to include save data, click on the relevant software, then click Import title data → public.sav and specify the dumped sav file.
9, Press Close to close the window, then select File → Boot firmware on the screen. If all goes well, the DSi should start up.
Good job! The whole process is now finished! It was a long one!
What you can do after modification
・You can play DSiware on a large screen
・You can use a controller
・You can open the DSi anywhere by putting it on your smartphone.
・DSiware memory analysis
After that, various things...
What you can't do even after modification
・Uploading dumped DSiware, BIOS, firmware, etc. to the internet. Be careful as this violates copyright law.
・Downloading pirated software, BIOS, firmware from the internet. This also violates copyright law.
・It may not be a good idea to brag about your modifications. It doesn't leave a good impression. If you do, limit it to posting in online communities like r/Roms in Reddit.
Have a good gaming life!
