Cifar100への取り組み
はじめに
作成したプログラム(VGG16を用いて)
学習の結果
今後の活用
最後に
はじめに
kaggleには色々なコンペなどがあるが、Cifar100のコードをのせているブログが異様に少ないことから、誰かの参考になればと思い、Cifar100の機械学習に挑むことにしました。
(youtubeでは英語で解説されている外人もおられましたが、私には聞き取りづらく断念しました。。。)
簡単なプロフィール
2019年4月より新卒→医療機器の営業(3年)→2022年7月現在Aidemy受講中
これからはITエンジニアとして転職し、AI領域で社会貢献していきます!
作成したプログラム(VGG16を用いて)
VGG16とは

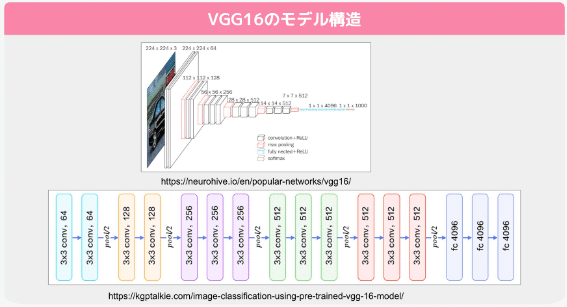
VGGモデルは、2014年のILSVRCという大規模な画像認識のコンペティションで2位になった、オックスフォード大学VGG(Visual Geometry Group)チームが作成したネットワークモデルです。
そして今回はVGG16と呼ばれる、畳み込み13層+全結合層3層=16層のニューラルネットワークを用いて、cifar100 の機械学習を行いました。
モジュールのインポートからVGG16の作成まで
import tensorflow as tf
import numpy as np
import os
import matplotlib.pyplot as plt
import requests
from tensorflow import keras
from tensorflow.keras.datasets import cifar100
from tensorflow.keras.layers import Dense
from tensorflow.keras.models import Sequential, Model
from tensorflow.keras.layers import Dense, Activation
from tensorflow.keras.utils import plot_model
from tensorflow.keras.utils import to_categorical
from keras.utils import np_utils
from tensorflow.keras.layers import Activation, Conv2D, Dense, Dropout, Flatten, MaxPooling2D, Input
from tensorflow.keras.applications.vgg16 import VGG16
from tensorflow.keras import optimizers
from google.colab import files

#CIFAR100のラベル名
CIFAR100_LABELS_LIST = [
                        'apple', 'aquarium_fish', 'baby', 'bear', 'beaver', 'bed', 'bee', 'beetle',
                        'bicycle', 'bottle', 'bowl', 'boy', 'bridge', 'bus', 'butterfly', 'camel',
                        'can', 'castle', 'caterpillar', 'cattle', 'chair', 'chimpanzee', 'clock',
                        'cloud', 'cockroach', 'couch', 'crab', 'crocodile', 'cup', 'dinosaur',
                        'dolphin', 'elephant', 'flatfish', 'forest', 'fox', 'girl', 'hamster',
                        'house', 'kangaroo', 'keyboard', 'lamp', 'lawn_mower', 'leopard', 'lion',
                        'lizard', 'lobster', 'man', 'maple_tree', 'motorcycle', 'mountain', 'mouse',
                        'mushroom', 'oak_tree', 'orange', 'orchid', 'otter', 'palm_tree', 'pear',
                        'pickup_truck', 'pine_tree', 'plain', 'plate', 'poppy', 'porcupine',
                        'possum', 'rabbit', 'raccoon', 'ray', 'road', 'rocket', 'rose',
                        'sea', 'seal', 'shark', 'shrew', 'skunk', 'skyscraper', 'snail', 'snake',
                        'spider', 'squirrel', 'streetcar', 'sunflower', 'sweet_pepper', 'table',
                        'tank', 'telephone', 'television', 'tiger', 'tractor', 'train', 'trout',
                        'tulip', 'turtle', 'wardrobe', 'whale', 'willow_tree', 'wolf', 'woman',
                        'worm'
                        ]


#CIFAR-100 datasetの読み込み
(x_train, y_train), (x_test, y_test) = cifar100.load_data(label_mode='fine')

y_train=keras.utils.to_categorical(y_train)
y_test=keras.utils.to_categorical(y_test)


#画像をfloat32(0.~1.)に変換
x_train=x_train.astype("float32")/255.0
x_test=x_test.astype("float32")/255.0

#input_tensorの定義をして、vggのImageNetによる学習済みモデルを作成してください
input_tensor = Input(shape=(32, 32, 3))
vgg16 = VGG16(include_top=False, weights="imagenet", input_tensor=input_tensor)
モデルの作成
# 特徴量抽出部分のモデルを作成しています
top_model = Sequential()
top_model.add(Flatten(input_shape=vgg16.output_shape[1:]))
top_model.add(Dense(256, activation='sigmoid'))
top_model.add(Dropout(0.5))
top_model.add(Dense(100, activation='softmax'))
# vgg16とtop_modelを連結してください
model = Model(inputs = vgg16.input, outputs=top_model(vgg16.output))
# 以下のfor文を完成させて、15層目までの重みを固定させてください
for layer in model.layers[:15]:
    layer.trainable = False
# 学習の前に、モデル構造を確認してください
model.summary()
# コンパイルをしています
model.compile(loss='categorical_crossentropy',
              optimizer=optimizers.SGD(lr=1e-4, momentum=0.9),
              metrics=['accuracy'])
# すでに学習済みのモデルを保存している場合、以下のように学習済みモデルを取得できます
# model.load_weights('param_vgg_15.hdf5')
# バッチサイズ32で学習を行ってください
model.fit(x_train, y_train, validation_data=(x_test, y_test), batch_size=32, epochs=100)
# 以下の式でモデルを保存することができます
model.save_weights('param_vgg_15.hdf5')
# 精度の評価をしています
scores = model.evaluate(x_test, y_test, verbose=1)
print('Test loss:', scores[0])
print('Test accuracy:', scores[1])


# 予測(検証データの先頭の10枚)
pred = np.argmax(model.predict(x_test[0:10]), axis=1)
print(pred)

model.summary()
学習の結果
Test loss: 1.9788304567337036
Test accuracy: 0.4830999970436096
となりました。
最初はepoch数を200にしていましたが、100を超えたあたりから結果が上がらなくなりましたので、最終的にepoch数を100にしました。

※2022/11/21
Denseを512に変更すると、Test accuracyが50.19%に上昇しました
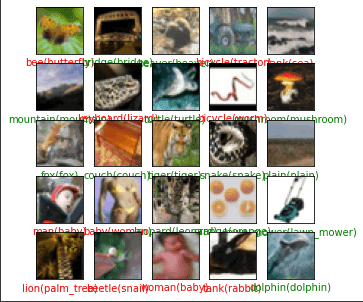
結果を見てみる
#テスト画像を入力して識別
labels=model.predict(x_test[:,:,:,:])

#結果を少し見る
plt.figure(figsize=(5,5))
for i in range(25):
    plt.subplot(5,5,i+1)
    plt.xticks([])
    plt.yticks([])
    #ランダムな番号の画像を見る
    index=np.random.randint(0,9999)
    true_index=np.argmax(y_test[index])#正解
    predict_index=np.argmax(labels[index])#予測したインデックス
    plt.imshow(x_test[index])#画像表示
    plt.xlabel("{}({})".format(CIFAR100_LABELS_LIST[predict_index],CIFAR100_LABELS_LIST[true_index]),color=("green" if predict_index==true_index else "red"))
#"予測したラベル(正解のラベル)"で表示.正解なら緑,間違っていれば赤で表示
今後の活用
VGG16だけではこれ以上精度は上がらないため、ResNetなどの複雑なモデルの学習、または、学習済みモデルを利用して転移学習を行うなどのアプローチを行なうことで、精度を上げることができるかもしれない。
最後に
今回はcifar100を用いて機械学習を行いましたが、今後は衛生画像からの機械学習に取り組んでいきたいと考えています。
この記事が気に入ったらサポートをしてみませんか?
