
Pythonライブラリ(Google Drive操作):PyDrive2

1.概要
PythonからGoogle Drive API×PyDrive2を用いてGoogle Driveの操作を実施してみます。
1-1.PyDrive2の特徴
PyDrive2は”google-api-python-client”のラッパーライブラリであり、多くのGoogle Drive API V2タスクを簡易化しており、下記特徴があります。
OAuth2.0の簡素化(数行で設定可)
よりオブジェクト指向化できるよう、Google Drive API V2を各クラスにラップ化
APIコールを除いた一般的な操作(fetchやページ操作)を助ける
”fsspec filesystem”実施の提供
PyDriveからフォーク(派生)したもの
PyDrive自体は既に更新されていない
1-2.PyDrive2でできること
できることの一部は下記の通り。その他は公式Docsをご確認ください。
APIを用いたOAuth接続
ファイルの作成/更新(Creating and Updating Files)
ファイル情報の取得(Listing Files)
フォルダの作成(Creating a Folder)
ファイルID取得(Return File ID via File Title)
フォルダ情報の取得(Browse Folders)
ファイル操作
アップロード
デリート(削除)
特別なメタデータの操作
1-3.PyDrive2の公式Docs
PyDrive2の公式Docsは下記の通りです。
Documentation: https://docs.iterative.ai/PyDrive2
2.環境構築1:Google Cloud
Google DriveにAPIでアクセスするための環境をGoogle Cloudから作成します。画面の体裁はやや異なりますが、下記記事が非常に分かりやすいため参照しました。
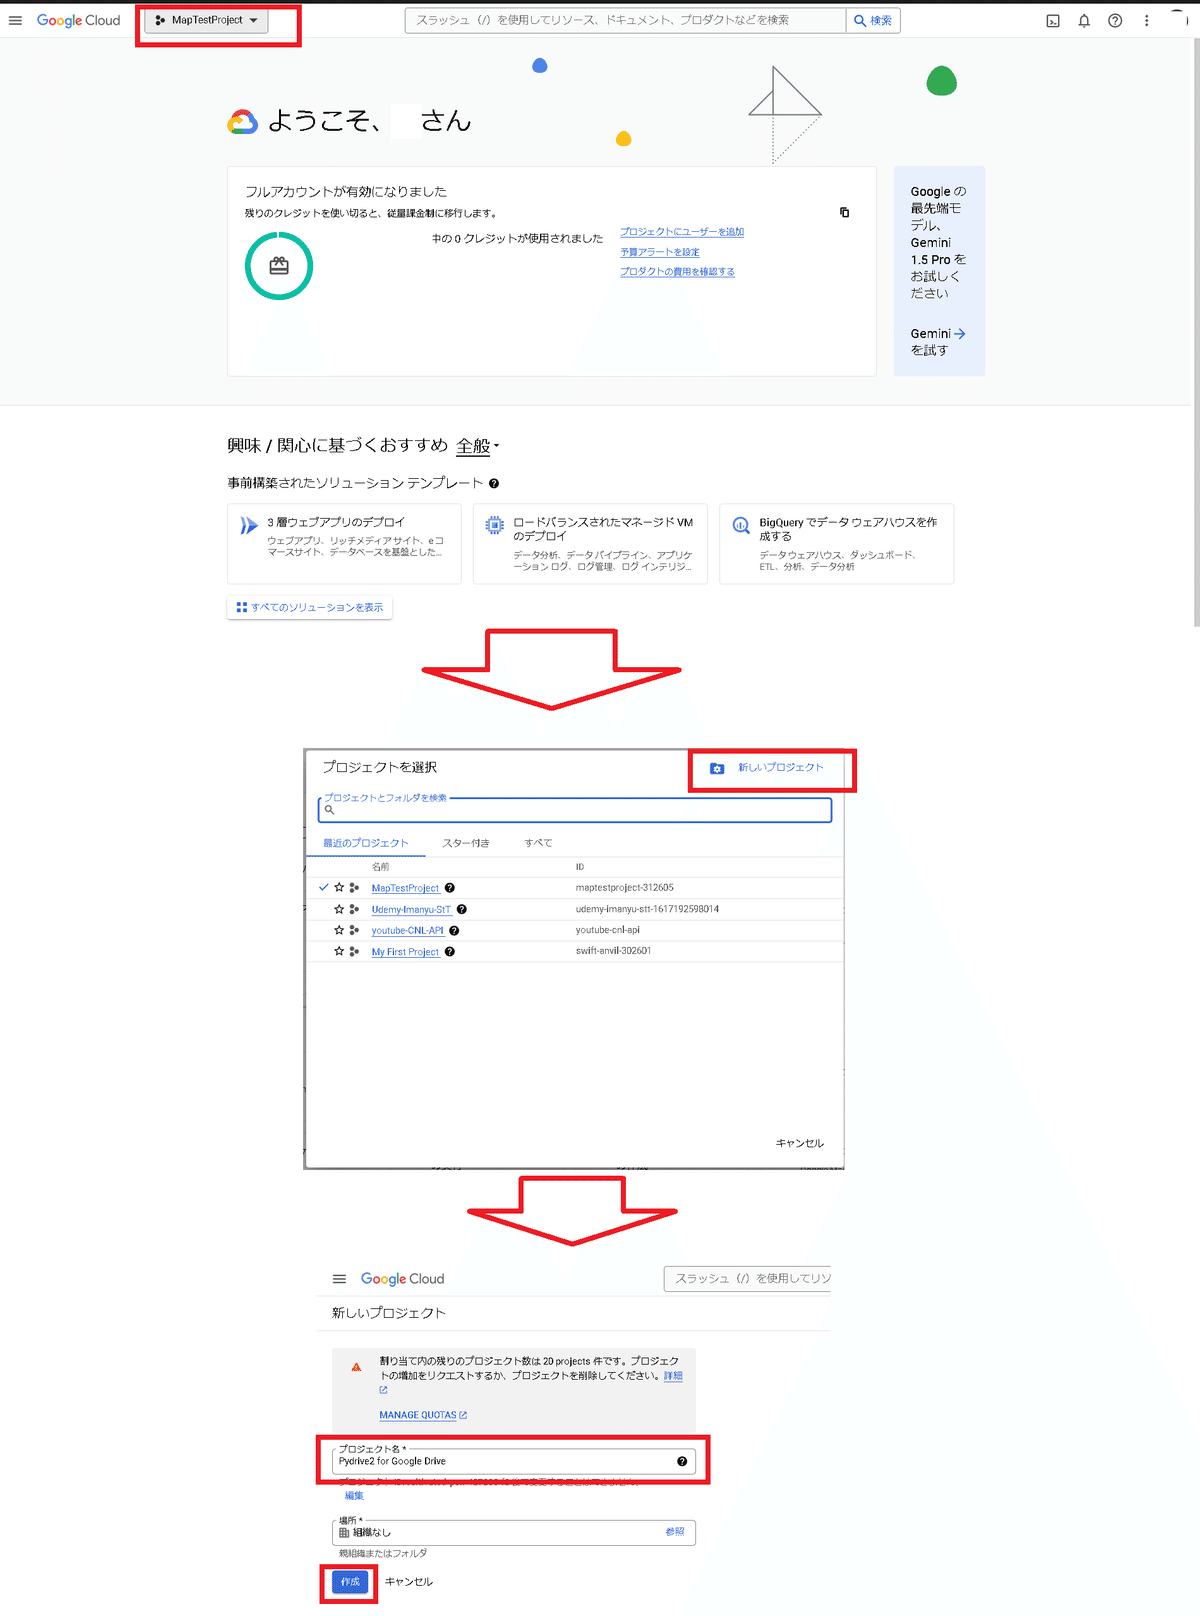
2-1.Google Cloud プロジェクトの作成
Google Cloud PlatformへアクセスしてGoogle Cloud プロジェクトを作成します。要領は以下の通りです。
Google Cloudロゴ横のセレクトボックスを選択
「プロジェクトを選択」ウィンドウの「新しいプロジェクト」を選択
「新しいプロジェクト」でプロジェクト名を入れて「作成」を押す
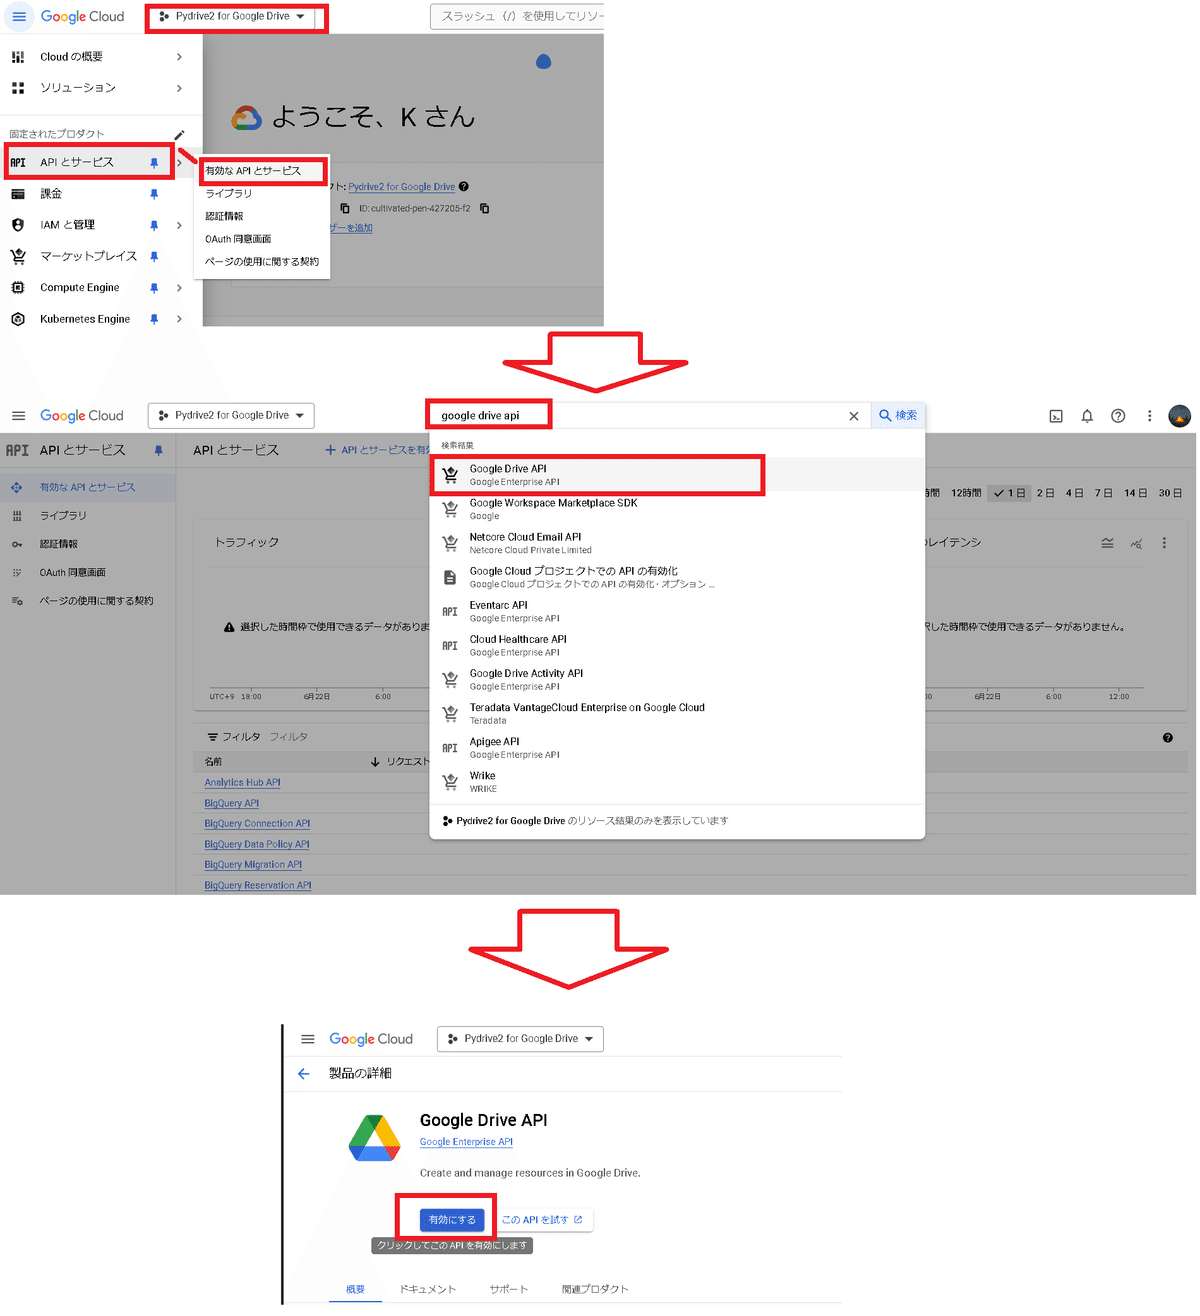
2-2.Google Drive APIの有効化
作成したプロジェクトに対して、Drive APIを有効化します。要領は以下の通りです。
Google Cloudロゴ横のセレクトボックスから作成したプロジェクトを選択
左上の三を押し「APIとサービス」から「有効なAPIとサービス」を選択
検索ボックスに「Google Drive」と入力し、「Google Drive API」を選択
製品の詳細で「有効にする」ボタンを押す。
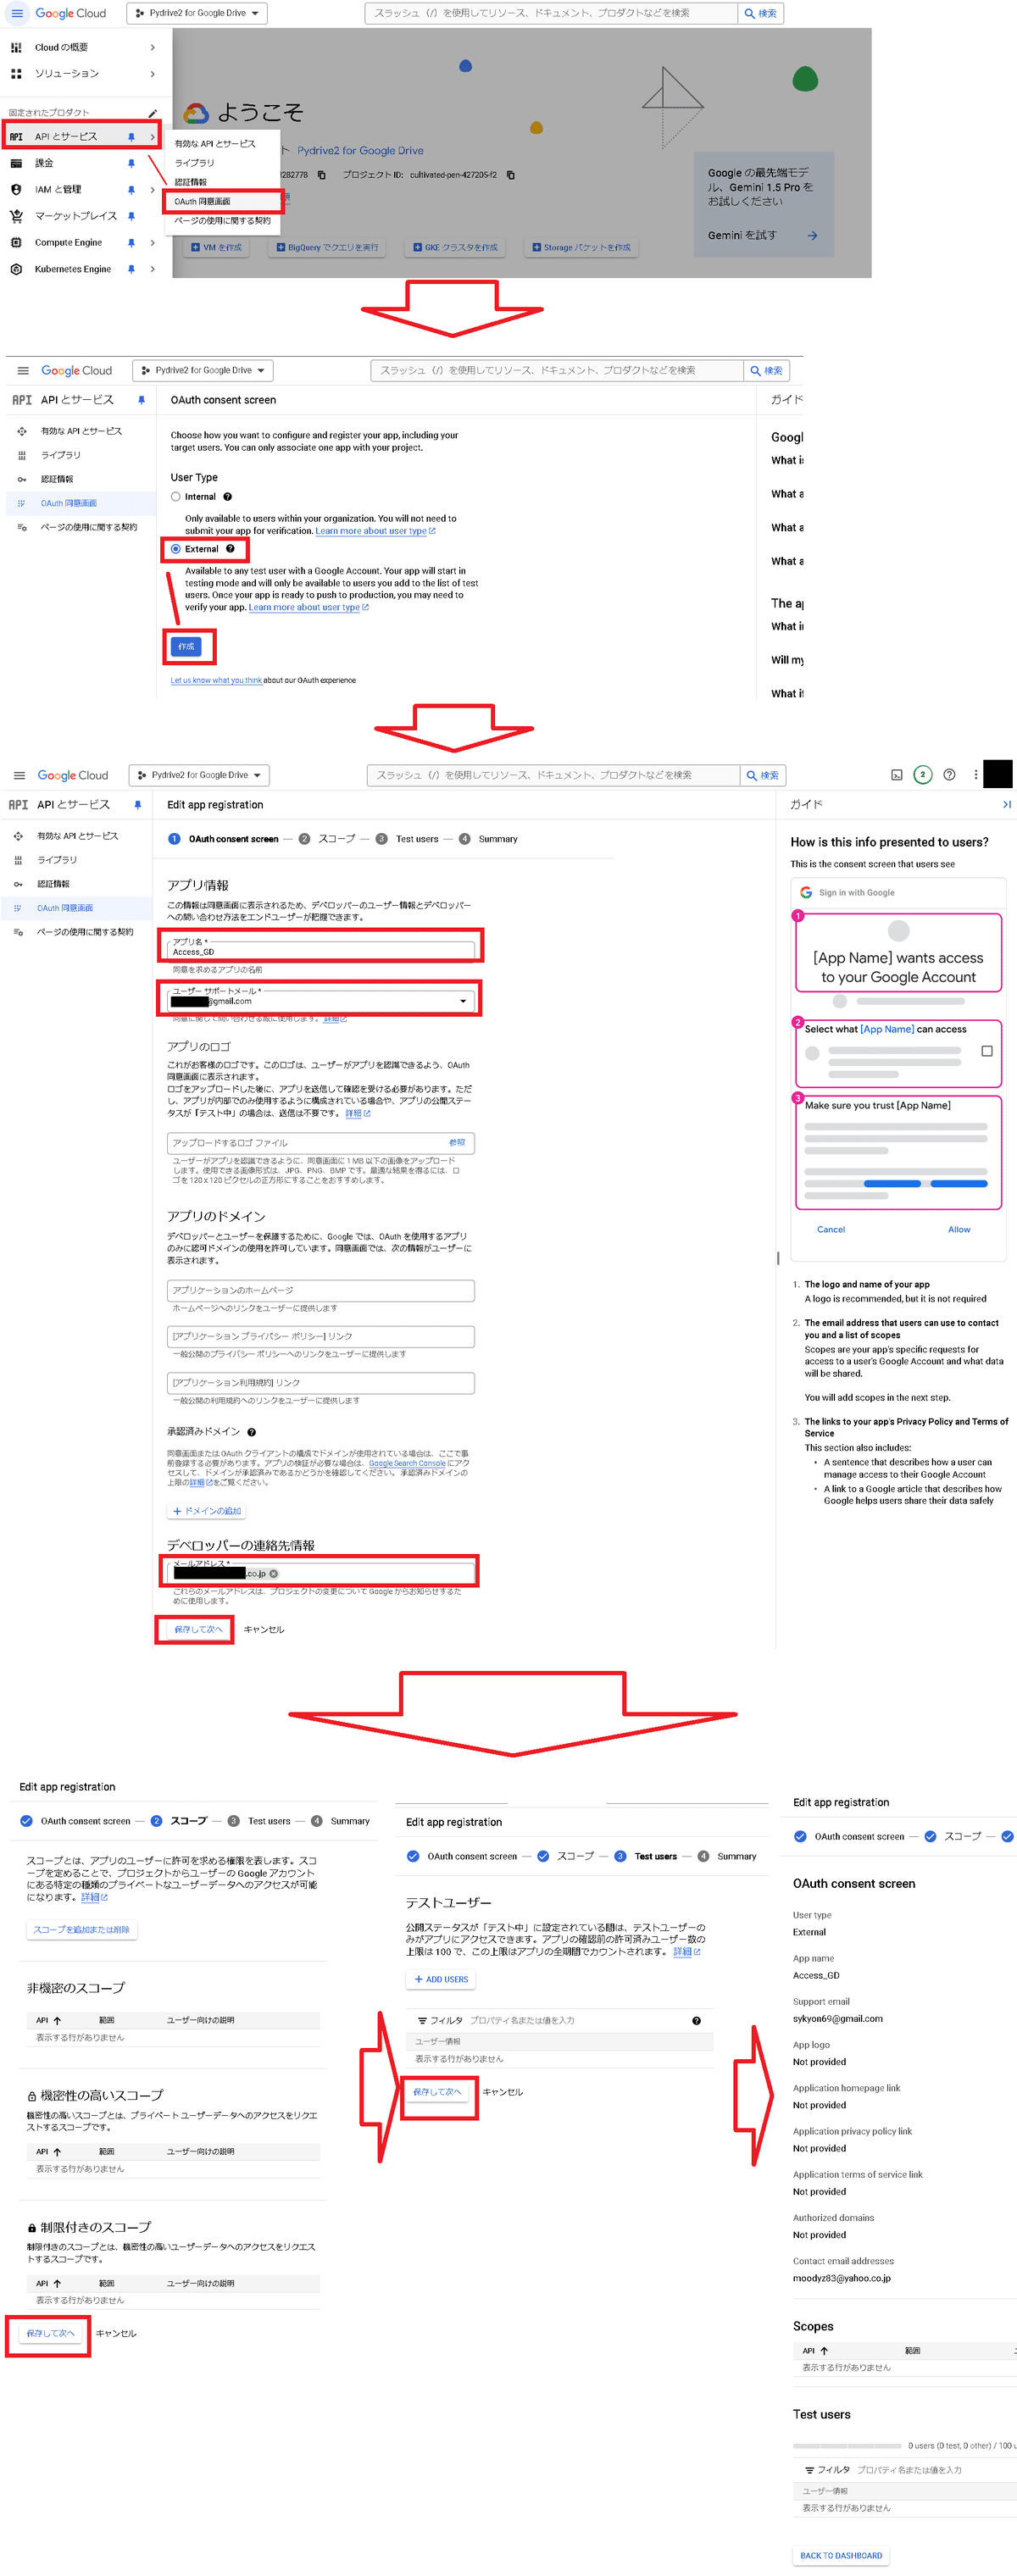
2-3.OAuthの認証
OAuth認証の設定を行います。要領は以下の通りです。
左上の三を押し「APIとサービス」から「OAuth同意画面」を選択
遷移した画面の外部(External)を選択し、「作成」を押す
アプリ情報に必須情報を入力し、「保存して次へ」ボタンを押す
アプリ名:適当に設定
ユーザーサポートメール
メールアドレス
スコープの設定はそのまま「保存して次へ」ボタンを押す
テストユーザーの設定もそのまま「保存して次へ」ボタンを押す
Summaryが表示される(この時点で完了)
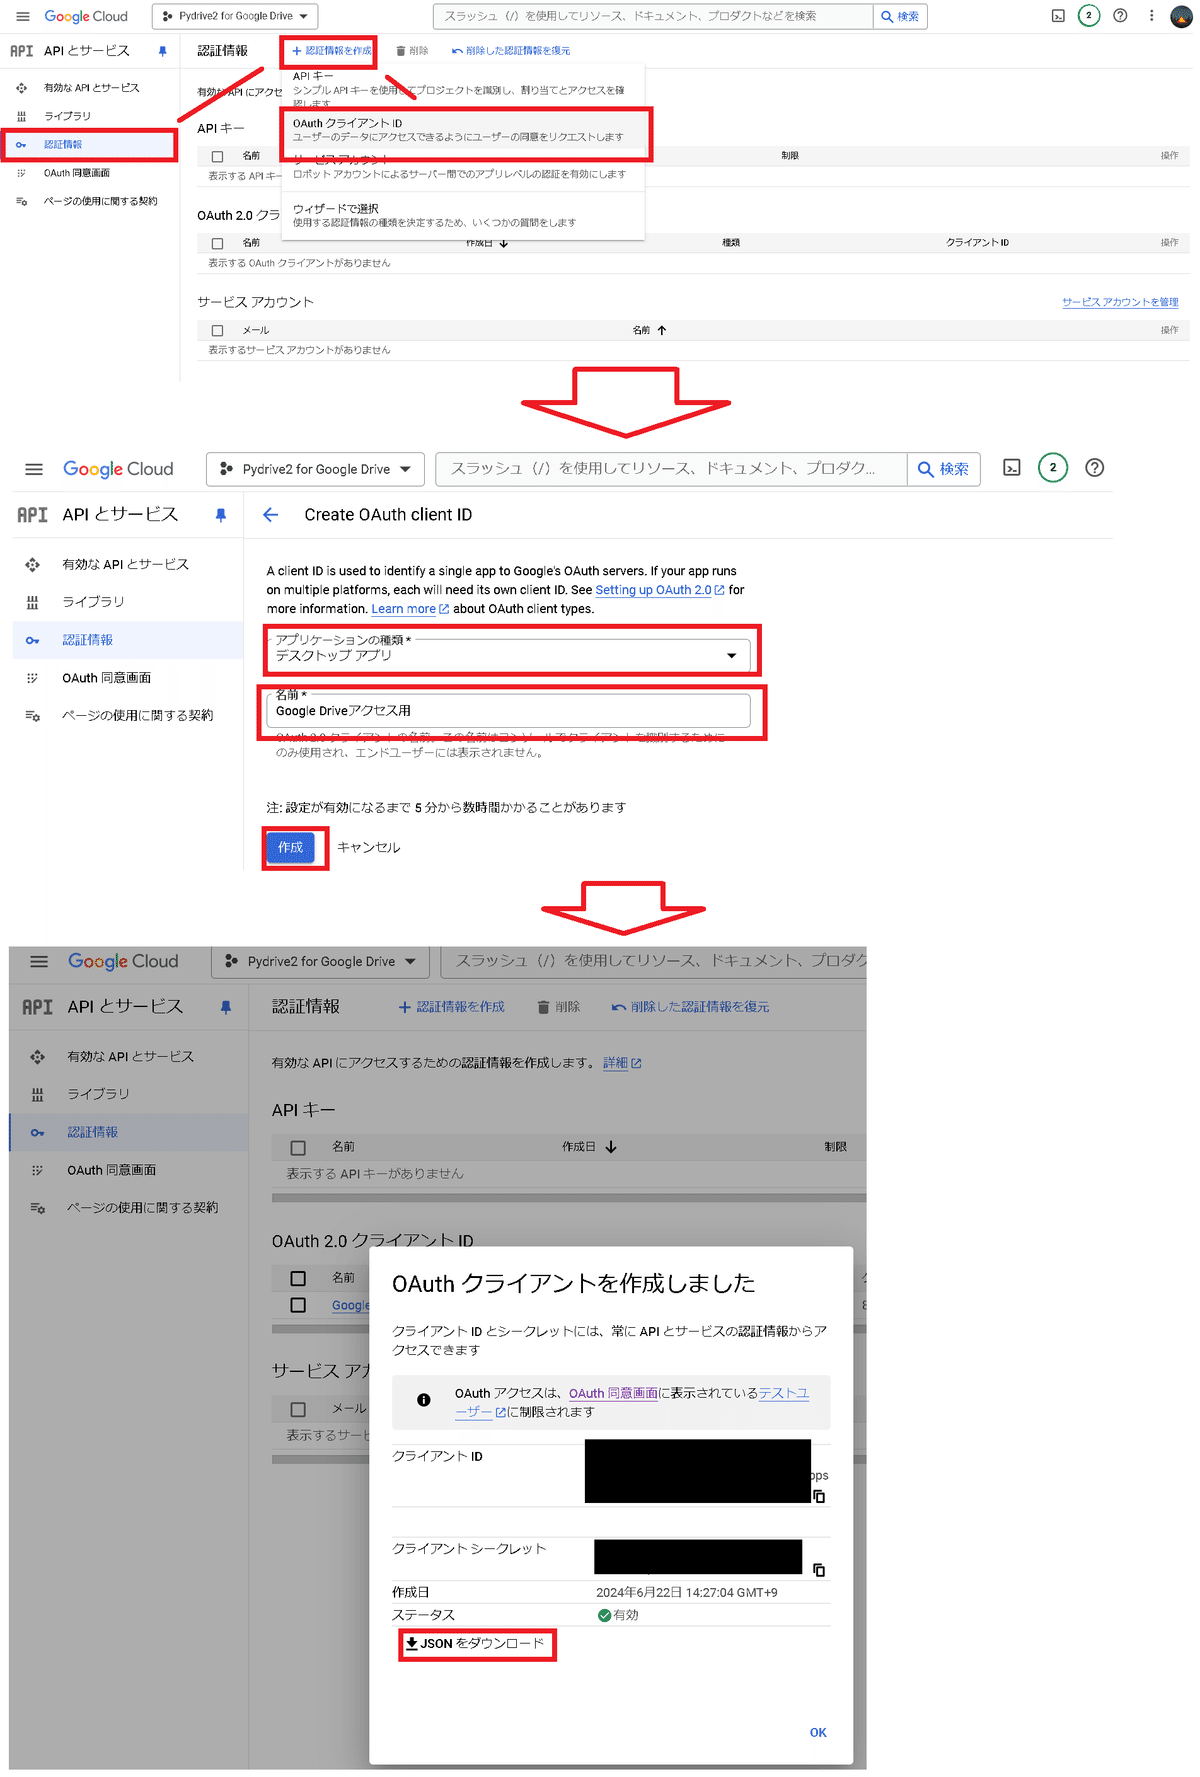
2-4.認証情報:OAuthクライアント作成
認証情報を作成します。要領は以下の通りです。
(APIとサービス画面の)「認証情報」を選択
「認証情報を取得」タブから「OAuthクライアントID」を選択
必要な情報を入力し「作成」ボタンを押す
アプリケーションの種類
名前
ウィンドウの「JSONをダウンロード」を押し、JSONファイルを取得
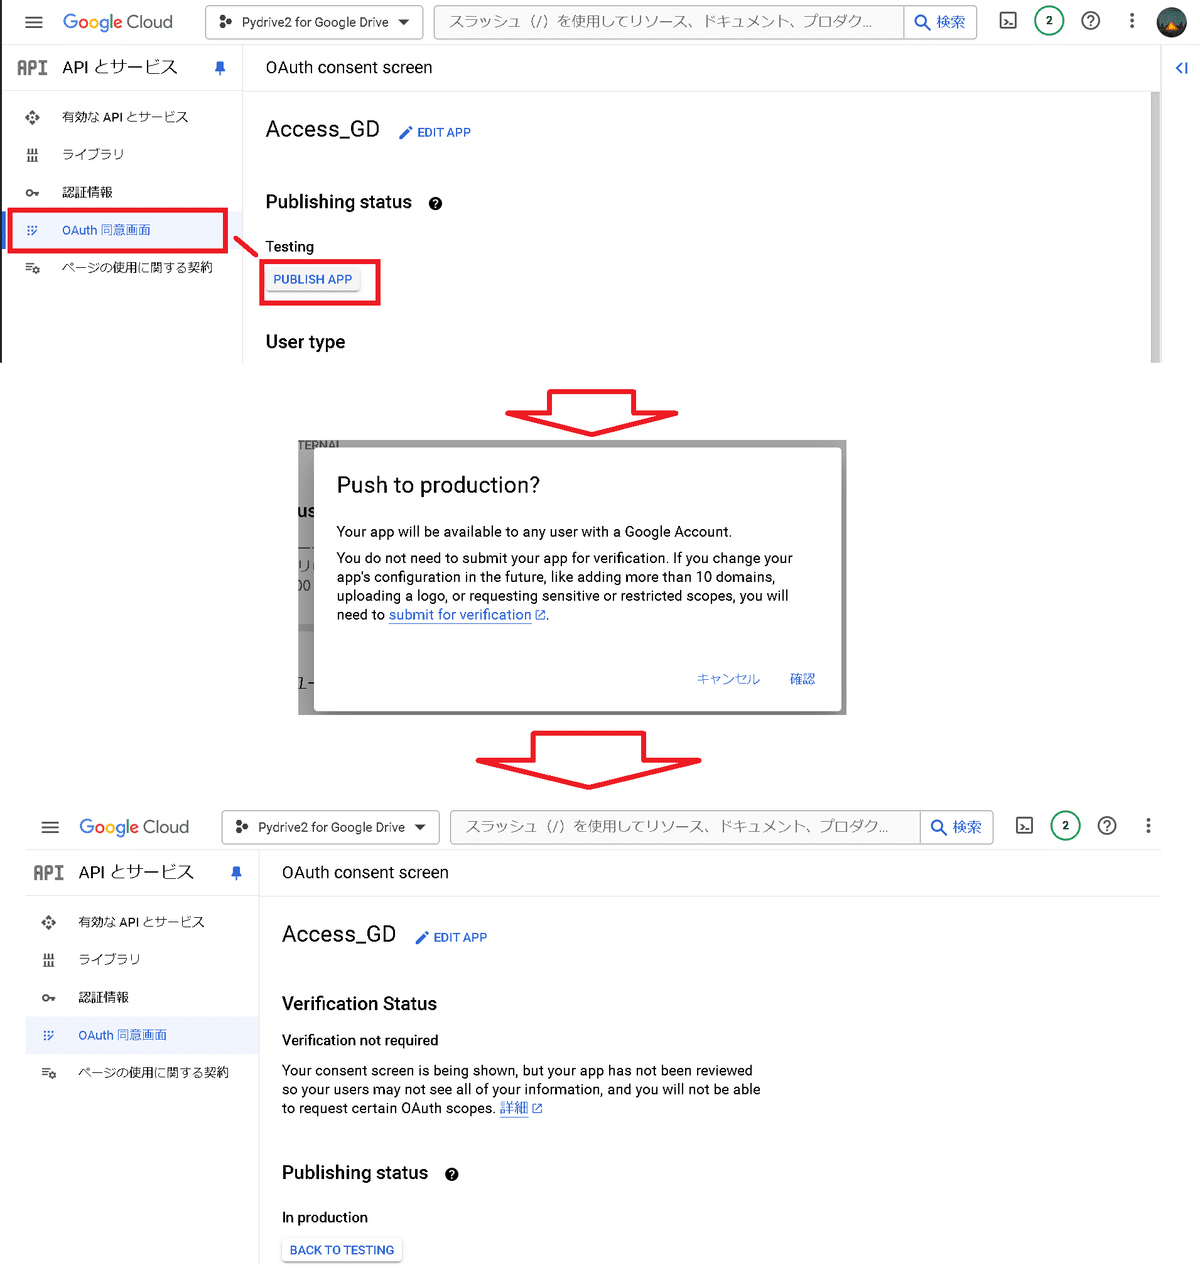
2-5.OAuthの同意:アプリ公開
OAuth同意画面からアプリの公開を設定します。要領は以下の通りです。
(APIとサービス画面の)「OAuth同意画面」を選択
公開ステータス(Publishing status)からアプリを公開(PUBLISH APP)を選択
確認ウィンドウが立ち上がるため「確認」を押す
ステータスが変更されたことを確認する(ここで完了)
【参考:Python実行時に承認エラー(403)が発生した場合】
私は問題なかったですが、もし403エラーが発生した場合は自分のGoogleアカウントをユーザーとして追加したら解決する可能性があります。
3.環境構築2:Python
Python側の環境構築を実施します。基本的にPythonに必要な環境構築は実施済みとします。
3-1.PyDrive2のインストール
PyDrive2を下記コマンドでインストールします。
[Terminal]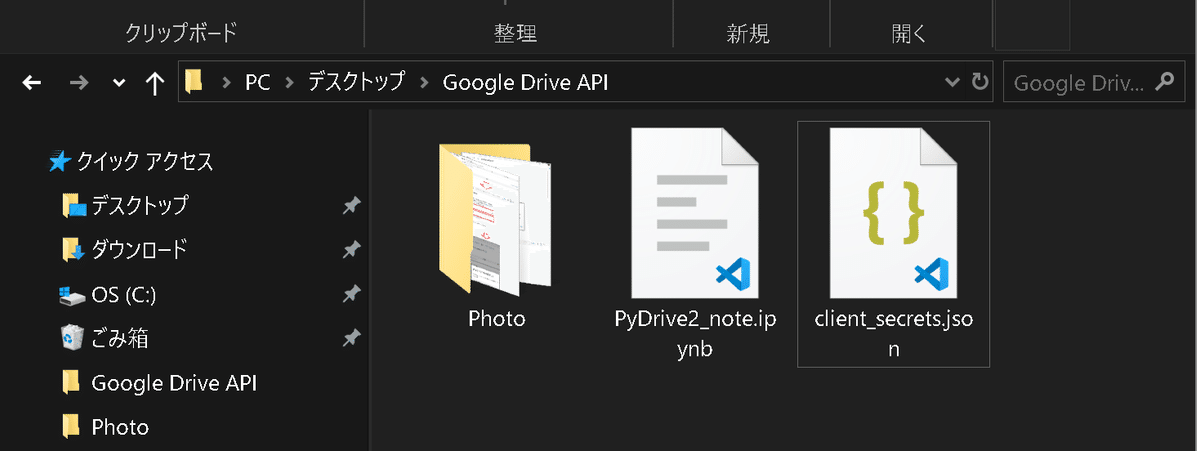
pip install PyDrive23-2.JSONファイルの配置
公式DocsのQuickStartより、2-4節でダウンロードしたJSONファイルの名称を“client_secrets.json”に変更し、作業ディレクトリに配置します。
4.QuickStart
公式DocsのQuickStartを確認しながら、簡単な操作を実行していきます。
細かいAPIは公式DocsのIndexから検索可能です。
4-1.Google Driveへの接続
Google Drive APIを使用してGoogle Driveへ接続します。
JSONファイルが準備された状態で下記実行すると、ブラウザが自動で開きGoogle Driveへのアクセスを許可する画面が出ます。自分のユーザー名を選択すると、Google Driveにアクセスできます。
[IN]
from pydrive2.auth import GoogleAuth
from pydrive2.drive import GoogleDrive

gauth = GoogleAuth()
gauth.LocalWebserverAuth()

drive = GoogleDrive(gauth)
[OUT]
Your browser has been opened to visit:
https://accounts.google.com/o/oauth2/auth?client_id=xxxxxxx
Authentication successful.
4-2.Txtファイルの作成/Upload
ファイル名が”Hello.txt”の中に、”Hello World!”という文字を記載してGoogle Driveへアップロードします。
下図の通り実行後にGoogleDriveにファイルを確認できました。
[IN]
file1 = drive.CreateFile({'title': 'Hello.txt'})  # Google Driveにファイル名「Hello.txt」でアップロード
file1.SetContentString('Hello World!') # ファイルの中身を設定
file1.Upload() # アップロード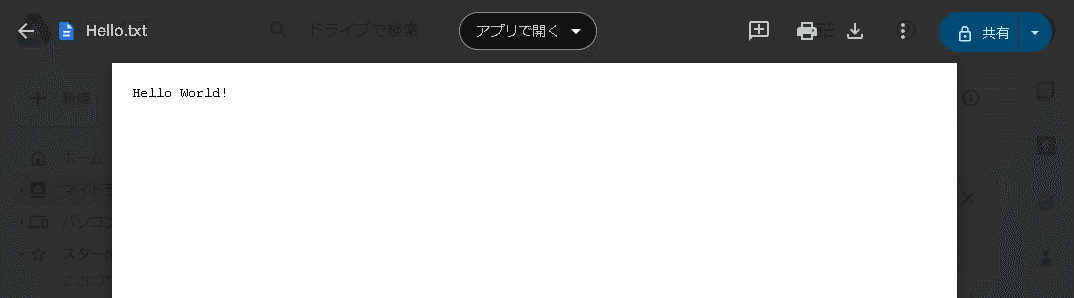
4-2.ルートのファイル一覧取得
ファイル一覧の取得は”drive.ListFile(<検索クエリ>).GetList()”で実行します。GoogleDriveのルートディレクトリになるファイルとフォルダの一覧を取得できました。
[IN]
# Auto-iterate through all files that matches this query
file_list = drive.ListFile({'q': "'root' in parents and trashed=false"}).GetList() #クエリ(q)でrootディレクトリのファイルを取得(ゴミ箱は除外)

for file1 in file_list:
  print('title: %s, id: %s' % (file1['title'], file1['id']))
[OUT]
title: .ipynb_checkpoints, id: 1-9E9QLhyH
title: 01. API, id: 1Zhi1maUYikFJ
title: 02. AI, id: 1Ih1TAF5jBQ
title: 03. AI_Art, id: 1TCL3ahrOWuP
title: 04. note, id: 1cUtKWhKmWW
title: 05. データベース(SQL), id: 1hvH1dIDFd5_64-3.フォルダの作成
GoogleDriveにフォルダを作成します。
GoogleDriveは全データをファイルとして取り扱い、異なるファイルフォーマット用に異なるmimetypesを割り当てます。
フォルダでは”application/vnd.google-apps.folder”を使用します。下記関数は親フォルダとフォルダ名が必要なためrootにテスト用フォルダを作成しました。
[IN]
def create_folder(parent_folder_id, subfolder_name):
    newFolder = drive.CreateFile({'title': subfolder_name,
                                  "parents": [{"kind": "drive#fileLink",
                                               "id": parent_folder_id}],
                                  "mimeType": "application/vnd.google-apps.folder"})
    newFolder.Upload()
    return newFolder

create_folder('root', '00_test_folder')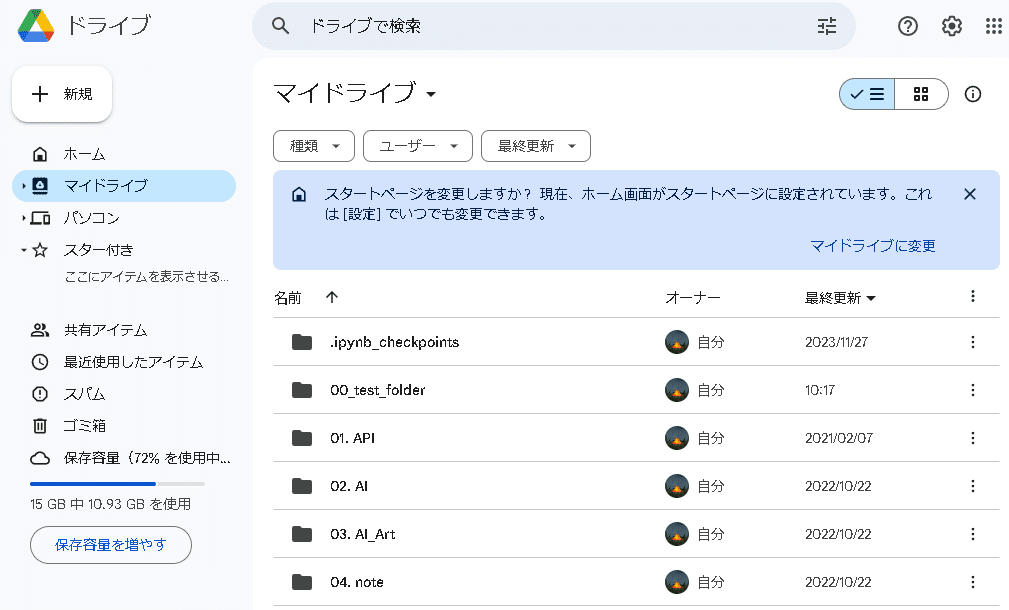
4-4.ファイル名からファイルID取得
ファイル名からファイルIDの取得は下記で実行します。参考までに前節で作成したフォルダからIDを取得しました。
※既にあるフォルダだと出力がでなかったため、parent_directory_id引数にはidをちゃんと指定しないといけないと思います。
[IN]
def get_id_of_title(title,parent_directory_id):
  foldered_list=drive.ListFile({'q':  "'"+parent_directory_id+"' in parents and trashed=false"}).GetList()
  for file in foldered_list:
    if(file['title']==title):
      return file['id']
    return None

get_id_of_title('00_test_folder','root')

[OUT]
'1bcJSXBironymImHfTxU35kfDxYoDgKCx'
5.APIの検索場所
PyDrive2のAPI(クラスのAPI)は「pydrive2 package」にまとめて記載されております。また詳細のAPIは「Index」参照のこと。
全ては記載できないため、自分が使用した物だけ適宜追記予定です。
6.API:OAuth
PyDrive2ではOAuthの認証は”GoogleAuth (”と”LocalWebserverAuth()”だけで実行できます。
[API]
class pydrive2.auth.GoogleAuth(settings_file='settings.yaml',
                               http_timeout=None,
                               settings=None)
[API]
LocalWebserverAuth(host_name='localhost',
port_numbers=None,
launch_browser=True,
bind_addr=None)コードは下記2行で簡単に実装できます。
[IN]
from pydrive2.auth import GoogleAuth

gauth = GoogleAuth()
gauth.LocalWebserverAuth()
細かい認証設定が必要な場合は公式Docs参照のこと。
6-1.認証のカスタム:settings.yaml
OAuth認証の設定変更は”settings.yaml”を作成します。
下記記事を参考にしながら「毎回立ち上がるログイン画面を省略」するカスタムを実装します。
下記の通り”settings.yaml”ファイルを作成し、コードを記載します。それぞれの意味は下記の通りです。
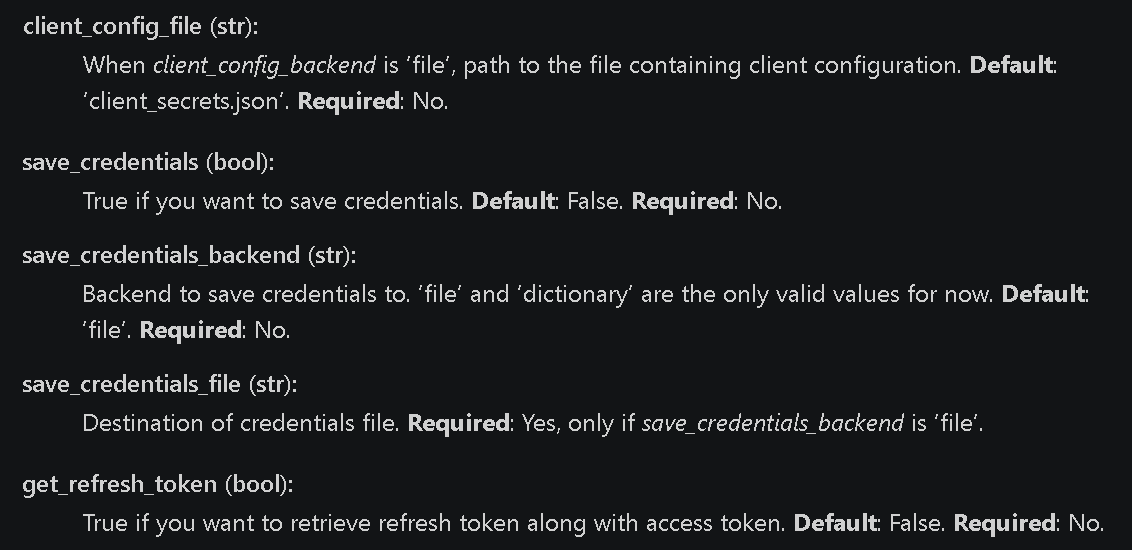

z[settings.yaml]
client_config_file: client_secrets.json

save_credentials: True
save_credentials_backend: file
save_credentials_file: saved_credentials.json

get_refresh_token: True初回ログイン時は認証確認されますが完了時に”saved_credentials.json”が生成されます。2回目以降はこのファイル内にアクセス情報が含まれるため認証不要です。

【参考:UnicodeDecodeError発生時の対応】
記事のコードをそのまま流用すると”UnicodeDecodeError: 'cp932' codec can't decode byte 0x81”が発生しました。原因はコメントアウトした日本語だったため、全て削除しました。
自分用でコメント追記したい方は英語の方が無難と思います。
7.API:ファイル操作
PyDrive2ではファイルの作成/更新/削除/アップロード/ダウンロードなどのファイル操作が可能です。
7-1.ファイルアップロード:Upload()
ファイルのアップロードはUpload() (pydrive2.files.GoogleDriveFile method)を使用します。
[API]
Upload(param=<アップロードするファイルのパラメータ>)QuickStartでは下記で実装しましたが、最初から”pydrive2.files module”を使用すると簡単にファイルをアップロードできます。
pydrive2.drive moduleをインスタンス化
CreateFileメソッドでファイル作成
戻り値がpydrive2.files.GoogleDriveFileクラス
.SetContentString()で中身を設定
file1.Upload()でアップロード
(OAuth認証後に)GoogleDriveFile()をインスタンス化し、ローカルファイルをSetContentFile()で設定すれば、Upload()メソッドでローカルにファイルがアップロードされます。
なおファイルはZipでも対応可能でした。
[IN]
from pydrive2.files import GoogleDriveFileList, GoogleDriveFile

googledrivefile = GoogleDriveFile()

path_file = 'emailreceipt_20240607R0911230830.pdf' # ローカルのファイルパス
googledrivefile.SetContentFile(path_file) # ファイルの中身を設定
googledrivefile.Upload() # アップロード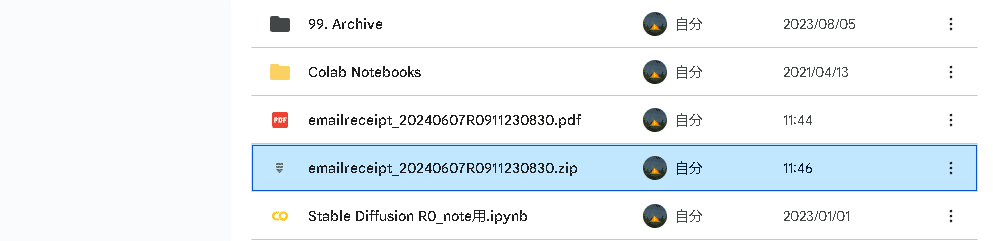
8.API:ファイル情報取得
Google Driveからファイル情報の取得方法を紹介します。
8-1.クエリ検索によるファイル取得
GoogleDriveFileListインスタンスに辞書型のパラメータをFiles.list(<検索クエリ>)につけてGetList()を実行すると、クエリにマッチしたGoogleDrive内の全ファイルリストが取得できます。
[API]
class pydrive2.drive.GoogleDrive(auth=None)[API]
ListFile(param=<辞書型のパラメータ>)[API]
GetList() 下記実行するとGoogleDriveのルートにあるファイル/ディレクトリの一覧を出力してくれます。出力はリストですが、各データは"<class 'pydrive2.
files.GoogleDriveFile'> "クラスとなります。
[IN]
from pydrive2.auth import GoogleAuth
from pydrive2.drive import GoogleDrive

gauth = GoogleAuth()
gauth.LocalWebserverAuth()

drive = GoogleDrive(gauth)

# Auto-iterate through all files that matches this query
file_list = drive.ListFile({'q': "'root' in parents and trashed=false"}).GetList()
file_list.sort(key=lambda x: x['title']) #titleキーでソート
print(type(file_list), len(file_list), type(file_list[0]), end='\n\n')

for file1 in file_list:
  print('title: %s, id: %s' % (file1['title'], file1['id']))
[OUT]
<class 'list'> 6 <class 'pydrive2.files.GoogleDriveFile'>
title: .ipynb_checkpoints, id: 1-9E9QLhyH
title: 01. API, id: 1Zhi1maUYikFJ
title: 02. AI, id: 1Ih1TAF5jBQ
title: 03. AI_Art, id: 1TCL3ahrOWuP
title: 04. note, id: 1cUtKWhKmWW
title: 05. データベース(SQL), id: 1hvH1dIDFd5_6【参考:pydrive2.files.GoogleDriveFileの保持データ】
pydrive2.files.GoogleDriveFileは辞書型としてデータを保持しています。情報は下記の通りです。
[IN]
for k, v in file_list[0].items():
    print(f'{k}: {v}')
[OUT]
kind: drive#file
userPermission: {'id': 'me', 'type': 'user', 'role': 'owner', 'kind': 'drive#permission', 'selfLink': 'https://www.googleapis.com/drive/v2/files/<idのデータ>/permissions/me', 'etag': '"ikE"', 'pendingOwner': False}
selfLink: https://www.googleapis.com/drive/v2/files/<idのデータ>
ownerNames: ['K']
lastModifyingUserName: K
editable: True
writersCanShare: True
mimeType: application/vnd.google-apps.folder
parents: [{'selfLink': 'https://www.googleapis.com/drive/v2/files/<idのデータ>/parents/0ADjyRvYLECjHUk9PVA', 'id': '0ADjyk9PVA', 'isRoot': True, 'kind': 'drive#parentReference', 'parentLink': 'https://www.googleapis.com/drive/v2/files/0ADVA'}]
appDataContents: False
iconLink: https://drive-thirdparty.googleusercontent.com/16/type/application/vnd.google-apps.folder
shared: False
lastModifyingUser: {'displayName': 'K', 'kind': 'drive#user', 'isAuthenticatedUser': True, 'permissionId': '03030118887000533084', 'emailAddress': 'sykyon69@gmail.com', 'picture': {'url': 'https://lh3.googleusercontent.com/a/B7=s64'}}
owners: [{'displayName': 'K', 'kind': 'drive#user', 'isAuthenticatedUser': True, 'permissionId': '03030118887000533084', 'emailAddress': 'sykyon69@gmail.com', 'picture': {'url': 'https://lh3.googleusercontent.com/a/B7=s64'}}]
copyable: False
etag: "<etagのデータ>"
alternateLink: https://drive.google.com/drive/folders/<idのデータ>
embedLink: https://drive.google.com/embeddedfolderview?id=<idのデータ>
copyRequiresWriterPermission: False
spaces: ['drive']
id: <idのデータ>
title: .ipynb_checkpoints
labels: {'viewed': True, 'restricted': False, 'starred': False, 'hidden': False, 'trashed': False}
explicitlyTrashed: False
createdDate: 2023-11-27T02:19:24.618Z
modifiedDate: 2023-11-27T02:19:24.618Z
modifiedByMeDate: 2023-11-27T02:19:24.618Z
lastViewedByMeDate: 2023-11-27T02:19:24.618Z
markedViewedByMeDate: 1970-01-01T00:00:00.000Z
quotaBytesUsed: 0
version: 1
capabilities: {'canEdit': True, 'canCopy': False}8-2.ページ数指定でのファイル検索
ファイルリストをページ指定(paginating)で出力できます。
maxResultsで1回の検索で何個のファイルか指定することが可能です。
[IN]
# Paginate file lists by specifying number of max results
for file_list in drive.ListFile({'q': 'trashed=true', 'maxResults': 10}): #取得ファイル数:10、クエリ(q):ゴミ箱のファイルも含む
  print('Received %s files from Files.list()' % len(file_list)) #10ファイルごとに表示
  for file1 in file_list:
      print('title: %s, id: %s' % (file1['title'], file1['id'])) #ファイル名とIDを表示
[OUT]
Received 10 files from Files.list(), id: 1-Kxx
title: aaa, id: 1-Kxx
title: bbb, id: 1-Kxxx
title: ccc, id: 1-Kxxx
title: ddd, id: 1-Kxxx
title: eee, id: 1-Kxx
title: fff, id: 1-Kxx
title: ggg, id: 1-Kxx
title: hhh, id: 1-Kxx
title: iii, id: 1-Kxxx
title: jjj, id: 1-Kxxx
title: kkk, id: 1-Kxxx
Received 10 files from Files.list()
~以下省略~9.API:fsspec filesystem
詳細は理解できないため追って
10.完成コード(自分用)
自分がやりたいことだけ集めたクラスを作成しましたのでご参考までに。
※適宜修正予定
【設計思想】
初期化時に認証実施(簡素化)
ファイルリストを取得
ファイル情報も取れるようにしたい
ファイルのダウンロードを簡素化
ファイルのアップロードを簡素化
[IN]
from pydrive2.auth import GoogleAuth
from pydrive2.drive import GoogleDrive
from pydrive2.files import GoogleDriveFileList, GoogleDriveFile
import pandas as pd

class GoogleDriveAPI:
    def __init__(self):
        self.gauth = GoogleAuth() # 認証
        self.gauth.LocalWebserverAuth() # ローカルサーバーで認証
        self.drive = GoogleDrive(self.gauth) # GoogleDriveオブジェクトの生成
        self.drivefile = GoogleDriveFile() # GoogleDriveFileオブジェクトの生成

    #フォルダ一覧取得(クエリ指定可)
    def get_folder_list(self, query:str=None, sorted:bool=True):
        df = pd.DataFrame({"fileType": [], "id":[], "title":[], "mimeType":[],
                           "fileSize":[], "createdDate":[], "modifiedDate":[]})
        if query is None:
            query = "'root' in parents and trashed=false" # ルートディレクトリのフォルダ一覧を取得
        file_list = self.drive.ListFile({'q': query}).GetList()
        for file in file_list:
            if 'fileSize' in file:
                fileType = 'file'
                df = pd.concat([df, pd.DataFrame({"fileType": [fileType], "id":[file['id']], "title":[file['title']],
                                                    "mimeType":[file['mimeType']], "fileSize":[round(float(file['fileSize'])/1024, 1)],
                                                    "createdDate":[file['createdDate']], "modifiedDate":[file['modifiedDate']]})])
            else:
                fileType, fileSize = 'folder', None
                df = pd.concat([df, pd.DataFrame({"fileType": [fileType], "id":[file['id']], "title":[file['title']],
                                                    "mimeType":[file['mimeType']], "fileSize":[fileSize],
                                                    "createdDate":[file['createdDate']], "modifiedDate":[file['modifiedDate']]})])
        #Titleでソート
        if sorted:
            df = df.sort_values('title')
        return df


    #GoogleDrive上のルートにファイルをアップロード(Zip可)
    def upload_file_root(self, file_path:str):
        self.drivefile.SetContentFile(file_path)
        self.drivefile.Upload()

gdrive = GoogleDriveAPI()

#サンプル
file_list = gdrive.get_folder_list() # ルートディレクトリのフォルダ一覧を取得
path_file = 'emailreceipt_20240607R0911230830.pdf' # ローカルのファイルパス
gdrive.upload_file_root(path_file) # ルートディレクトリにファイルをアップロード
参考資料
あとがき
久しぶりのコーディングだけどChatGPT Copilot君がいれば昔ほど苦しむことは無くなったので、設計思想とか要件定義の方に力を入れていくのがいいかも・・・・・