Unityで指定フォルダ内のシーンを開くEditor拡張作成
unityでプロジェクトが肥大化していった時にイチイチシーンフォルダのパスに行ってシーンファイルを開くのがめんどくさくて作成しました。
以下サンプルコードになります。コピペで動くと思われます。
private string specifiedFolder = "Assets/Scenes"; こちらのパスをシーンが入っている任意のパスにして下さい。
using UnityEditor;
using UnityEditor.SceneManagement;
using UnityEngine;

public class SceneSwitcherEditorWindow : EditorWindow
{
    [MenuItem("Tools/Scene Switcher")]
    public static void ShowWindow()
    {
        GetWindow<SceneSwitcherEditorWindow>("Scene Switcher");
    }

    private string specifiedFolder = "Assets/Scenes";
    private string[] scenePaths;
    private string[] sceneNames;
    private int selectedSceneIndex;

    private void OnEnable()
    {
        string[] guids = AssetDatabase.FindAssets("t:Scene", new[] { specifiedFolder });
        int sceneCount = guids.Length;
        scenePaths = new string[sceneCount];
        sceneNames = new string[sceneCount];

        for (int i = 0; i < sceneCount; i++)
        {
            scenePaths[i] = AssetDatabase.GUIDToAssetPath(guids[i]);
            sceneNames[i] = System.IO.Path.GetFileNameWithoutExtension(scenePaths[i]);
        }
    }

    private void OnGUI()
    {
        GUILayout.Label("Select Scene", EditorStyles.boldLabel);
        GUILayout.Label("選択したシーンを表示します", EditorStyles.wordWrappedLabel); // キャプションを追加
        selectedSceneIndex = EditorGUILayout.Popup(selectedSceneIndex, sceneNames);
        GUILayout.Space(10);
        // カスタムスタイルを設定
        GUIStyle customButtonStyle = new GUIStyle(GUI.skin.button);
        customButtonStyle.fontSize = 12;
        customButtonStyle.fontStyle = FontStyle.Bold;
        customButtonStyle.normal.textColor = Color.white;

        // ボタンサイズを指定して、カスタムスタイルを適用
        GUILayout.BeginHorizontal();
        GUILayout.FlexibleSpace();
        GUILayout.BeginVertical();
        if (GUILayout.Button("Open Scene", customButtonStyle, GUILayout.Width(100), GUILayout.Height(30)))
        {
            if (EditorSceneManager.SaveCurrentModifiedScenesIfUserWantsTo())
            {
                EditorSceneManager.OpenScene(scenePaths[selectedSceneIndex]);
            }
        }
        GUILayout.FlexibleSpace();
        GUILayout.EndVertical();
        GUILayout.FlexibleSpace();
        GUILayout.EndHorizontal();
    }
}
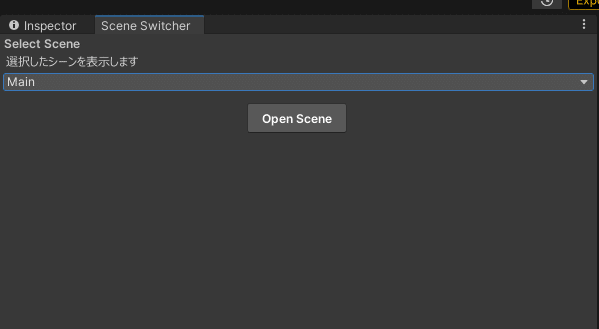
Tools/Scene Switcherを選択するとウインドウが表示されます。
以下のようにドロップダウンでシーンを選択してロードできます。

