
StableDiffusionを使ったテクスチャ作成テクニック

最近のお絵描きAIブームに乗っかてStableDiffusionを使ってみた。絵を描けない自分にとって代わっていい感じの絵を描いてくれるのはありがたい。
モデリング際によく使うSeamless Texture、Matcap TextureがStableDiffusionでいい感じに作れたのでそのコツをここにまとめる。
Google colaboratoryを使用して作成する。
Hugging Faceトークン取得
Hugging Faceログイン(アカウントがない場合作成)する。
右上のアイコンから「Settings」→左サイドバー「Access Tokens」→「New Token」からトークンを作成する。
stable-diffusion-v1-4にアクセスしライセンスを確認し同意する。
共通設定
googleのドライブからノートブックを作成する。
「ランタイム」→「ランタイムのタイプを変更」→「ハードウェア アクセラレータ」を「GPU」に変更。
パッケージをインストールする。
# パッケージのインストール
!pip install --upgrade diffusers==0.3.0 transformers scipy
取得したトークンを貼り付ける。
# Hugging Faceトークン
YOUR_TOKEN = "[トークン]"
Seamless Texture
Seamless Textureを作成するにはモジュールのtorchパッチを当ててシームレス用に変換する。
特に変なものは作っていないが、NSFW判定に引っかかるものが多かったので、NSFW判定回避も行った。
# ライブラリインポート
import torch
from torch import autocast
# StableDiffusionパイプライン
from diffusers import StableDiffusionPipeline

# シームレス変換用関数
def patch_conv(cls):
	init = cls.__init__
	def __init__(self, *args, **kwargs):
		return init(self, *args, **kwargs, padding_mode='circular')
	cls.__init__ = __init__

# シームレス変換実行
patch_conv(torch.nn.Conv2d)

# StableDiffusionパイプラインの準備
pipe = StableDiffusionPipeline.from_pretrained(
    "CompVis/stable-diffusion-v1-4",
    use_auth_token=YOUR_TOKEN
    ).to("cuda")

# safety_checkerを上書きする(NSFW判定回避)
pipe.safety_checker = lambda images, **kwargs: (images, False)
パラメータを設定し画像を生成する。
今回は試しにブロッコリーカリフラワーのSeamless Textureを作成する。
prompt = "Grass broccoli cauliflower sprouts"

# 画像生成
with autocast("cuda"):
    image = pipe(
        prompt,                                           # プロンプト
        height=512,                                       # 生成する画像の幅
        width=512,                                        # 生成する画像の高さ
        guidance_scale=7.5,                               # 画像とプロンプトの類似度 (0〜20)
        num_inference_steps=50,                           # 画像生成に費やすステップ数
        generator=torch.Generator("cuda").manual_seed(0), # 乱数シード
        ).images[0]
image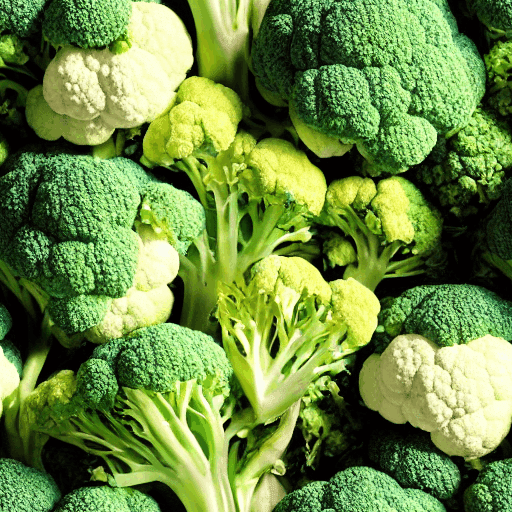
# 画像出力
image.save("ファイル名")
Matcap Texture
Seamless Textureと同じノートブックを使う場合はランタイムを再起動してリセットする。
Matcap作成時にはInpaintパイプラインを使用する。Inpaintはテキスト、ベースとなる元画像、変更したいとことをエリア指定するmask画像3つの入力から画像を生成する。
Matcapの場合、球体の画像からオブジェクトの法線にマッピングするため、通常のパイプラインで作成することは難しい。ベース画像とmask画像を使えるInpaint使用することで、Matcapの特徴を崩さずに画像を生成することができる。
# ライブラリインポート
import torch
from torch import autocast
from PIL import Image
# StableDiffusionInpaintパイプライン
from diffusers import StableDiffusionInpaintPipeline

# StableDiffusion Inpaintパイプラインの準備
pipe = StableDiffusionInpaintPipeline.from_pretrained(
    "CompVis/stable-diffusion-v1-4",
    revision="fp16",
    torch_dtype=torch.float16,
    use_auth_token=YOUR_TOKEN
    ).to("cuda")

# safety_checkerを上書きする(NSFW判定で黒塗りになるのを防ぐ)
pipe.safety_checker = lambda images, **kwargs: (images, False)今回元画像としたのはUnityAssetStoreのFree MatCap Shadersにあるものの1つを使用した。もともとは256×256サイズだったが、512×512サイズで生成した方がきれいなものができたのでリサイズした。
出力時は256×256サイズに戻した。
入力する画像はGoogleドライブ上にアップロードしておく。
# input
w, h = 512, 512 # 横縦サイズ
input_path = "/content/drive/MyDrive/Colab Notebooks/xxx" # ファイルパス
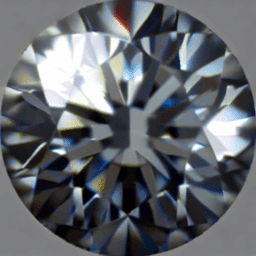
prompt = "matcap,glitter,diamond"
img_name = "MC Basic 1.png" # 元画像ファイル名
mask_name = "circle_mask.png" # mask画像ファイル名
init_image = Image.open(input_path+img_name).convert("RGB").resize((w, h))
mask_image = Image.open(input_path+mask_name).convert("RGB").resize((w, h))
# 画像生成
with autocast("cuda"):
inimg = pipeinp(
prompt=prompt, # プロンプト
init_image=init_image, # 入力画像
mask_image=mask_image, # マスク画像
strength=0.8, # 入力画像と出力画像と相違度 (0.0〜1.0) #0.75
guidance_scale=7.5, # プロンプトと出力画像の類似度 (0〜20) #7.5
num_inference_steps=50, # 画像生成に費やすステップ数 (50)
generator=torch.Generator("cuda").manual_seed(0), # 乱数シード
).images[0]
image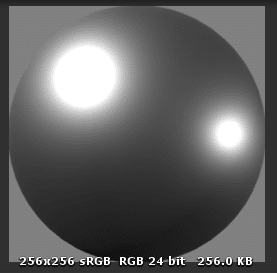
# 画像出力
image.resize((256,256)).save("ファイル名")
mask画像は変更したい箇所を白、したくない場所を黒とする。
このmask画像は自由使用可
