【初心者向け】Azure版ChatGPTをスプレッドシートと連携する方法(GASサンプルコード有り)

こんにちは、株式会社IZAI(イザイ)エンジニアチームです。
今回はAzure OpenAIのChatGPT を、スプレッドシート経由で使用する方法を解説します。
やりたいこと
文字通り、スプレッドシートから関数でChatGPTを呼び出す
モデルを変更できるように
Temparature, max_tokenを変更できるように
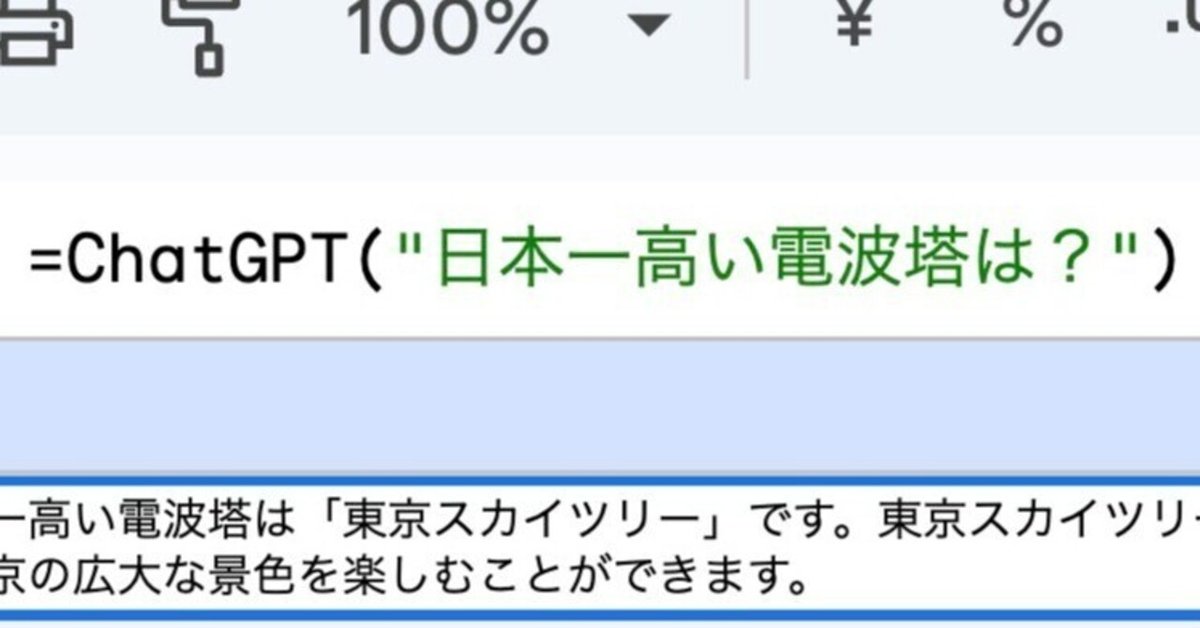
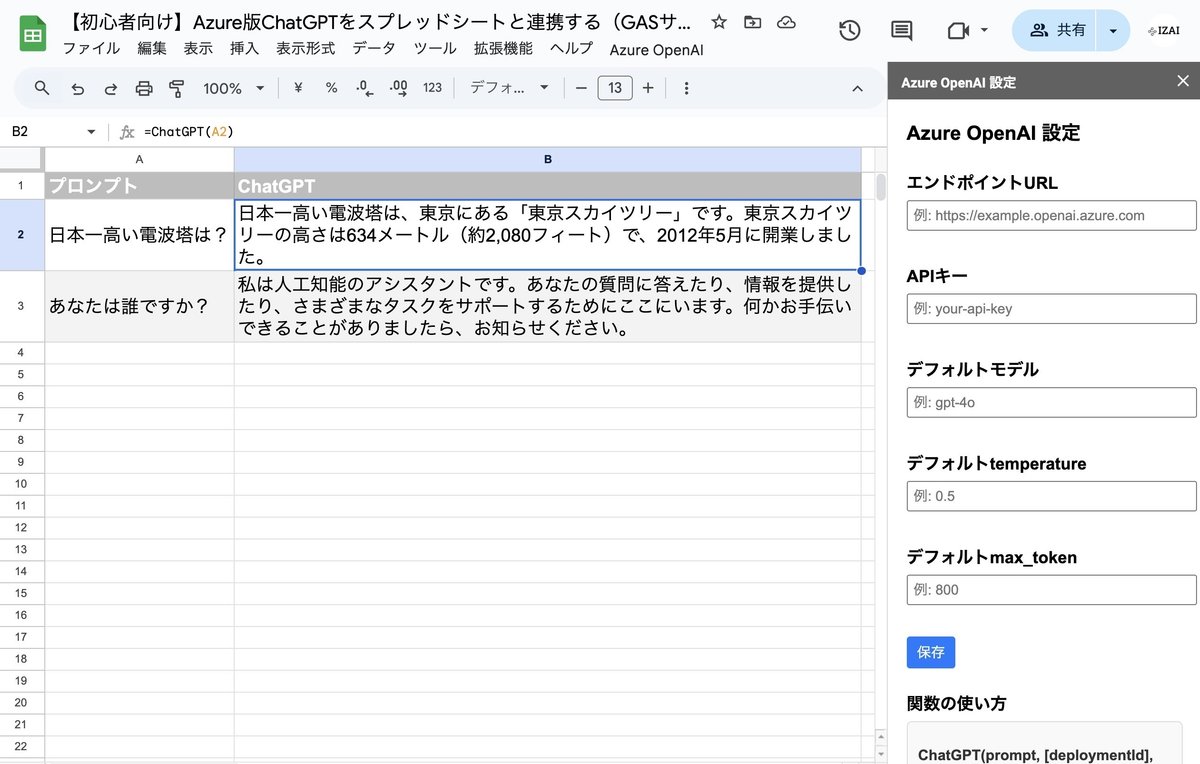
■ イメージ
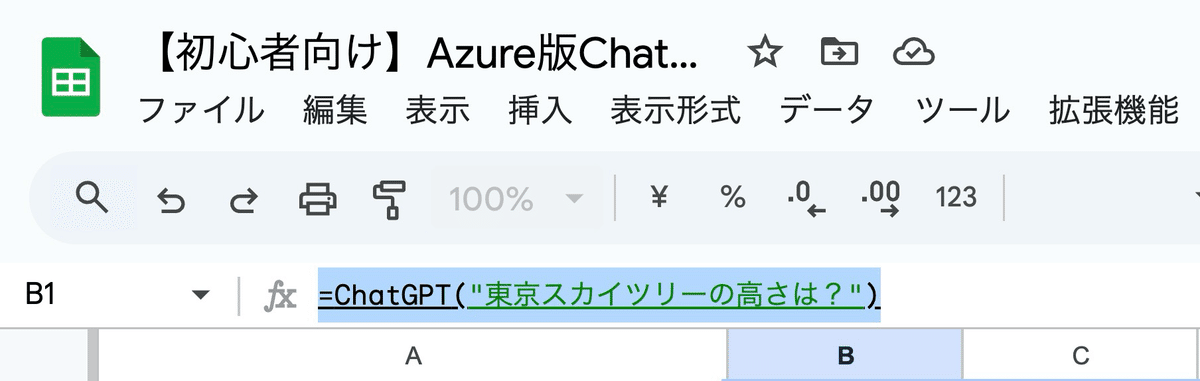
=ChatGPT("東京スカイツリーの高さは?", "gpt-4o", 0.5, 800)
それでは早速スプレッドシートの設定に進みましょう
スプレッドシート設定方法
1. GAS※プロジェクトを作成
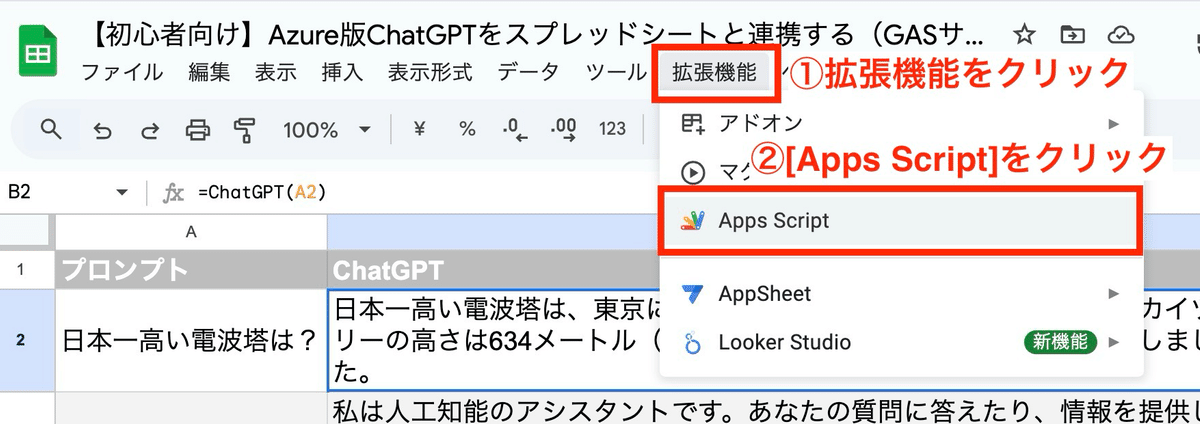
Google スプレッドシートを開き、[拡張機能] → [Apps Script] を選択します。
※ Apps Script (Google Apps Script、通称"GAS")は、Googleが提供する開発環境で、Googleの各種ツールの自動化・連携に使用します。Googleスプレッドシート、Googleドキュメント、Googleフォーム、GmailなどのGoogleサービスを自動化したり、拡張したりすることができます。
※ 本記事はGASを編集する必要はありません。コピー&ペーストで動作します。
2. コードを貼り付ける
以下のコードを `コード.gs` にペーストします。
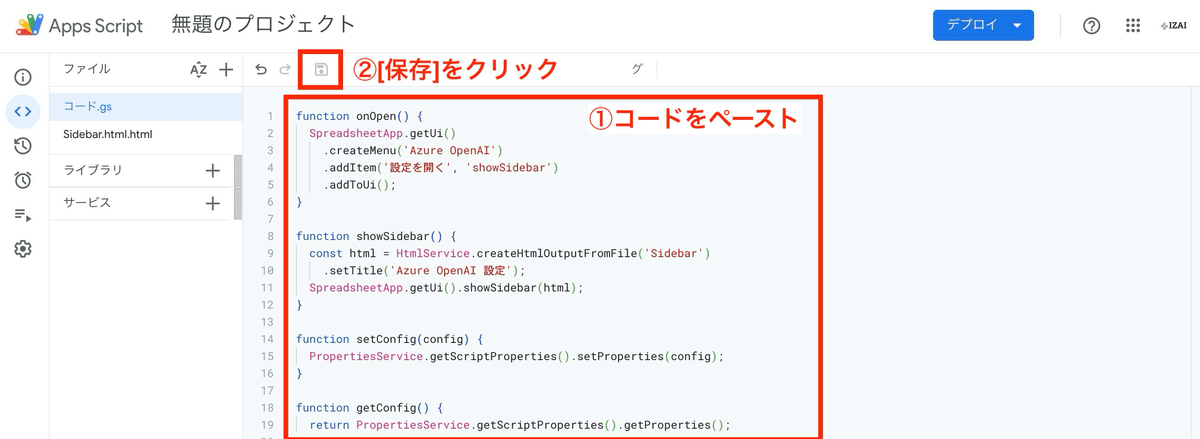
コード.gs
function onOpen() {
  SpreadsheetApp.getUi()
    .createMenu('Azure OpenAI')
    .addItem('設定を開く', 'showSidebar')
    .addToUi();
}

function showSidebar() {
  const html = HtmlService.createHtmlOutputFromFile('Sidebar')
    .setTitle('Azure OpenAI 設定');
  SpreadsheetApp.getUi().showSidebar(html);
}

function setConfig(config) {
  PropertiesService.getScriptProperties().setProperties(config);
}

function getConfig() {
  return PropertiesService.getScriptProperties().getProperties();
}

function ChatGPT(prompt, deploymentId = null, temp = null, maxTokens = null) {
  if (!prompt || prompt.trim() === '') {
    throw new Error('入力テキストが空です。');
  }

  const config = getConfig();
  const apiKey = config.apiKey;
  const endpoint = config.endpoint;
  const model = deploymentId || config.model || 'gpt-4o';
  const temperature = temp || parseFloat(config.temp) || 0.7;
  const max_token = maxTokens || parseInt(config.maxTokens) || 150;

  if (!apiKey || !endpoint) {
    throw new Error('APIキーまたはエンドポイントURLが設定されていません。');
  }

  const url = `${endpoint}/openai/deployments/${model}/chat/completions?api-version=2024-10-21`;

  const payload = {
    messages: [
      { role: 'system', content: 'あなたは優秀なアシスタントです。' },
      { role: 'user', content: prompt }
    ],
    temperature: temperature,
    max_tokens: max_token
  };
  const options = {
    "method": "POST",
    "headers": {
      "Content-Type": "application/json",
      "api-key": apiKey
    },
    "payload": JSON.stringify(payload)
  };

  const response = UrlFetchApp.fetch(url, options);
  const data = JSON.parse(response);

  return data.choices[0].message.content.trim();
}同様に以下のHTMLファイルを`Sidebar.html`としてプロジェクトに追加してください。
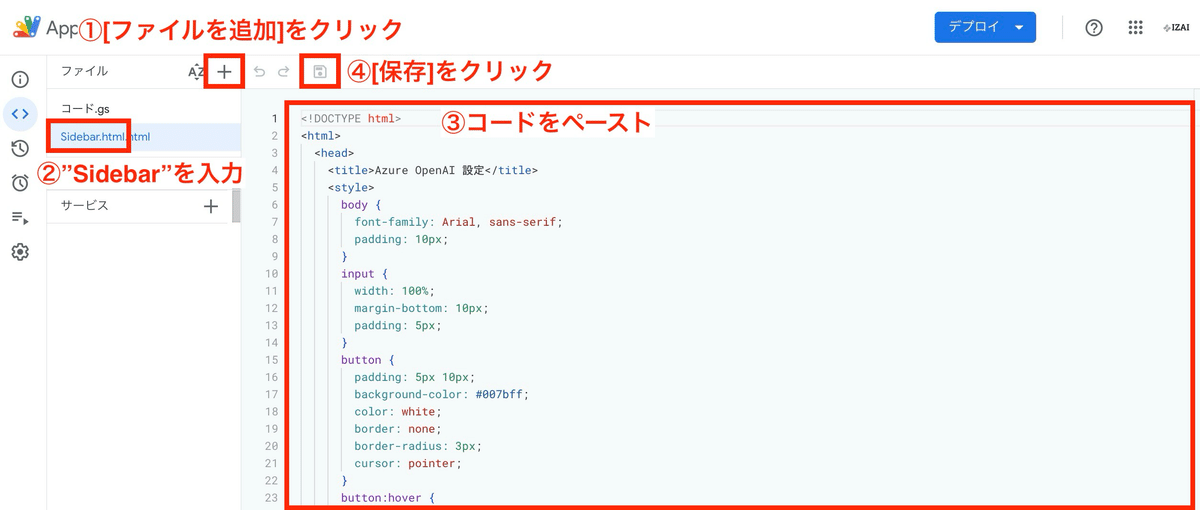
Sidebar.html
<!DOCTYPE html>
<html>
  <head>
    <title>Azure OpenAI 設定</title>
    <style>
      body {
        font-family: Arial, sans-serif;
        padding: 10px;
      }
      input {
        width: 100%;
        margin-bottom: 10px;
        padding: 5px;
      }
      button {
        padding: 5px 10px;
        background-color: #007bff;
        color: white;
        border: none;
        border-radius: 3px;
        cursor: pointer;
      }
      button:hover {
        background-color: #0056b3;
      }
      .section {
        margin-bottom: 20px;
      }
      h4 {
        margin-bottom: 5px;
      }
      .usage {
        font-size: 14px;
        color: #333;
        background-color: #f9f9f9;
        border: 1px solid #ddd;
        padding: 10px;
        border-radius: 5px;
      }
    </style>
  </head>
  <body>
    <h3>Azure OpenAI 設定</h3>

    <div class="section">
      <h4>エンドポイントURL</h4>
      <input type="text" id="endpoint" placeholder="例: https://example.openai.azure.com">
    </div>

    <div class="section">
      <h4>APIキー</h4>
      <input type="text" id="apiKey" placeholder="例: your-api-key">
    </div>

    <div class="section">
      <h4>デフォルトモデル</h4>
      <input type="text" id="model" placeholder="例: gpt-4o">
    </div>

    <div class="section">
      <h4>デフォルトtemperature</h4>
      <input type="number" id="temp" placeholder="例: 0.5" step="0.1" min="0" max="2">
    </div>

    <div class="section">
      <h4>デフォルトmax_token</h4>
      <input type="number" id="maxTokens" placeholder="例: 800">
    </div>

    <button onclick="saveConfig()">保存</button>

    <h4>関数の使い方</h4>
    <div class="usage">
      <p><strong>=ChatGPT(prompt, [deploymentId], [temperature], [maxTokens])</strong></p>
      <ul>
        <li><strong>必須引数:</strong> <code>prompt</code> - 空でないテキスト</li>
        <li><strong>任意引数:</strong></li>
        <ul>
          <li><code>deploymentId</code> - デフォルトモデル以外を使用する場合に指定</li>
          <li><code>temperature</code> - 応答のランダム性(デフォルト: 0.7)</li>
          <li><code>maxTokens</code> - 最大トークン数(デフォルト: 800)</li>
        </ul>
      </ul>
      <p><strong>使用例:</strong></p>
      <ul>
        <li><code>=ChatGPT("こんにちは、自己紹介をしてください")</code></li>
        <li><code>=ChatGPT(A1)</code>(セル内の値を使用)</li>
        <li><code>=ChatGPT(A1, "gpt-35-turbo", 0.5, 100)</code></li>
      </ul>
    </div>

    <script>
      function saveConfig() {
        const config = {
          endpoint: document.getElementById('endpoint').value,
          apiKey: document.getElementById('apiKey').value,
          model: document.getElementById('model').value,
          temp: document.getElementById('temp').value || '0.5',
          maxTokens: document.getElementById('maxTokens').value || '800'
        };

        google.script.run.setConfig(config);
        alert('設定が保存されました!');
      }
    </script>
  </body>
</html>
これで準備は完了です。それでは実際にスプレッドシートで実行していきましょう。
使用手順
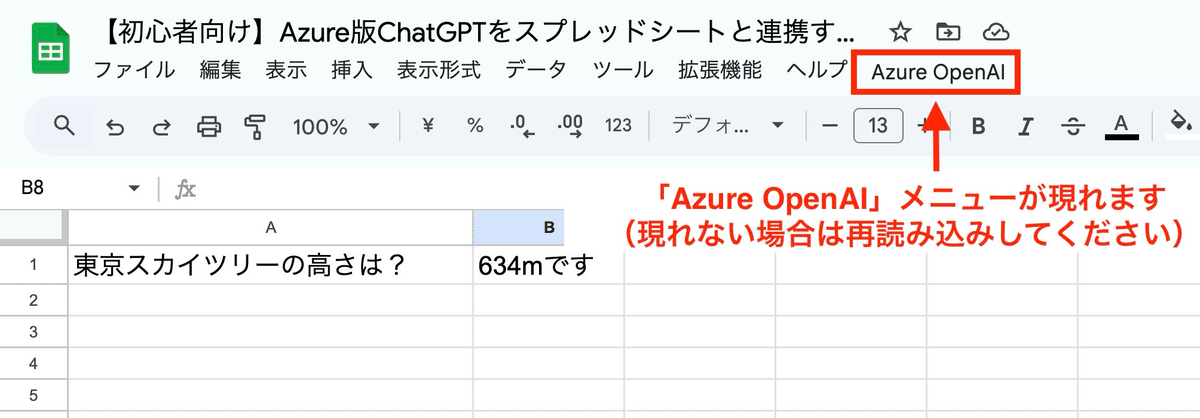
1. Azure OpenAI > 設定を開くメニューをクリックしてサイドバーを表示
※ 表示されない場合は一度タブを閉じてから再度開いてください。
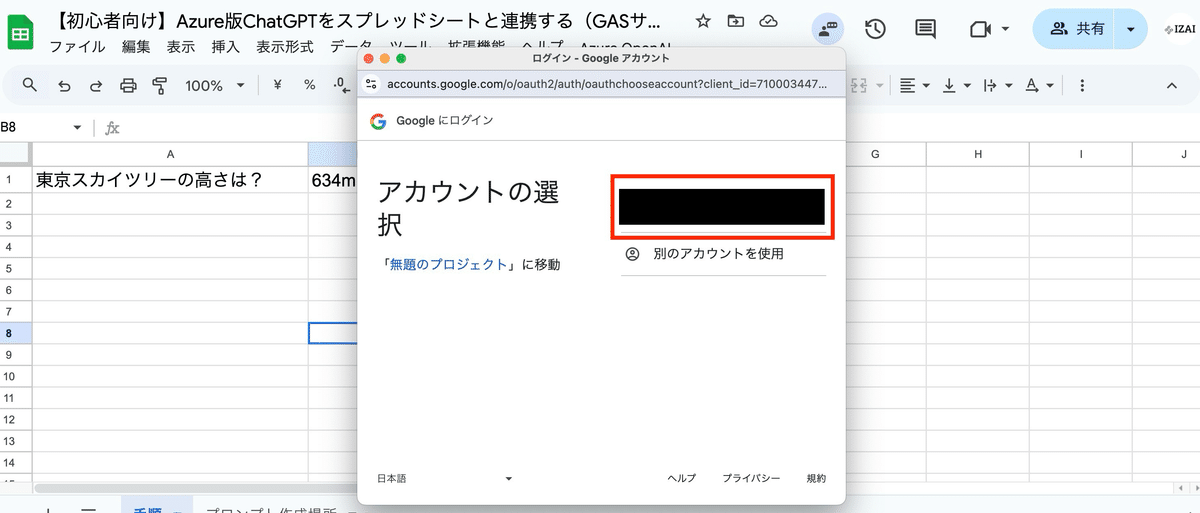
2. GASプロジェクトに権限を付与します
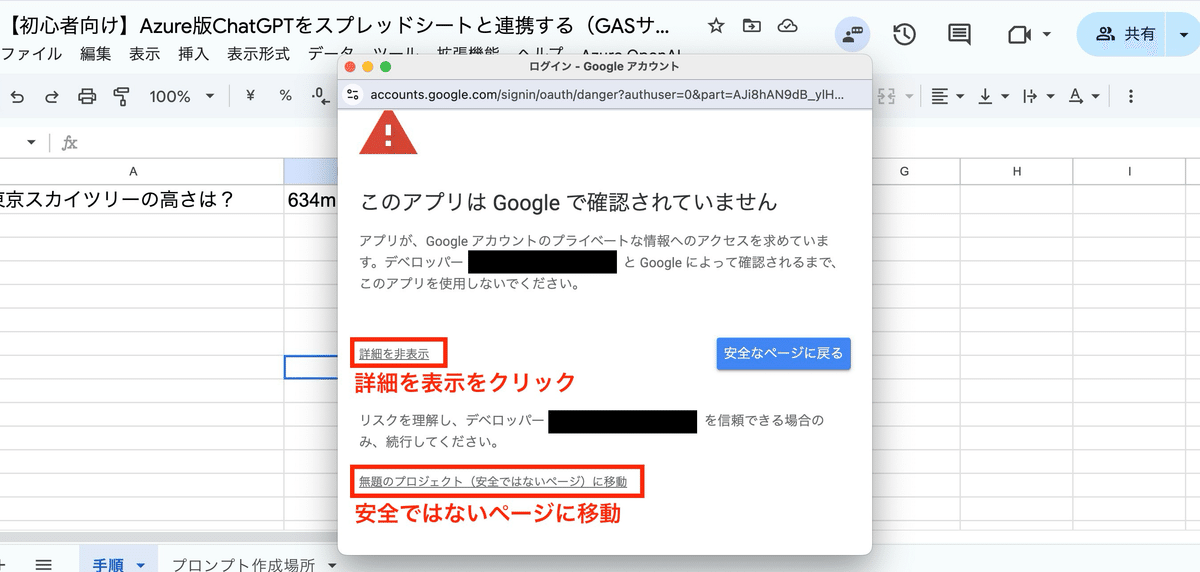
3. 警告が出るので[詳細を表示]から認証
4. サイドバーから設定を保存
APIキー、エンドポイントURL、モデル等を設定します

5. 【完成】スプレッドシートの任意のセルでChatGPT関数を実行
これで、スプレッドシートからChatGPTを呼び出せるようになりました
プロンプトエンジニアリングにぜひお使いください
<注意>
スプレッドシートの操作を誤ると、意図せず膨大な量のリクエストを一度に送信し、高額なAPI利用料が請求される可能性があります。
・使わないスプレッドシートの行を削除しておく
・第三者へスプレッドシートの編集権限を付与しない
・Azure側からTPM(トークン利用制限)を設定しておく
などの対策を事前に取っておきましょう。
<免責>
本記事は参考情報として提供するものであり、利用に際しては自己責任でお願いいたします。本記事により発生した損害は負いかねます。API利用料金その他ご注意の上、ご活用ください。
掲載コードについて不具合等ございましたら、コメントにてご指摘いただけますと幸いです