【Flutter】シンプルメモ帳作ろう2~画面遷移を作る
アプリでは必須となる画面遷移を実装します。
Flutterでは画面遷移を行う方法がいくつかあるのですが、
今回はその中でも基礎的なメソッドのみを使用します。
メモ帳アプリは下記の3つのルート(画面)を使用します。
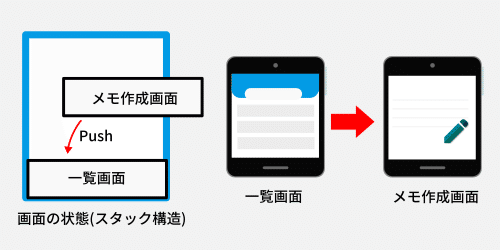
これらを画面遷移を行う場合、スタック構造を意識した実装を行います。
メモ帳アプリではメモを書いた後、保存を行い一覧画面に戻るという流れを作ります。
次の画面に遷移する際にpush、前の画面に戻る操作にpopを用います。

■次の画面に遷移~ソースコード(一部抜粋)
次の遷移したい画面をプッシュ。★1

//source:main.dart

// ★1 メモ作成画面への遷移
Navigator.push(
 context,
 MaterialPageRoute(
     builder: (context) => WriteMemoPage(
         )),
);
■トップ画面に遷移~ソースコード(一部抜粋)
作成したメモを「保存するか?」確認を行うダイアログを表示する。★2
ダイアログに対して選択(いいえボタンをタッチ)した際にダイアログをポップし(ダイアログが閉じられる)。★3
メモ作成画面をポップし、トップ画面へ遷移する。★4

// source:writememo.dart

// ★2 画面遷移を促す為のダイアログを表示する
   return showDialog<void>(
     context: context,
     barrierDismissible: false, // user must tap button!
     builder: (BuildContext context) {
       return AlertDialog(
         title: Text('保存しますか?'),
         content: SingleChildScrollView(
           child: ListBody(
             children: <Widget>[
               Text('いいえを選ぶと'),
               Text('変更が破棄されます。'),
             ],
           ),
         ),
         actions: <Widget>[
           FlatButton(
             color: kPrimaryColor,
             child: Text('いいえ', style: TextStyle(color: Colors.white)),
             onPressed: () {
               // ★3 ダイアログを閉じる
               Navigator.of(context).pop();
               FocusScope.of(context).unfocus();
               // ★4 トップ画面へ遷移
               Navigator.of(context).pop();
             },
           ),
           FlatButton(
             color: kPrimaryColor,
             child: Text('はい', style: TextStyle(color: Colors.white)),
             onPressed: () async {
               await _saveArticle();
               debugPrint("保存しました");
               Navigator.of(context).pop();
               FocusScope.of(context).unfocus();
               Navigator.of(context).pop();
               Navigator.of(context).popAndPushNamed("/");
             },
           )
         ],
       );
     },
   );
公式のリファレンスは下記です。
■ソースコード(全体)
↓にシンプルメモ帳アプリの全ソースコードをアップしています。
