BitNet&BitNet b158の実装②
はじめに
少し間が空いてしまいましたが、BitNetおよびBitNet b158の実装を続けていこうと思います。
ボリュームが大きくなってきたため、ページを分けることとしました。前回までの内容は以下をご参照ください。
2. BitNetの検証
今回は、前回作ったBitNetの検証を進めていこうと思います。
検証内容としては、
BitLlamaの構築
事前学習ができるか(Lossが下がるか)確認
を行いました。使い物になるまで学習するのは手元の環境だと時間がかかりそうだったため一旦ある程度まで下がればクリアとしようと思います。
ひとまず、BitLinearだけだと言語モデルとはならないため、BitNetを作っていきます。論文ではBitLinearを採用したLlama2をBitNetと呼んでいましたが、今後Llama2以外のモデルにBitLinearを採用するケースが出てくる可能性があるためここではBitLinearを採用したLlama2をBitLlamaと呼びたいと思います。
2-1. BitLlamaの構築
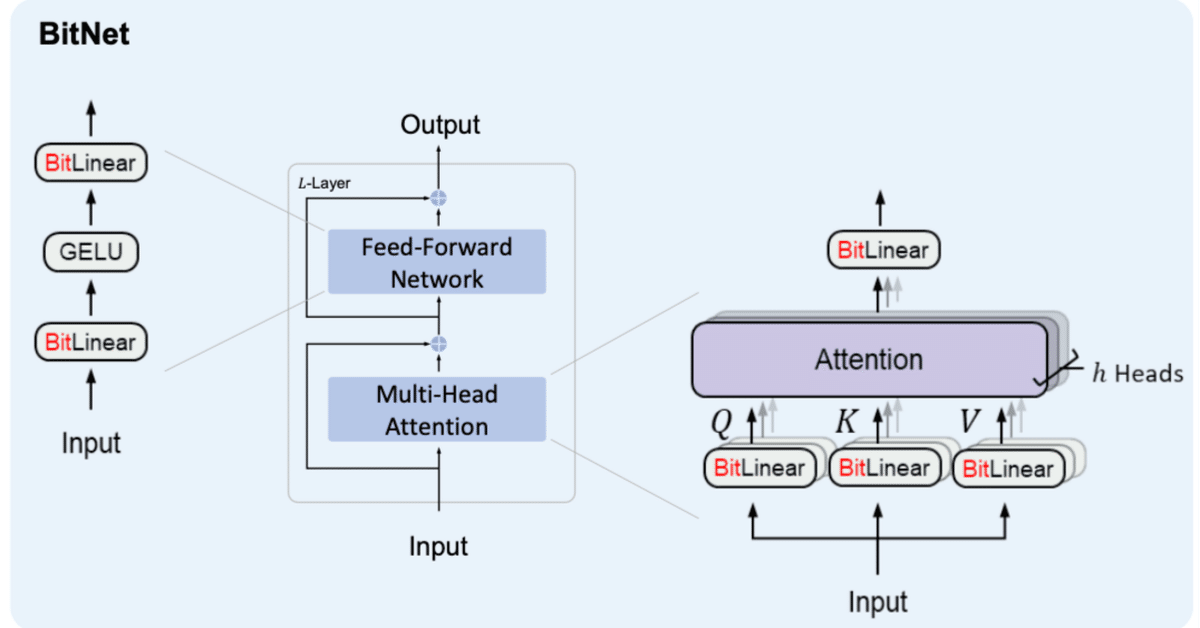
There are two steps to change from a LLaMA LLM architecture to BitNet b1.58: 1. Replace all nn.Linear in attention and SwiGLU with BitLinear (Figure 3);
2. Remove RMSNorm before attention and SwiGLU because BitLinear has built-in RMSNorm.
BitLlamaの構築にあたって、元のLlama2のアーキテクチャとの変更点は2点です。modeling_llama.pyに倣って、modeling_bit_llama.pyを作成していきます。
① LinearのBitLinearへの置き換え
② AttentionとMLPの前のRMSNormを削除(BitLinearに既にRMSNormが含まれているため)
① LinearのBitLinearへの置き換え
Linearを全量BitLinearに置き換えます。Llama2においてLinearを持つモジュールはLlamaMLP, LlamaAttention(, LlamaFlashAttention2, LlamaSdpaAttention)です。例えば、以下の様にLlamaMLPを継承したBitLlamaMLPを作ります。
class BitLlamaMLP(LlamaMLP):
    def __init__(self, config):
        super().__init__(config)
        self.gate_proj = BitLinear(self.hidden_size, self.intermediate_size, bias=False, rms_norm_eps=config.rms_norm_eps, bits=config.bits, flg_before_linear=False)
        self.up_proj = BitLinear(self.hidden_size, self.intermediate_size, bias=False, rms_norm_eps=config.rms_norm_eps, bits=config.bits, flg_before_linear=True)
        self.down_proj = BitLinear(self.intermediate_size, self.hidden_size, bias=False, rms_norm_eps=config.rms_norm_eps, bits=config.bits, flg_before_linear=True)
* BitLlamaMLPにおいて、self.gate_projは非線形層(Silu)の前のBitLinearであるためflg_before_linear=Falseとします。AttentionにもMLPにも他に非線形層の前のLinearはなかったと思うのでFalseとなるのはここだけです。flg_before_linearについては前の章をご確認ください。
② AttentionとMLPの前のRMSNormを削除
TransformersのLlamaDecoderLayerを参照すると、この DecoderLayerは各モジュールを以下の順番で呼び出します。
input_layernorm (RMSNorm)
self_attn
post_attention_layernorm (RMSNorm)
mlp
BitLinearに既にRMSNormを含んでいます。そのため、冗長となったinput_layernormとpost_attention_layernormをこのLlamaDecoderLayerから取り除き、新しくBitLlamaDecoderLayerを作成します。
class BitLlamaDecoderLayer(LlamaDecoderLayer):
    def __init__(self, config: BitLlamaConfig, layer_idx: int):
        super().__init__(config, layer_idx)
        self.self_attn = BITLLAMA_ATTENTION_CLASSES[config._attn_implementation](config=config, layer_idx=layer_idx)
        self.mlp = BitLlamaMLP(config)
        # RMSNormの削除
        del self.input_layernorm
        del self.post_attention_layernorm

    def forward(
        self,
        hidden_states: torch.Tensor,
        attention_mask: Optional[torch.Tensor] = None,
        position_ids: Optional[torch.LongTensor] = None,
        past_key_value: Optional[Tuple[torch.Tensor]] = None,
        output_attentions: Optional[bool] = False,
        use_cache: Optional[bool] = False,
        cache_position: Optional[torch.LongTensor] = None,
        **kwargs,
    ) -> Tuple[torch.FloatTensor, Optional[Tuple[torch.FloatTensor, torch.FloatTensor]]]:
        """
        refers: https://github.com/huggingface/transformers/blob/c5f0288bc7d76f65996586f79f69fba8867a0e67/src/transformers/models/llama/modeling_llama.py#L693
        """
        if "padding_mask" in kwargs:
            warnings.warn(
                "Passing `padding_mask` is deprecated and will be removed in v4.37. Please make sure use `attention_mask` instead.`"
            )

        residual = hidden_states

        # RMSNormの削除
        # hidden_states = self.input_layernorm(hidden_states)

        # Self Attention
        hidden_states, self_attn_weights, present_key_value = self.self_attn(
            hidden_states=hidden_states,
            attention_mask=attention_mask,
            position_ids=position_ids,
            past_key_value=past_key_value,
            output_attentions=output_attentions,
            use_cache=use_cache,
            cache_position=cache_position,
            **kwargs,
        )
        hidden_states = residual + hidden_states

        # Fully Connected
        residual = hidden_states
        # RMSNormの削除
        # hidden_states = self.post_attention_layernorm(hidden_states)
        hidden_states = self.mlp(hidden_states)
        hidden_states = residual + hidden_states

        outputs = (hidden_states,)

        if output_attentions:
            outputs += (self_attn_weights,)

        if use_cache:
            outputs += (present_key_value,)

        return outputs
これらをmodeling_bit_llama.pyとして以下に配置しました。
HuggingFaceにプッシュするための工夫を入れ込んでいます。詳細は以下をご確認ください。
2-2. 事前学習(Lossの確認)
手元の計算リソースの関係から、学習は"range3/wiki40b-ja"を1epochのみ実行しある程度Lossが下がっていきそうなことを確認するに止めました。
モデルサイズは127Mほどです。
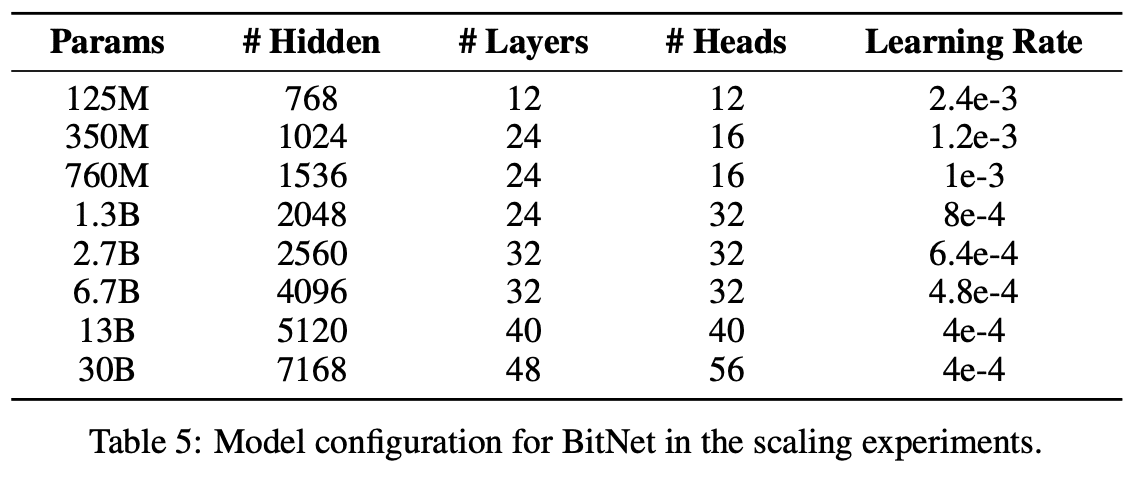
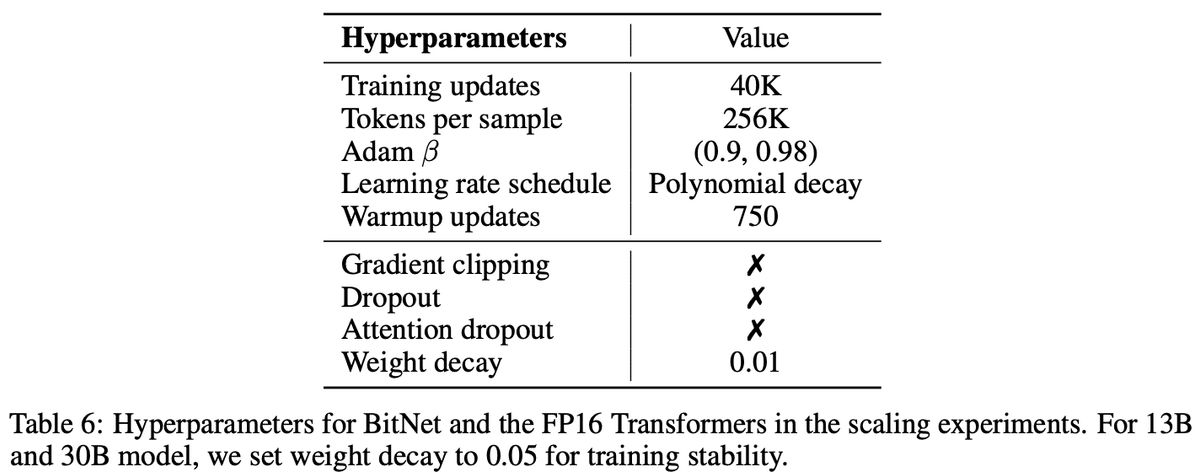
BitNet論文Table5,6を参照し、learning rate周りは以下の様に設定しています。
lr_scheduler_type="polynomial",  # BitNet論文より
learning_rate=2.4e-3,  # BitNet論文より

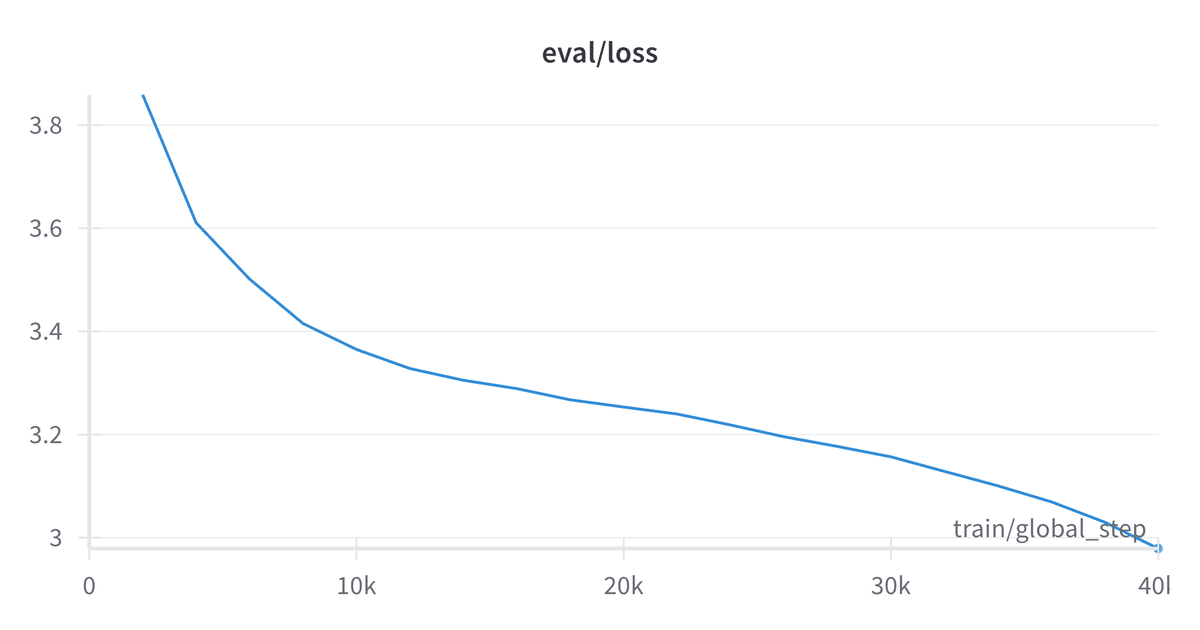
Trainの実行結果は以下の様になりました。
余談ではありますが、『The Era of 1-bit LLMs: Training Tips, Code and FAQ』で言及のあったThe S−shape Loss Curveが確認できたと言って良い気がします。学習の後半、learning rateが下がってきたタイミングでLossの下がり方が大きくなっています。

Training Loss	Epoch	Step	Validation Loss
4.8696			0.05	2000	3.8588
3.7027			0.1 	4000	3.6106
3.5648			0.15	6000	3.5014
3.448			0.20	8000	3.4153
3.3884			0.25	10000	3.3650
3.3462			0.29	12000	3.3280
3.3155			0.34	14000	3.3053
3.2932			0.39	16000	3.2891
3.2762			0.44	18000	3.2673
3.2594			0.49	20000	3.2533
3.2432			0.54	22000	3.2398
3.2286			0.59	24000	3.2186
3.2083			0.64	26000	3.1957
3.1867			0.69	28000	3.1769
3.1676			0.74	30000	3.1568
3.14			0.79	32000	3.1286
3.114			0.83	34000	3.1006
3.0848			0.88	36000	3.0696
3.0511			0.93	38000	3.0301
3.005			0.98	40000	2.9790
モデルは以下に配置してあります。
以下でモデル取得し、動かすことができました。学習が足りない感じの返答となります。ただ、稼働確認という意味ではクリアと考えます。
import torch
from transformers import AutoTokenizer, AutoModelForCausalLM

model_name = "HachiML/myBit-Llama2-jp-127M-4"

tokenizer = AutoTokenizer.from_pretrained(model_name)
model = AutoModelForCausalLM.from_pretrained(model_name, torch_dtype=torch.bfloat16, device_map="auto", trust_remote_code=True)
prompt = "昔々あるところに、"
input_ids = tokenizer.encode(
prompt,
return_tensors="pt"
)
tokens = model.generate(
input_ids.to(device=model.device),
max_new_tokens=128,
)
out = tokenizer.decode(tokens[0], skip_special_tokens=True)
print(out)昔々あるところに、この地域には、この地域の人々が住んでいる。_NEWLINE_1960年代には、アメリカ合衆国の歴史家ロバート・マッカーシーが、この地域の歴史を調査した。この地域は、アメリカ合衆国の歴史的な歴史を調査したもので、アメリカ合衆国の歴史的な歴史を調査したものである。この地域は、アメリカ合衆国の歴史的な歴史を調査したものである。この地域は、アメリカ合衆国の歴史的な歴史的歴史的歴史を調査したものである。
127Mパラメータ、1epochなので期待していませんでしたが、思ったよりそれらしい出力をする様になりました。
学習に使ったコードの全体は以下に配置してあります。ご参照ください。
最新のtransformersでは、customモデルの取得にバグがあるみたいで上手く行えないので、しばらくはtransformers==4.38.2として使用するのが良いと思います。
3. BitNet b158
次はいよいよBitNet b158を作っていきたいと思います。
参照
コード
この記事が気に入ったらサポートをしてみませんか?
