
【公式】スプシディファイ はじめての使い方ガイド🔰

スプシディファイは、Difyとスプレッドシートを簡単に連携するChrome拡張機能です。
この記事では、
「スプシディファイを使ってみたい」「使ってみたけどよく分からなかった…」
という方に向けて、スプシディファイの使い方を解説します!
スプシディファイでできること
スプシディファイでは、
「スプレッドシート上のデータを、Difyで処理し、その結果をスプレッドシートに反映する」
という作業を、無料で簡単に行えます。

これまでGASなどのコーディングが必要だった作業も、スプシディファイ上の設定だけですぐに行え、大量のリストを生成AIで処理することが簡単になります。
必要な準備
スプシディファイの利用に必要な準備は次の3点です。
Googleアカウントの作成
スプレッドシートを利用するため、Googleアカウントが必要です。Difyアカウントの作成
Difyのアプリを利用するため、Difyアカウントが必要です。
※ SaaS版のDify、独自環境のDifyのどちらもスプシディファイを利用できます。Chromeのインストール
スプシディファイはChromeの拡張機能であるため、ブラウザはGoogle Chromeを使用してください。
スプシディファイのインストール
まずはスプシディファイをインストールします。
1. Chromeにスプシディファイを追加
Chromeウェブストアから「Chromeに追加」をクリックします。

2. 拡張機能を追加
"「スプシディファイ」を追加しますか?"と表示されたら
「拡張機能を追加」をクリックします。

スプシディファイへようこその画面が開いたら、インストールは完了です。

公式サンプルツールの実行
スプシディファイにはじめから用意されている公式サンプルツールを使ってみましょう!
1. スプレッドシートの作成
スプレッドシートにアクセスし、空白のスプレッドシートを作成します。

2. スプシディファイの起動
右上のパズルアイコンをクリックし、スプシディファイを選択します。

※ ピン留めをしておくと、次回以降すぐにスプシディファイを開けるので便利です。

3. アカウントの作成
メールアドレスを入力し、「サインアップ」をクリックします。

4. 公式サンプルツールの実行
「公式サンプルツール」の「実行」をクリックします。

5. Googleアカウントへのアクセスを許可
初回実行時は、別タブでGoogle認証画面が開きます。
スプレッドシートを作成したGoogleアカウントを選択します。

"スプシディファイがGoogleアカウントへのアクセスをリクエストしています"
と表示されたら「許可」をクリックします。

次のような画面になったら、公式サンプルツールの実行は完了です!
自作ワークフローの作成
スプシディファイで実行するためのワークフローを作成します。
今回は単語を入力したら、その単語の意味を教えてくれるワークフローを作成します。
アプリは以下の手順で作成するか、上記DSLファイルをDifyにインポートしてお使いください。

1. Difyアプリの作成
Difyにログインします。
「スタジオ」を選択し、「最初から作成」をクリックします。

アプリの種類は、「ワークフロー」を選択し、
アプリの名前を入力したら、「作成する」をクリックします。

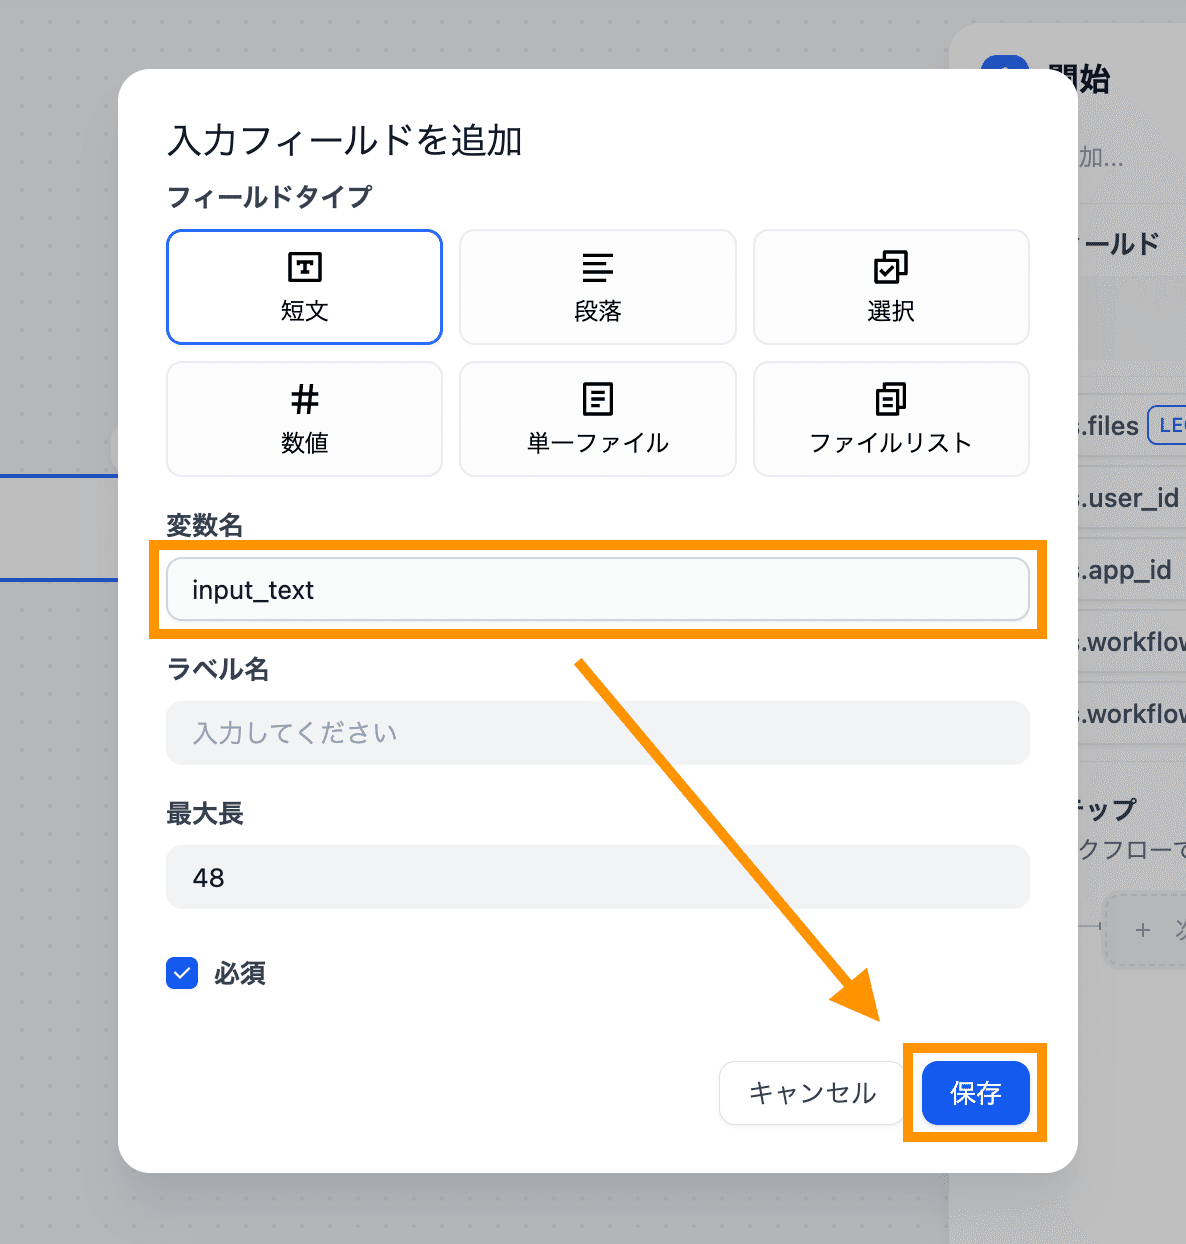
2. 開始ブロックの設定
開始ブロックを選択し、「+」をクリックします。
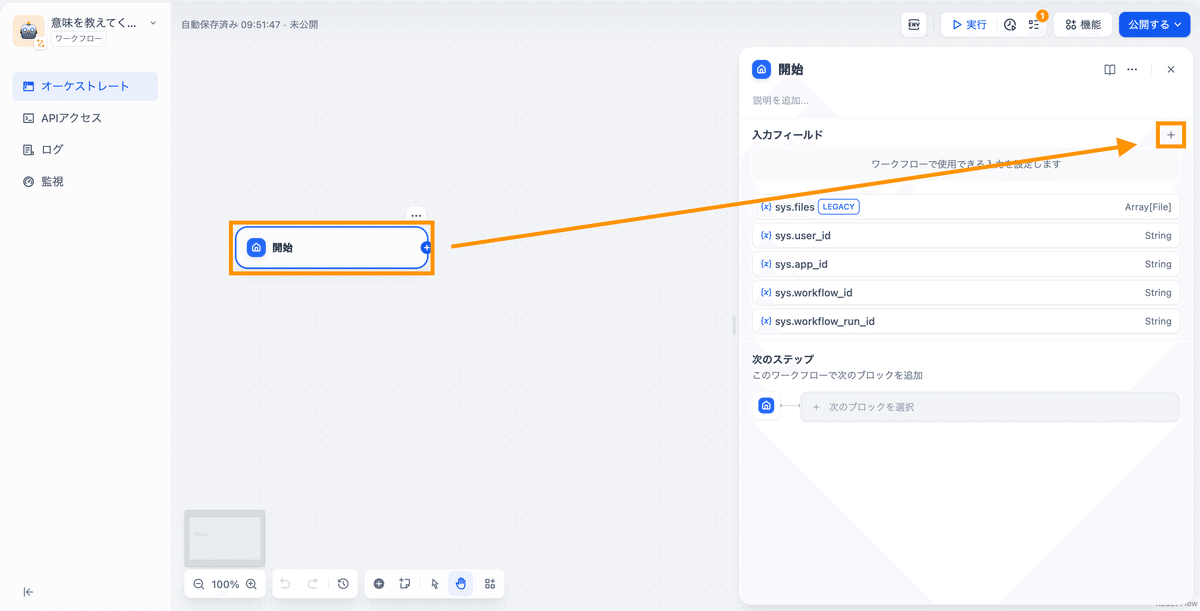
変数名に「input_text」と入力し、「保存」をクリックします。
3. LLMブロックの追加
開始ブロックの「+」をクリックし、「LLM」を選択します。

4. LLMブロックの設定
System欄に「単語の意味を教えてください」と入力します。
System欄への入力が、LLMへの命令(プロンプト)になります。
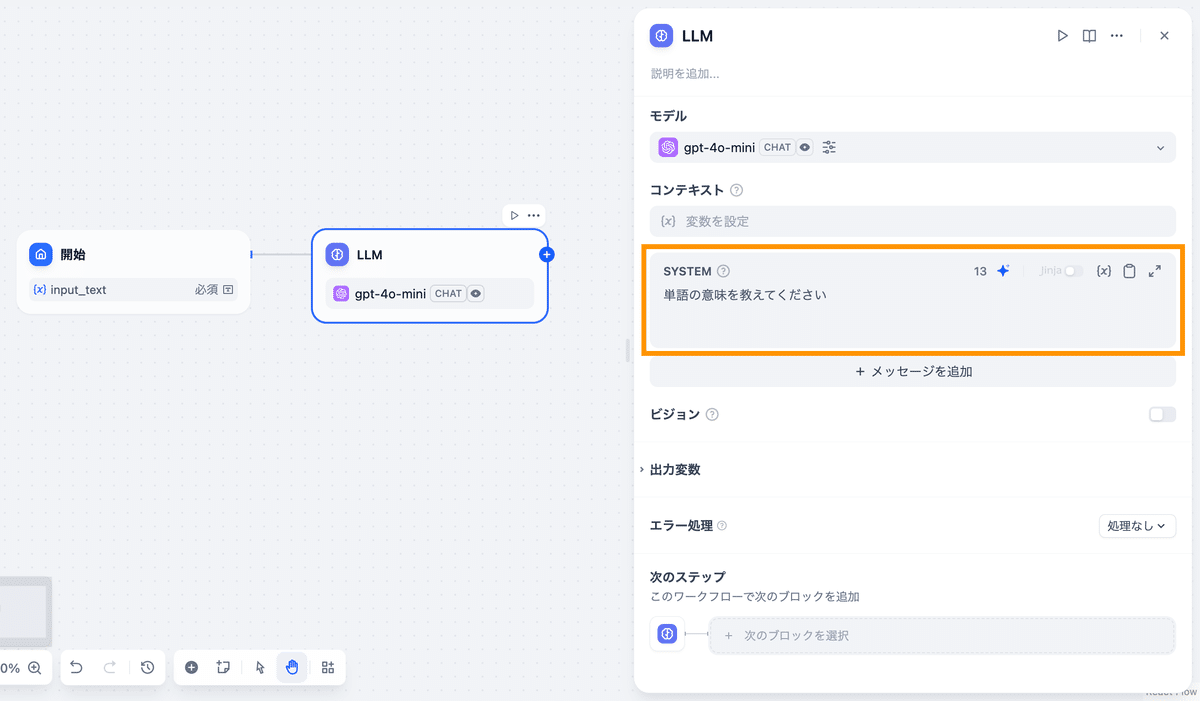
「メッセージを追加」をクリックします。

{x} をクリックし、「input_text」を選択します。

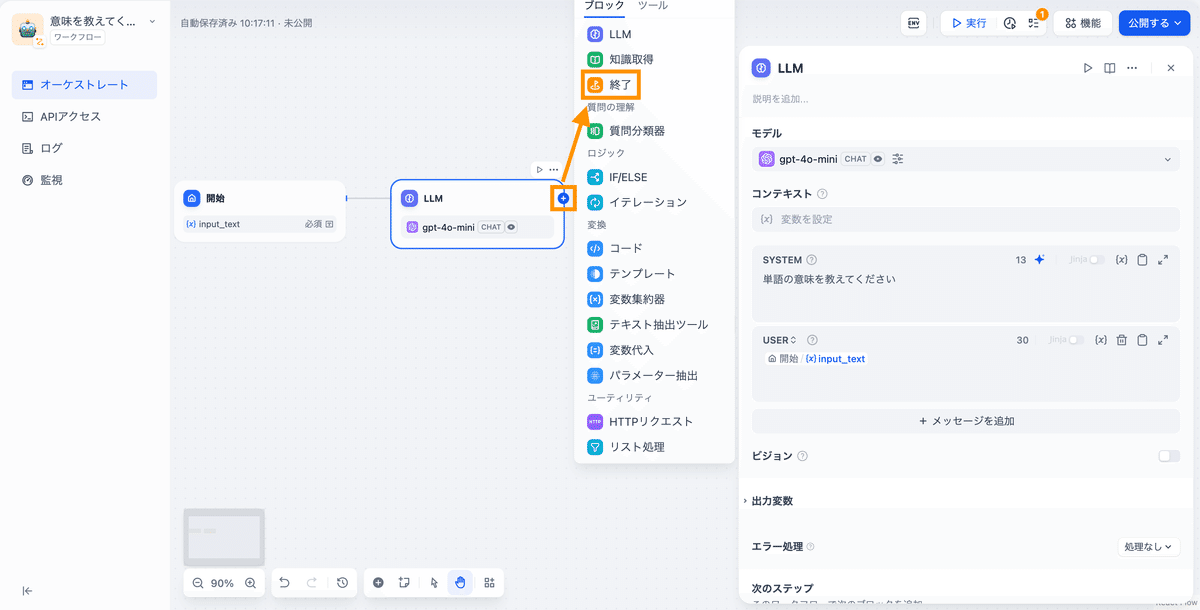
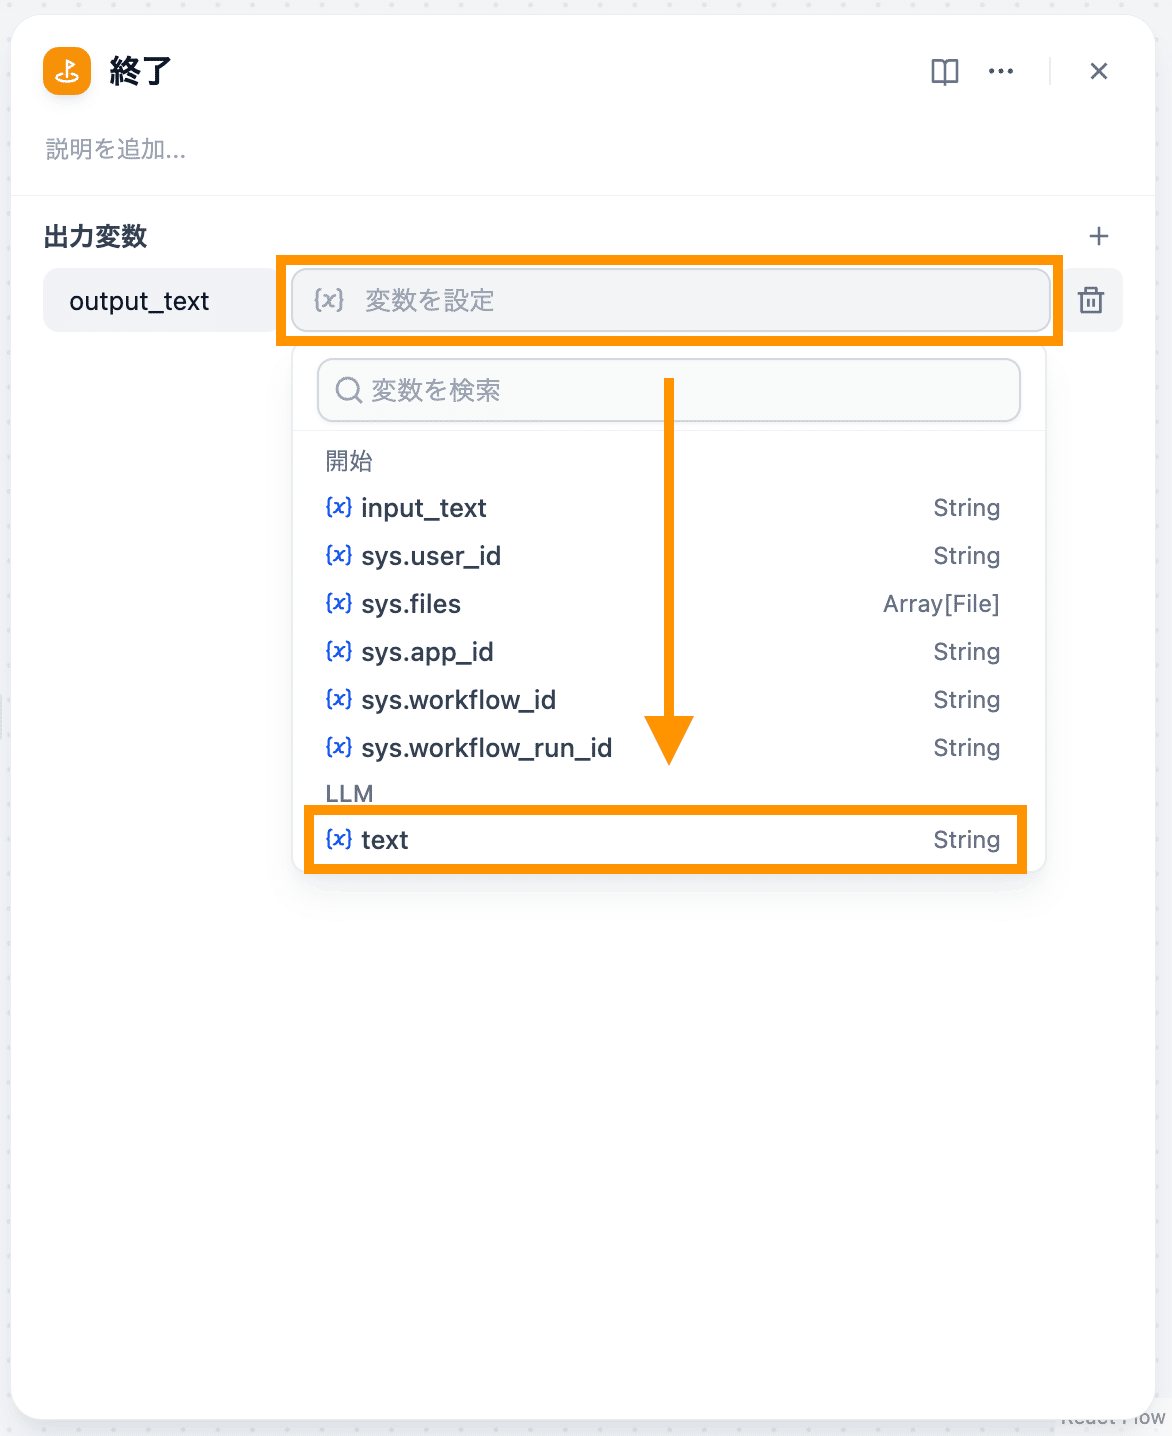
5. 終了ブロックの設定
LLMブロックの「+」をクリックし、「終了」を選択します。
出力変数の「+」をクリックし、変数名に「output_text」と入力します。
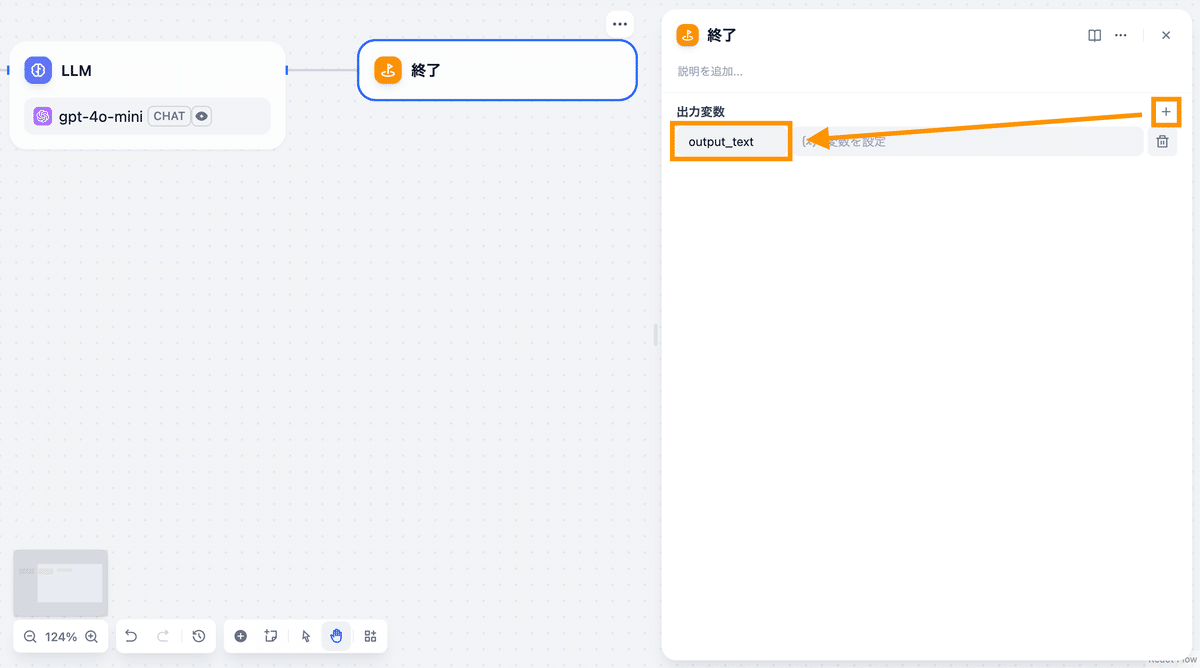
「変数を設定」をクリックし、LLMブロックの「text」を選択します。
6. アプリの公開
右上の「公開する」を選択し、「公開する」をクリックします。

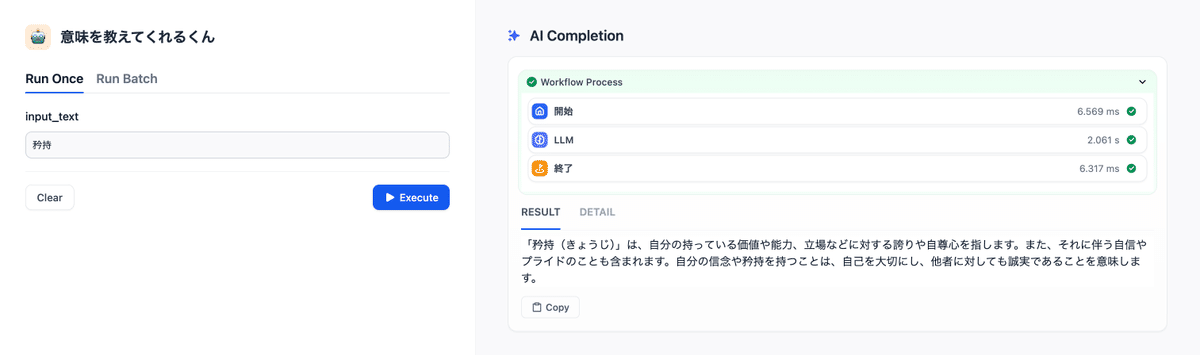
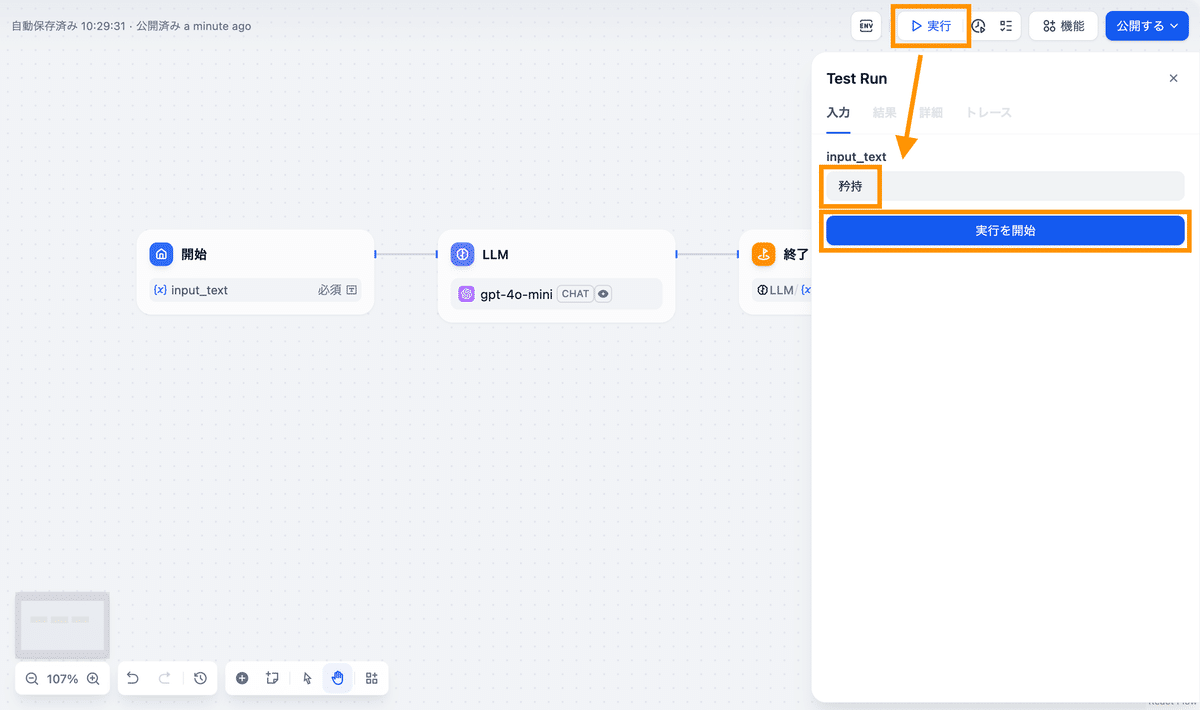
「実行」をクリックすると、作成したワークフローをテスト実行できます!

自作ワークフローを、スプレッドシート上で実行
最後にDifyで自作したワークフローを、スプシディファイで実行してみましょう!
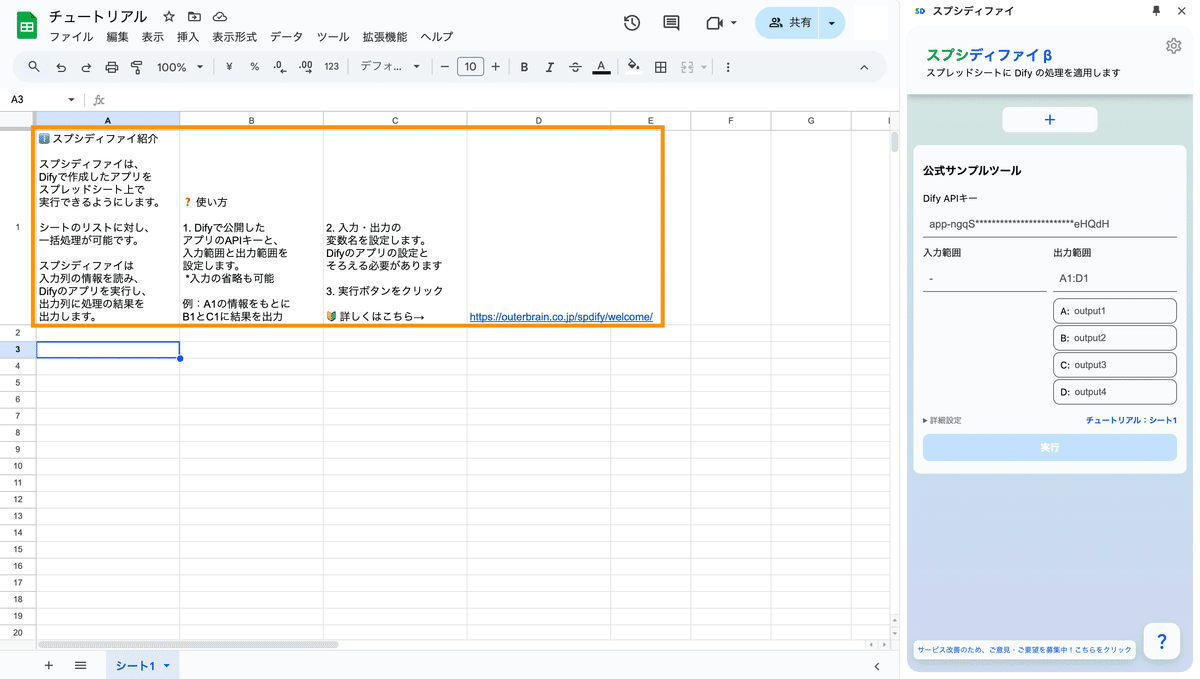
1. スプレッドシートの作成
画像のようにスプレッドシートを作成します。

こちら単語をコピーしてお使いください。
矜持
彷徨
壮麗
漸進
殊勲
淵源
端倪
屈託
悠揚
顕彰
2. Dify APIキーの取得
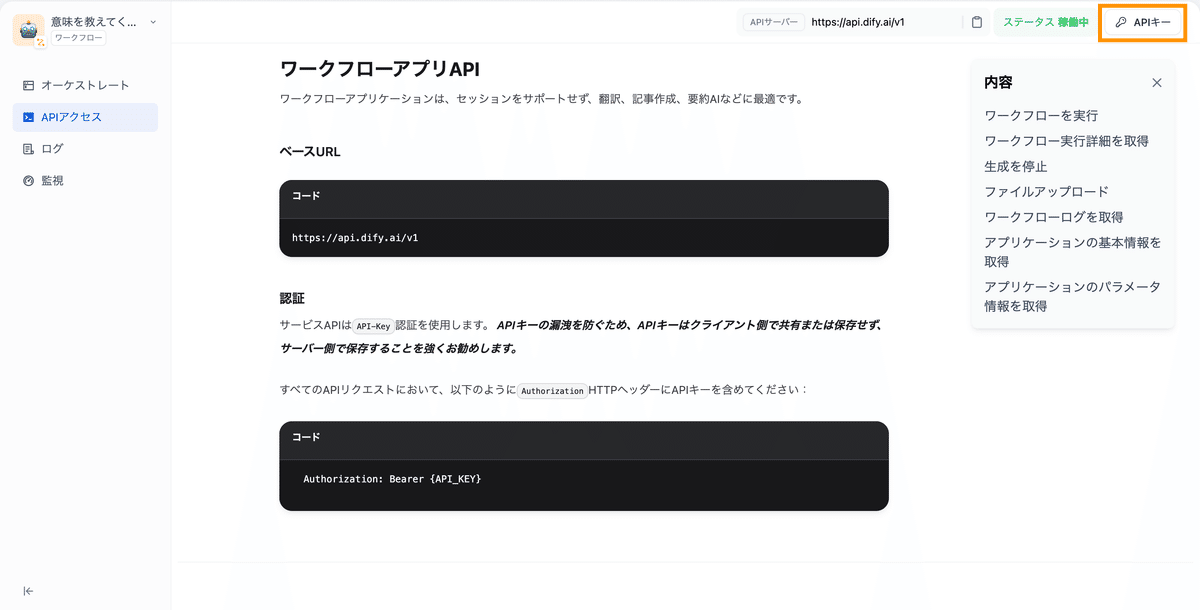
Difyのアプリ作成画面右上の「公開する」をクリックし、「APIリファレンスにアクセス」をクリックします。

「APIキー」をクリックします。
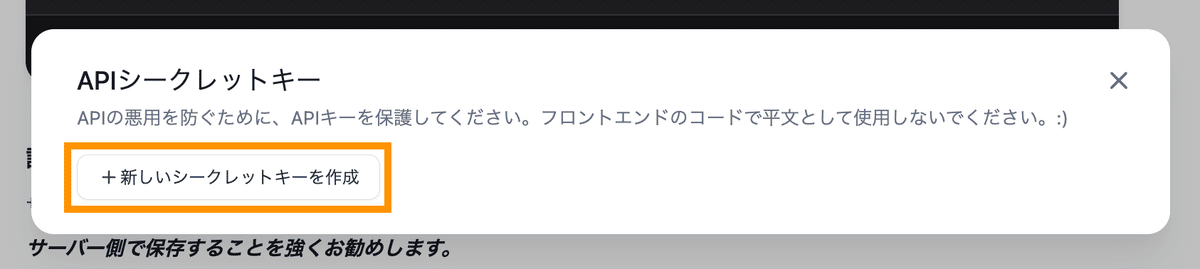
「新しいシークレットキーを作成」をクリックし、作成されたキーをコピーします。
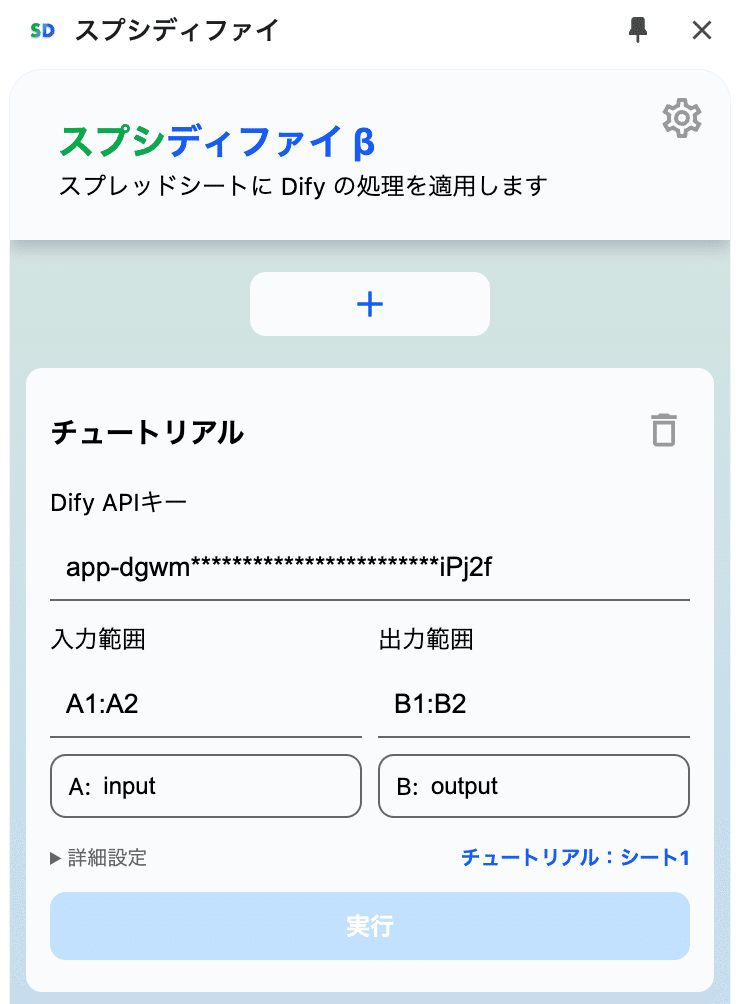
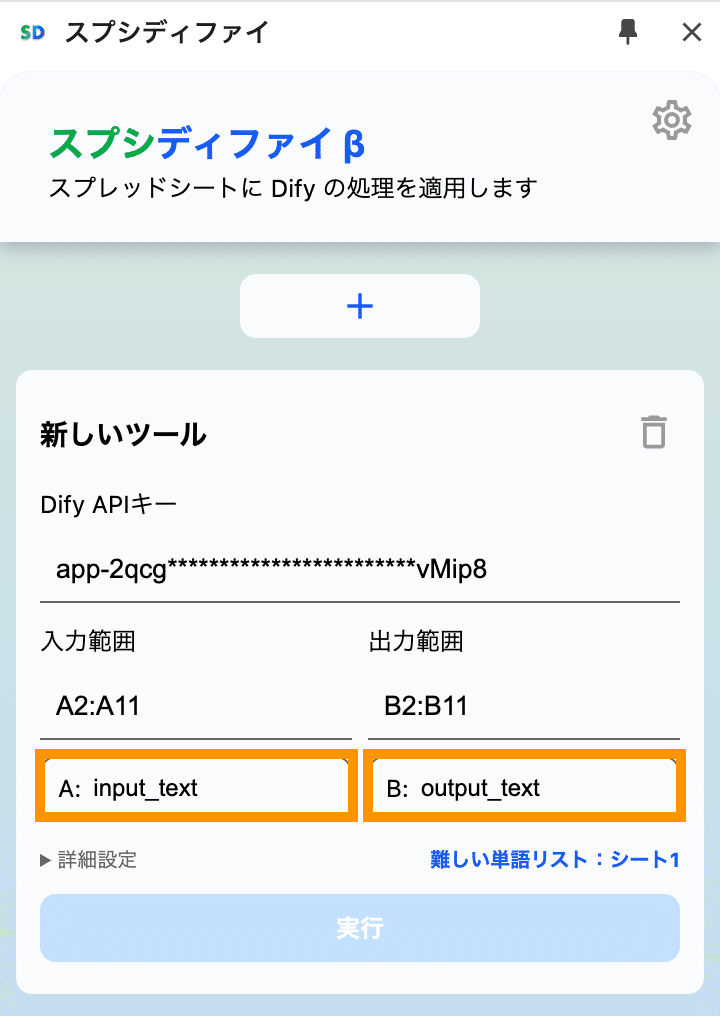
3. スプシディファイのツール追加
スプレッドシートの画面で、スプシディファイを起動し、「+」をクリックします。

先ほどコピーしたDify APIキーを入力します。

入力範囲に「A2:A11」、出力範囲に「B2:B11」と記載します。

Aのボックスに「input_text」、Bのボックスに「output_text」と入力します。
※ 入力範囲のボックスには、Difyの開始ブロックで定義した変数名を入力します。
※ 出力範囲のボックスには、Difyの終了ブロックで定義した変数名を入力します。
4. 処理の実行
「実行」をクリックすると、処理が実行されます!


※「新しいツール」をクリックするとツール名を編集できます。

※ ワークフロー以外のアプリの種類を選択した場合や、独自環境のDifyをお使いの場合は、「詳細設定」から設定を変更してください。

スプシディファイ はじめての使い方ガイドは以上です。
スプシディファイはまだまだリリースしたばかりのプロダクトです。スプシディファイに関するご意見ご要望は下記よりお寄せください。