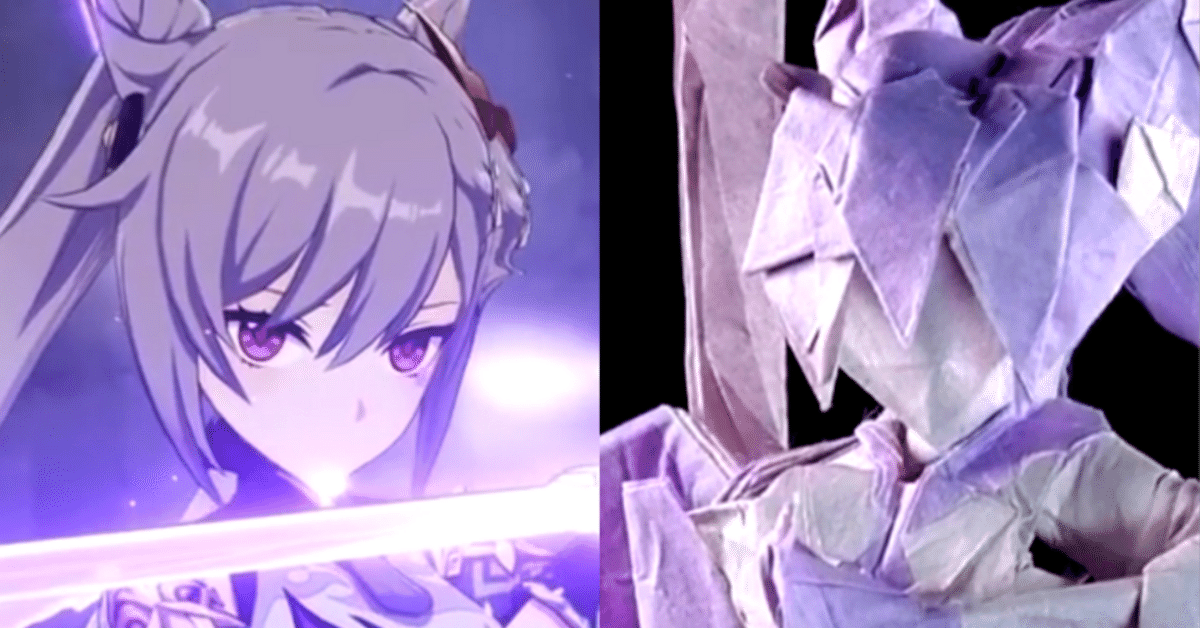
「刻晴 (Keqing)」Challenge
Keqing Challenge
この記事は下記記事の続編としても読めます。よかったらこちらもどうぞ。
This article is continued from following article. Please help yourself.
Two Vietnamese
今回はさらに2人の登場人物が加わる。2023年1月、ベトナム人作家、imrich氏、carrot氏と3人で「チャレンジ」を行う運びになった。
In January 2023, I joined a "challenge" with two Vietnamese creators, imrich and carrot.
あるときimrichが森末のとあるつくりかけの22.5度の展開図を見て、その雰囲気を真似してみたいと言い、当時彼のお気に入りだった中国のソーシャルゲーム「原神」のキャラクター、「刻晴」を創り始めた。
One day imrich started to imitate the structure of my models when he saw an unfinished 22.5 based CP of mine by designing his favorite character, "Keqing" from "Genshin Impact".
ところが逐一アドバイスを与えていた外野であったはずのcarrotと森末がいつの間にか各々の刻晴を創り始めていた。結局3人で「BPに頼らずなるべく良い刻晴を創ろうチャレンジ」が始まった。進捗が止まらないrichに寄ってたかって各国の作家が意見を出し合う様はそれはそれで面白かったので別記事にするかもしれない。ちなみにrichが見た森末の作りかけの作品も原神のキャラクターだったという話は偶然ではないかもしれない。
However, some back seaters also started to design their own Keqing at some point. It was me and carrot. Consequently, we three went to like "Let us show doing human models better than BP". The progress of imrich was incredible and it was interestig that creators from various countries giving advises for him in various way each other. Perhaps it will be another article. Incidentally the CP that pushed rich to went for like that was also based on a character from Genshin. It may be or not just a coinsidence.
Phase 0: Observation
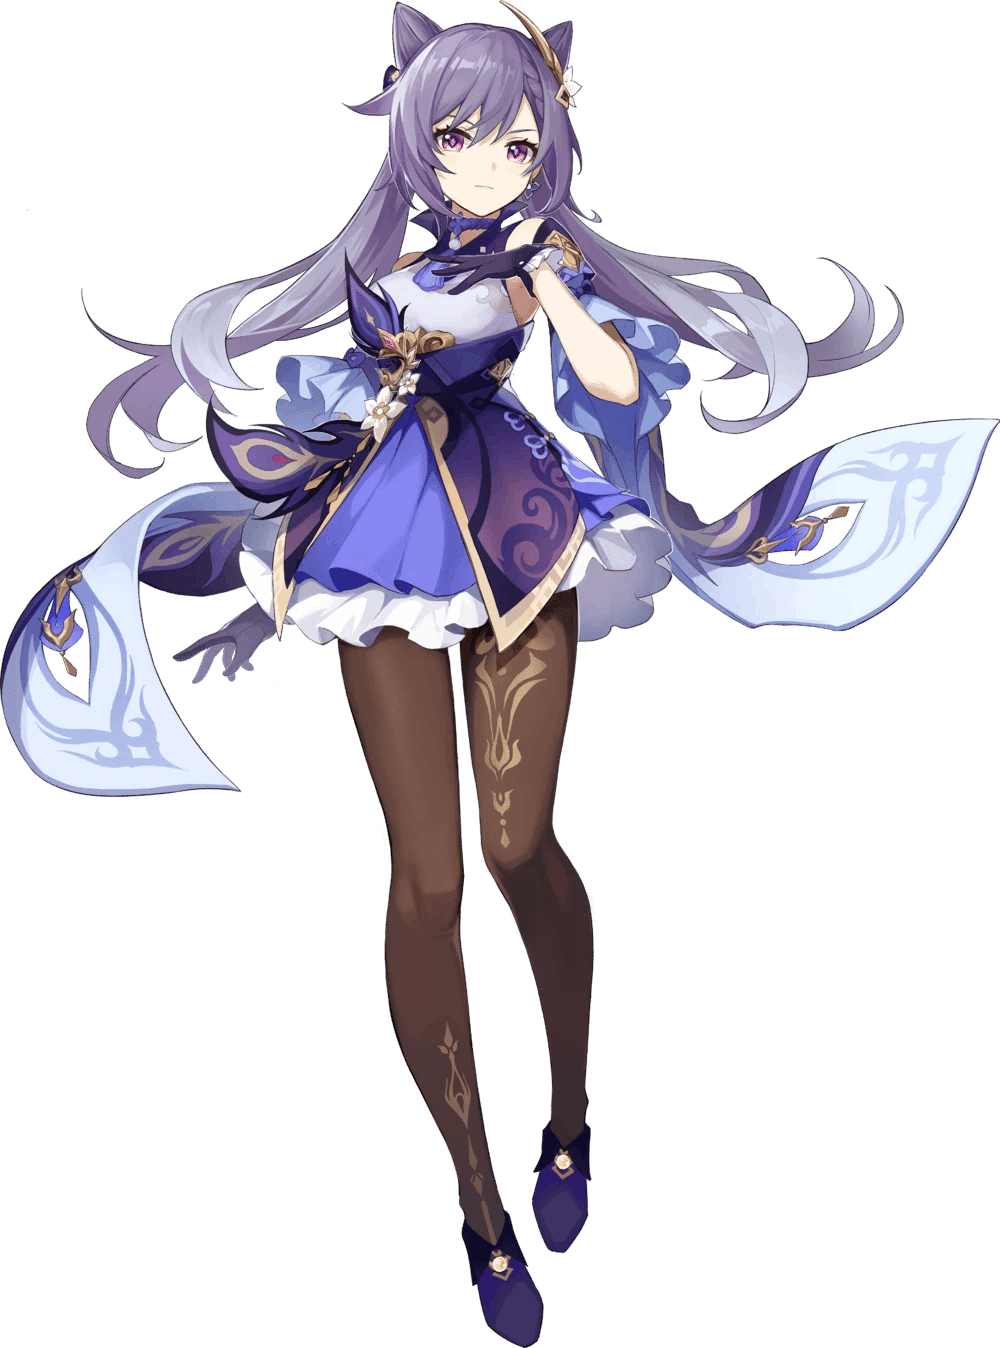
森末も兼ねてよりこのキャラクターを気に入っていて、競作が始まる前から「折るなら何を表現するか」程度の構想を練ってはいた。
I also love this character and had an idea of what to represent as an origami model even before the challenge.
Color Change
インサイドアウトは自身の持ちネタとも言えるので欠かせない。色の配置はロジカルな(色の明度に準拠した)2値化とは別問題であるという持論がある。そのため創作の際はいつも、雑に塗り絵用のスケッチを描いている。
Color changing is my specialty. And in my opinion the configuration of the two colors on the model is totally independent from actual logical binaries of the colors. It is why I draw a rough sketch.
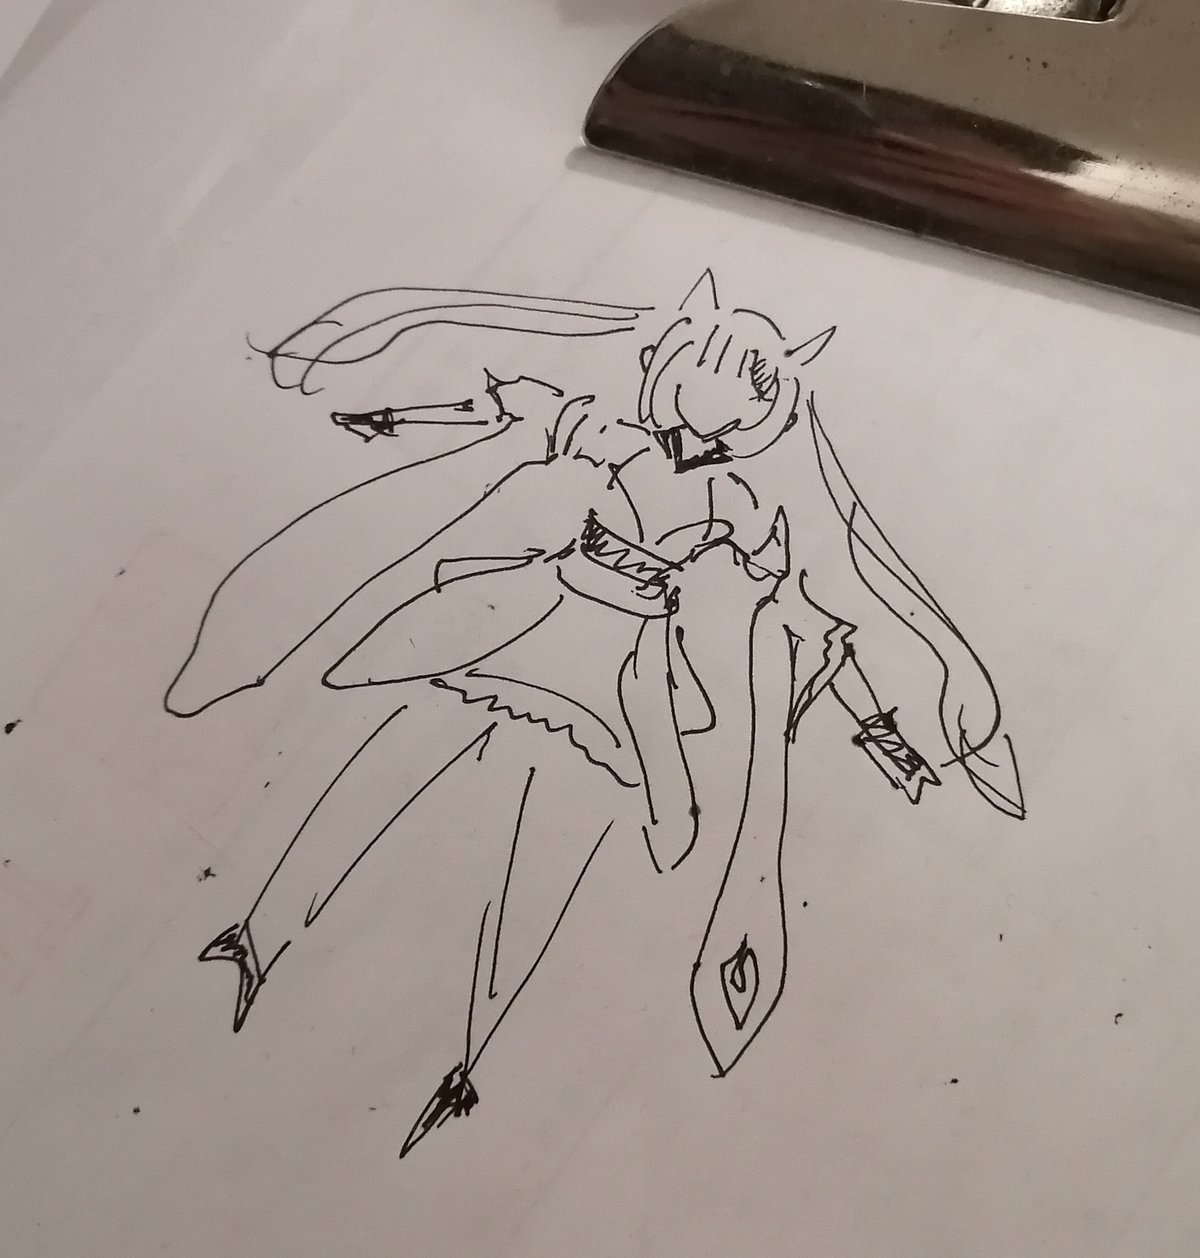
「ここは絶対色側だ!」と思った部分を塗りつぶしている。
I put the color to where I definitely want to emphasize.
ここまで描いた時点で情報量の多さに絶望したため、こんな初期段階で手が止まっていた。ちなみにObelisk氏も同じ時期、原神の「雷電将軍」を製作中で、似たような手順を踏んでいたことが後で分かって喜び合った記憶がある。
At the moment I finished the drawing I was so overwhelmed by the amount of the things in the sketch. Even though it is very begging of the creation, the progress is completely stopped. By the way meanwhile, Obelisk was also designing Raiden Shogun and drawing similar sketch to do similar process which are happy coincidence for us.
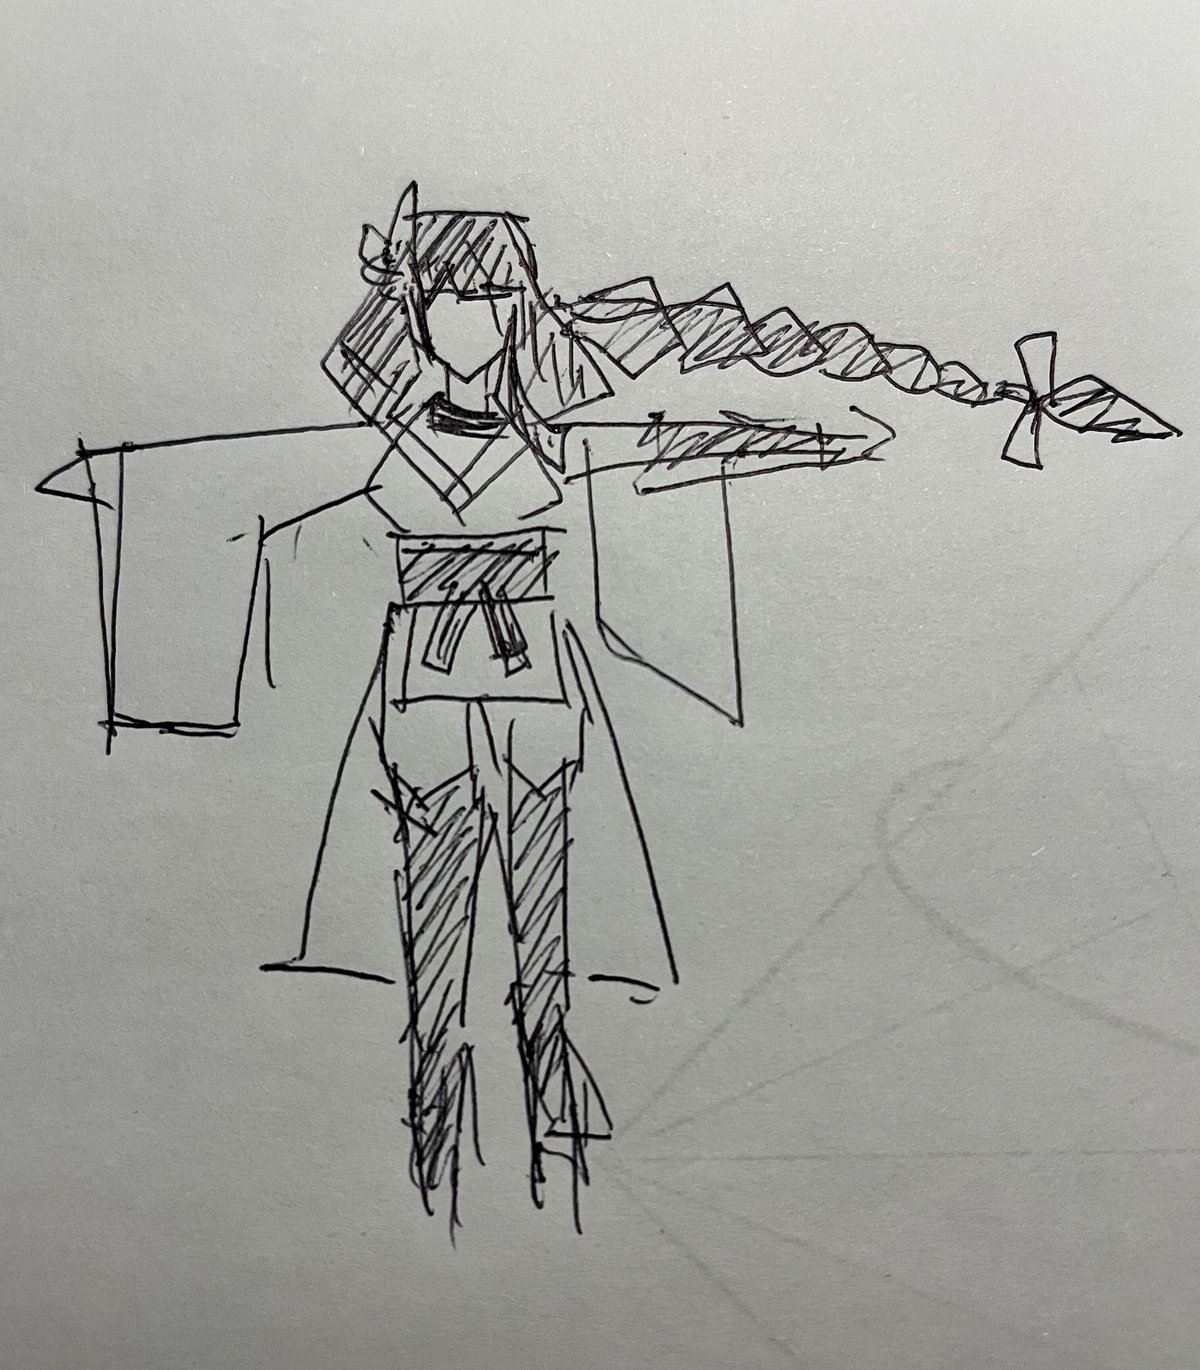
Obelisk draws with origamiish polygons on the other hand.
Backside
「原神」は3Dアクションゲームで、キャラクターを背中から眺める時間が長い。そのために衣装の背中が開いていたり、後ろ側に流れる飾りがたくさんひらひらしていたりと、後方からの視点でもデザインが作りこまれている。
Genshin is a 3D action game, which for almost of the time we watch the characters from their behind. Thus the design of the original characters are well detailed aso on their back. Such like many flaps of sleeves are flowing to their behind.
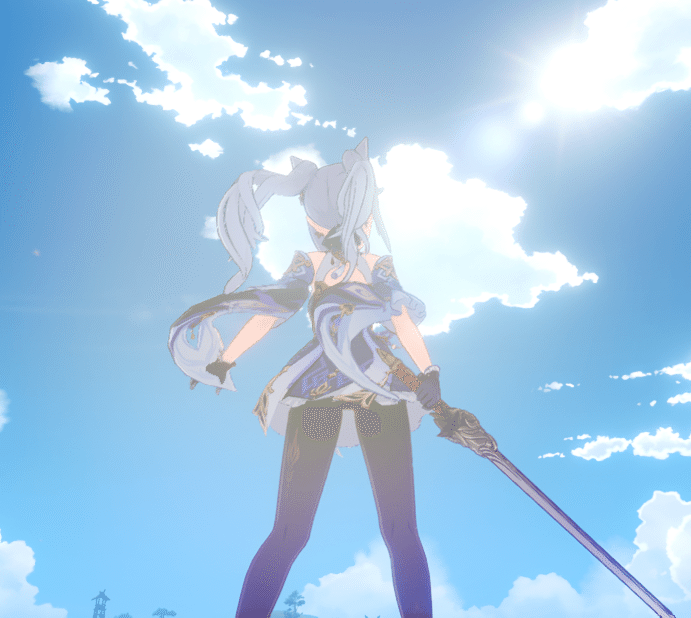
原作のこの点をリスペクトして、どの方向からでも、特に後ろ側からも鑑賞を楽しめる作品にしようと考えていた。
To respect such aspect of the original design, I was also trying to make the details on the back.
Let her grab my sword
原作中で刻晴が剣を振るう様を私はとても気に入っている。
I do love how she slays.
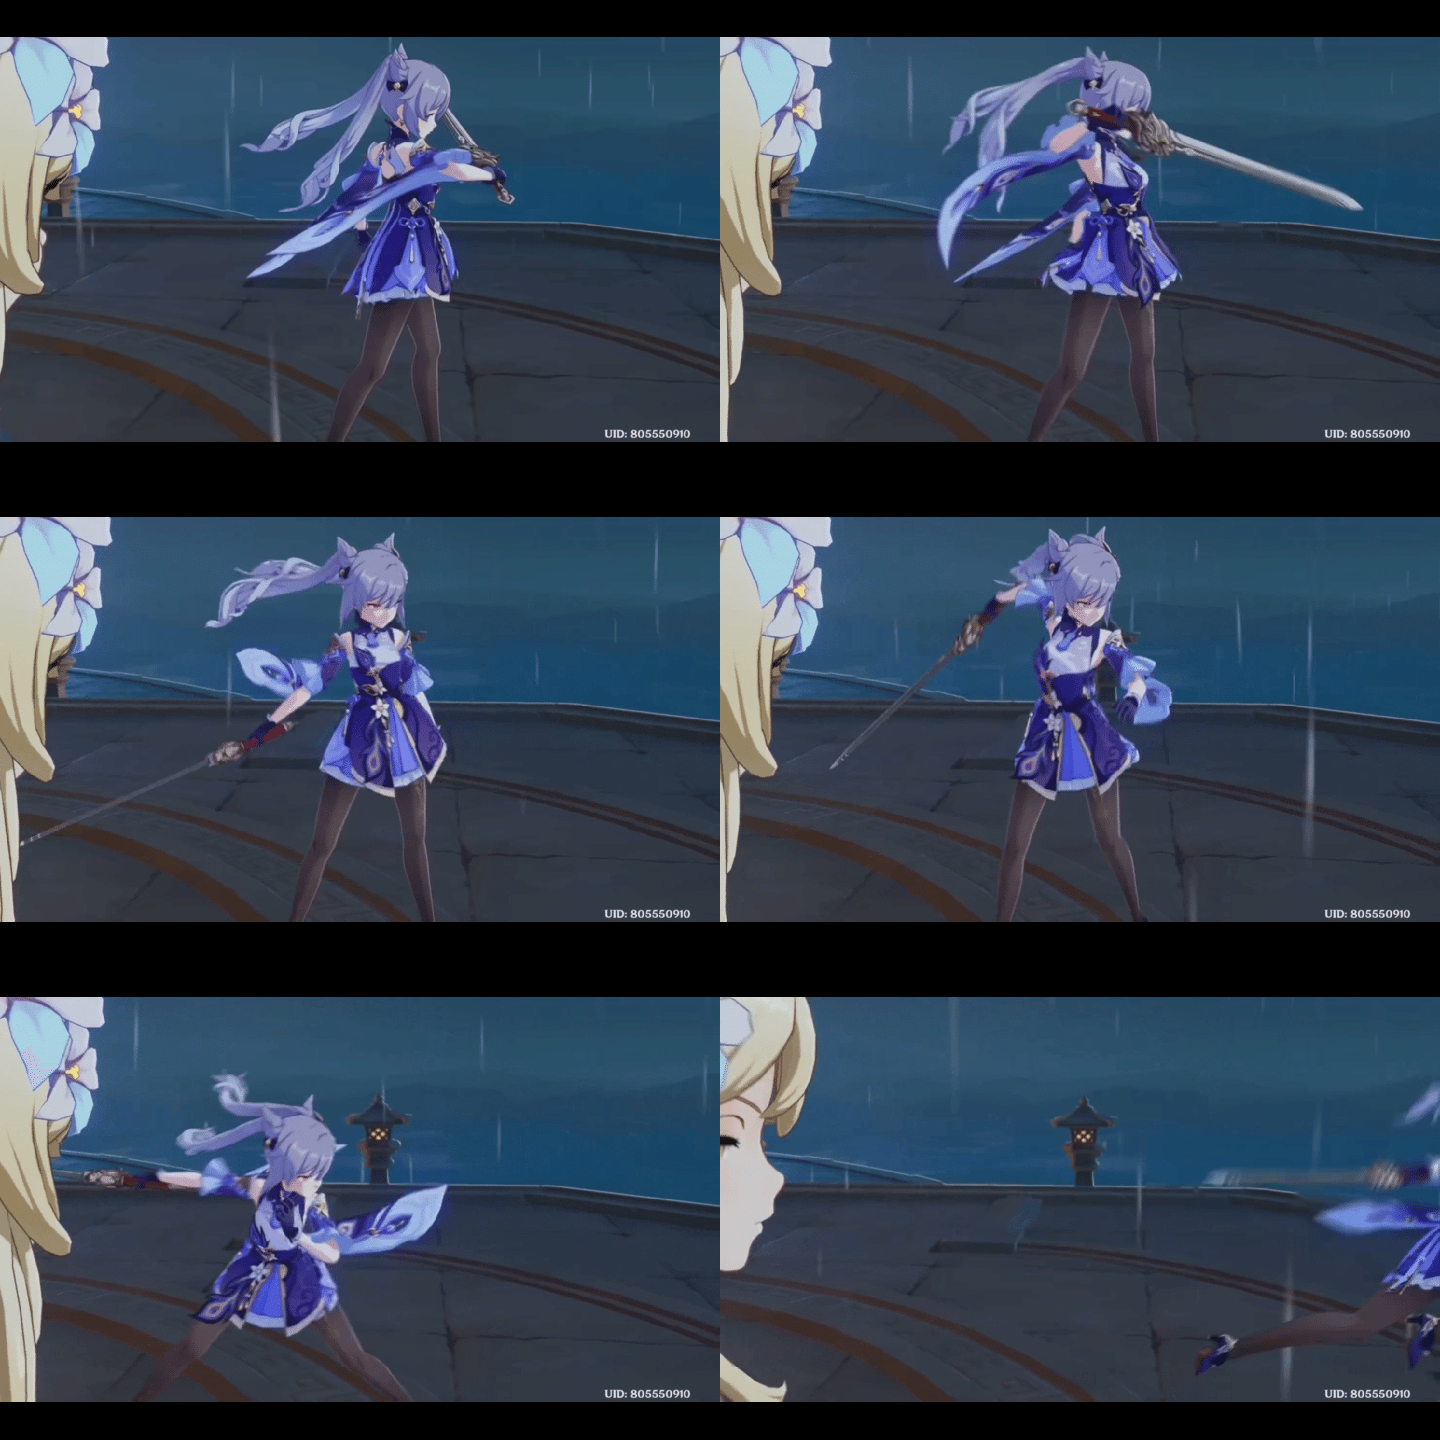
Keqing unleashing her sword.
折り紙にする上では左右非対称になることが強いられ、面倒かもしれないが、どんな簡単な剣でもいいから持たせたいと考えていた。
In terms origami design it requires asymmetrical structure and extra effort, but I want her to grab my sword by any chance.
Phase 1: The Base
conditions
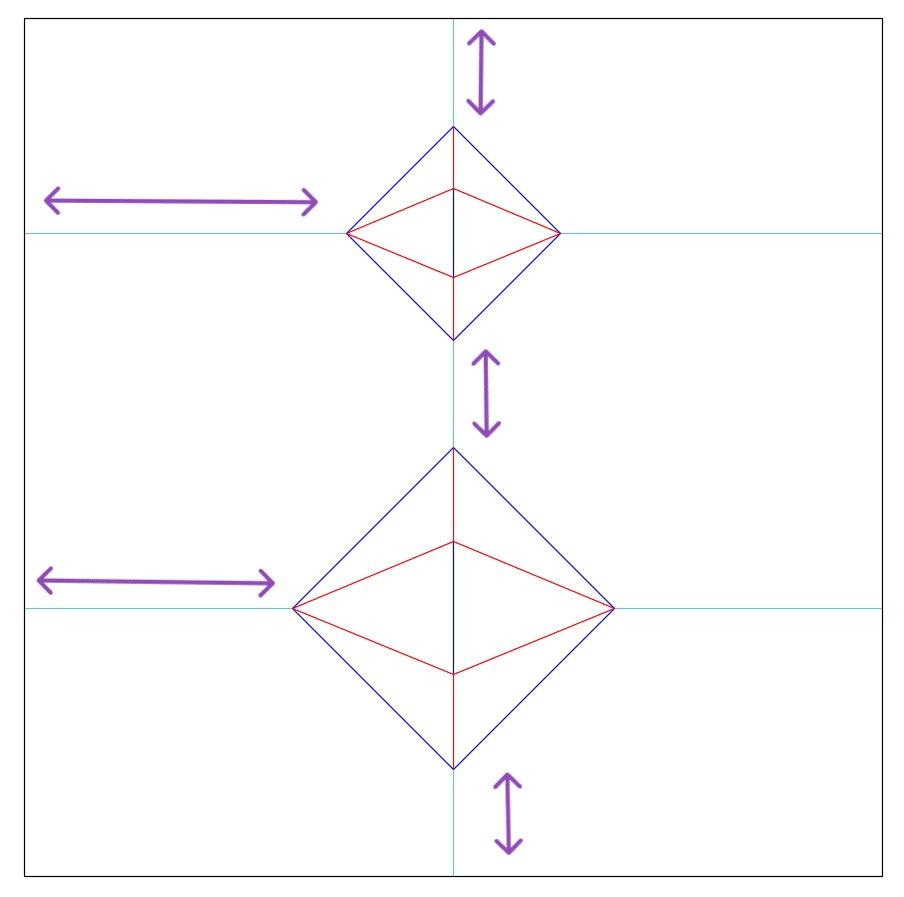
紙は横向き axial structure
両足を中央縦軸上に魚の基本形として配置する(カドとして根元を共有しているため)The legs are from a fish base.
ツインテールも同様 ditto for the twin tails.
このような要請をすると、次図の矢印ような5個のパラメータで展開図が決定する。(正方形に収めるという条件が1つあるので実際は5-1=4自由度)
We impose these requirements, which leads to a structure in the following figure with 5 parameters (We also impose it be square so actually the degrees of freedom is 5-1=4).
two candidates
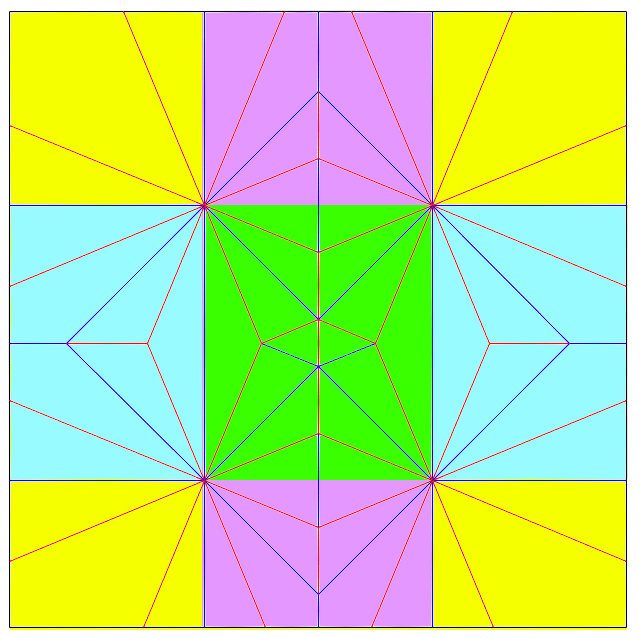
imrichはそういった候補の中から「いい感じのもの」を探し出し、次図の2案に絞り込んだ。(ここがいちばん自明じゃないし、誉められるべきところ)
Imrich had picked up just two candidates out of those bunch of possibilities. Absolutely this part is not trivial and where he unleashed his creativity.
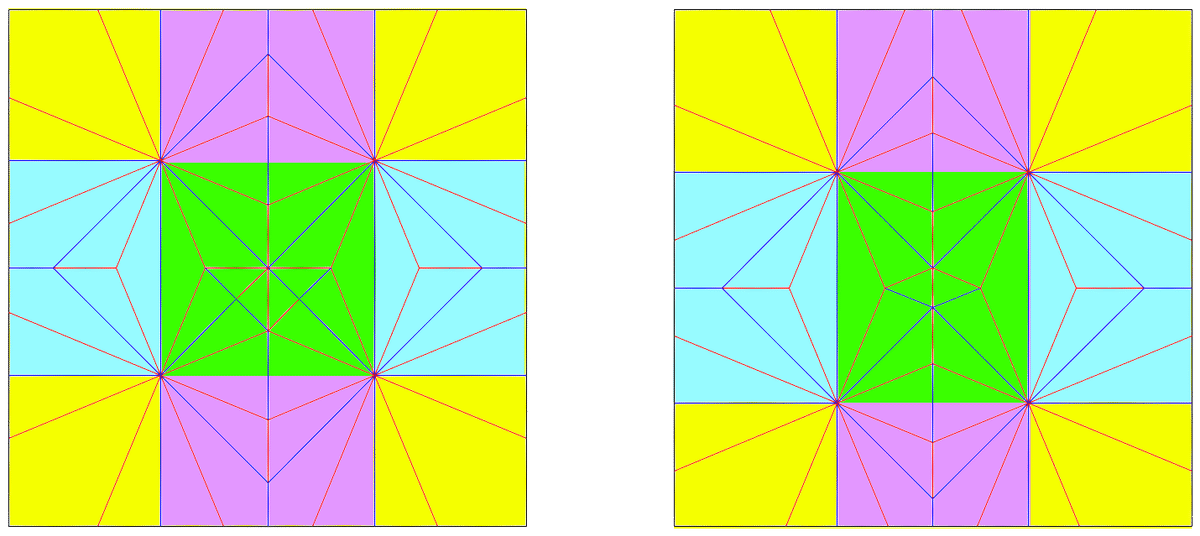
相違点を大まかに言えば、緑色の一値分子群が1:1か2:1+√2かという点である。前回記事のObeliskの教えやeRの鶴ドラゴン基本形のセオリーに近しいのはどちらかといえば左図のものだ。
Basically the difference is the molecular at the middle. If we obey the lessons by Obelisk and eR, the left one is more preferable than the right one because it's more simple and more like the crane dragon base.
しかし私は右図のものを採用しようとimrichに助言した。2つの魚の基本形が癒着している左図のものでは、ツインテールと足のカドの根元が一緒になってしまい、股下~頭頂部までの長さが無視されてしまうからである。
But I offered Imrich to use the right one because the left one cannot have enough "gaps" to represent the body, which has to be placed between two fish bases.
Phase 2: The Last Parameter
かくしてimrichは第1段階の基本形を得た。
Imrich got the base.
The raw base
だがここで論争が起きた。頭部になるのは上紫領域と下紫領域のどちらかという問題である。要は最後に残った1自由度で揉めたのだ。
Here we had a conflict. Which purple area of those two fish beses is the head?
imrichは足やスカートから試作を始めていた関係で、比較的構造が整った上側をスカートにしようとしていた。一方で私は
Imrich was trying to make the upper part (simpler one) to be the skirt since he was starting from the legs. But I was like
見慣れない比率の矩形をした下部をあまり加工したくない。 I don't like the irregular part to be processed so much.
むしろその変則性をスカートのゴテゴテ感に利用したい。 Rather I'd like to use that irregularities to make the messy details for the skirt.
黄色領域の大きいほうを腕部(袖や剣を作らなければならない)にしたい。I want to use bigger areas to make sleeves and the sword.
という理由からずっと展開図を天地逆転して眺めていた。carrotに至っては中間の案や緑領域を台形にする案をぶっこんでくる。こうしてこの問題は外野も含めて決着がつかず、私がここまでのimrichの成果を盗む形で、「チャレンジ」がまずこの2人で始まった。
So I was watching the structure upsidedown all along. For Carrot, he even offered an intermediate plan or ones with trapezoid in the middle. Therefore, this conflict didn't settle. This is how the "challenge" started as I "stole" the results so far by imrich.
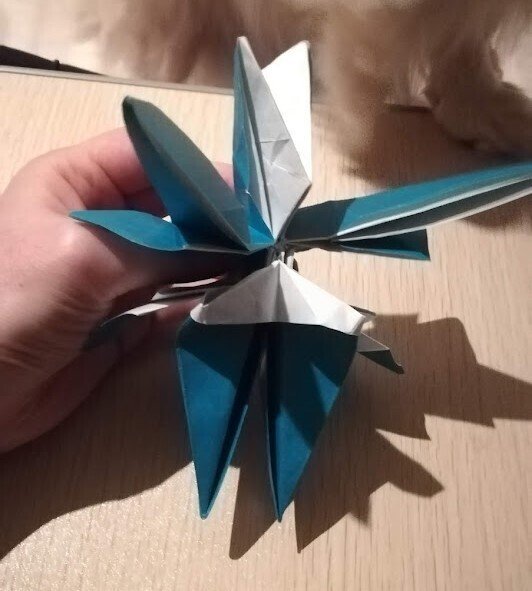
I was like "it's possible" when I saw this shape.
そこで私は第1の基本形を実際に畳んでプロポーションやリソースの配置具合を見た。樹形図は人の形をしているし、頭部や腕、腰の周りにリソースが余っていることが確認できた。これだけあれば、ヘアアクセサリー、剣や長い袖、飾りの多いスカートを再現することができるだろう。
Then I checked the proportions of the flaps and configuration of the resources in the raw base. The stick figure looks like a human, there are some extra resources in the head, arms and the body. They are going to become as the hair accessories, long sleeves and gorgeous skirt.
Phase 3: The Sink Depth
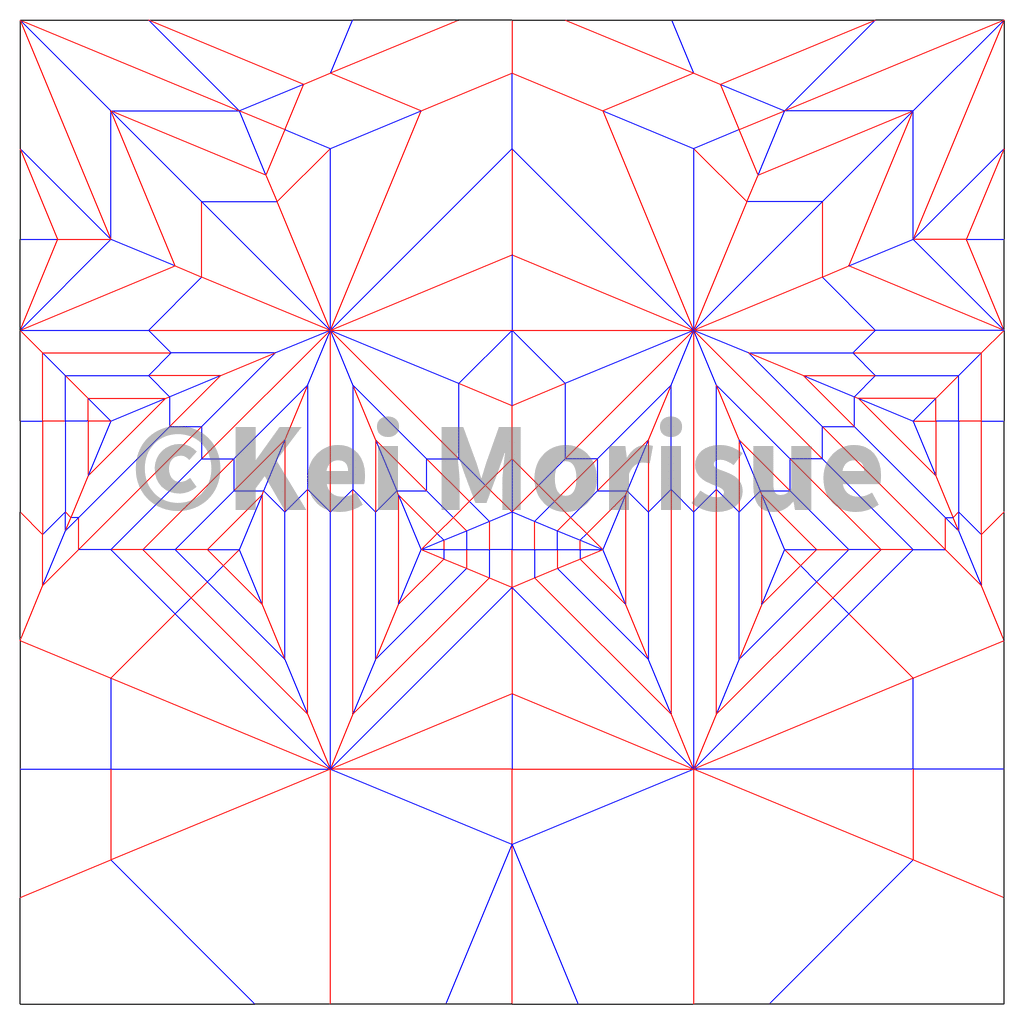
基本形を得た次の段階は沈め折りの深さを決めること。22.5度(TTF、twenty two point five)の基本形そのままでは女性キャラクターの線の細さを追求するには限界がある。そこで身長と水平方向にほとんどの「ヤマ」、つまり各分子の中心をOpen Sinkする。このときに問題になるのがその深さ、どれだけ、そしてどういった基準で細くするかということである。
The next step is open sink hell. It's is difficult to represent thin shapes of a female simply with a raw TTF(22.5) base. We're going to open sink almost all of the tips of every molecules, but how depth and what kind of reference?
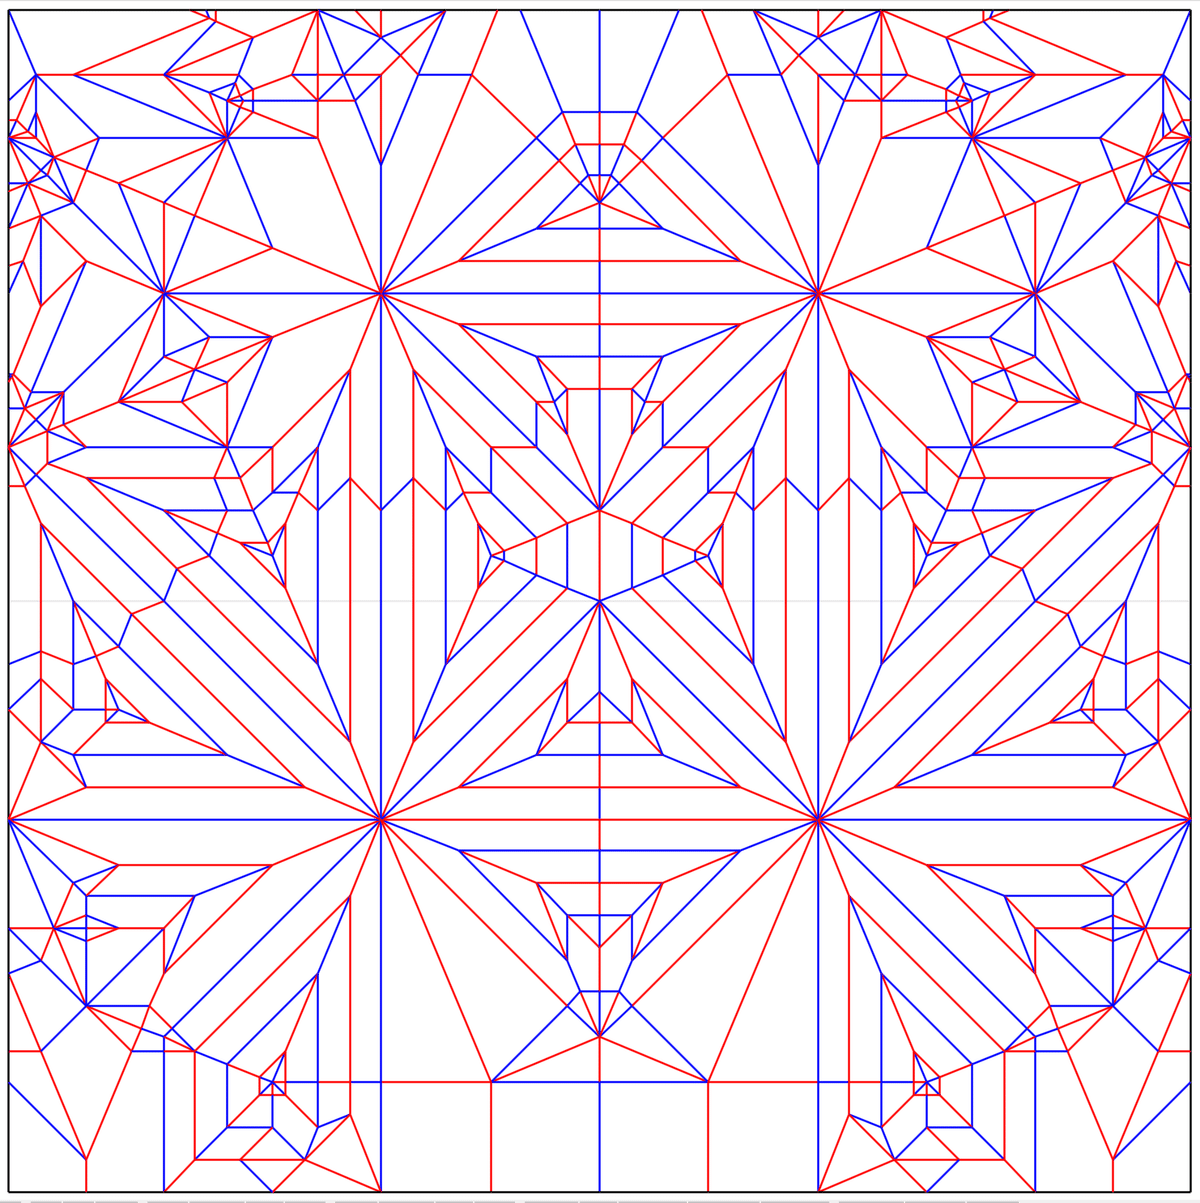
A example of sink hell by Imrich
森末はこの問題をある基準とルールを持って解く。Imrichのとある途中経過を見てほしい。I have a policy to solve this problem. Look at this halfway result by Imrich.
Equal Depth
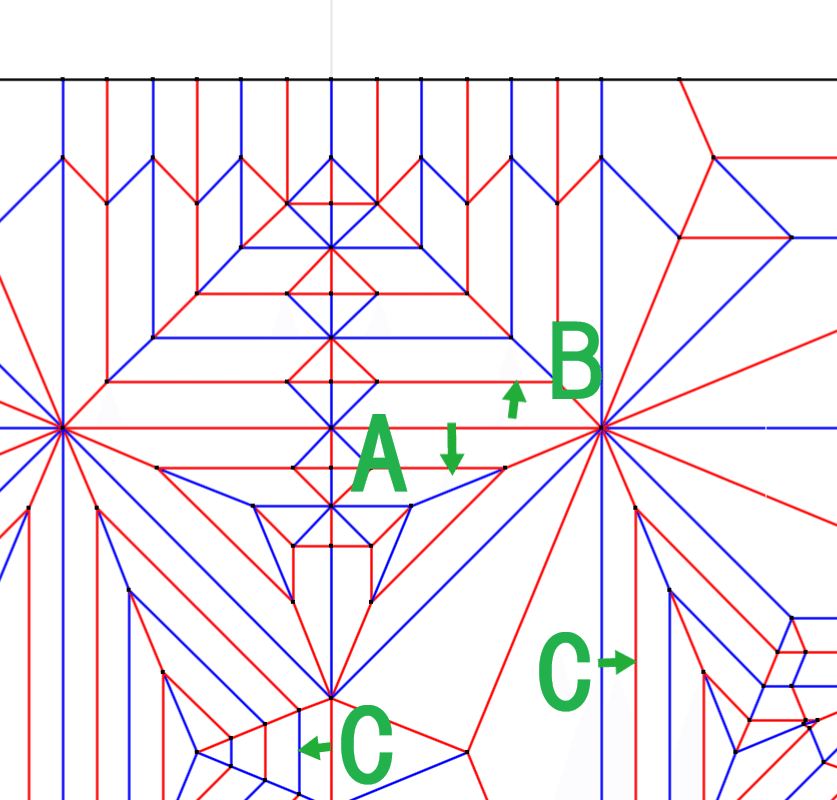
3種類の深さと基準による沈めA、BそしてCが確認できる。これらはそれぞれの分子からすれば自然に思える基準による深さである。
We can see 3 kinds of sinks. Each sink looks natural for the specifications of its belonging molecular:
A:魚(カエル)の基本形の幅を半分にする fish base in half
B:風船の基本形を6等分する balloon base in 6th
C:変則分子の幅を4等分する an irregular molecular in 4th
ところが図の中に見えるカド(この例ではツインテールに対応する)の細さは、この3つの中で最も深さの浅いBになってしまう。せっかくCで4等分もして細くしたつもりのカドだが、結局は一番太いBの面が露出してしまうからだ。
However the width of flaps in the crease pattern, which is going to be the twin tails, is the thickest one of those 3, B. Even though you're trying to make them thin by 4th in C, the thickest surface of B appears after all.
これを解決する手段は一つだけ、全ての沈め折りの高さを揃えるということだ。
The solution is to make the sink depths consistent.
4th grids are powerful enough
そのためには展開図全体の分子を見渡し、全ての分子に都合のいいただ一つの深さを探すことになるので、当然問題は簡単ではなくなる。
Now the problem is even difficult since we have to find one universal depth for all of the molecules.
Consistent sinks with C by Imrich
これは後続のフェーズでも触れるが、整数等分蛇腹が局所的に現れることで、大局的にはTTFであるにもかかわらず、細部ではBPの技法を用いた加工や仕上げが可能となる。ただしそのためには、他所の分子を整数等分する高さが、ほかの分子を沈めた時に高さが中途半端に余ることは避けなくてはならないということである。
Thanks to dividing the molecules equally, we have local BP structures. Thus we can process or shape with BP techniques locally, despite the structure is globally a TTF. We will experience the power of such hybrid techniques later in this article. Instead however, we have to avoid sinks with irregular with.
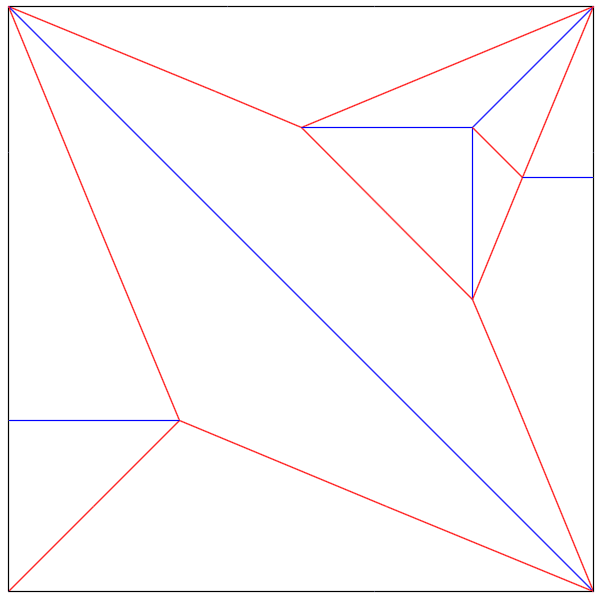
例を挙げて説明する。下側で魚の基本形、上側で鶴の基本形を基にした分子が配置されている。この構造を「細く」するにはどんな方法があるだろうか?
Let me explain it by an example. The lower part is a fish, the upper part is a crane here. How can we make them thinner?
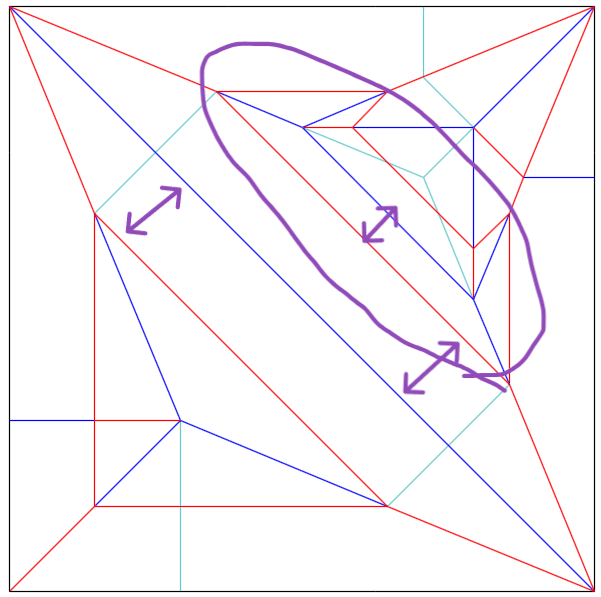
I hate this type of sinks.
これは悪い例である。下側の魚の基本形の幅を基準にして2等分が行われており、BP構造として見ても応用が利きやすい。しかし、上側分子の沈め折りでは中途半端な幅が出現しているため、そのような応用を期待することができない。
This is a bad answer. The lower part is divided in half so that some BP like structures are appearing there. On the other side, the upper part has a tiny fraction from the sink, which is not suitable for BP treatment.
したがって、右上のカドがどうしてもTTFになっていて欲しい場合(例えば8角形の車輪を創りたい、など)を除き、上下の分子は魚の基本形に揃えるべきだろう。というように、第1段階の基本形を調整する過程に戻ることもある。
So except the case where you expect the upper right corner to be TTF, such like where you're trying to make a octagonal wheel from it, we have to those structures to be consistent. Now you can see that we have to adjust the raw base at this phase.
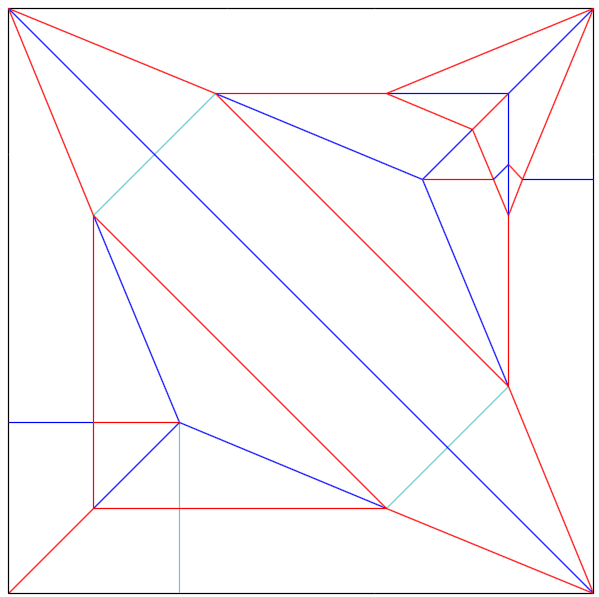
An example with sinks of equal width and TTF at the upper right corner.
もしくは、右上をTTFに保つならこういった解もあるだろう。
Or you can do this to preserve the TTF structure at the upper right.
あとは「程よく」細長く見えるまで沈め折りを続ける。経験側でしかないが、だいたいの分子は4等分くらいで丁度よくなる。3等分や5等分などを混ぜるてもよいが、これも経験上、折りづらくなる以上のポジティブな効果はない。2,4,8を以って手を打つべし。
Now we have to sink it until "properly" thin shape. Epistemically, it's enough to have 4th grids most of the cases. You also can have 3 or 5 grids though, you don't have any more positive effects from it than annoying folding sequences. 2, 4, 8 are the most feasible possibilities.
Phase 4: Bones and Flesh
Stick Figure
人物作品で今は当たり前になった考え方が「ボーン(骨)」を作るということ。
A modern idea for character designs is to make "bones".
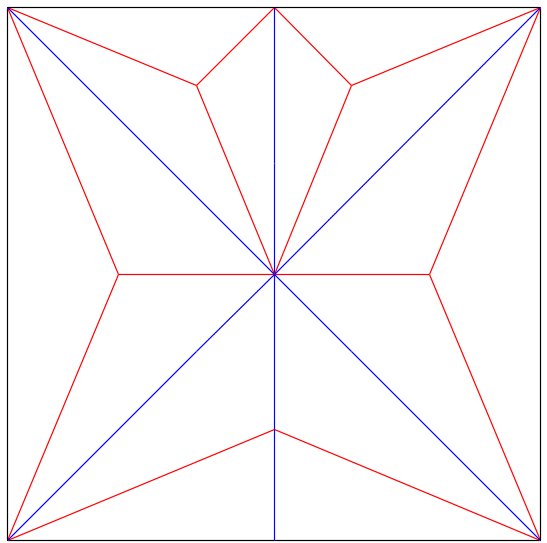
A typical model for a character.
このような展開図を経て人物に見立てた場合、典型的には
When we have this crease pattern for a character:
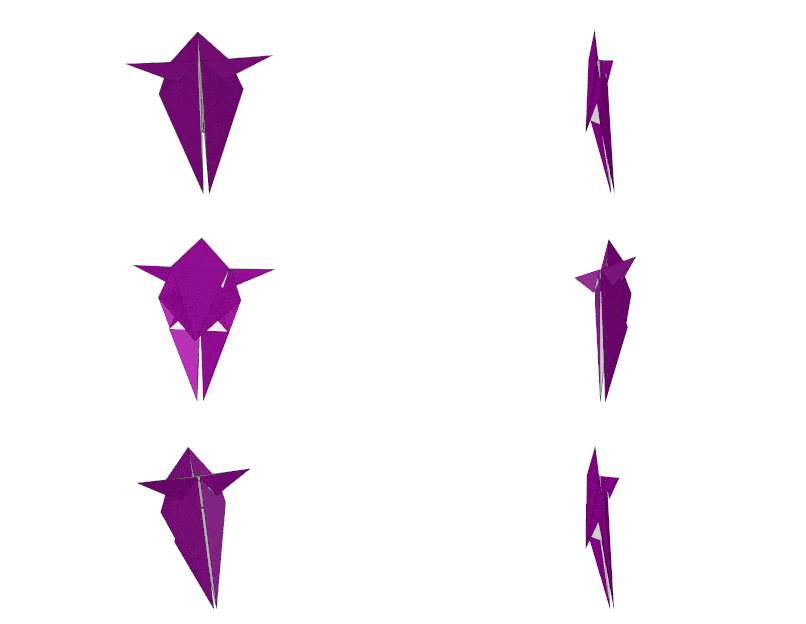
このように、中央で開いて平たくして眺める。フェーズを進めて沈め折りを施せば
We typically open it in the middle and flatten the model. In the following phase, we sink the structure so that it looks like T-pose.
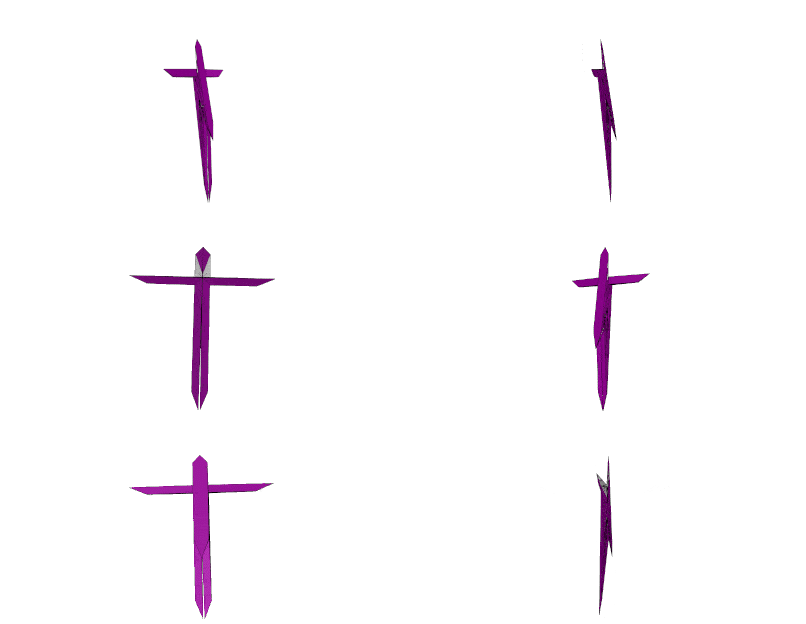
このようにTポーズの人物に次第に近づいていく。
ここで昔から問題になっていたのが首の細さである。情報量の密集した肩から下、頭から上をつなぐ部分はあまりにも細くしなければならないという問題である。もし首の細さに沈め折りの基準を置いてしまうと全体が極端にやせ細ってしまう上に折りづらくもなる。
Here we always have a problem that we have to make the neck even more thinner. The neck bridges two massive parts: head and body. If we're going to sink the base up to the width of the neck, the model get too much thin and hard to collapse.
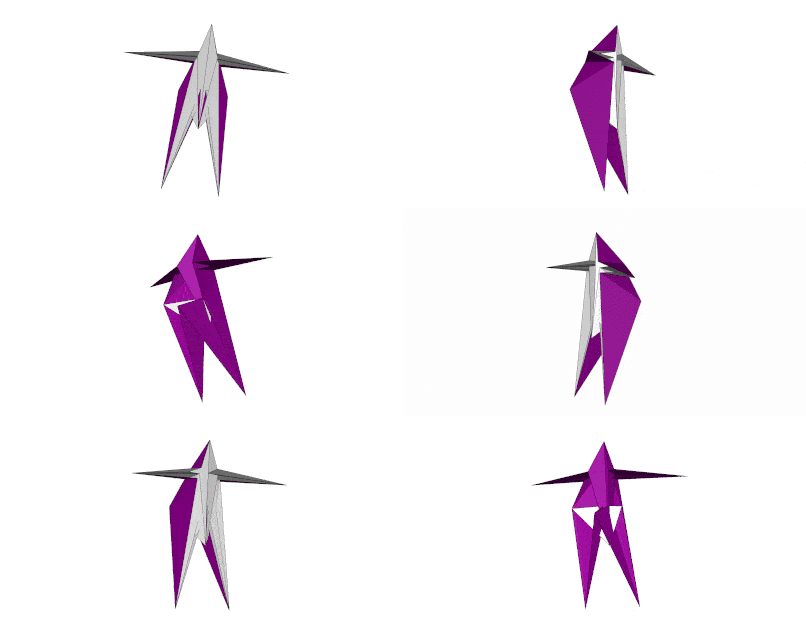
その解決策として現れたのが「ボーン(骨)」である。することは単純で、中心線で半分に折り畳み、「樹形図」の状態から見立てを行う。実質「紙の厚さ」だけが首の細さになるため、沈め折りを施さなくとも、前面からの鑑賞は担保される。
The solution is "bones". The operation itself is simple: just to fold the model in half vertically, and to watch the model as the stick figure. Especially from the front view, the thickness of the neck is basically only that of paper, we even don't have to sink the tips.
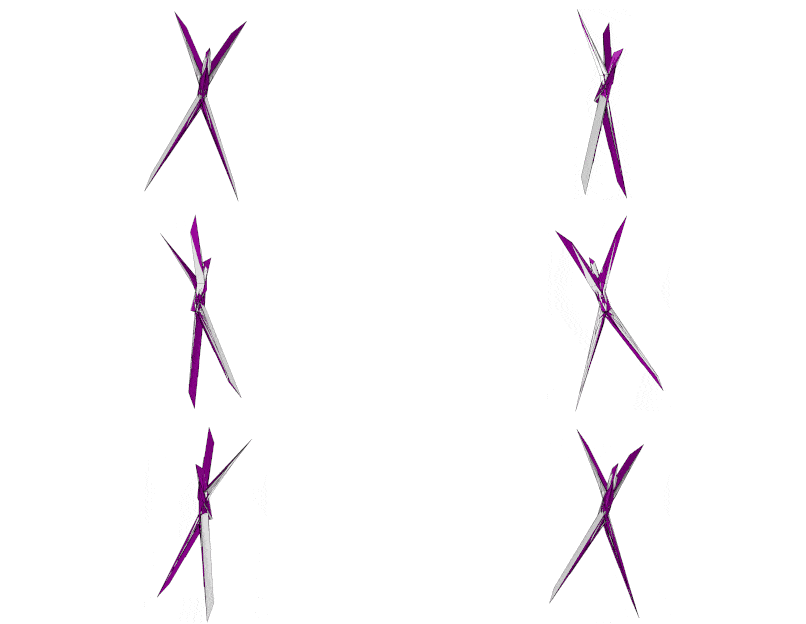
上記の例と同じ幅で沈め折りを施せば、ほぼあらゆる角度から見ても「首」が細くなった。半面、ボーンになったので人物がやせ細ってしまった。「肉」付けが必要だ。
When we sink the tips, the neck looks valid from any angles. On the other hand we have to flesh out something since the model looks thin too much.
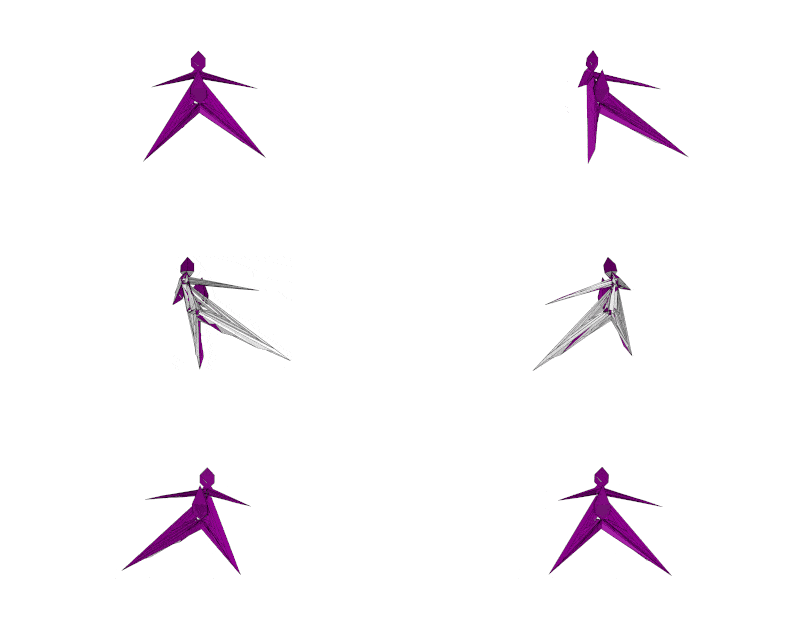
「肉」はどこから来るのかというと、頭や衣服などの余剰領域を長めに作っておいて、ボーンから「梁り出す」ことで表現される。腰や首のようなところは特に何もせずそのまま、骨をむき出しにしておけば、特に前面からの細さはそのまま担保される上、後続の「造形」フェーズで作品の造形ポテンシャルを格段に上げることができる。
How do we make flesh? We can represent it by making the flaps a bit longer such like head or the unused areas for clothes, and "picking out" them out of the bones. If you let the neck or the waist just as a bone, you can even get some more additional potential for the shaping phase.
Neck Twist
フェーズ3で森末が基本形を縦に折りたたんで眺めていたこと、そしてそれぞれの枝に肉付け用の余剰領域があることを確認していた理由がここで分かったと思う。
Now you can understand the reason why I was watching the base with folded in half and confirming that extra areas for fleshing out at the picture in Phase 3.
念のための補足だが、この方法に則らないのが決して時代遅れと言うつもりはない。師匠たち(前回記事)の代表例を挙げれば、
By the way I'm not insisting that designs without those techniques are already out of date. We have good examples by my Masters (in the previous article):
eR氏は「鈴蘭」、
"Ling Lan" by eR
铃兰#Arknights #ArknightsFanArt #折り紙 pic.twitter.com/n163Lq7FyC
— eR (@Dhujsi) January 21, 2023
Obelisk氏は「虞美人」
"Yu Mei Ren" by Obelisk
虞美人 v2 (FGO)
— 陈晓 Chen Xiao (@__ObeLisK) February 7, 2021
From 60cm*60cm craft paper. Better reference points now. And her dress is more layered.#FGO #origami #折り紙 pic.twitter.com/5UtbaWp1G1
などで、それぞれ違ったアプローチで「首」と闘っている。They're struggling with the "neck" with their own approaches.
首といえばこの競作ではもう一つ、森末はNeck Twistというアプローチで「首」に迫っている。本来は首の前後を入れ替える既存のテクニックだが、森末はここではシンプルに首「許」を細く見せる技として駆使した。
Speaking of the neck, I additionally used an approach called neck twist to have better result in the neck. The neck twist is originally a technique to switching the front and back of the head though, I applied it to simply make the throat more clear.
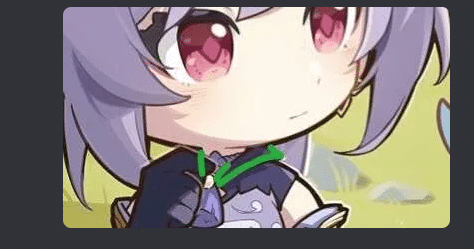
I love her collars
「刻晴」は首許に大きな襟やアクセサリーなどを持っていて、ただでさえ紙を集めたくない場所に情報が集まっている。そこで、肩から喉元に向けて細くなっていく首の形を、斜め方向の段折り(沈め折り)で表現する。
Keqing has big collars and accessories around her throat. So I represent the shape of the throat by slant pleat (open sink) fold. getting even thinner from the shoulders to the head.
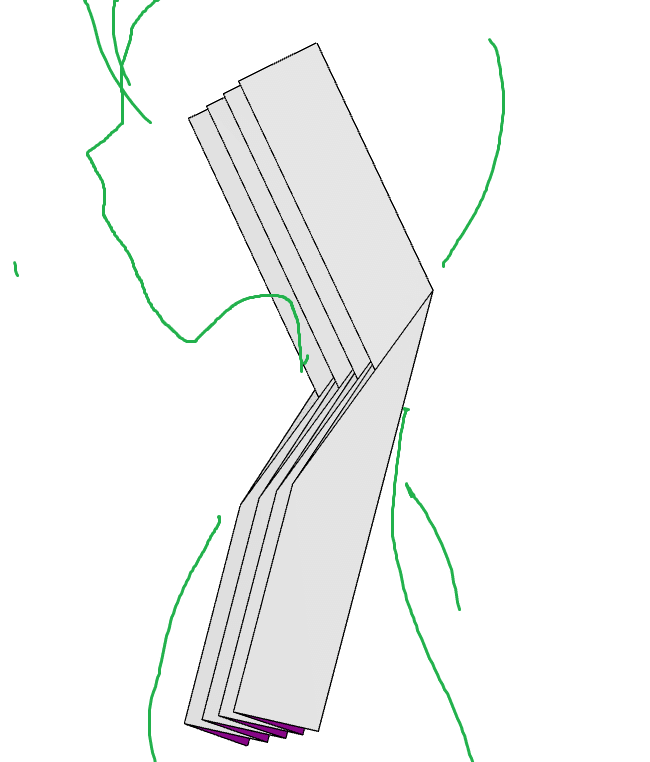
Description of the neck twist. Of course we're watching the character from the side.
設計の観点で言えばこれはあまりお勧めできない。せっかく綺麗に整えた基本形のほとんどを横断する形で斜めのギザギザの構造が入り込む。良くも悪くも、この横断で仕切られた構造たちはこれ以降、影響しあうことができない(例えば、仕上げの段階で足りない紙を少しだけ拝借するなどといったことができなくなる)のだ。
It is not recommendable to neck twist by means of structure. A huge zig zag is all across the structure. And fortunately or unfortunately, the structures divided by it can not interfere each other.
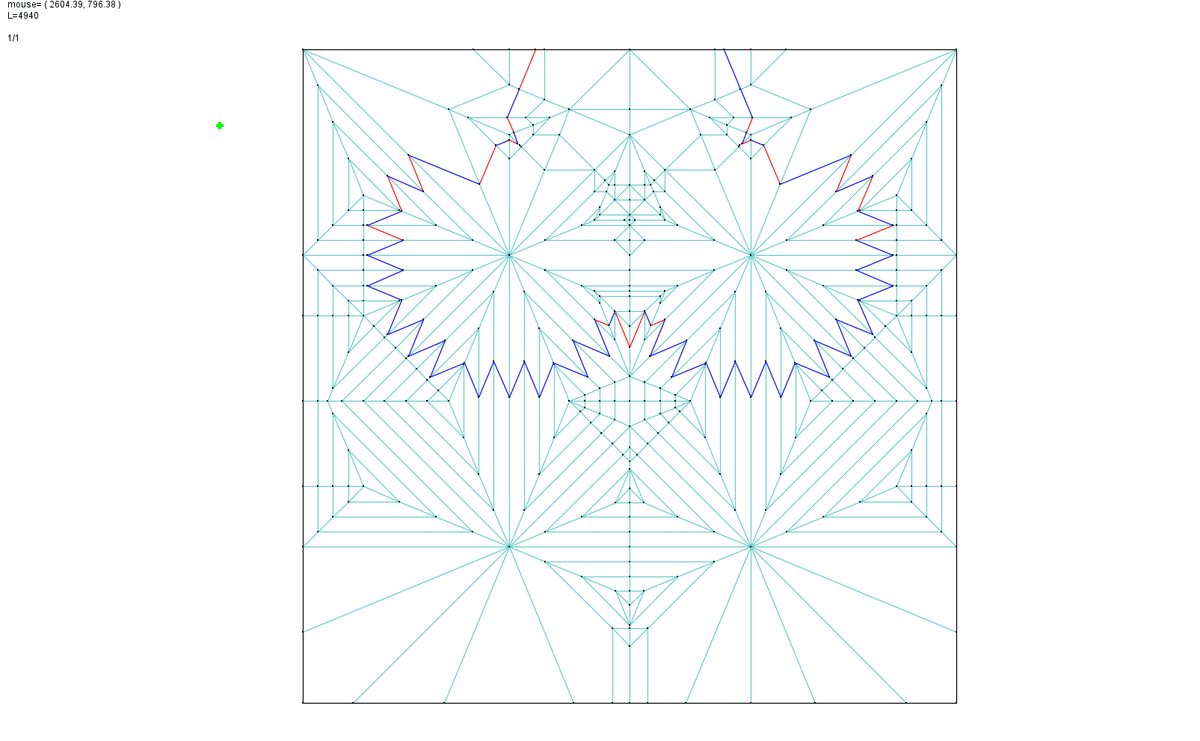
The structure is divided into independent areas by the neck twist.
Phase 5: Local BPs in TTF
ここまでのフェーズで紙を折っていないと感じただろうが、実際折っていない。
We're not folding any paper in the phases so far.
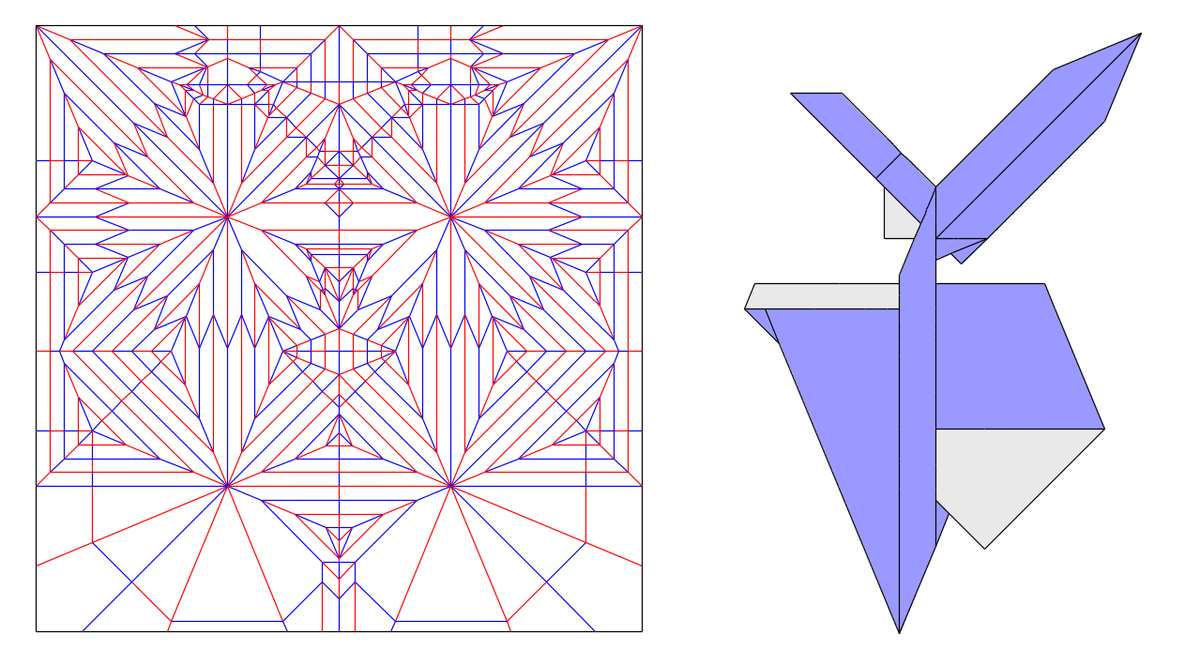
The structure determined so far
等間隔の沈め折り、単純な分子、半分に畳まれた体、そしてNeck Twistを要請するとだいたいこのくらいまで展開図が描ける。
The equal width, simple molecules, folding in half and the neck twist imposes this crease pattern.
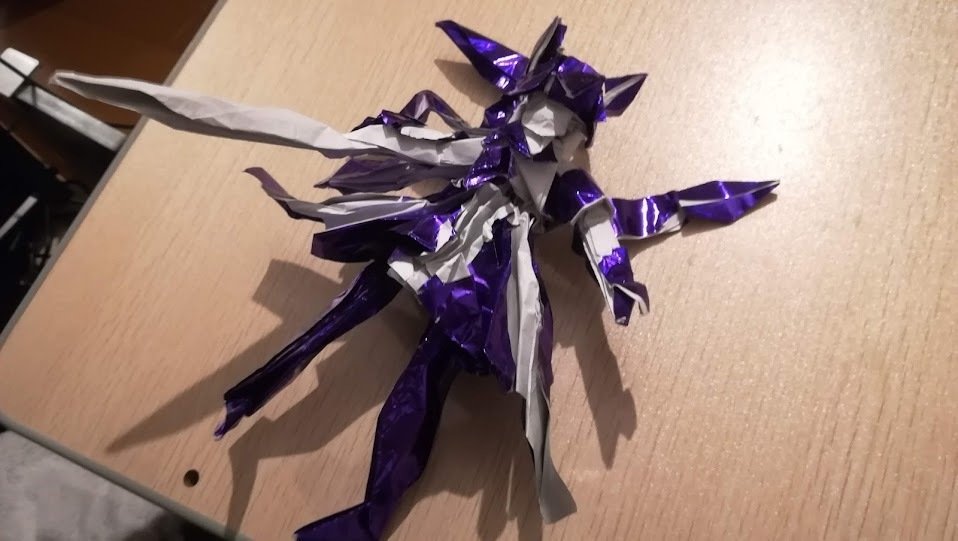
My very first plot
ぜひ注目してほしいのはこの展開図だけでこの第1プロットが創れてしまうということだ。時期としてはフェーズ2の写真が2023/1/19で、このプロットは2023/1/23に撮影されているのでかなり初期段階である(完成は2023/2/25)。
Here I would like you to note that, that draft crease pattern can produce this first plot. The picture in Phase 2 is taken on Jan 19th and this plot is on 23rd of January. So this plot is still at the begging since the model is finished on Feb 25th.
このフェーズ以降で行うのはプロットにおける即興的な折り筋を、平坦折り可能な展開図に落とし込むことである。絵でいうところの下書きに「ペン入れ」をするようなものだ。この作品では、TTFに局所的なBPを埋め込むことで「ペン入れ」を行う。
In the following phases, we settle the immediate creases in the plot into flat foldable crease pattern. It is just like "ink in" a pencil lines in a draft. In this case, we ink the creases by embedding local BPs in TTF.
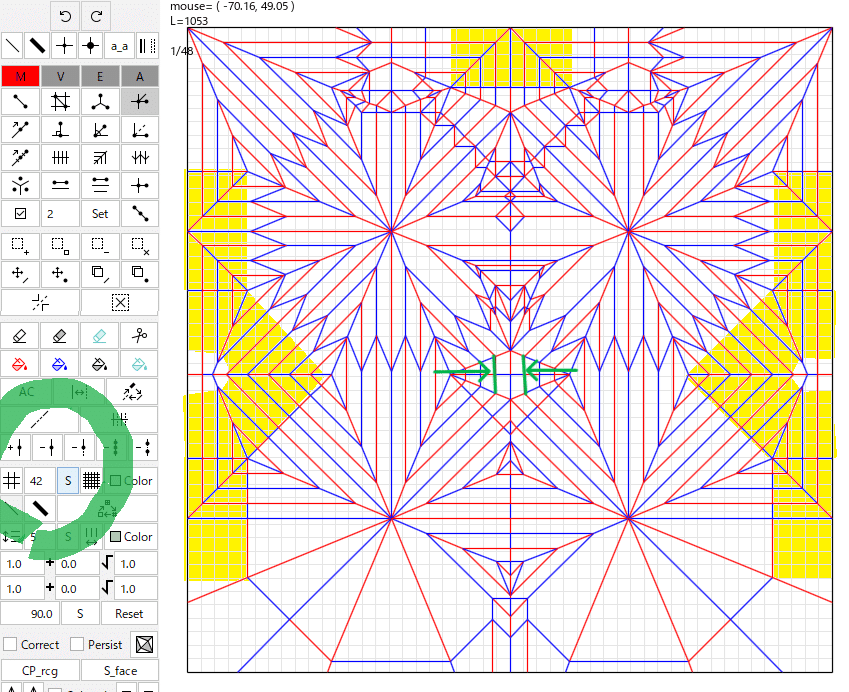
沈めの深さが均一(緑線を参照)なおかげで、この構造が純粋なBPでいうところのだいたい42等分相当であることがわかる(正確には24+12√2≒41等分)。BPとしてみれば簡単な部類になるだろう。
Even sink depths (green lines) tells us that the structure is equivalent to a simple BP with 42nd grids (in precise it is 41≒24+12√2). So it is relatively easy as a BP model.
そして最も大事なのは、黄色く示した領域、魚の基本形を沈めた部分には必ず局所的なBPが現れることだ。
Mist importantly, the yellow areas beneath the dish bases, we can always see "local" BPs.
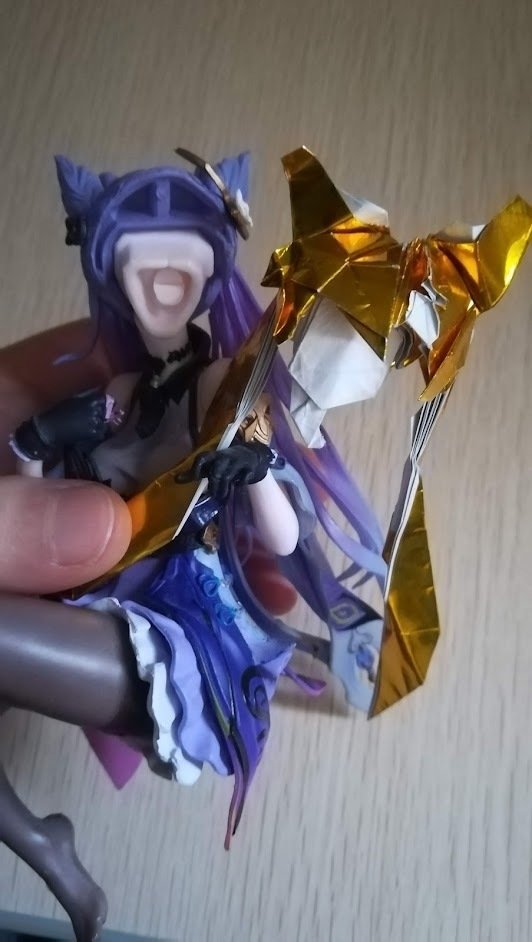
Another plot fir the head folded after the first plot. Note that BP in the front hair and TTF in the face are at the same place.
局所的に構造が与えられたため、それぞれの部分で、ボトムアップ式の試作や加工が可能になる。ただしこれらは、等分数が確定したBPであるため、「足りなければ領域や等分数を足す」ではなく「与えられたリソースでどれだけ作りこめるか」を考えるタイプの試作(前回記事参照)である。
Since the structure is locally given, one can do a test fold or processing partially with the bottom-up style. As the BP grid is given, it is not "add some grids if it is short" but "" (please refer the previous article).
BPの技法や試作方法についてはすでによく研究・周知されているため、ここでは参照資料だけを残す。
We can refer a lot of references for BP test folding or techniques here.
創作のほとんどの時間がこのフェーズに費やされ、これ以上に形式的な記述の方法を森末は持たない。ただ、認識に値する事実として、TTF構造とBPは入れ子状に再帰可能だということである。
Most of the time of designing is paid for this phase and I don't have further formal ways to express the way to ink a structure.
Here however, I have to emphasize that TTF and BP can be iterated as a nested structure.
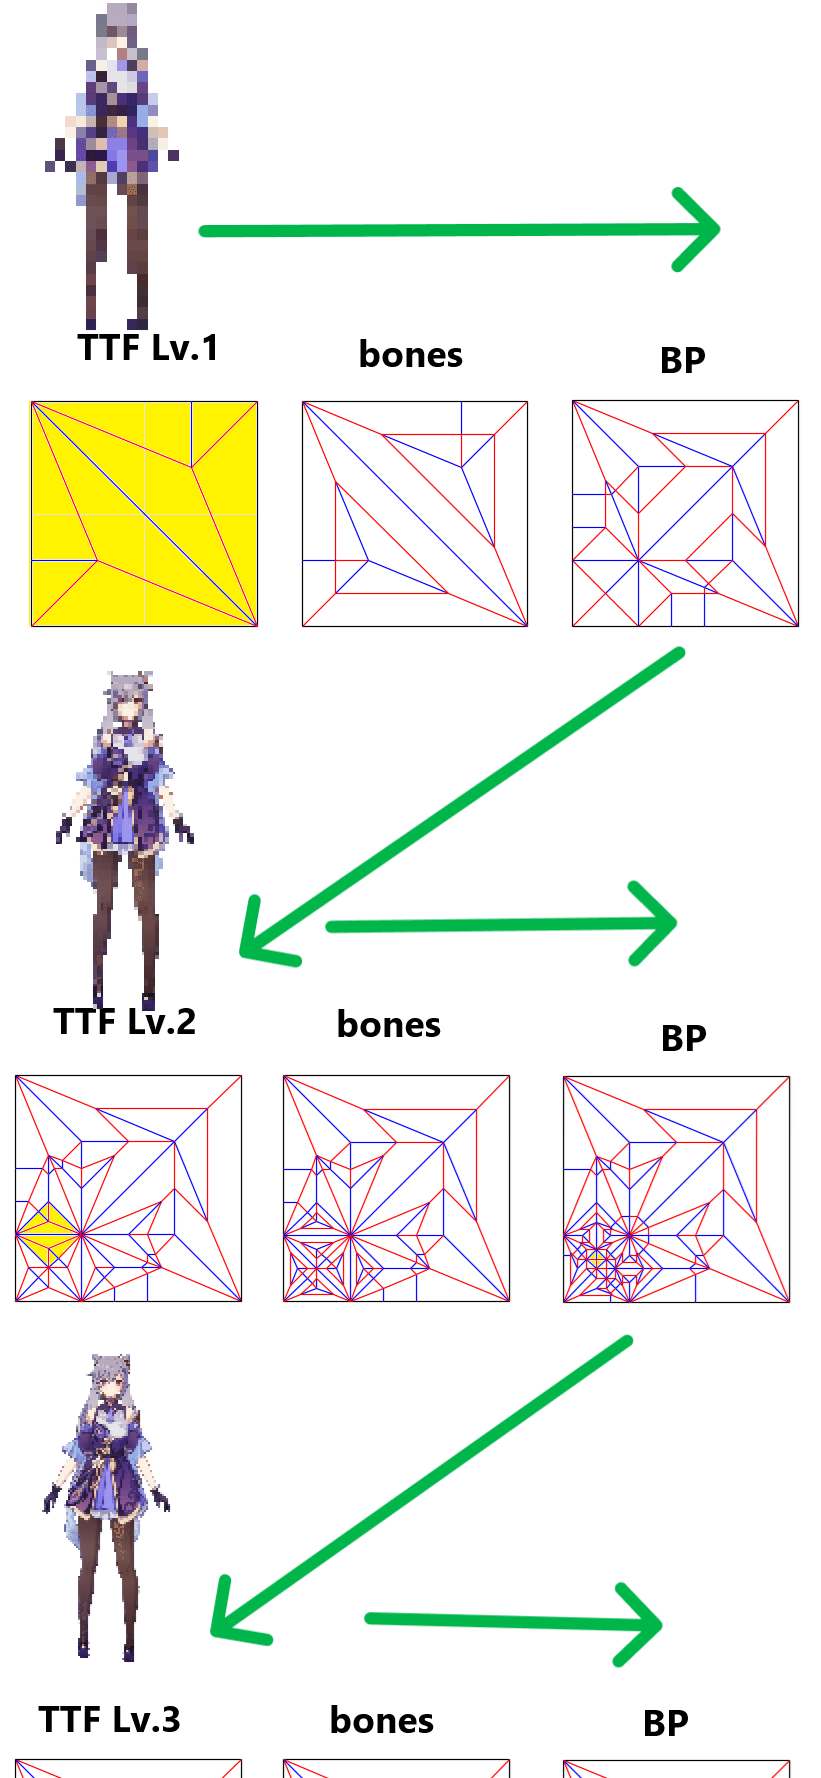
単なる魚の基本形が、ボーン化とBP加工を経て局所的な魚の基本形を再び生み出し、構造の解像度が段階的に上がる様子の例を示している。言い方を変えれば、作品の各パーツを大きさによって階層化し、一番大きな階層から順番に構造を決定するという設計方法にあたる。
Here is an example that shows the resolution of the structure is growing gradually. An ordinal fish base is recursively generating itself locally through the bones and BP processing. One can also say that this is one of the design techniques that hierachazes the parts in the model by their scales.
情報密度の高い作品を制作しようとする際、すべてのパーツを並列に設計を行うより形式的かつ効率的な設計方法を与えている。
When you're trying to make a dense model, it gives an effective and formal approach than that treats every single feature of model parallel.
Phase 6: Kado Colle
フェーズ5によってほとんどの下書きにペンが入る。
Phase 5 determines almost every draft crease as an inked crease line.
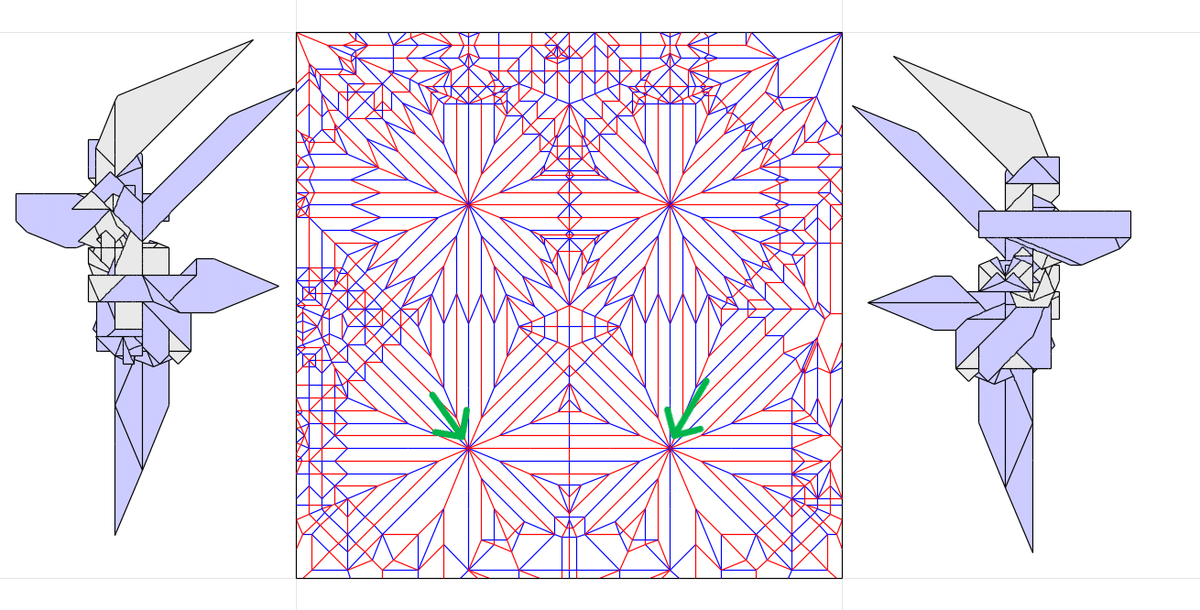
残すは、BP加工と相性の悪いTTFのカド(緑色)のペン入れである。因みに上側の2つのTTFのカドはそのままツインテールの襞にするため、あえて加工は施さない。
What we have to do here is to ink the TTF flaps that is not consistent with BP processing (green points). Incidentally, the upper two TTF remains as they are since those are twin tails and we are going to treat the pleats as the hairlines.
TTFのカドにペンを入れるには、「角コレ」を用いる。角コレとは、point splitting をはじめとした、TTFを加工する方法の総称(として森末が提案したもの)である。
To ink a TTF flap, we apply "Kado Colle". Kado Colle is a collection of TTF processing.
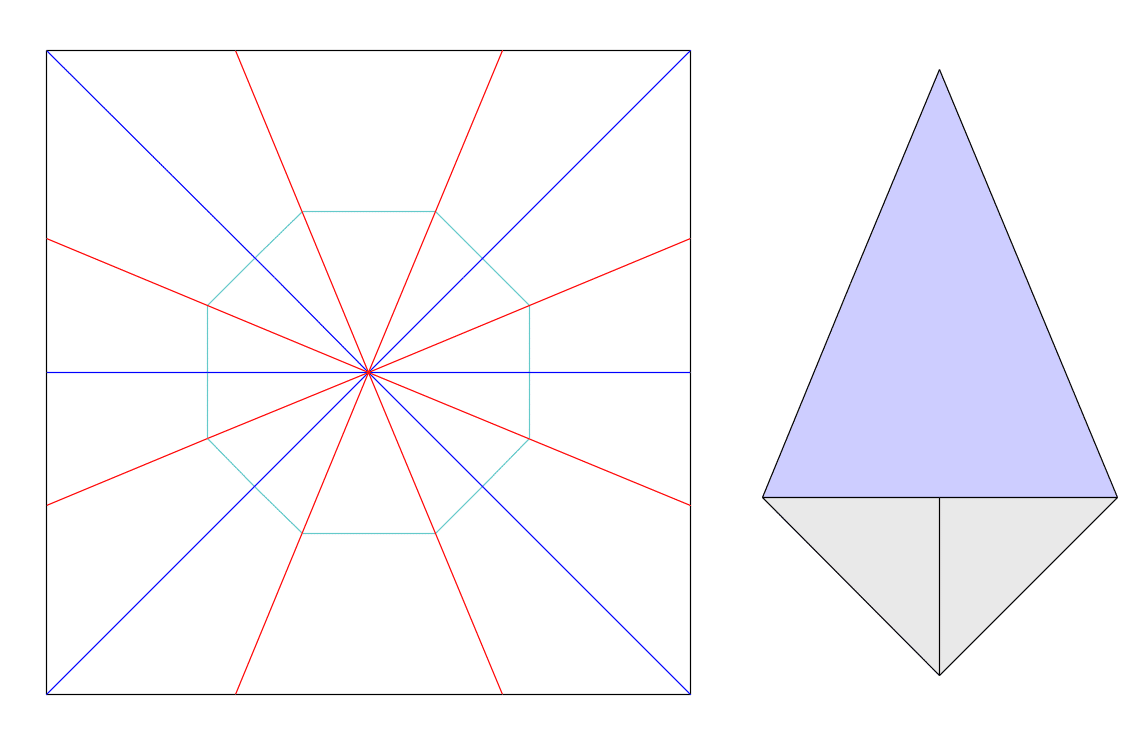
Kado Colle contains any transformations inside the green octagon.
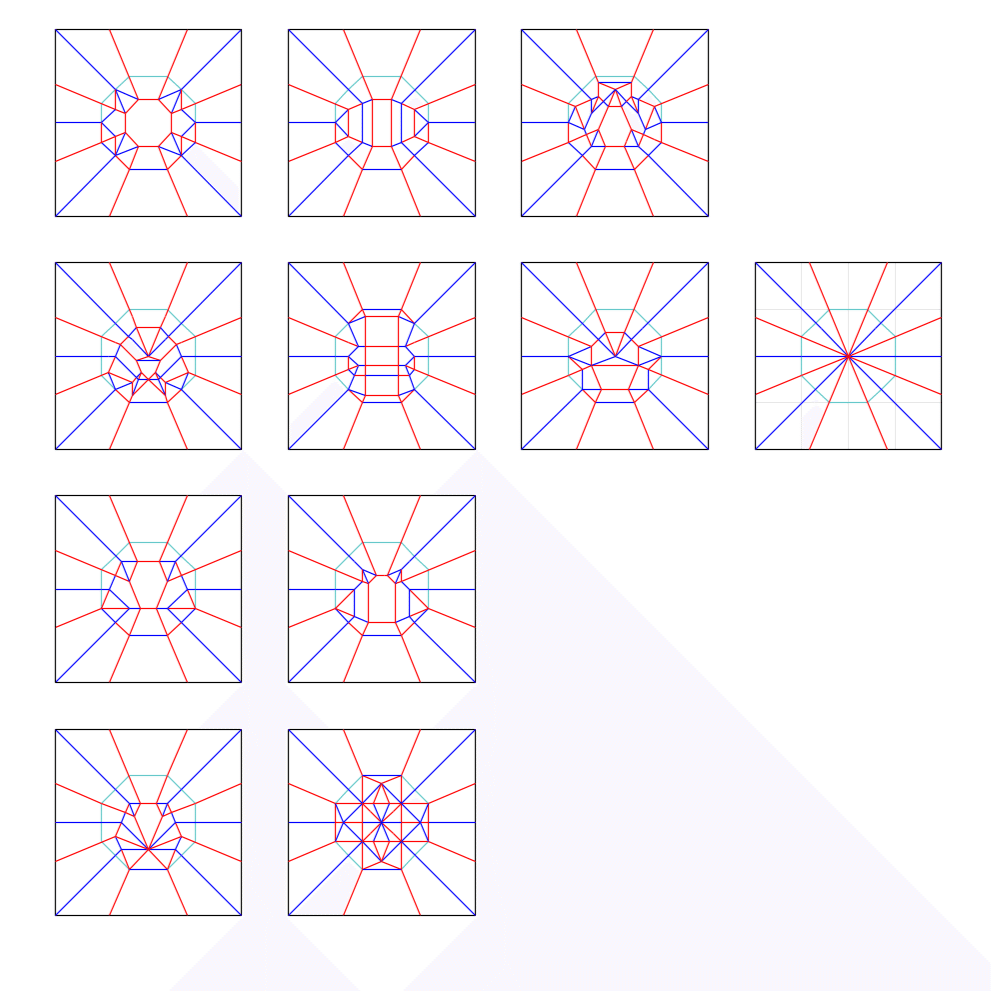
The variations of Kado Colle. The bottom right is what we call point splitting. The upper left is the most familiar one, simple open sink.
刻晴では、靴のヒールを表現するために、シンプルな単一のTTFのカドを、大小2つのカドに分割するものを適用した。
To express the tip of the heels of Keqing's shoes, I applied the one that divides a TTF into two different size of flaps.
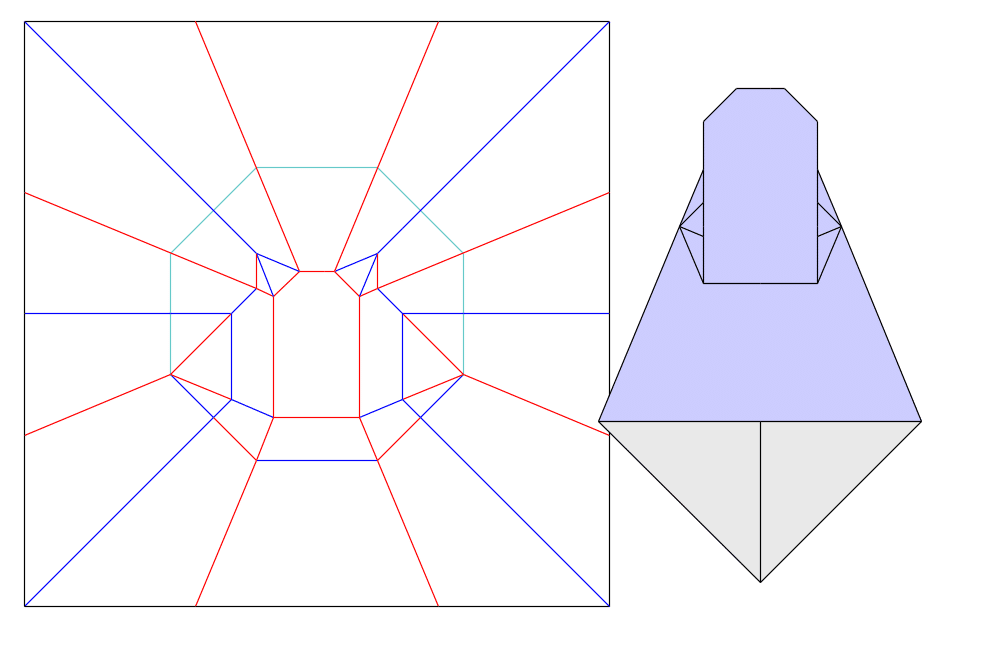
I call this Morisue pattern.
ちなみにこのパターンの使い道は足先だけではなく、さらに加工を施すことでノコギリ状の小さな角を付与することができ、ドラゴンの牙などにも応用できる。
This pattern can be used not only for the tip of a leg but also for the jaws of a dragon.
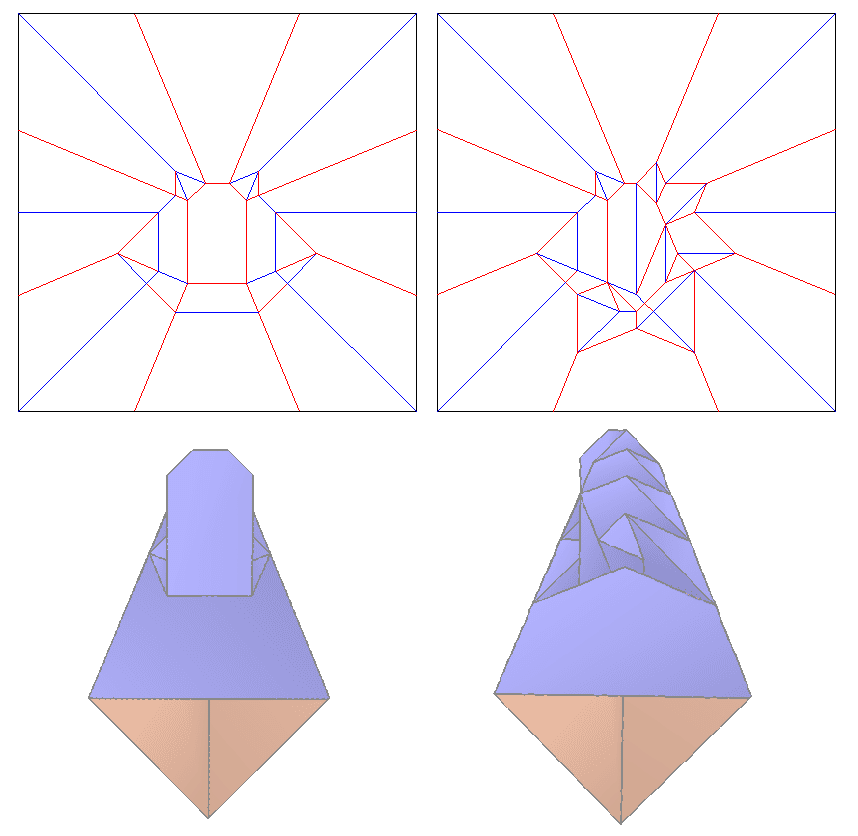
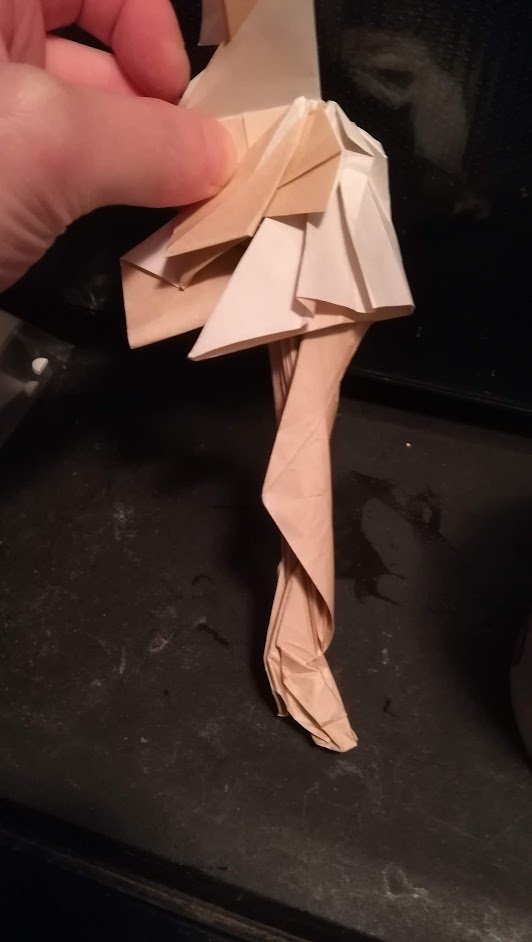
Partial test fold gor the skirt and the leg made on Feb. 9th.
Phase 7: Shaping
これにてペン入れは完了、展開図が決定する。できればこれで完成としたいものだが、目標が立体的である以上、展開図だけではそのデザインを表現できない。森末はこの「展開図にはどうしても落とし込めない折り筋」を「造形」と定義している。
Now we have settled the inks and the crease pattern is determined. Perhaps one wants to finish it here though, since the target itself is 3D, you can't express the model just by a flat foldable crease pattern. I define "shaping" as "the creases that can't be inked in a flat foldable crease pattern".
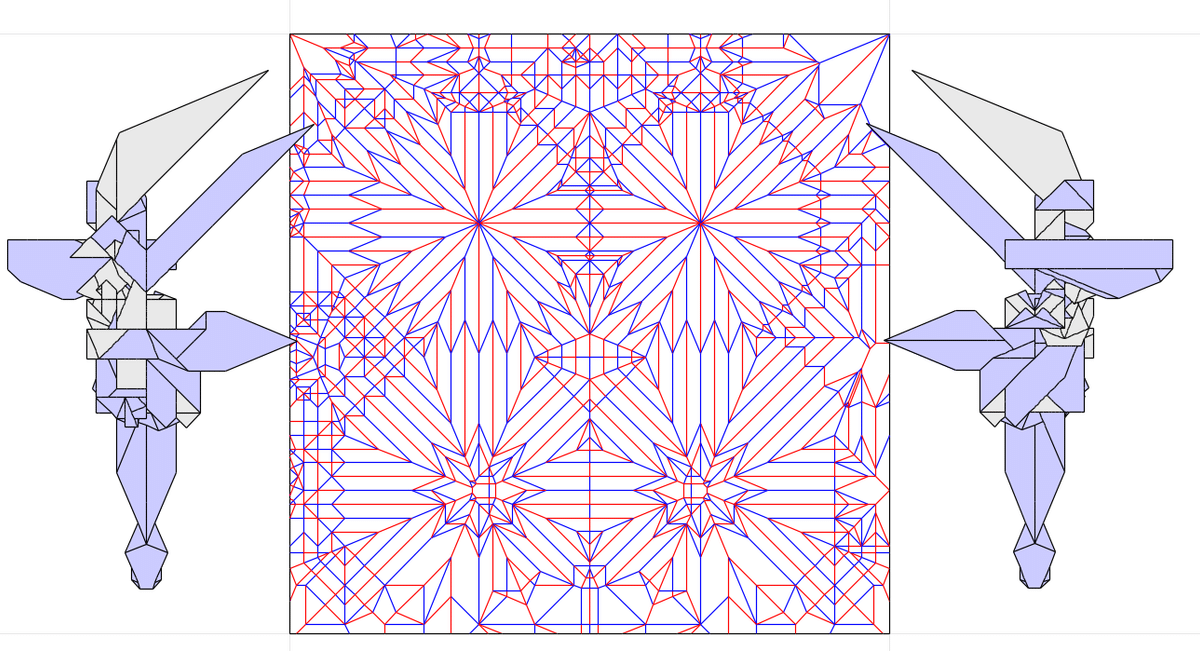
The final base = final crease pattern.
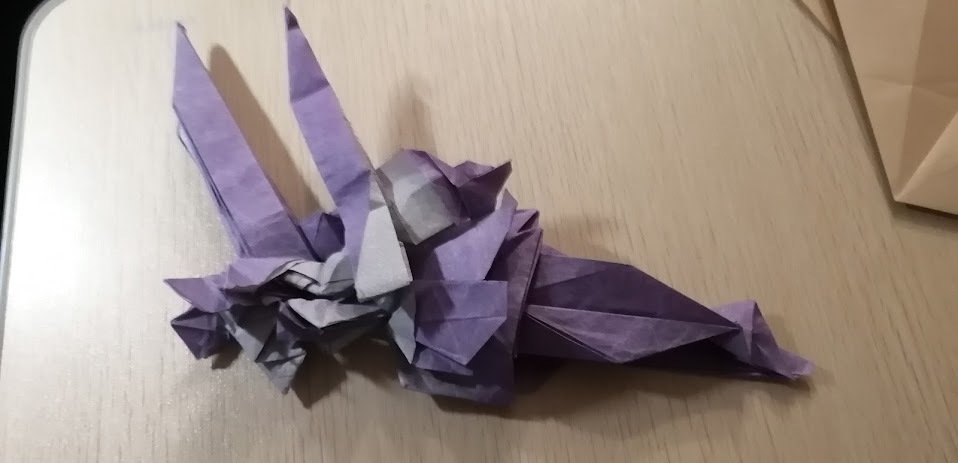
The base at the final phase made on Feb. 8th.
Posing
人物の造形で特有なのはポーズ付けができる点である。フェーズ4でボーンを使っていない場合はポーズ付けが難しく、簡素なポーズで完結させる場合が多い。
It is specific for shaping if a character to make a posture. Most of the cases where the bones are not used in the phase 4, making complicated posture is not easy and we tend to finish with a simple posture.
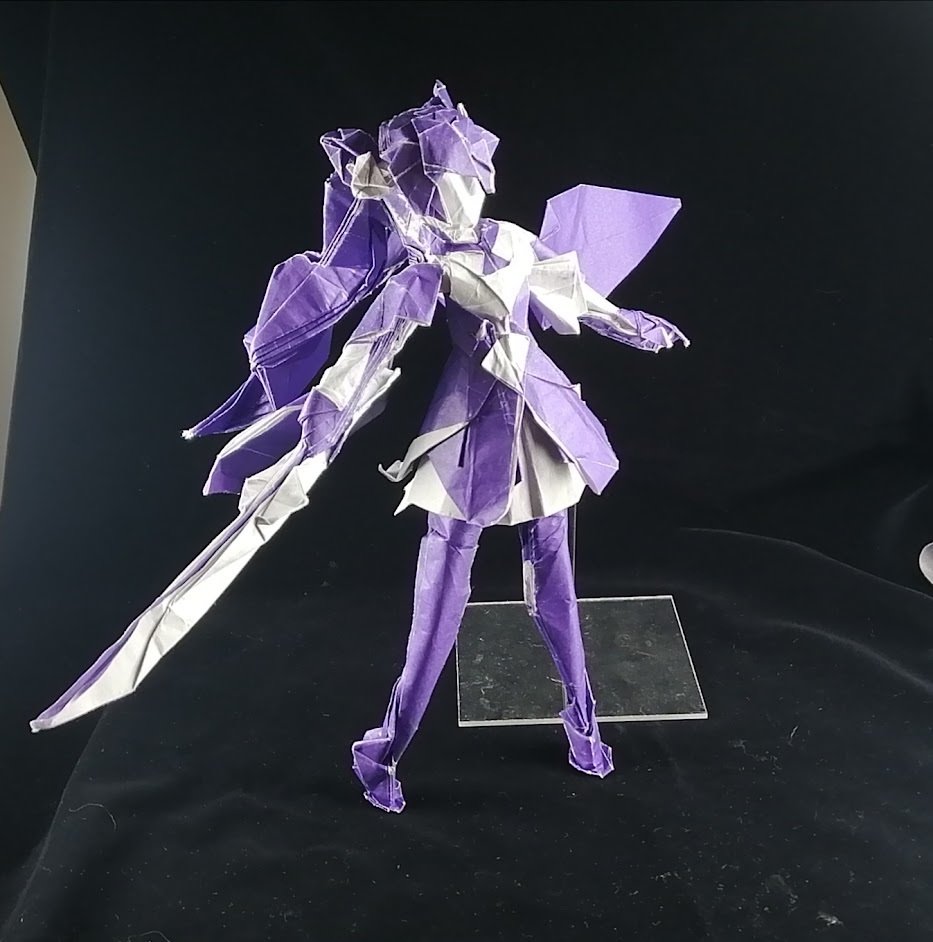
Keqing with simple posture.
今回はしっかりボーンを入れたので、ポーズもしっかりとる。フィギュアの造形よろしくどんなポーズをとるかは個人の感性の生かしどころなので、ここでは触れない。
Now this time we have bunch of bones, that can make any posture. As like shaping of a figure, we have to pour one's creativity for what kind of posture to apply, we don't argue about that point.
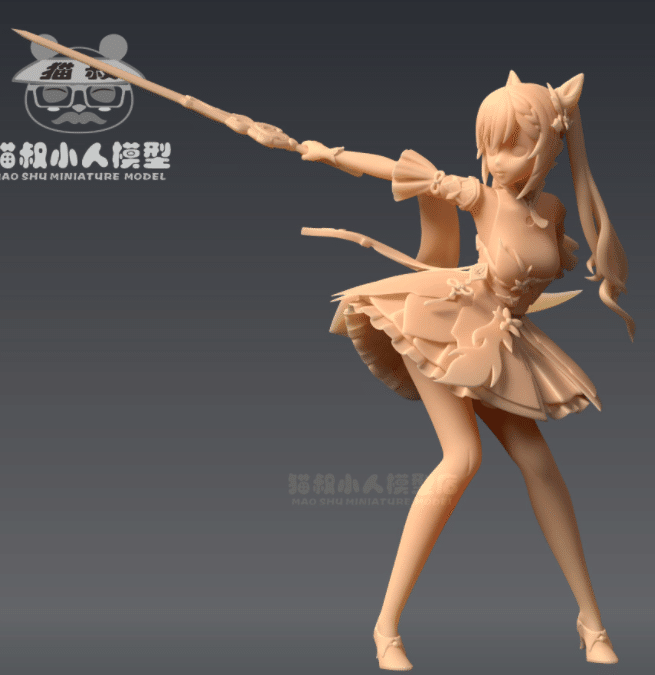
The posture that Obelisk asked me to do. It's cute.
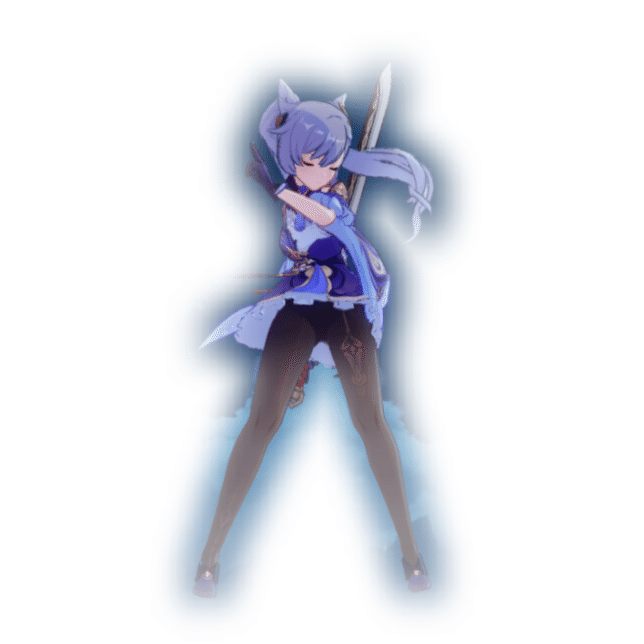
My posture plan. Bad ass.
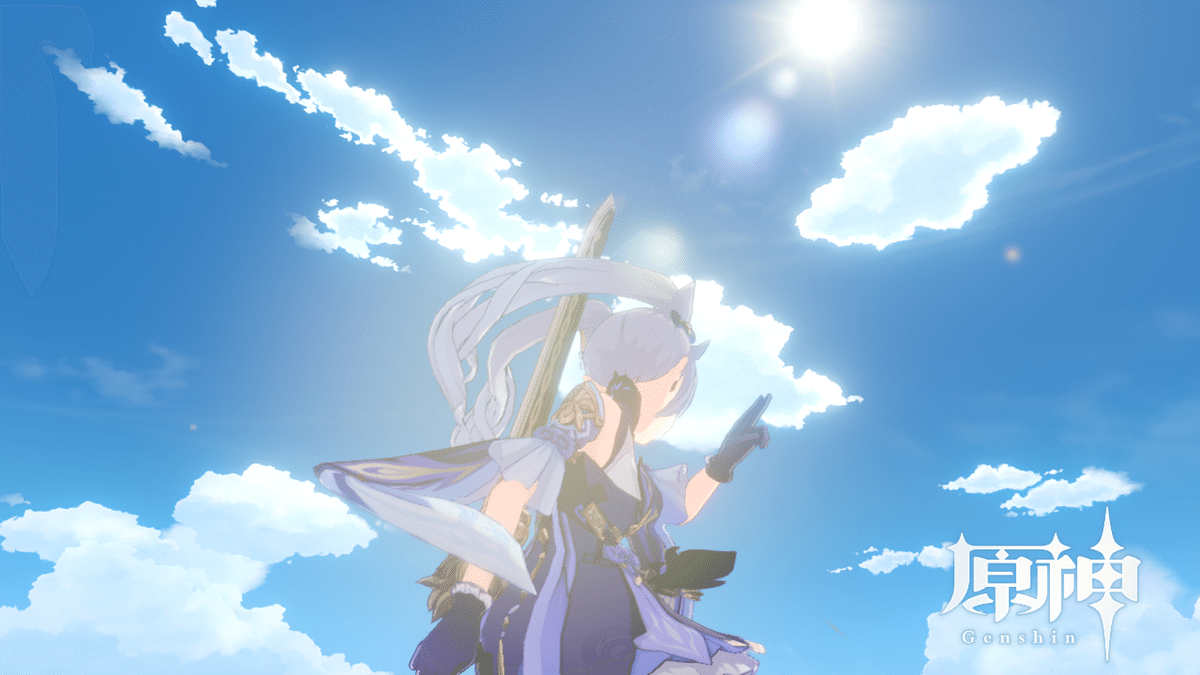
Bad ass from her back as well.
なんならObeliskはポーズに関して苦情(リクエスト?)を出すくらいで、個々の思うキャラクターの立ち姿は異なるということだ。
Specifically Obelisk complained (had a request?) about the posture that I were going to apply. It really differs that what kind of posture one thinks of for a character…
Posture and the Bones
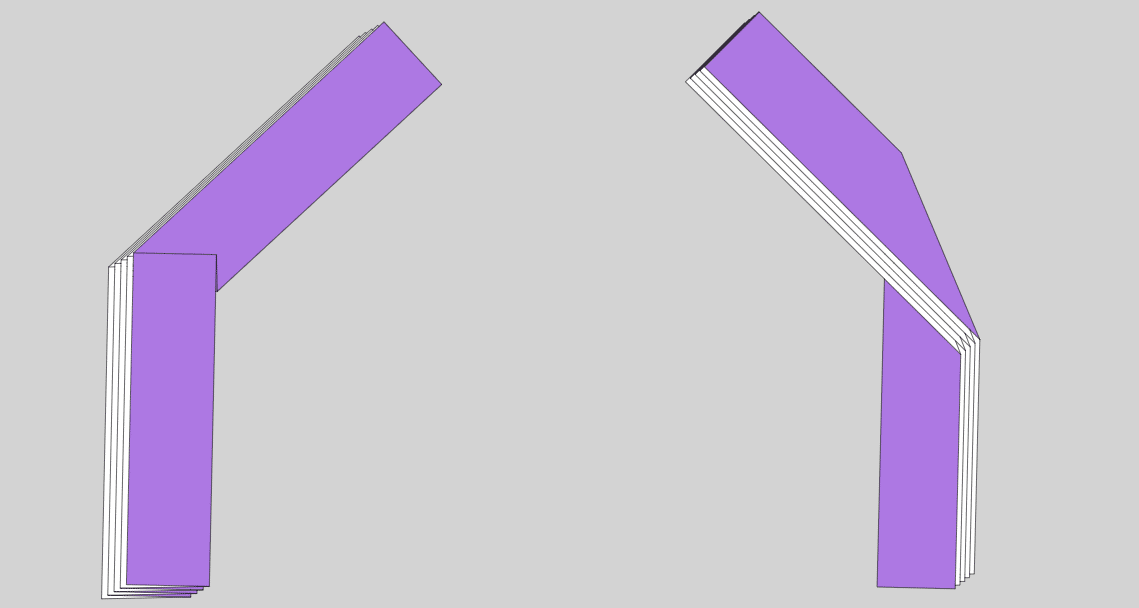
The bones are hidden, so we can apply any kinds of pleats on them.
さて、ボーンをポージングに活かすには2種類の道具さえあれば良い。段折りと捻りだ。
Here, we only have to apply two kinds of operations on the bones to make a posture: pleat and twisting.
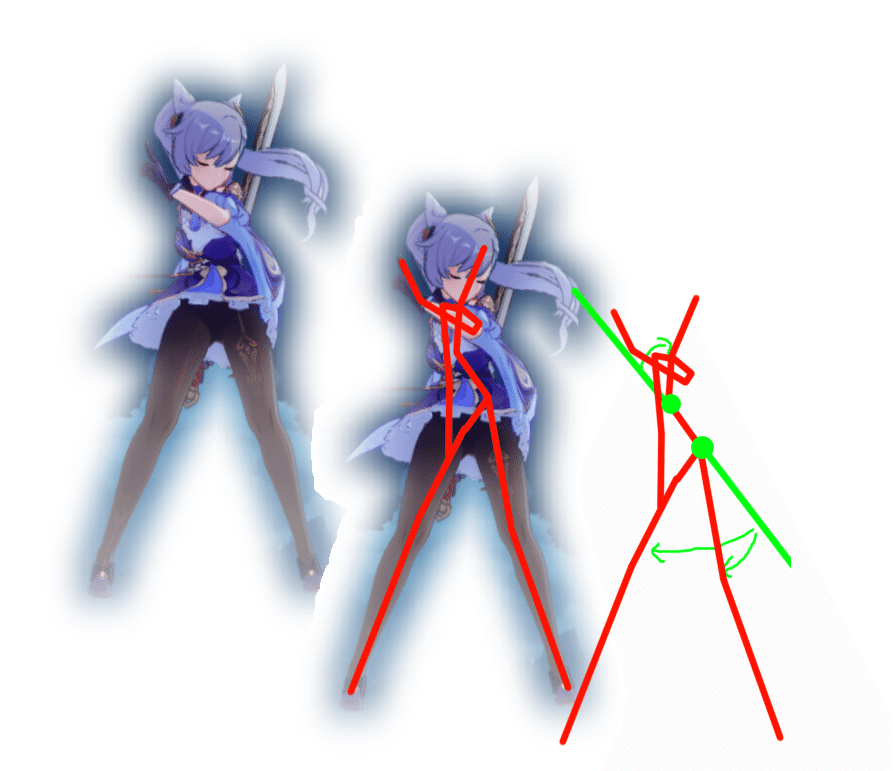
Observing the bones.
まずは立体的な観察力を用いてボーンの折れ曲がり方を抽出する。とくに緑のポイントで示した関節、上体と腰(トランク)の曲がり方をよく観察しよう。これらはボーンを用いない作品では弄る機会が少ないため、訓練が必要かもしれない。
Firstly we extract the kinks of the bones with 3D oriented observation. Especially we have to care about the green dots, the body and the trunk, which is not usually treated.
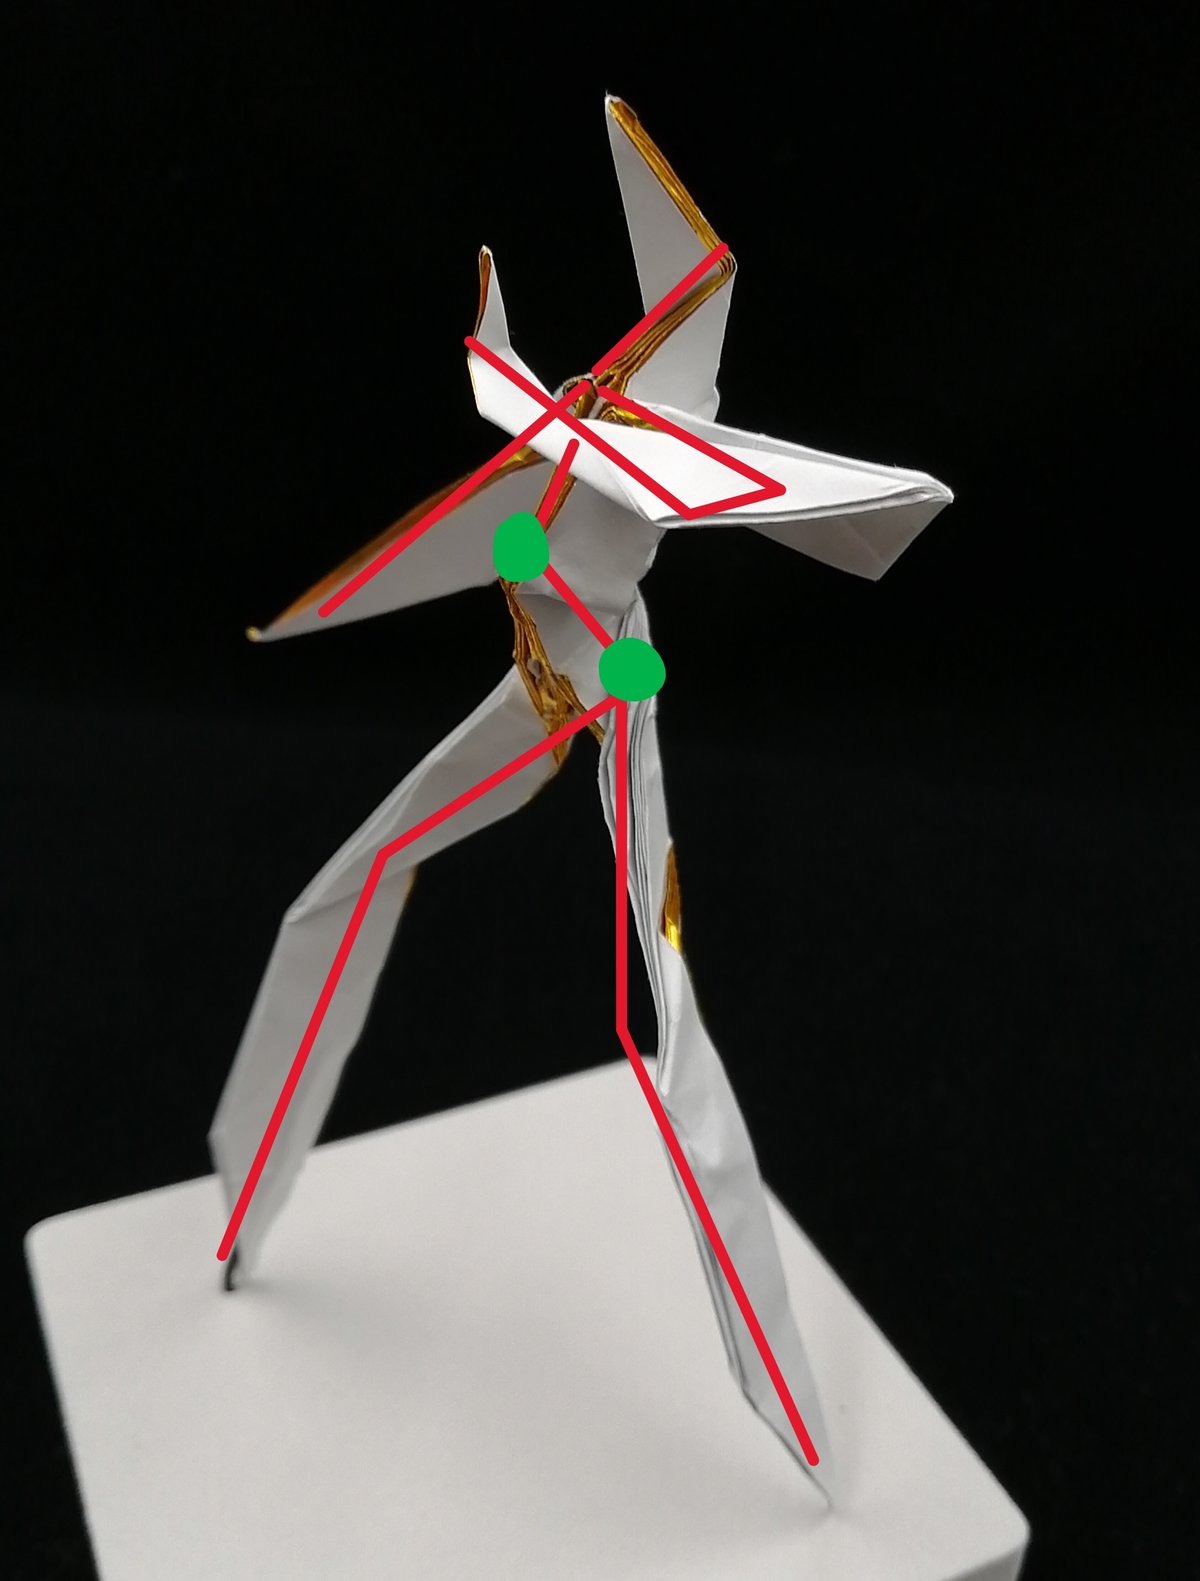
An example that shows the bones only.
よく観察するとこれらの関節は実際に前後方向に曲がることが多い。よって、作品を正面からだけ見てしまったり、ボーンを平面的に左右にだけ曲げて満足しないように注意しよう。
Those nodes are tend to be bent to the front/back. So we have to care not to observe the model only from the front side, also not to bend the bones to the right/left only.
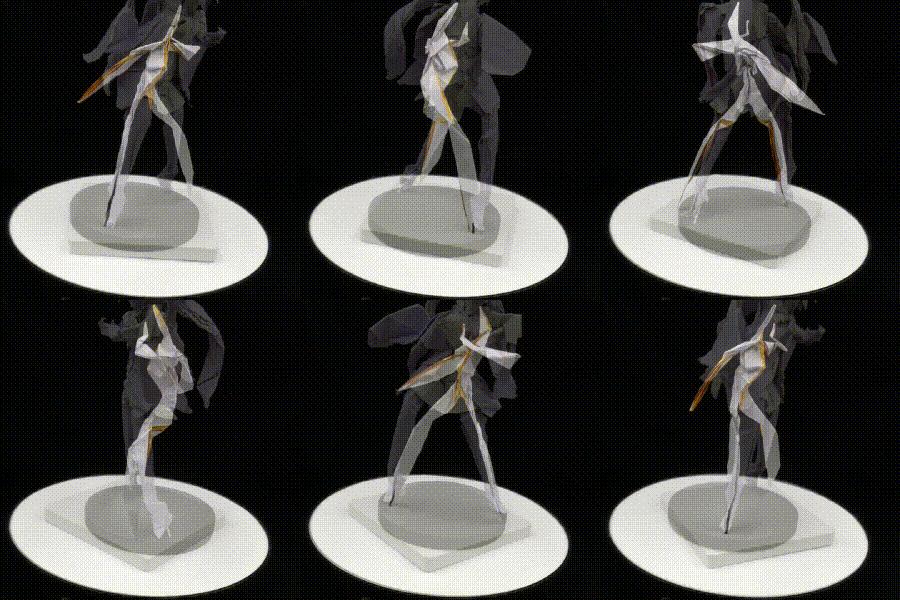
見ての通り、ボーンに関して言えば特に複雑な処理をする必要はない。段折りと捻じりが適切な箇所に適切な方向に働いていることさえ保証すればよい(それが意外と難しい)。
As you can see in terms of the bones, one doesn't have to process such complex operations on it. One just have to be careful about the pleats/twists are applied on proper place and making proper direction of a kink (still difficult to do it though).
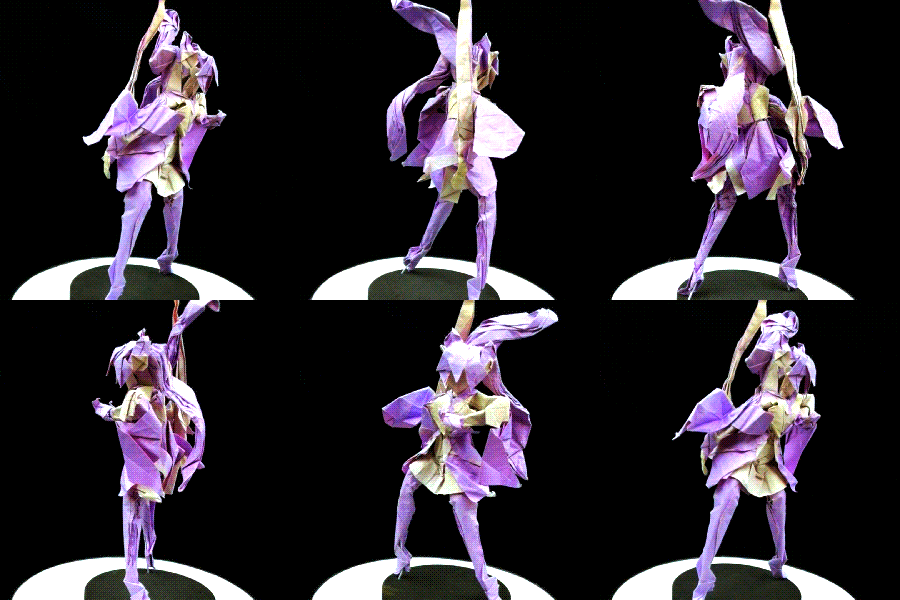
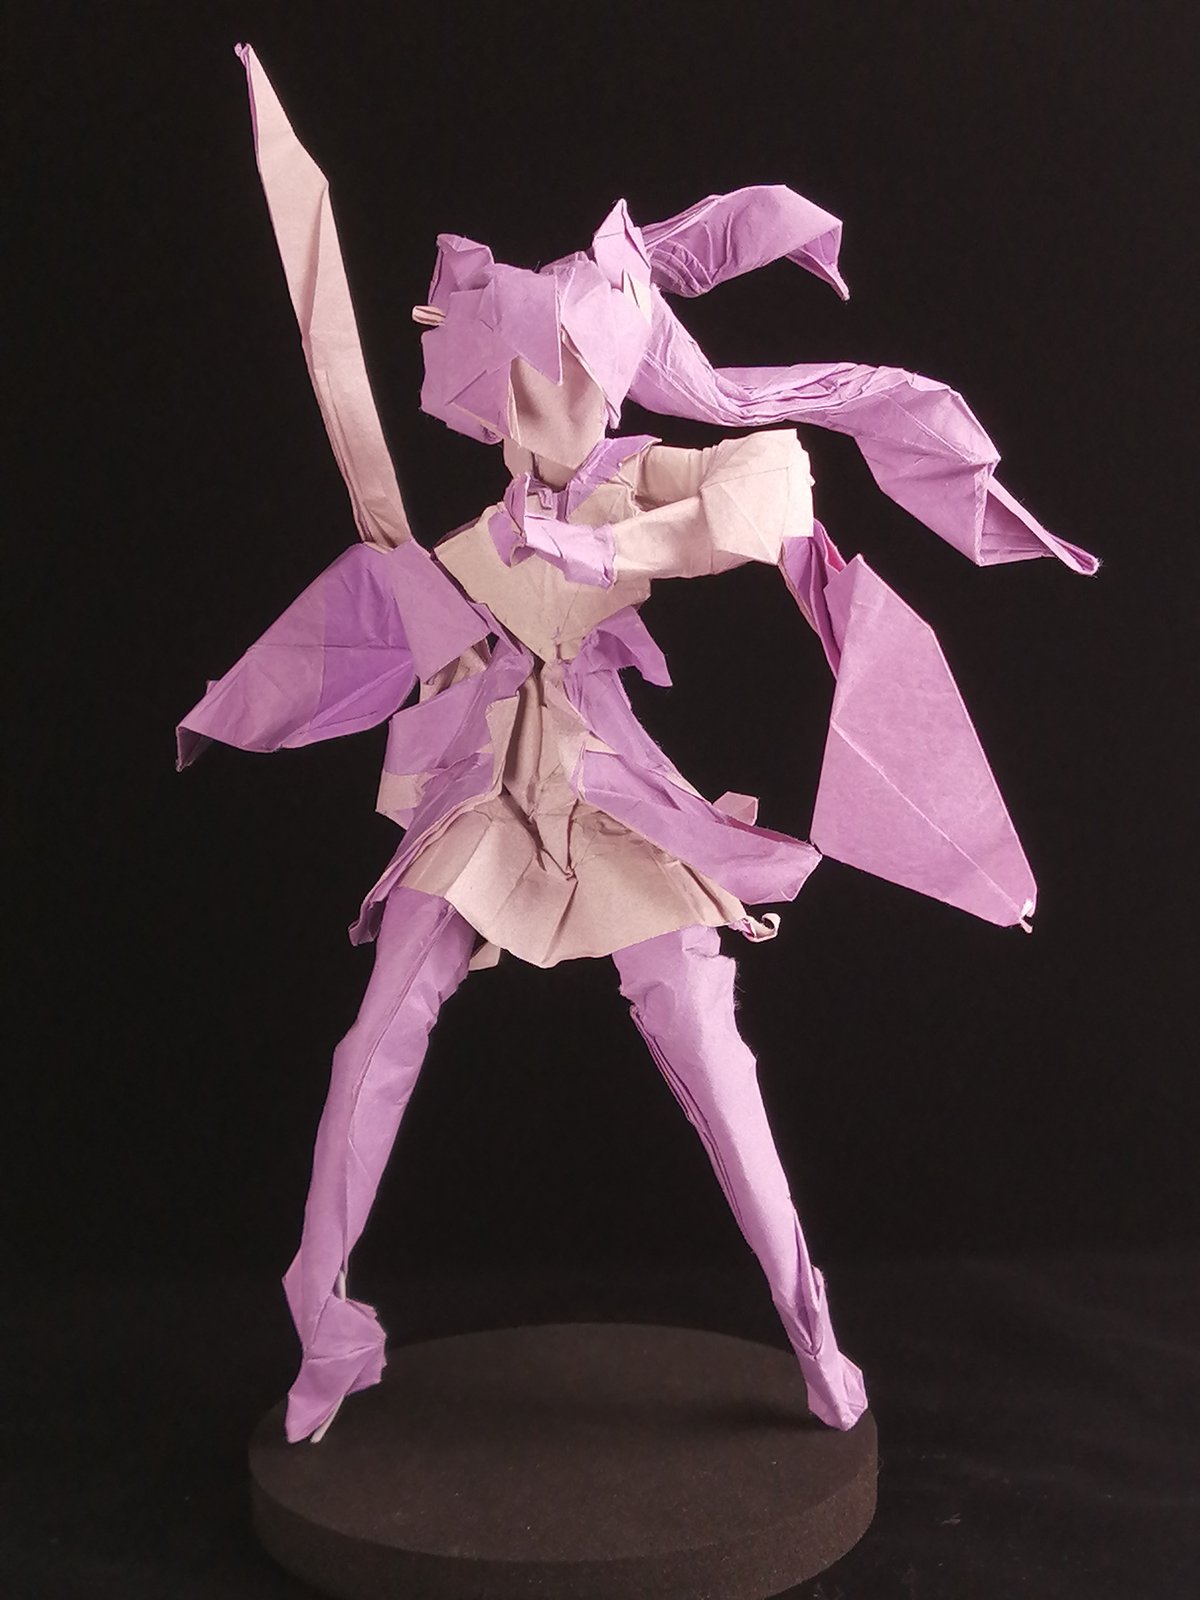
The results of the challenge
Keiqing
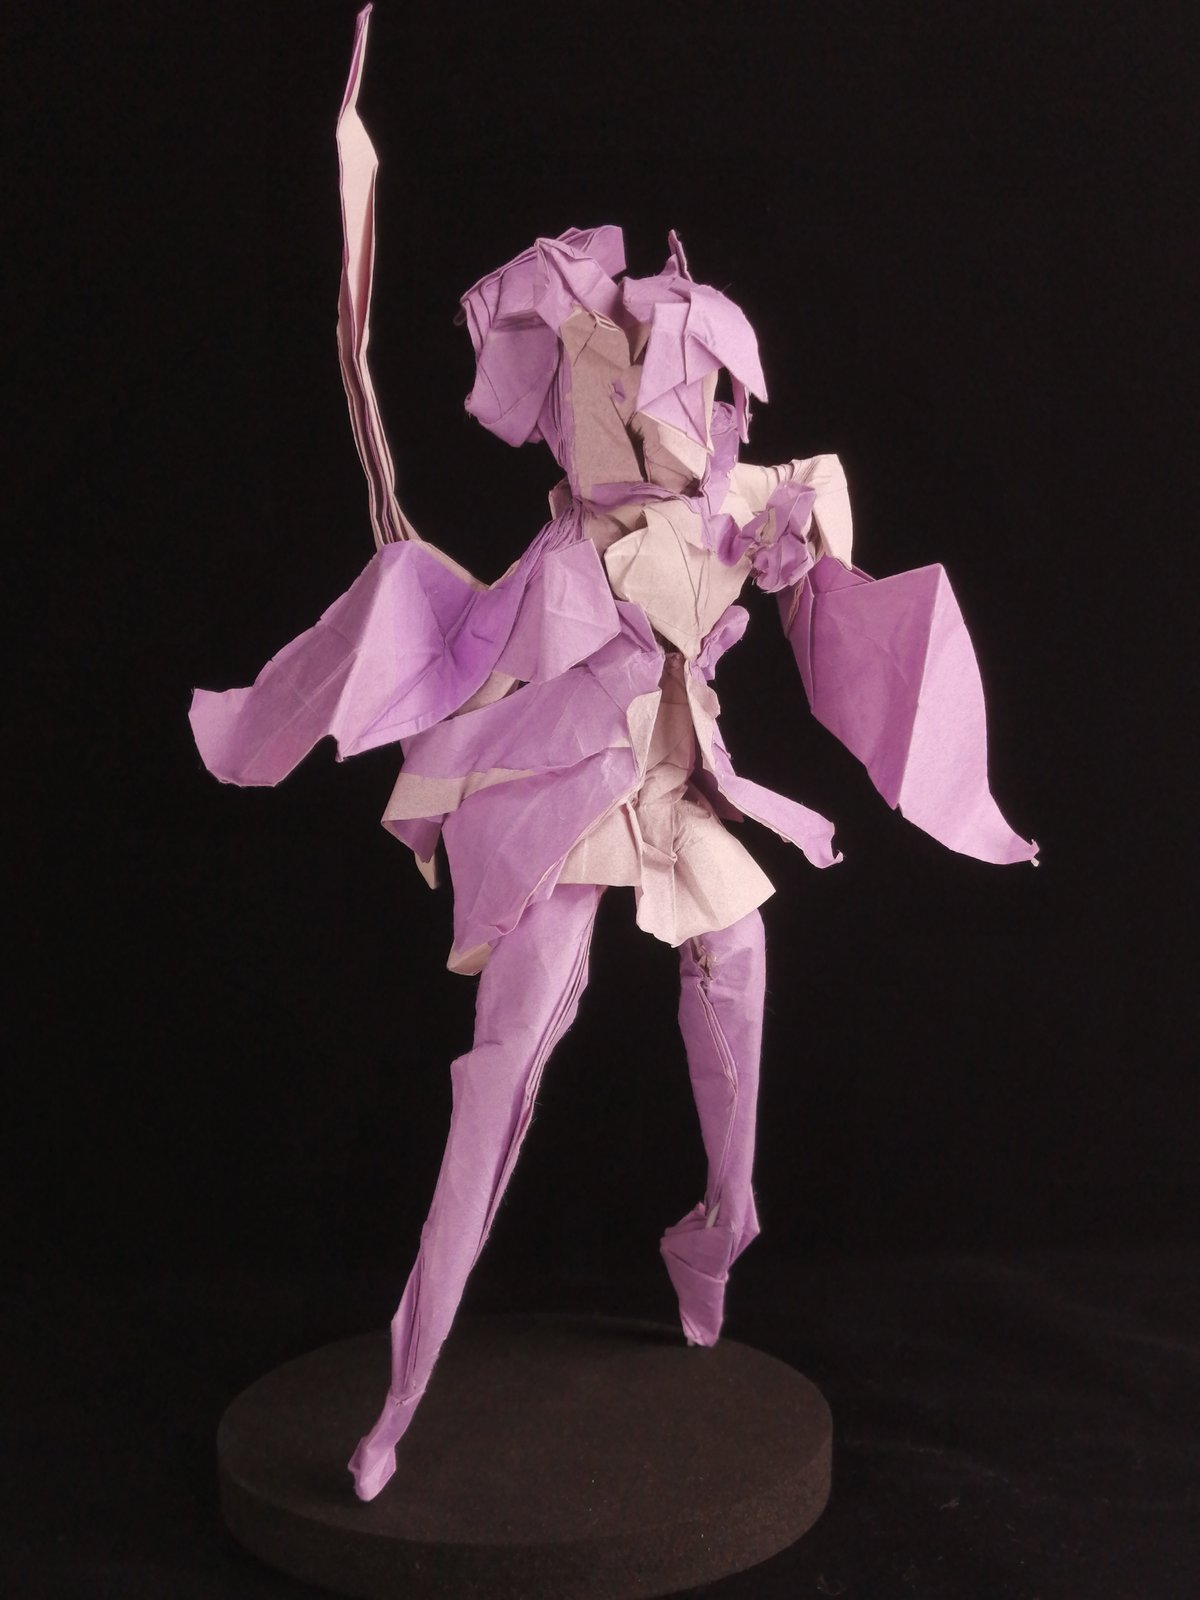
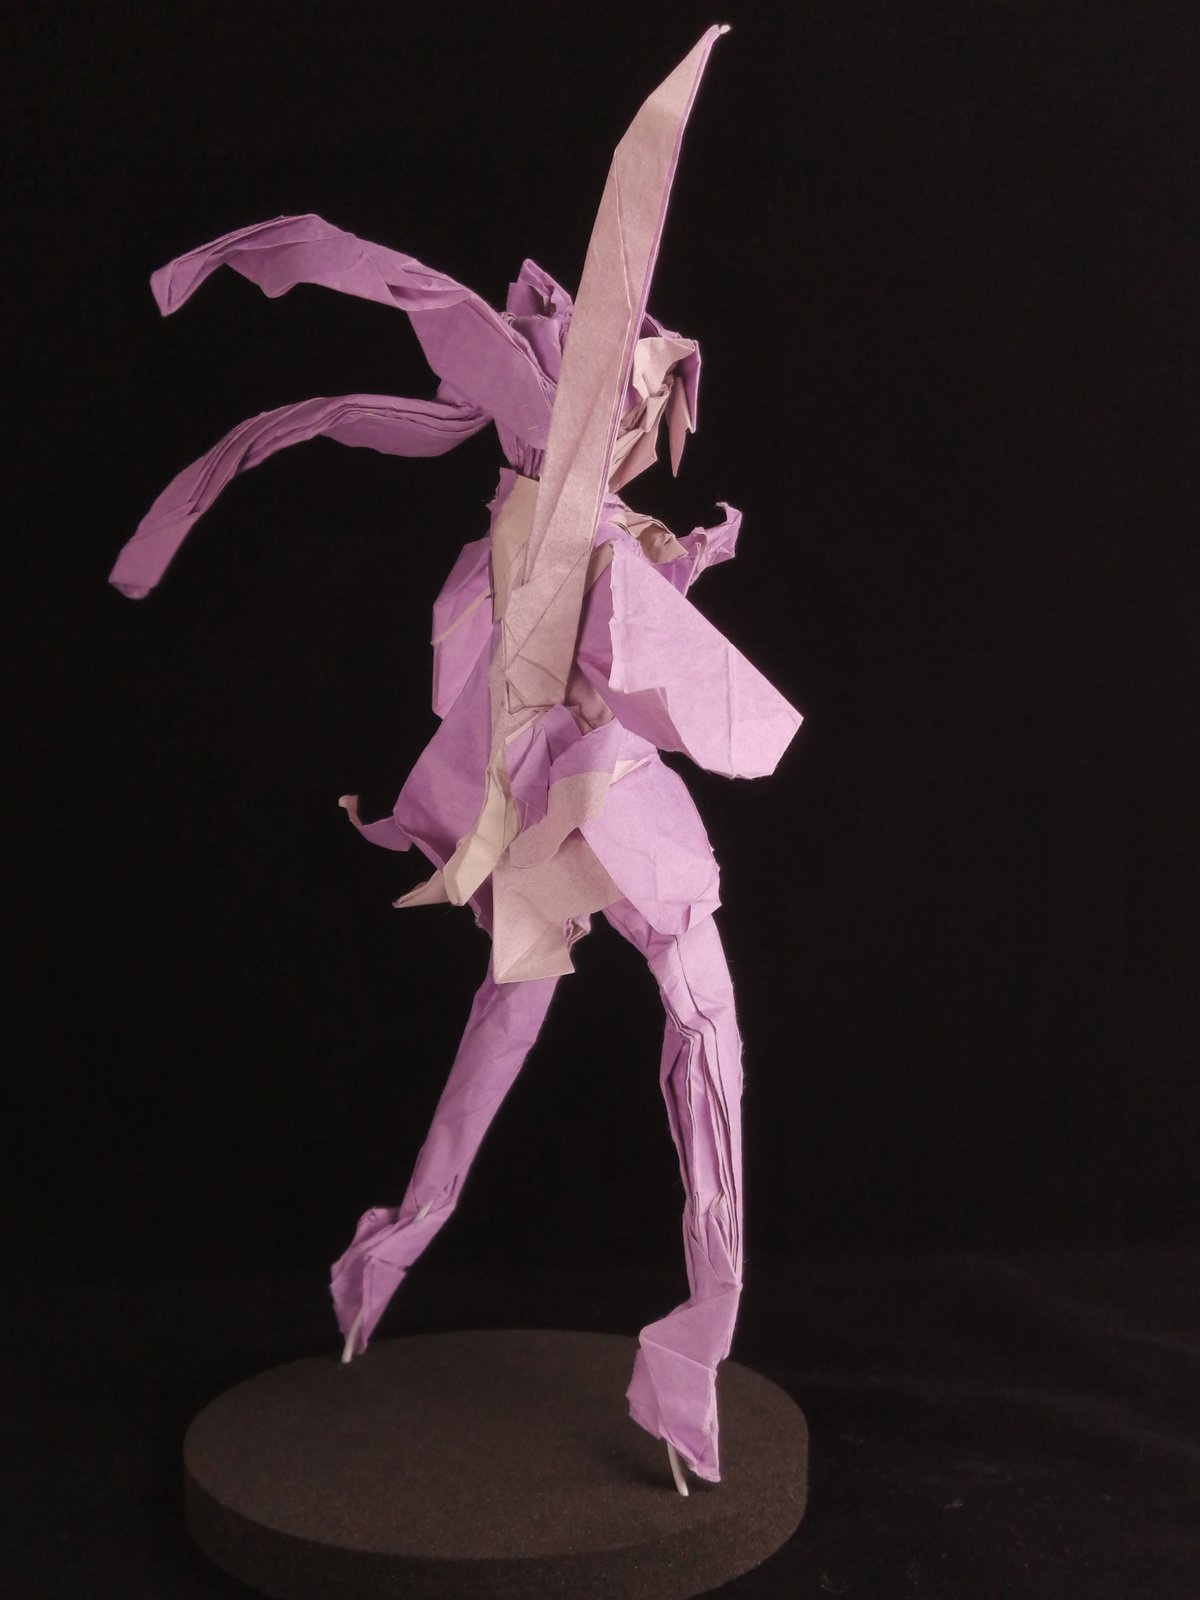
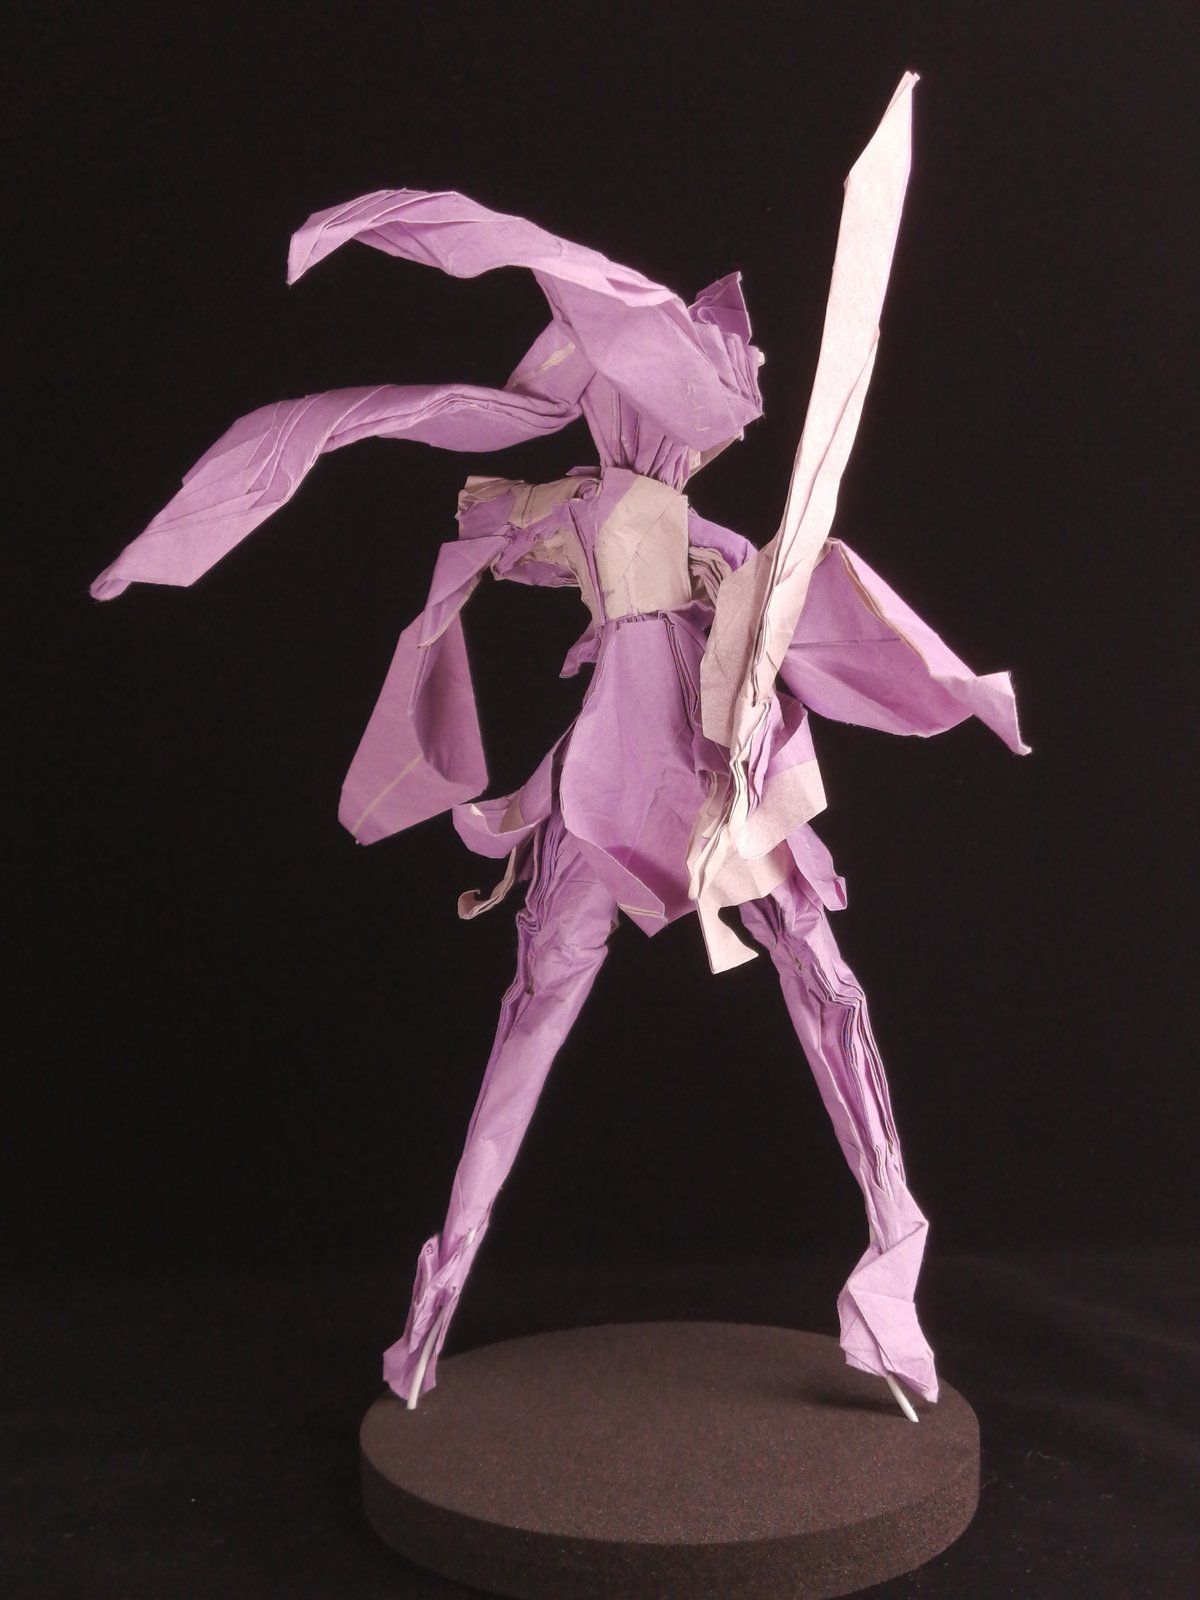
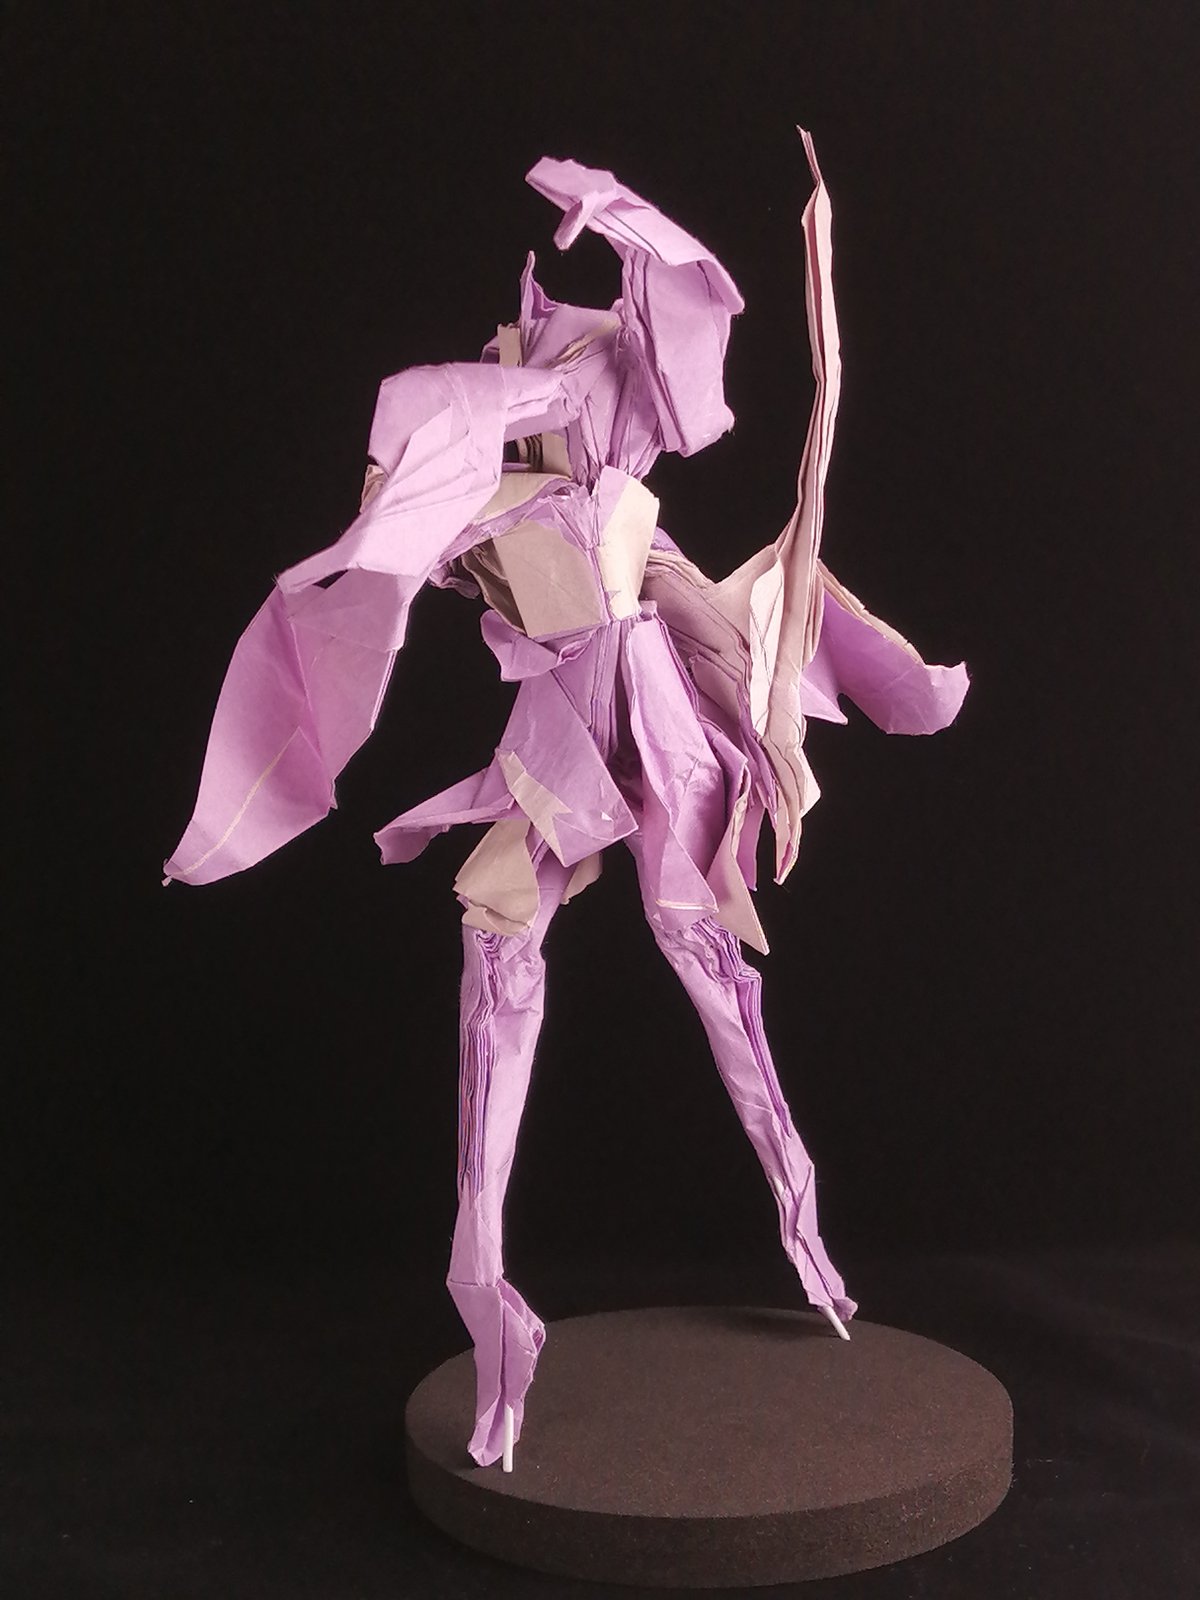
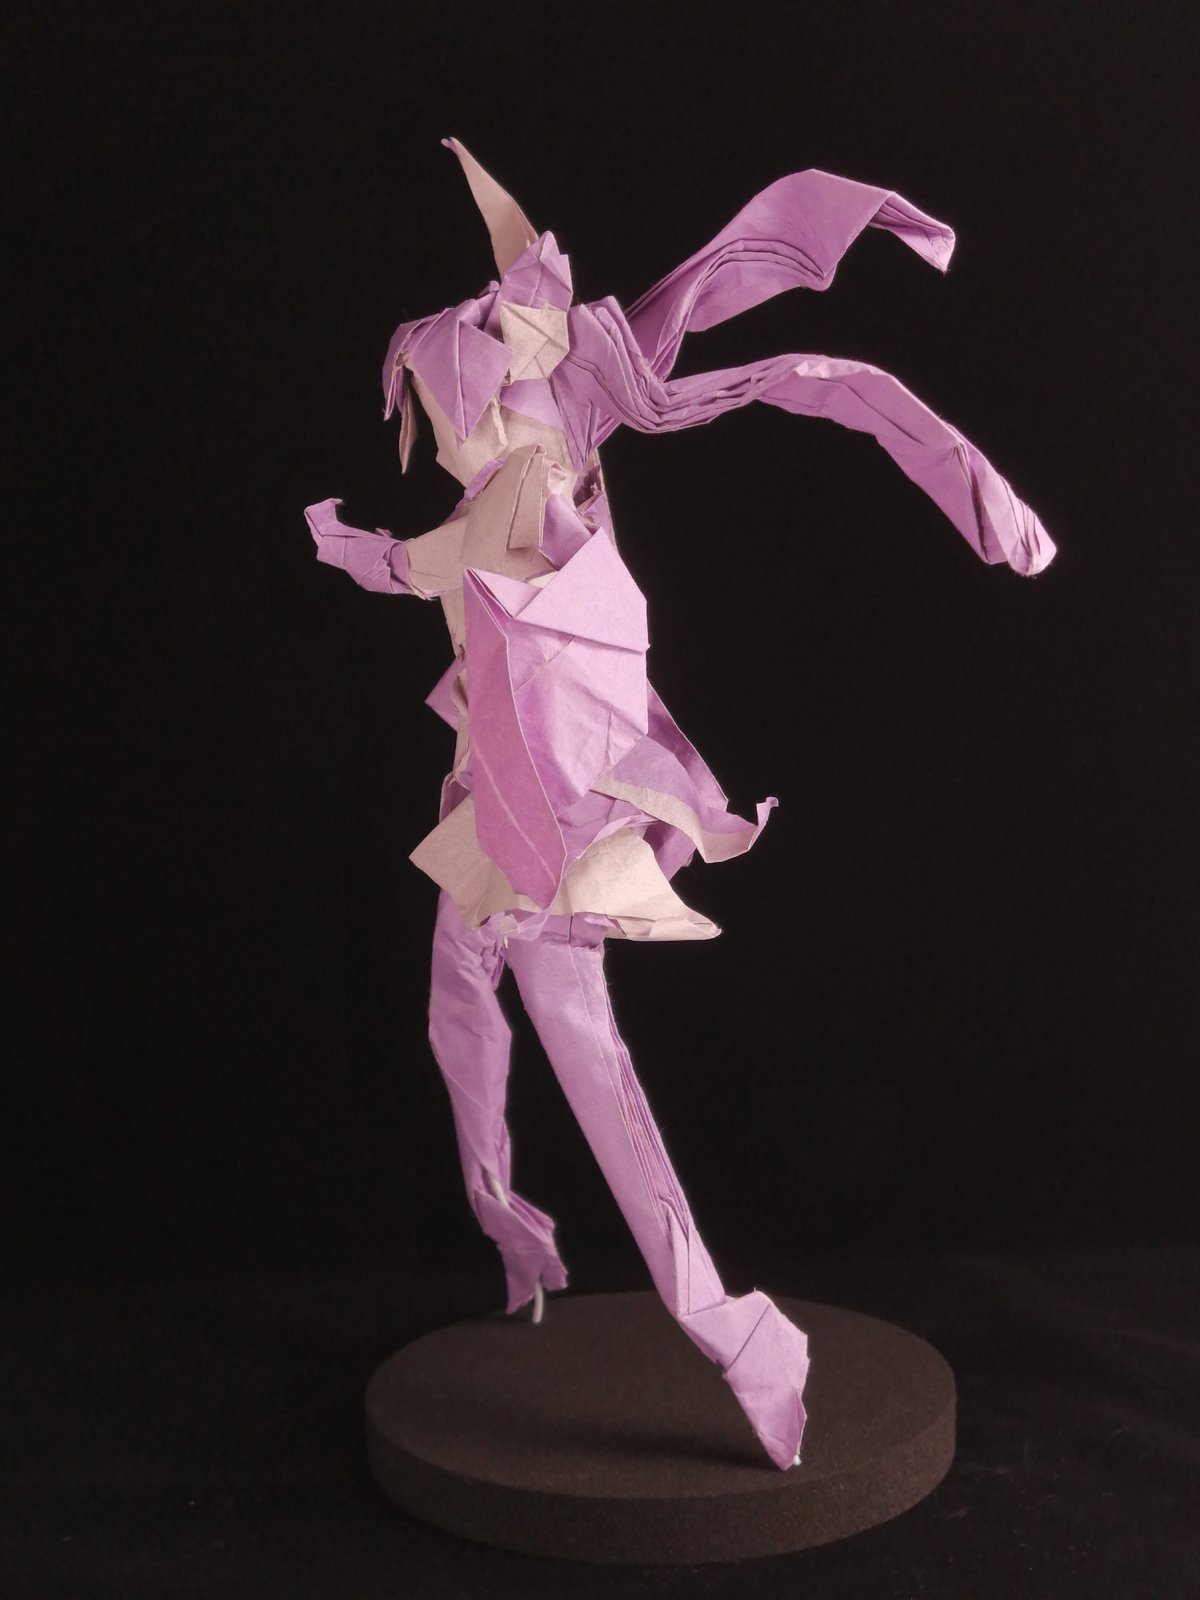
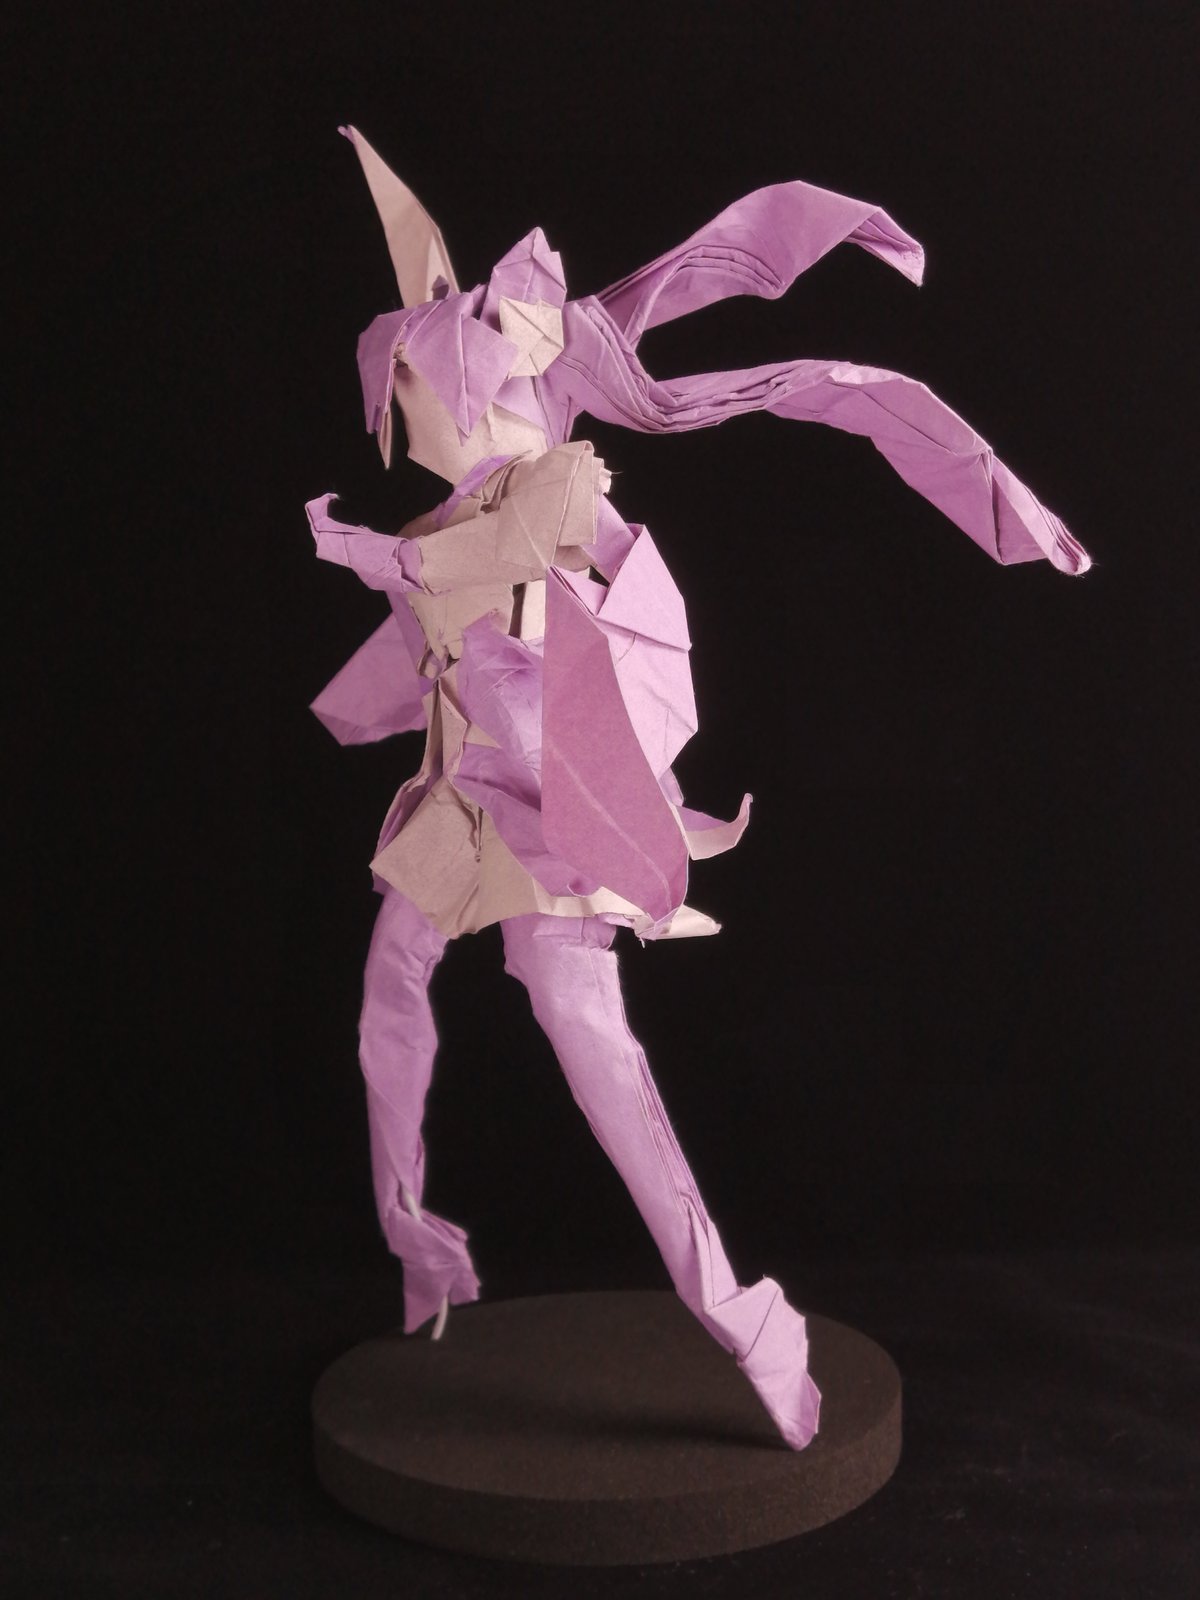
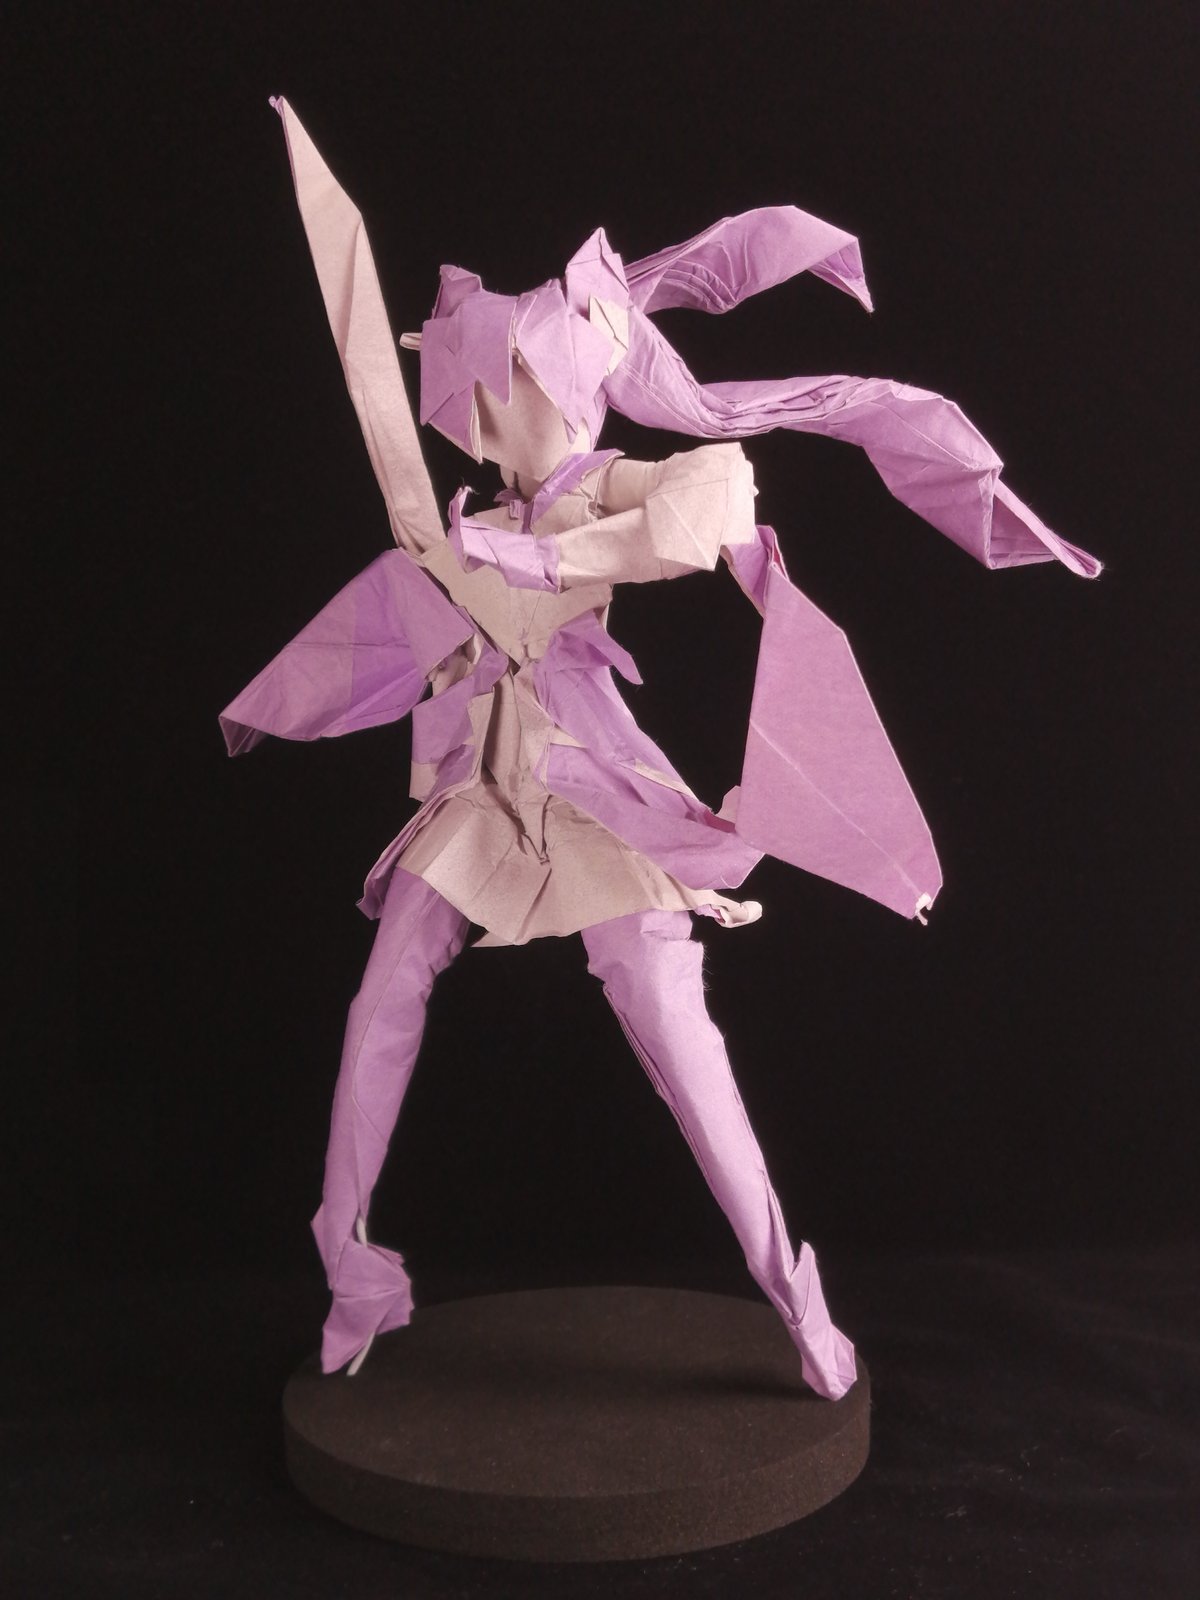
Imriqing
実質Keiqingと効率は同じだが、腕が長過ぎるなど、プロポーションの調節に苦労していた。
It's basically as efficient as Keiqing though, he was struggling with adjusting the proportions such like the length of the arms.
Kerrot
一着は彼。スタートも最後だったので、最速のチャレンジだったことになる。
He finished the challenge first despite he started the challenge at the last.
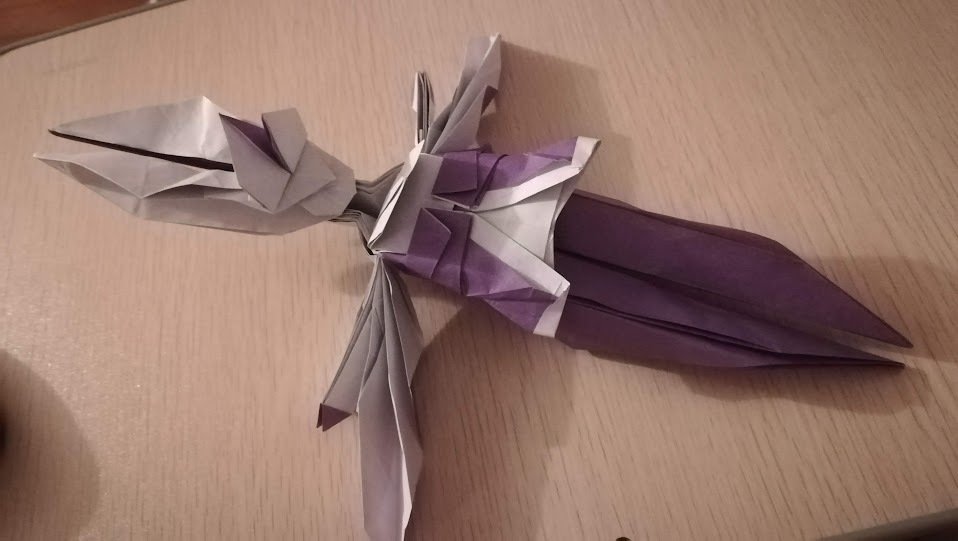
He had applied the most simple structure out of three results.
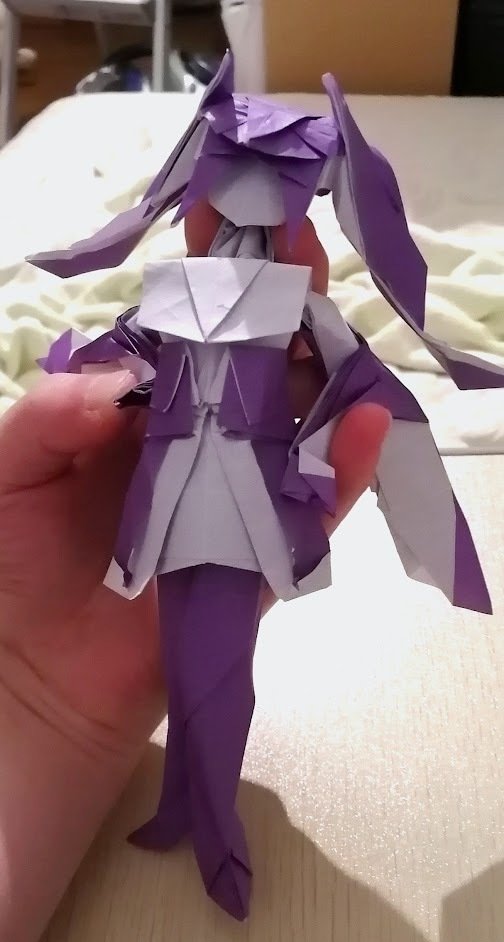
And I was interrupted by carrot because I had to experience how efficiently the model is constructed.
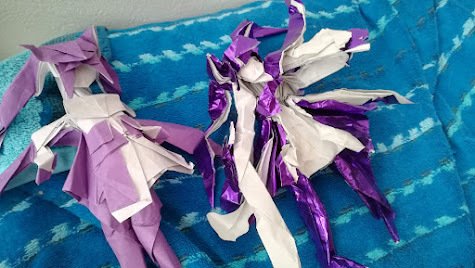
After finishing kerrot, I was like "huh why do I have to manage those complicated structure while carrot is saving his efforts in this way…"
