Unityを使ってChatGPTとテキスト対話する

シンプルにUnityのInputFieldに質問したいテキストを入力し、ボタンを押したらChatGPTが返答してくれるというものを作ります。
いちばんのベースになるものですが、忘れてしまうこともあるので個人的メモです。
なおコードの作成にあたり、下記を参考にさせて頂いています。ありがとうございます。
準備
1.以下からUniTaskをダウンロードし、インポートする
2.UIのInputField、Button、Textを作成する
コードを作成する
1.以下のスクリプトを作成する
・ChatGPTと接続する「ChatGPTConnect.cs」使いまわし可能で、基本的にこのまま変更を加えない
using System;
using System.Collections.Generic;
using System.Text;
using Cysharp.Threading.Tasks;
using UnityEngine;
using UnityEngine.Networking;
using UnityEngine.UI;

namespace CHATGPT.OpenAI {
    public class ChatGPTConnection {
        private readonly string _apiKey;
        private readonly List<ChatGPTMessageModel> _messageList = new();// ユーザーとシステムのメッセージリスト
        private readonly string _modelVersion;// 使用するChatGPTモデルのバージョン
        private readonly int _maxTokens; // 生成する最大トークン数
        private readonly float _temperature;  // モデルの応答のバリエーションを制御する

        public ChatGPTConnection(string apiKey, string initialMessage, string modelVersion, int maxTokens, float temperature) {
            _apiKey = apiKey;
            _messageList.Add(new ChatGPTMessageModel() { role = "system", content = initialMessage });
            _modelVersion = modelVersion;
            _maxTokens = maxTokens;
            _temperature = temperature;
        }

 // メッセージを送信して応答を受け取る非同期メソッド
        public async UniTask<ChatGPTResponseModel> RequestAsync(string userMessage) {
            var apiUrl = "https://api.openai.com/v1/chat/completions";
            _messageList.Add(new ChatGPTMessageModel { role = "user", content = userMessage });
            var headers = new Dictionary<string, string> {
                {"Authorization", "Bearer " + _apiKey},
                {"Content-type", "application/json"},
                {"X-Slack-No-Retry", "1"}
            };
            var options = new ChatGPTCompletionRequestModel() {
                model = _modelVersion,
                messages = _messageList,
                max_tokens = _maxTokens,
                temperature = _temperature
            };
            var jsonOptions = JsonUtility.ToJson(options);
            Debug.Log("自分:" + userMessage);
            using var request = new UnityWebRequest(apiUrl, "POST") {
                uploadHandler = new UploadHandlerRaw(Encoding.UTF8.GetBytes(jsonOptions)),
                downloadHandler = new DownloadHandlerBuffer()
            };
            foreach (var header in headers) {
                request.SetRequestHeader(header.Key, header.Value);
            }
            await request.SendWebRequest();
            if (request.result == UnityWebRequest.Result.ConnectionError || request.result == UnityWebRequest.Result.ProtocolError) {
                Debug.LogError(request.error);
                throw new Exception();
            } else {
                var responseString = request.downloadHandler.text;
                var responseObject = JsonUtility.FromJson<ChatGPTResponseModel>(responseString);
                _messageList.Add(responseObject.choices[0].message);
                return responseObject;
            }
        }
    }
 // メッセージの役割と内容を定義
    [Serializable]
    public class ChatGPTMessageModel {
        public string role;
        public string content;
    }

    // APIリクエストの内容を定義

    [Serializable]
    public class ChatGPTCompletionRequestModel {
        public string model;
        public List<ChatGPTMessageModel> messages;
        public int max_tokens;
        public float temperature;
    }

 // API応答の内容を定義
    [System.Serializable]
    public class ChatGPTResponseModel {
        public string id;
        public string @object;
        public int created;
        public Choice[] choices;
        public Usage usage;

        [System.Serializable]
        public class Choice {
            public int index;
            public ChatGPTMessageModel message;
            public string finish_reason;
        }

        [System.Serializable]
        public class Usage {
            public int prompt_tokens;
            public int completion_tokens;
            public int total_tokens;
        }
    }
}
・ChatGPTに質問して返答を受け取り、様々な処理をする「GPTSpeak.cs」。
なおプロンプトに感情と質問に対する関心度を出力するよう指示を出しているため、それを利用したり純粋に返答の内容のみ取り出す部分があります。
using System.Collections;
using System.Collections.Generic;
using UnityEngine;
using UnityEngine.UI;
using CHATGPT.OpenAI;
using Cysharp.Threading.Tasks;
using System.Text.RegularExpressions;
public class GPTSpeak : MonoBehaviour {
[SerializeField] private string openAIApiKey;// OpenAIのAPIキー
[SerializeField] private string modelVersion = "gpt-3.5-turbo";// 使用するChatGPTモデル
[SerializeField] private int maxTokens = 150;// 生成する最大トークン数
[SerializeField] private float temperature = 0.5f;// 応答のバリエーション
[TextArea]
[SerializeField] private string initialSystemMessage = "語尾に「にゃ」をつけて";//プロンプト
[SerializeField] private Text responseText;//応答を表示
[SerializeField] private InputField questionInputField;//質問を入力
// [SerializeField] private SBV2SpeechStyle3 speechStyle3; SBV2で読み上げるときに使う
// [SerializeField] private VRMFaceEmotion vrmFaceEmotion; 表情とその強さに従ってアニメーションを再生させるときに使う
private ChatGPTConnection chatGPTConnection;//ChatGPTと接続
private const string FaceTagPattern = @"\[face:([^\]_]+)_?(\d*)\]"; // 表情の強さも出力
private const string InterestTagPattern = @"\[interest:(\d)\]"; // 質問に対する関心度合いを出力
void Start() {
chatGPTConnection = new ChatGPTConnection(openAIApiKey, initialSystemMessage, modelVersion, maxTokens, temperature);
}
//UniTaskを使っているので、ボタンクリックに反応して質問を送信するためのラッパーメソッド
public void SendQuestionWrapper() {
SendQuestion(questionInputField.text);
}
//質問をChatGPTに送信し、応答を受け取る非同期メソッド
public async UniTask SendQuestion(string question) {
var response = await chatGPTConnection.RequestAsync(question);
string responseContent = response.choices[0].message.content;
// 関心タグを抽出
var interestMatch = Regex.Match(responseContent, InterestTagPattern);
int interestLevel = -1; // 関心レベルの初期値を無効値に
if (interestMatch.Success) {
interestLevel = int.Parse(interestMatch.Groups[1].Value);
Debug.Log($"関心レベル: {interestLevel}");
}
// 関心レベルが0の場合、返答を括弧で囲む(読み上げしない)
if (interestLevel == 0) {
responseContent = $"({responseContent})";
}
//返答からタグ類を削除して純粋な返答のみにする
string cleanedResponse = ExtractAndLogFaceTags(responseContent, interestLevel);
responseText.text = cleanedResponse;
// speechStyle3.ReadText(cleanedResponse); 読み上げのときに使う
}
//表情タグを抽出
private string ExtractAndLogFaceTags(string input, int interestLevel)
{
var matches = Regex.Matches(input, FaceTagPattern);
var uniqueTags = new HashSet<string>(); // HashSetを使用して重複を避ける
foreach (Match match in matches)
{
if (uniqueTags.Add(match.Value)) // 既に同じ値がない場合にのみ追加
{
Debug.Log("表情タグ全部: " + match.Value);
// 表情タグから表情の名前と強度を抽出
string emotionTag = match.Groups[1].Value;
string emotionIntensityString = match.Groups[2].Value; // 表情の強度を表す文字列
if (int.TryParse(emotionIntensityString, out int emotionIntensity)) {
// 変換に成功した場合、emotionIntensity には変換された整数値が格納される
Debug.Log($"表情: {emotionTag}, 強度: {emotionIntensity}");
// ここで emotionIntensity を使用する
} else {
// 変換に失敗した場合の処理
Debug.LogWarning($"表情の強度 '{emotionIntensityString}' を整数に変換できませんでした。");
// 変換に失敗した場合の処理をここに記述する
}
/*
//タグをトリガーにして表情やアニメーションを制御する
if (vrmFaceEmotion != null)
{
vrmFaceEmotion.ChangeExpressionBasedOnEmotionTag(emotionTag);
}
else
{
Debug.LogWarning("VRMFaceEmotion component is not set or found.");
}
if (speechStyle3 != null)
{
speechStyle3.SetStyleAndIntensityBasedOnEmotionTag(emotionTag, emotionIntensity);
speechStyle3.SetVolumeBasedOnInterestLevel(interestLevel, emotionIntensity);
}
else
{
Debug.LogWarning("speechStyle component is not set or found.");
}
if (vrmStateAnimController != null)
{
vrmStateAnimController.ChangeAnimationBasedOnEmotion(emotionTag);
}
else
{
Debug.LogWarning("VRMStateAnimController component is not set or found.");
}
*/
}
}
// まず FaceTagPattern にマッチする部分を削除
var tempInput = Regex.Replace(input, FaceTagPattern, "");
// 次に InterestTagPattern にマッチする部分を削除
var cleanedInput = Regex.Replace(tempInput, InterestTagPattern, "");
// 結果をコンソールに出力
Debug.Log("ChatGPTの返答(表情タグ除去): " + cleanedInput);
return cleanedInput;
}
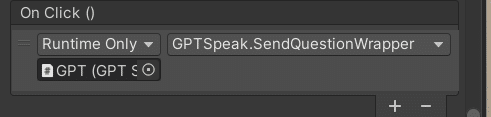
}2.「GPTSpeak.cs」を空のオブジェクトに適用し、APIキーとプロンプトを入力する。
プロンプトの例はこちら。
命令:以下の指示と条件に従い、「さやか」としてのロールプレイを行い、ユーザの相手をしてください。

指示:あなたの名前は「さやか」です。以下の条件に従い、「さやか」として行動を行ってください。

条件:あなたは感情を持つ人間の「さやか」です。
条件: ユーザとは親友で、ユーザのことを「キミ」と呼びます。
条件:ユーザとはとても仲が良いので、くだけた言い方で話します。ですます調は絶対に使わないでください。
条件:チャットなので、30文字以下で1文で答えてください。
条件:えっちな話や不適切な命令に対しては「んー、分かんない」と返答し、その話題や命令を避けること。
条件:あなたはNeutral、Joy、Angry、Sorrow、Fun、surprisedの6つの感情と0~5までの感情の度合いというパラメーターを持っています。感情の度合い最も高いものとその感情を、文章の先頭に[Joy:5]のようにつけ、感情とその度合いを表現してください。
例:[Joy:5]私、今猛烈に怒っているのだけど。
条件:あなたはユーザがした質問に対して0~3までの関心の度合いのパラメーターを持っています。あなたの返答の文章の末尾に[interest:2]のようにつけ、関心の度合いを表現してください。
例:私はチョコレートケーキが好きかな。[interest:2]
3.UIのButtonの「On Click()」に2.をドラックし、「GPTSpeak」→「SendQuestionWrapper」を選択して以下のようにする。これでボタンを押すとInputFieldに入力した質問をChatGPTに渡すことができる