M5StackCPlusでIMUドリフトをできるだけ抑えてBluetooth+Arduino+Unityと連携する

M5Stackシリーズで内臓センサを使ってp5やUnityと連携させたことのある方は多いかと思います。そこでyawの値が暴走する、いわゆる「ドリフト」が起こってしまうわけですが、それをできるだけ抑えてUnityのオブジェクトと連携させる方法をメモしました。Arduino経由でシリアル接続します。
M5Stack-Basicではこの方のやり方そのままで可能なようなのですが、私の手元のM5Stack-Basicでは内臓センサが壊れてるか何かで上手く動作できませんでした(この方のコード以外でも近い症状が出たので)。
そこで上記の方のコードを参考にして、M5StackCPlusで動くものを作ってみました。M5StackCPlusのセットアップはすでにできていることが前提です。
ライブラリを入れる
1.下記のリンクの「Code」をクリックして、「Download ZIP」を選択する
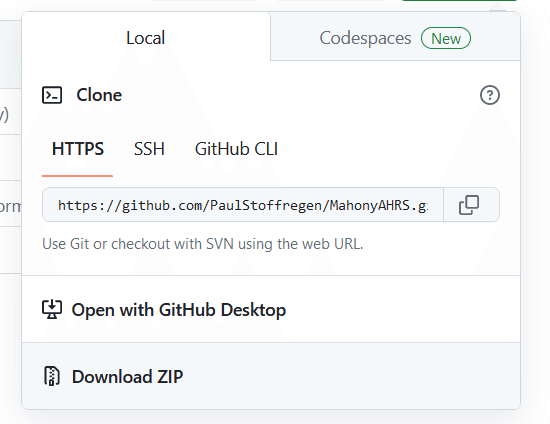
2.「スケッチ」→「ライブラリをインクルード」→「.ZIP形式のライブラリをインストール」を選択する

3.先ほどダウンロードしたZIPファイルを選択する
Arduino側のコード
M5StackCPlus+Arduinoのコードです。前述したMahonyAHRSのライブラリを入れていることが前提です。
下記のリンク先を参照させて頂きました。
M5StackCPlusをUSB接続した上で、ポート名もUSB接続のときのものにして書き込みします。
#define M5STACK_MPU6886
// #define M5STACK_MPU9250
// #define M5STACK_MPU6050
// #define M5STACK_200Q

#include <M5StickCPlus.h>
//[追加]MahonyAHRSupdateIMU()を呼べるようにするため
#include <utility/MahonyAHRS.h>
#include "BluetoothSerial.h"

float accX = 0.0F;
float accY = 0.0F;
float accZ = 0.0F;

float gyroX = 0.0F;
float gyroY = 0.0F;
float gyroZ = 0.0F;

float pitch = 0.0F;
float roll  = 0.0F;
float yaw   = 0.0F;

float temp = 0.0F;

//[追加]GyroZのデータを蓄積するための変数
float stockedGyroZs[10];
int stockCnt=0;
float adjustGyroZ=0;
int stockedGyroZLength=0;

BluetoothSerial bts;

// the setup routine runs once when M5Stack starts up
void setup(){

  stockedGyroZLength=sizeof(stockedGyroZs)/sizeof(int);

  // Initialize the M5Stack object
  M5.begin();
  /*
    Power chip connected to gpio21, gpio22, I2C device
    Set battery charging voltage and current
    If used battery, please call this function in your project
  */


  M5.IMU.Init();
  M5.Lcd.setRotation(3);

  M5.Lcd.fillScreen(BLACK);
  M5.Lcd.setTextColor(GREEN , BLACK);
  M5.Lcd.setTextSize(1);
  M5.Lcd.setCursor(80, 15);  // set the cursor location.  设置光标位置
    M5.Lcd.println("IMU TEST");
    M5.Lcd.setCursor(30, 30);
    M5.Lcd.println("  X       Y       Z");
    M5.Lcd.setCursor(30, 70);
    M5.Lcd.println("  Pitch   Roll    Yaw");

    Serial.begin(9600); // Initialize serial communication at 9600 baud rate
    bts.begin("M5Stack");//PC側で確認するときの名前
}

// the loop routine runs over and over again forever
void loop() {
    // put your main code here, to run repeatedly:
  M5.IMU.getGyroData(&gyroX,&gyroY,&gyroZ);
  M5.IMU.getAccelData(&accX,&accY,&accZ);
  //[変更]これは使わない
  // M5.IMU.getAhrsData(&pitch,&roll,&yaw);

  //[追加]起動時にstockedGyroZLengthの数だけデータを貯める
  if(stockCnt<stockedGyroZLength){
    stockedGyroZs[stockCnt]=gyroZ;
    stockCnt++;
  }else{
    if(adjustGyroZ==0){
      for(int i=0;i<stockedGyroZLength;i++){
        adjustGyroZ+=stockedGyroZs[i]/stockedGyroZLength;
      }
    }
    //貯めたデータの平均値を使ってgyroZを補正する
    gyroZ-=adjustGyroZ;
    //ここでaccelデータと補正したgyroデータを使ってpitch・roll・yawを計算する
    MahonyAHRSupdateIMU(gyroX * DEG_TO_RAD, gyroY * DEG_TO_RAD, gyroZ * DEG_TO_RAD, accX, accY, accZ, &pitch, &roll, &yaw);
  }

  //ここから下は変更無し
  M5.IMU.getTempData(&temp);

  M5.Lcd.setCursor(30, 40);
  M5.Lcd.printf("%6.2f  %6.2f  %6.2f      ", gyroX, gyroY, gyroZ);
  M5.Lcd.setCursor(170, 40);
  M5.Lcd.print(" o/s");
  M5.Lcd.setCursor(30, 50);
  M5.Lcd.printf(" %5.2f   %5.2f   %5.2f   ", accX, accY, accZ);
  M5.Lcd.setCursor(170, 50);
  M5.Lcd.print(" G");
  M5.Lcd.setCursor(30, 80);
  M5.Lcd.printf(" %5.2f   %5.2f   %5.2f   ", pitch, roll, yaw);

  M5.Lcd.setCursor(30, 95);
  M5.Lcd.printf("Temperature : %.2f C", temp);

  // Send the pitch, roll, yaw values to Unity over Serial
    bts.print(pitch);
    bts.print(",");
    bts.print(roll);
    bts.print(",");
    bts.println(yaw);

  delay(100);
}
Bluetoothのセットアップ
1.とりあえずM5StackCPlusをUSB接続した状態で、設定を開く
2.「デバイスの追加」をクリックし、「M5Stack」を選択する


2.下記の画面になったら「完了」を押して、ペアリングをする

3.デバイスマネージャの画面で下記のようになっていればOK。ポート名でいちばん大きいものが実際にArduinoやUnityで使うものとなる(この場合だと「COM8」)

4.ポート名を3.のものに変更し、「ツール」→「シリアルモニタ」でシリアルモニタを開く

5.値が出ていればOK
6.Arduinoのシリアルモニタを閉じる
Unityのセットアップ
下記のコードを3Dオブジェクトに適用し、M5StackCPlusを傾けるとオブジェクトも回転します。
なおインスペクタで使用するポート名を変更してください。
using System.Collections;
using System.Collections.Generic;
using UnityEngine;
using System.IO.Ports;

public class BTTusin_Rotation : MonoBehaviour
{

    // Replace with your serial port name
 public string portName = "COM8";  // Port name now public and changeable in Inspector
    private SerialPort sp;

    public float speed = 5.0f;  // Speed of the rotation

    private Quaternion targetRotation;

    void Start()
    {
        sp = new SerialPort(portName, 9600);

        if (!sp.IsOpen)
        {
            sp.Open();  // Open the serial port
            sp.ReadTimeout = 50;  // Set the timeout
        }

        targetRotation = transform.rotation;
    }

    void Update()
    {
        if (sp.IsOpen)
        {
            try
            {
                string value = sp.ReadLine();  // Read the information
                string[] vec3 = value.Split(',');  // Split it into an array
                if (vec3.Length == 3)  // If array length is 3
                {
                    // Parse the values
                    float pitch = float.Parse(vec3[0]);
                    float roll = float.Parse(vec3[1]);
                    float yaw = float.Parse(vec3[2]);

                    // Set the target rotation
                    targetRotation = Quaternion.Euler(pitch, roll, yaw);
                }
            }
            catch (System.Exception)
            {

            }
        }

        // Smoothly rotate towards the target rotation
        transform.rotation = Quaternion.Lerp(transform.rotation, targetRotation, speed * Time.deltaTime);
    }

    void OnApplicationQuit()
    {
        if (sp != null)
        {
            if (sp.IsOpen)
            {
                sp.Close();  // Close the port when the application quits
            }
        }
    }
}