VRMお人形遊びのポーズ画像をUnityで使う方法

VRMお人形遊び?
概要
以前に以下のような記事を書きました。
この記事ではポーズテキストファイルでしたが、恐らくポーズ画像の方がご利用頂いている方が多いと思われますので、ポーズ画像に対応した方法を記載します。
コード
ファイル名はなんでも良いので、Unity上にスクリプトファイルを作成して、以下をコピーペーストしてください。
using System;
using System.IO;
using System.Collections.Generic;
using UnityEngine;
using UnityEditor;

[CustomEditor(typeof(Animator), true)]

public class SetPose : Editor
{
   Animator Anim;
   List<HumanBodyBones> Bones;

   void OnEnable()
   {
       Anim = target as Animator;

       Bones = new List<HumanBodyBones>();
       Bones.Add(HumanBodyBones.Head);
       Bones.Add(HumanBodyBones.Neck);
       Bones.Add(HumanBodyBones.Hips);
       Bones.Add(HumanBodyBones.Spine);
       Bones.Add(HumanBodyBones.Chest);
       Bones.Add(HumanBodyBones.UpperChest);
       Bones.Add(HumanBodyBones.LeftUpperArm);
       Bones.Add(HumanBodyBones.LeftLowerArm);
       Bones.Add(HumanBodyBones.LeftHand);
       Bones.Add(HumanBodyBones.RightUpperArm);
       Bones.Add(HumanBodyBones.RightLowerArm);
       Bones.Add(HumanBodyBones.RightHand);
       Bones.Add(HumanBodyBones.LeftUpperLeg);
       Bones.Add(HumanBodyBones.LeftLowerLeg);
       Bones.Add(HumanBodyBones.LeftFoot);
       Bones.Add(HumanBodyBones.RightUpperLeg);
       Bones.Add(HumanBodyBones.RightLowerLeg);
       Bones.Add(HumanBodyBones.RightFoot);
   }

   public override void OnInspectorGUI()
   {
       base.OnInspectorGUI();

       EditorGUILayout.LabelField("Set Pose Image");

       if (GUILayout.Button("Open Pose Image"))
       {
           var path = EditorUtility.OpenFilePanel("Select Pose Image", "", "png");
           if (!string.IsNullOrEmpty(path))
           {
               OpenPoseImage(path);
           }
       }
   }

   void OpenPoseImage(string path)
   {
       var tex = new Texture2D(1, 1);
       var img = File.ReadAllBytes(path);

       tex.LoadImage(img);

       // ポーズ画像チェック
       var color = tex.GetPixels();
       var pose = Color2Byte(color[0]);
       if (pose[0] == 'p' && pose[1] == 'o' && pose[2] == 's' && pose[3] == 'e')
       {
           for (int i = 0; i < Bones.Count; i++)
           {
               // ポーズ取得
               var index = i * 3 + 1;
               byte[] byte_x = Color2Byte(color[index + 0]);
               byte[] byte_y = Color2Byte(color[index + 1]);
               byte[] byte_z = Color2Byte(color[index + 2]);
               var float_x = BitConverter.ToSingle(byte_x, 0);
               var float_y = BitConverter.ToSingle(byte_y, 0);
               var float_z = BitConverter.ToSingle(byte_z, 0);

               // ポーズ適用
               var t = Anim.GetBoneTransform(Bones[i]);
               if (t != null && !float.IsNaN(float_x) && !float.IsNaN(float_y) && !float.IsNaN(float_z))
               {
                   t.localEulerAngles = new Vector3(float_x, float_y, float_z);
               }
           }
       }
   }

   byte[] Color2Byte(Color color)
   {
       byte[] byte4 = {
           (byte)(color.r * byte.MaxValue),
           (byte)(color.g * byte.MaxValue),
           (byte)(color.b * byte.MaxValue),
           (byte)(color.a * byte.MaxValue)
       };
       return byte4;
   }
}
使い方
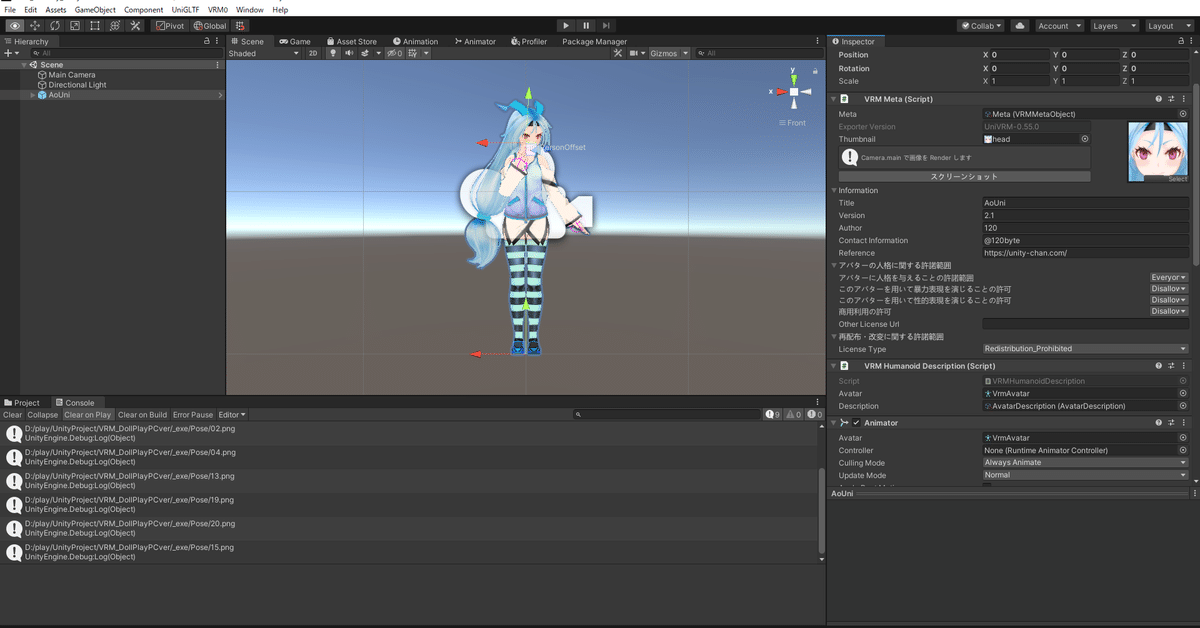
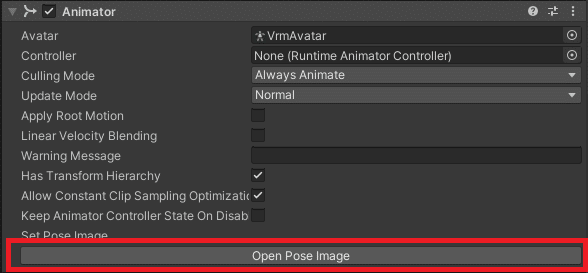
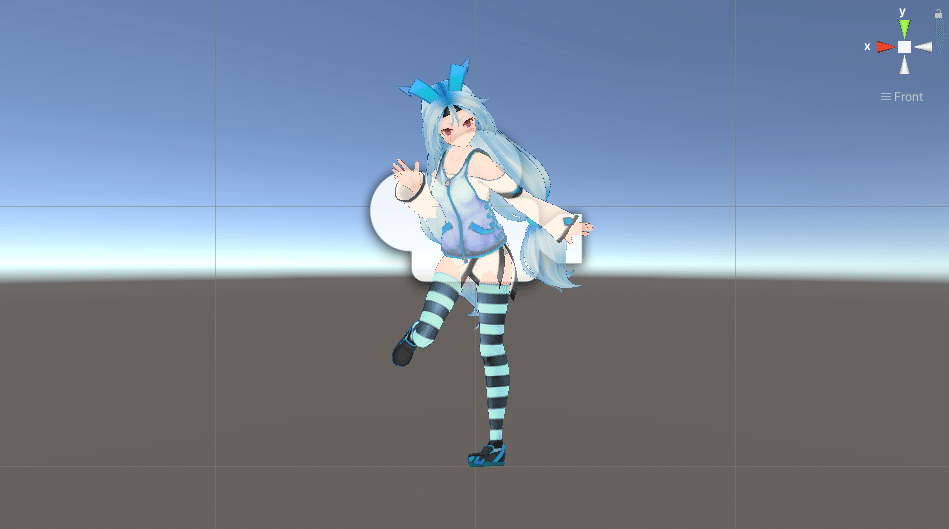
Animatorを持つモデルに対してポーズを適用することができます。先述のコードにより、Animatorの一番下にOpen Pose Imageというボタンが追加されています。それをクリックすると、ファイル選択画面が開くので、ポーズ画像を選択して、モデルにポーズを適用することができます。

© Unity Technologies Japan/UCL