MapleSimで超簡単な油圧モデルを作ってみた#5(マルチボディモデルと連結)
#4の記事で作成した油圧モデルとマルチボディ入門で作成したリンクモデルとを連結してみましょう。
2つのモデルを開くとタブでモデルを切り替えられるようになります。マルチボディのモデルから機構部分をコピーして、油圧モデル側に貼り付けて結線するだけで連結できます。
#4の記事で作成した油圧モデルの油圧シリンダについている機構部分を削除して、マルチボディ入門の記事で作成したモデルの「Prismatic」のところにつなげます(図1)。
油圧シリンダの設定をマルチボディ入門の記事で設定したのと同じ値、Lmaxを1.8[m]、Lminを1[m]に変更するだけで、他の設定は変更不要です。

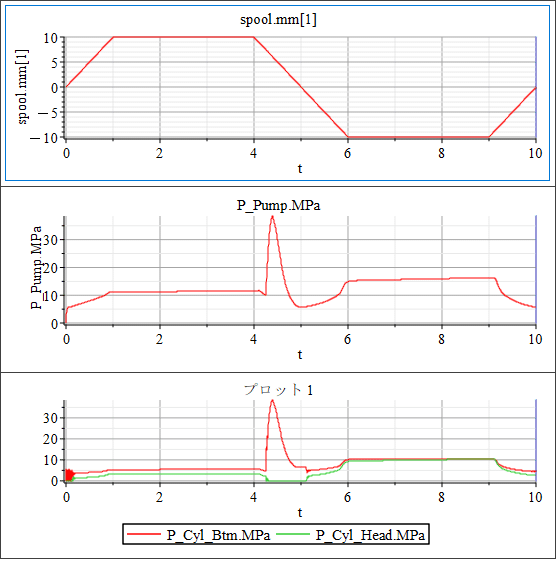
シミュレーションを実行すると、図2に示すようにリンクの上げ下げする様子を見ることができます。図3にはスプールやポンプ圧の時系列データを表示しています。
あれ?
シリンダのダンパ抵抗を入れてないのに、マルチボディ入門の記事みたいにポンプ圧が振動していないぞと気づきましたか?
バルブの両端にチャンバーがあること、そしてバルブでの圧力損失で油圧振動がしなくなっているのです。
考えてパラメータを設定していかないと、モデルが複雑になったときに困ったことが発生するかもしれません。パラメータはよく考えて設定するようにしましょうね。


【English】
Let's link the hydraulic model created in the #4 article with the linked model created in the introduction to multibody.
When two models are opened, you can switch models by tabs. You can connect them by simply copying the mechanism part from the multibody model, pasting it to the hydraulic model side, and connecting the wires. Delete the mechanical part attached to the hydraulic cylinder of the hydraulic model created in the #4 article and connect it to the "Prismatic" part of the model created in the Introduction to Multibody article (Figure 1). The hydraulic cylinder settings need only be changed to the same values as in the Introduction to Multibody article, Lmax to 1.8[m] and Lmin to 1[m], and the other settings need not be changed.

After running the simulation, you can see the link raising and lowering as shown in Figure 2. Figure 3 shows the time series data of spool and pump pressure.
Huh?
Did you notice that the pump pressure is not oscillating like in the introductory article on multibody, even though the cylinder's damper resistance is not included? The fact that there are chambers at both ends of the valve and the pressure loss at the valve are preventing the hydraulic pressure from oscillating. If you don't set parameters thoughtfully, you may find yourself in trouble when your model becomes more complex. Let's think carefully about setting the parameters.


【Sample Model】
Created by MapleSim 2023
