
[研究] Flashbotsを使ってみる
おはこんばんにちは。
わ(以下略 です
久しぶりに、ブロックチェーンブロックチェーンした(?) 研究記事を書こうと思い、noteを更新をするに至りました。
今回はスマコンレスのDEXbotter / Sandwicher ならお馴染みであろうFlashbotsについて少しだけ触れます。
1. 概要
まず、Flashbotsとは、、
いつも通りPerplexity先輩にご教授いただきました。
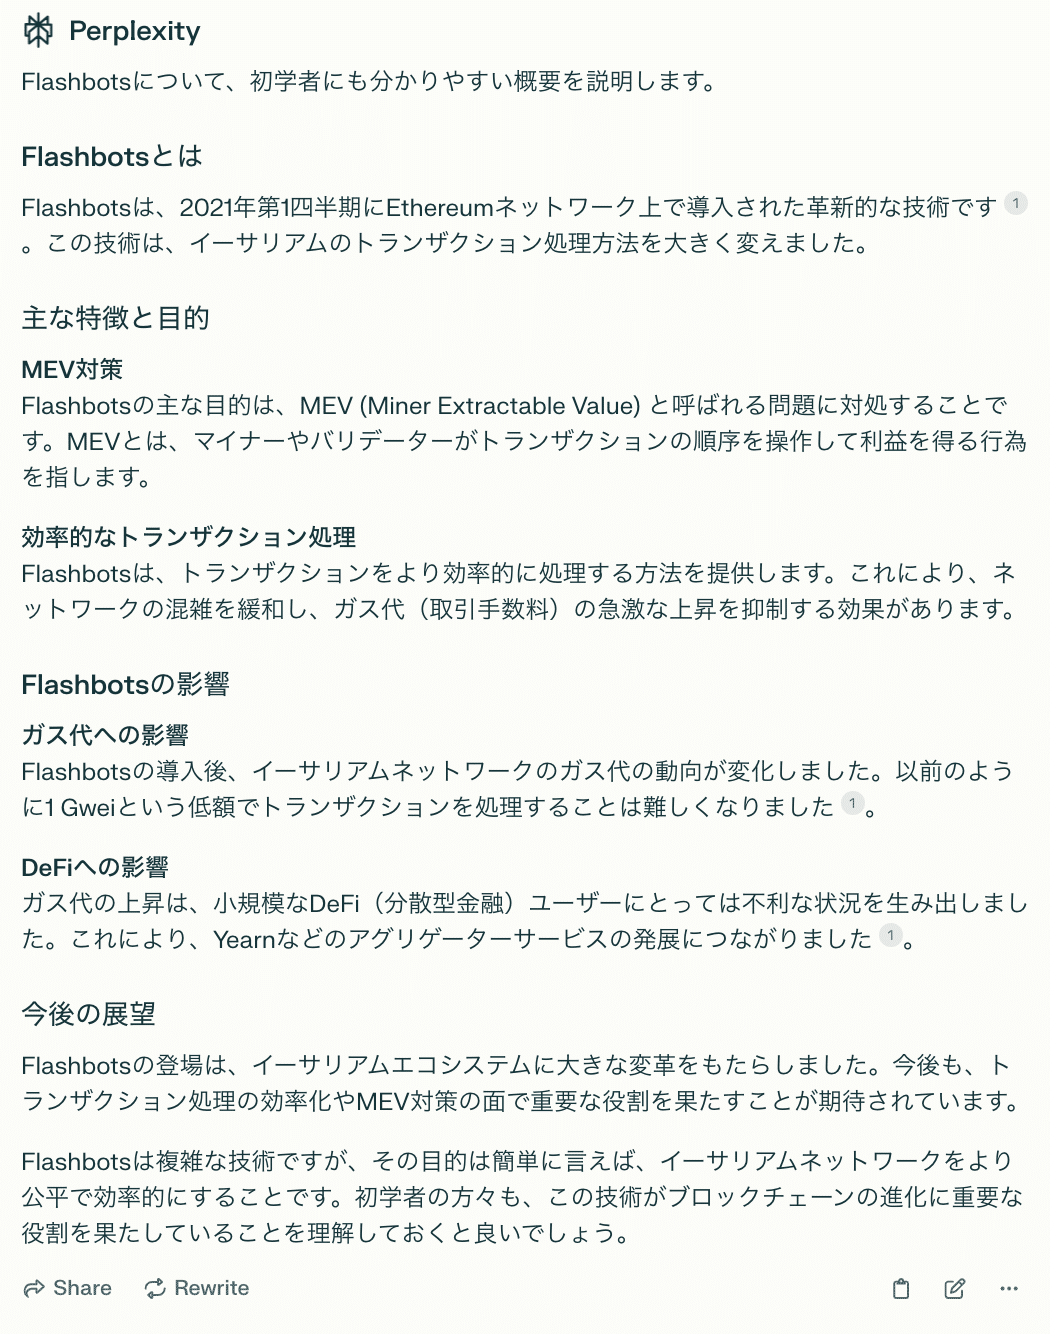
やはり、事の発端はMEV問題から。
(この問題に触れると長くなるので今回は割愛)
MEVについての解説記事ですが、自分が知る限り中々いいものがなかったので、リファレンスは貼れないです。
ただ、個人的には下記のアーカイブ動画が割と掴みやすかったです。
一から分かりやすいようにMEVについて解説してます(初学者向け)
1.1 アーキテクチャ
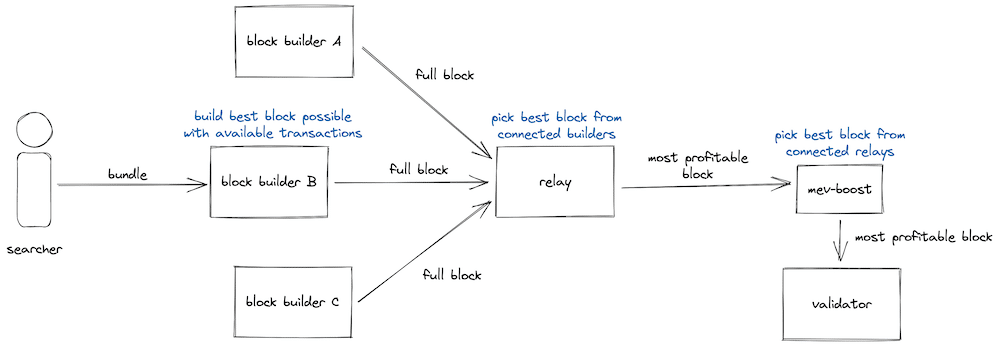
Flashbotsのオークションアーキテクチャは、主に3つで構成されており、
サーチャー(Searchers)
ブロックビルダー(Block Builders)
バリデーター(Validators)
また、eth_sendBundle RPCの利点的には下記の通りです
・原子性の保証
・条件設定
・失敗許容
・MEV抽出 (意図的なTX構造の柔軟性)
Searcher(我々)はこれを使用する事で、初めてFlashbotsを使用できます。
eth_sendBundle パラメータ例
{
  "jsonrpc": "2.0",
  "id": 1,
  "method": "eth_sendBundle",
  "params": [
    {
      txs,               // 原子的に実行される署名済みトランザクションのリスト
      blockNumber,       // このバンドルが有効なブロック番号(16進数)
      minTimestamp,      // (オプション)バンドルが有効になる最小タイムスタンプ(UNIXエポック秒)
      maxTimestamp,      // (オプション)バンドルが有効な最大タイムスタンプ(UNIXエポック秒)
      revertingTxHashes, // (オプション)リバートが許可されるトランザクションハッシュのリスト
    }
  ]
}txs: バンドル内のすべてのTXを含む
blockNumber: バンドルが有効なブロック番号を指定
minTimestamp/ maxTimestamp: バンドルの有効期間を制限
revertingTxHashes: 特定のTXがrevertされても続行するオプション
割とサンドイッチャーからしたら重宝しますよねw(ジレンマ)
なお、それぞれの役割ですが、
Searcherが チェーンの状態監視と、BlockBuilderへの直接バンドル送信BlockBuilderは 文字通り受取ったバンドルTXを含めてブロック構築
VailidatorがBlockBuilderから受取ったブロックの判断と検証、追加
大雑把に言えばそんな感じです。
これによって、MEVの大きな問題であるフロントランやバックランなどの手法を用いて、不当に利益獲得を行おうとするTXから守られて、自身のTXを送信することができると。
まぁ、通常処理でmempoolにTXを泳がせとくより、flashbots使ったほうがいいかもよって感じです。
2. 実行
本題の実行ですが、今回はSepolia上で行います。
2.1 事前準備
・Node.js環境
・Sepolia Testnet RPC (Infura)
・Private Key
2.2 セットアップ
プロジェクト作成
mkdir flashbots-example
cd flashbots-example
初期化
npm init -yライブラリインストール
npm install ethers@5.7.2 @flashbots/ethers-provider-bundle dotenv.envファイル&mainファイル作成
touch .env
touch main.js
そして、.envファイルには下記のようにプライベートキーとRPCを設定
PRIVATE_KEY=ここにプライベートキー
SEPOLIA_RPC_URL=ここにRPCURL
ディレクトリ構造が下記のようになっていればOKです。
FLASHBOTS-EXAMPLE/
│
├── node_modules/
├── .env
├── main.js
├── package-lock.json
└── package.json
2.3 実行コード
main.js内にコピペしてください。
※一応自己責任で。
コードに関しては後ほど解説します
機能としては5つのアドレスへETHを指定数量分をバンドル送信します
const { FlashbotsBundleProvider } = require('@flashbots/ethers-provider-bundle');
const { ethers } = require('ethers');
require('dotenv').config();

// ログ設定 (任意)
function log(message) {
  const now = new Date();
  const timestamp = now.toLocaleString('en-US', {
    month: '2-digit',
    day: '2-digit',
    hour: '2-digit',
    minute: '2-digit',
    second: '2-digit',
    hour12: false
  }).replace(/,/g, ':');
  console.log(`${timestamp} - { INFO } - ${message}`);
}

async function main() {
  const provider = new ethers.providers.JsonRpcProvider(process.env.SEPOLIA_RPC_URL);

  const PRIVATE_KEY = process.env.PRIVATE_KEY;
  const wallet = new ethers.Wallet(PRIVATE_KEY, provider);

  const flashbotsProvider = await FlashbotsBundleProvider.create(
    provider,
    wallet,
    'https://relay-sepolia.flashbots.net',
    'sepolia'
  );

  let gasPrice = await provider.getGasPrice();
  let adjustedGasPrice = gasPrice.mul(150).div(100); // 初期ガス価格を50%上乗せ
  let retryCount = 0;
  const maxRetries = 10; // 10回リトライ

  while (retryCount < maxRetries) {
    try {
      const nonce = await provider.getTransactionCount(wallet.address, "pending");

      log(`Current nonce: ${nonce}`);

      // バンドルTX 内部
      const transactions = [
        {
          to: "0x7A23608a8eBe71868013BDA0d900351efb0f97E1",
          value: ethers.utils.parseEther("0.001"),
          gasPrice: adjustedGasPrice,
          gasLimit: 21000,
          nonce: nonce
        },
        {
          to: "0xF45B14ddaBF0F0e275E215b94dD24Ae013a27F12",
          value: ethers.utils.parseEther("0.002"),
          gasPrice: adjustedGasPrice,
          gasLimit: 21000,
          nonce: nonce + 1
        },
        {
          to: "0x2B5AD5c4795c026514f8317c7a215E218DcCD6cF",
          value: ethers.utils.parseEther("0.003"),
          gasPrice: adjustedGasPrice,
          gasLimit: 21000,
          nonce: nonce + 2
        },
        {
          to: "0x6E9e7A8Fb61b0e1Bc3cB30e6c8E335046267D3A0",
          value: ethers.utils.parseEther("0.004"),
          gasPrice: adjustedGasPrice,
          gasLimit: 21000,
          nonce: nonce + 3
        },
        {
          to: "0xD8f24D8E24A005846E7Da61620F303f35e3620D4",
          value: ethers.utils.parseEther("0.005"),
          gasPrice: adjustedGasPrice,
          gasLimit: 21000,
          nonce: nonce + 4
        },
      ];

      const signedTransactions = await Promise.all(
        transactions.map(tx => flashbotsProvider.signBundle([
          {
            signer: wallet,
            transaction: tx
          }
        ]))
      );

      const bundleTransactions = signedTransactions.flat();
      const blockNumber = await provider.getBlockNumber();
      const targetBlockNumber = blockNumber + 5;

      const simulation = await flashbotsProvider.simulate(bundleTransactions, targetBlockNumber);

      if ("error" in simulation) {
        throw new Error(`Simulation Error: ${simulation.error.message}`);
      }

      log(`Simulation Success: ${JSON.stringify(simulation, null, 2)}`);

      for (let i = 1; i <= 5; i++) {
        const bundleSubmission = await flashbotsProvider.sendRawBundle(
          bundleTransactions,
          blockNumber + i
        );

        log(`Bundle submitted for block ${blockNumber + i}, waiting for inclusion`);

        const waitResponse = await bundleSubmission.wait();

        if (waitResponse === 0) {
          log("Transactions successful!");
          simulation.results.forEach((result, index) => {
            log(`Transaction ${index + 1} included! TX: ${result.txHash}`);
          });
          return;
        } else if (i === 5) {
          throw new Error(`Transactions failed with response code: ${waitResponse}`);
        }
      }
    } catch (error) {
      retryCount++;
      log(`Attempt ${retryCount} failed: ${error.message}`);

      if (retryCount < maxRetries) {
        // ガス価格を20%上乗せ (リトライ回数に応じて)
        adjustedGasPrice = adjustedGasPrice.mul(120).div(100);
        log(`Increasing gas price to ${ethers.utils.formatUnits(adjustedGasPrice, 'gwei')} Gwei. Retrying...`);
        await new Promise(resolve => setTimeout(resolve, 15000));
      } else {
        log("Max retries reached. Transactions failed.");
      }
    }
  }
}

main().catch((error) => {
  log(`Unhandled Error: ${error.message}`);
  process.exit(1);
});
貼り付けたら下記コマンドで実行します。
node main.js2.4 レスポンス例
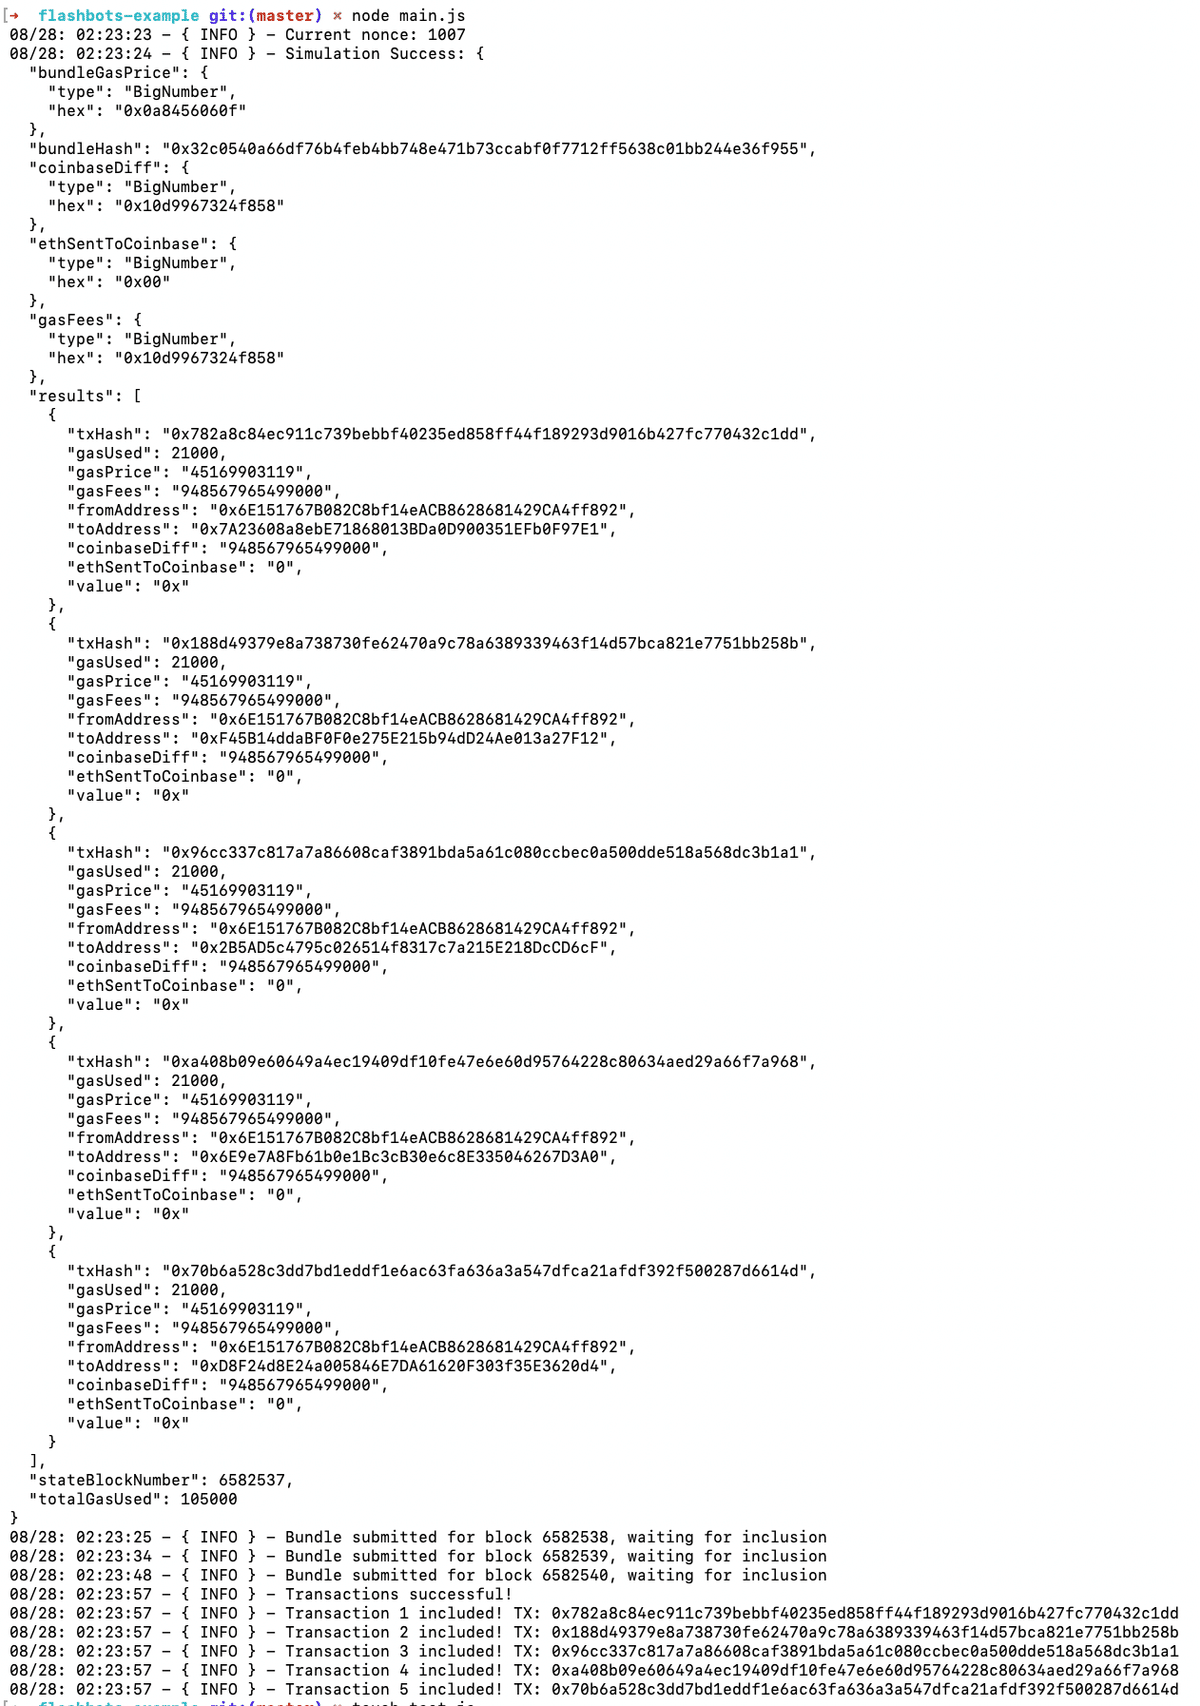
実行に成功すると上記のようなログ出力結果になります。
シミュレーションが行われてバンドル送信。
そして、BlockBuilderへ渡され、ブロック構築内に含まれるかを待機。
正常にVailidateされブロックチェーンへ反映されたら完了です。
実際のTX順を見てみましょう。

5つとも独立したTXで同じBlock Numberで承認されています。
ブロック内Positionも覗いてみます。

3. 解説
ここで、本スクリプトの解説です。
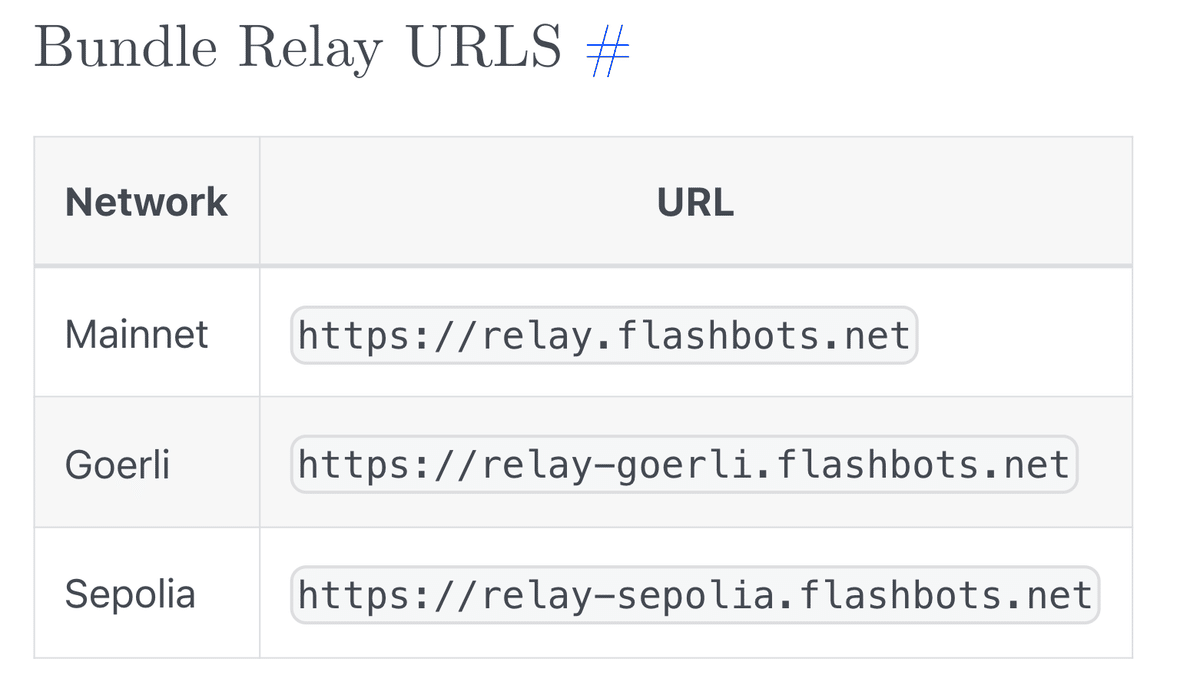
3.1 ネットワーク変更
今回は試験的ですので、SepoliaのRelayを使用しました。
Mainnet版を使用する方は、下記のようにすればOKです
  const flashbotsProvider = await FlashbotsBundleProvider.create(
    provider,
    wallet,
    'https://relay.flashbots.net',
    'mainnet'
  );
3.2 リトライ箇所とGAS調整
  let gasPrice = await provider.getGasPrice();
  let adjustedGasPrice = gasPrice.mul(150).div(100); // 初期ガス価格を50%上乗せ
  let retryCount = 0;
  const maxRetries = 10; // 10回リトライ
バンドルがブロックに正常に格納されなかった場合、10回リトライするようにしています。
標準GASはgetGasPriceした値に50%上乗せ。
また、リトライごとに追加で20%動的にGAS盛りしてます。
if (retryCount < maxRetries) {
  // ガス価格を20%上乗せ (リトライ回数に応じて)
  adjustedGasPrice = adjustedGasPrice.mul(120).div(100);
  log(`Increasing gas price to ${ethers.utils.formatUnits(adjustedGasPrice, 'gwei')} Gwei. Retrying...`);
市況によってはGAS調整をいくらパラメータでいじっても、builderが通してくれない場合があるので、この箇所はかなり重要です。
もっと最適化できるやり方はあると思うので、自分の戦略に応じて随時変更しましょう。
3.3 シミュレーション有効期限
const targetBlockNumber = blockNumber + 5;
const simulation = await flashbotsProvider.simulate(bundleTransactions, targetBlockNumber);

if ("error" in simulation) {
  throw new Error(`Simulation Error: ${simulation.error.message}`);
}

log(`Simulation Success: ${JSON.stringify(simulation, null, 2)}`);
基本的にバンドル構造のresultsがシミュレーションで通され、通過したら本実行の流れです。
シミュレーション段階で、時間経過でBlockが進み、うまく実行されない時の対策として、次回5blockまで許容しています。
3.4 バンドル送信のブロックリトライ
for (let i = 1; i <= 5; i++) {
  const bundleSubmission = await flashbotsProvider.sendRawBundle(
    bundleTransactions,
    blockNumber + i
  );

  log(`Bundle submitted for block ${blockNumber + i}, waiting for inclusion`);
こちらは実際にバンドルを送信し、Block格納を待機する箇所です。
こちらもシミュレーションと同じような想定で、含まれなかった場合に次回5blockまでリトライしています。
なお、このリトライ箇所に関してですが、実装例によっては随時変更した方が良いケースがあります。
(e.g: 短期的な鞘を抜く際に、リトライ機能で無駄な損失を防ぐため)
3.5 バンドル内のmetadata
const transactions = [
  {
    to: "0x7A23608a8eBe71868013BDA0d900351efb0f97E1",
    value: ethers.utils.parseEther("0.001"),
    gasPrice: adjustedGasPrice,
    gasLimit: 21000,
    nonce: nonce
  },
  {
    to: "0xF45B14ddaBF0F0e275E215b94dD24Ae013a27F12",
    value: ethers.utils.parseEther("0.002"),
    gasPrice: adjustedGasPrice,
    gasLimit: 21000,
    nonce: nonce + 1
  },
  {
    to: "0x2B5AD5c4795c026514f8317c7a215E218DcCD6cF",
    value: ethers.utils.parseEther("0.003"),
    gasPrice: adjustedGasPrice,
    gasLimit: 21000,
    nonce: nonce + 2
  },
  {
    to: "0x6E9e7A8Fb61b0e1Bc3cB30e6c8E335046267D3A0",
    value: ethers.utils.parseEther("0.004"),
    gasPrice: adjustedGasPrice,
    gasLimit: 21000,
    nonce: nonce + 3
  },
  {
    to: "0xD8f24D8E24A005846E7Da61620F303f35e3620D4",
    value: ethers.utils.parseEther("0.005"),
    gasPrice: adjustedGasPrice,
    gasLimit: 21000,
    nonce: nonce + 4
  },
];
例として、5つの異なったアドレスへ異なったNative Etherを送信するものとしました。
Native Etherの送信には固定で21000 GASlimitとされているので、それ厳守で行なっております。
また、nonce値ですがgetした値にそれぞれのTXずつに+1してます。
ハードコードなので、改良の余地ありです。
以上が主な機能箇所の解説でした。
4. 応用
発展ということで、例えばERC20トークンの一括送付をコントラ無しで行いたいときに、Flashbotsを使用するなどあります。
4.1 ERC20トークン一括送信
// 1. ERC20トークンのABIを追加
const ERC20_ABI = [
  "function transfer(address to, uint256 amount) returns (bool)"
];

// 2. アドレスを正規化する関数を追加
function normalizeAddress(address) {
  return ethers.utils.getAddress(address.toLowerCase());
}

async function main() {
  // ... (既存のコード)

  // 3. トークンコントラアドレスを設定し、インスタンス作成
  const tokenAddress = normalizeAddress("0x1234567890123456789012345678901234567890"); // 実際のトークンアドレスに置き換える
  const tokenContract = new ethers.Contract(tokenAddress, ERC20_ABI, wallet);

  // ... (既存のコード)

  // 4. トランザクション部分を修正
  const transactions = [
    {
      to: tokenAddress,
      data: tokenContract.interface.encodeFunctionData("transfer", [
        normalizeAddress("0x7A23608a8eBe71868013BDA0d900351efb0f97E1"),
        ethers.utils.parseUnits("10", 18) // トークンの小数点桁数に応じて調整
      ]),
      gasPrice: adjustedGasPrice,
      gasLimit: 100000, // ERC20転送用にガスリミットを増加 (随時変更)
      nonce: nonce
    },
    // 他のトランザクションも同様に修正
  ];

  // ... (残りのコードは基本的に同じ)
}
なお、コントラクトを叩く場合(transfer含む) は、checksum付きのアドレスでないとエラーが出ます。
実行結果

ログ出力
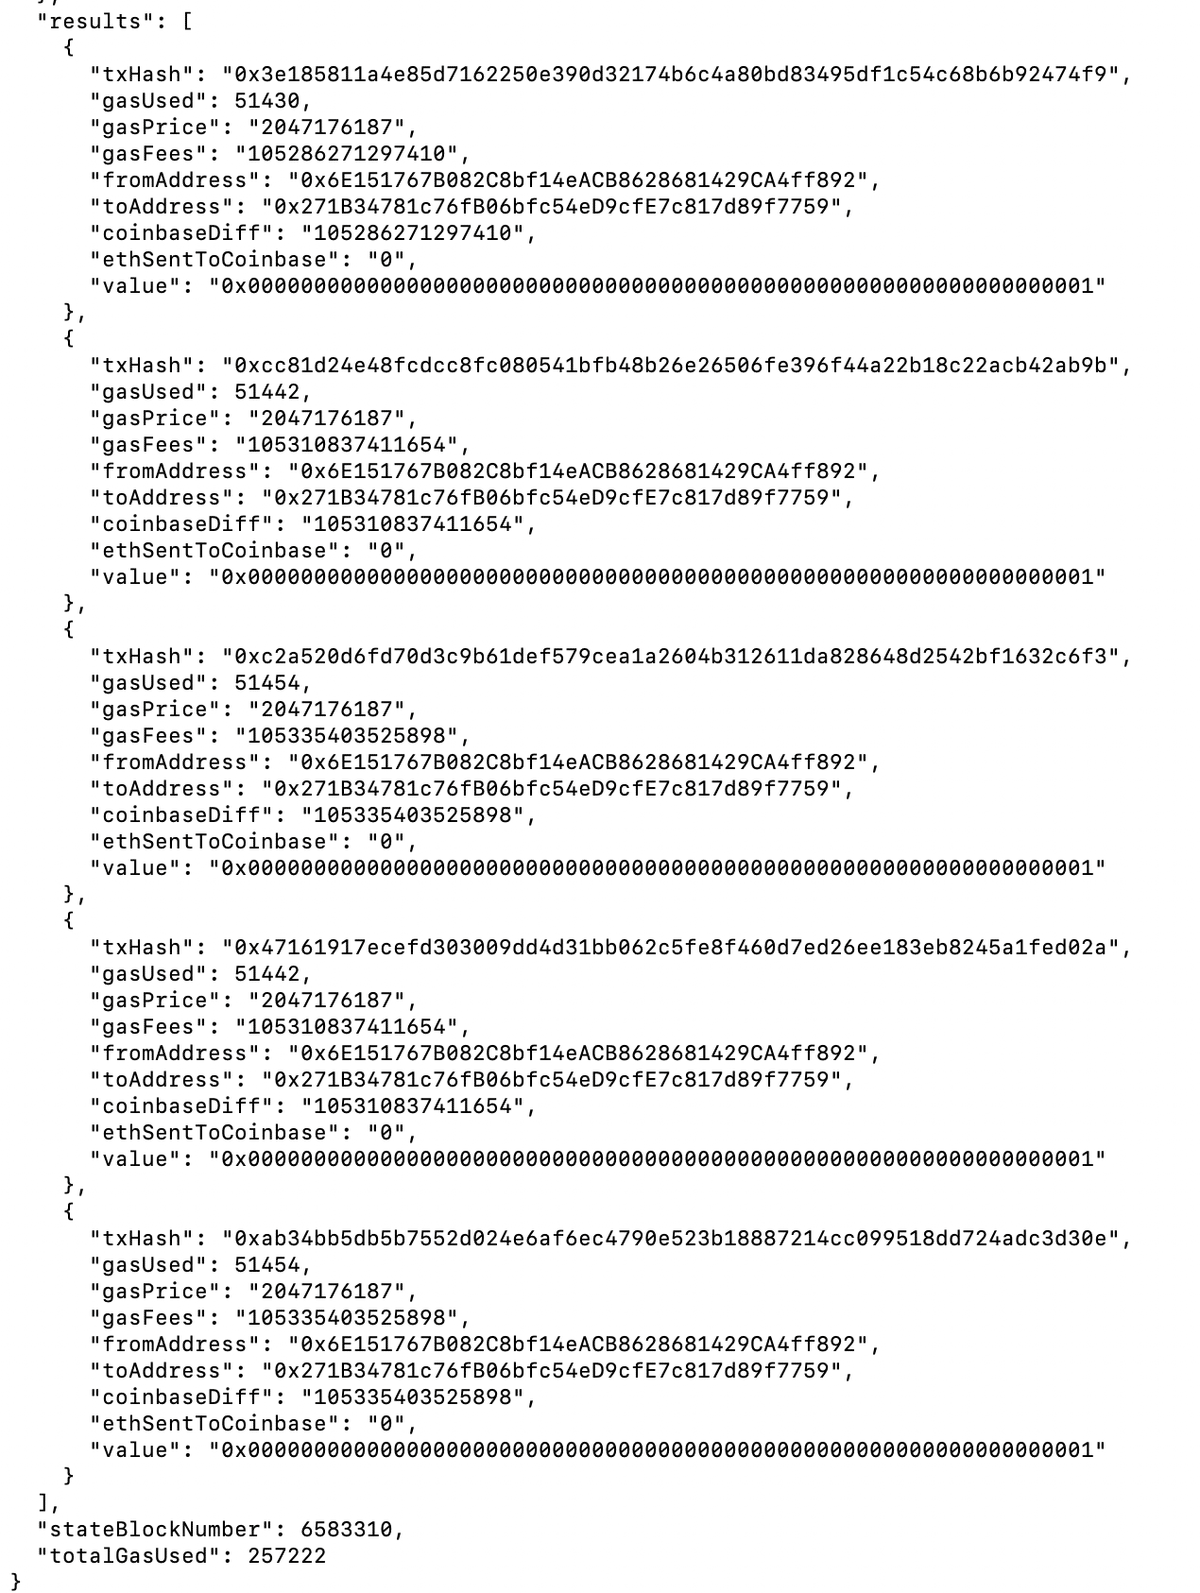
まあ、実用的ではないですね。
それならコントラ叩いたほうが早いし安上がりでしょう。
5. 終章
まあそんな感じで、Flashbotsという便利機能でコントラ無しでもbotterとして戦える可能性は、、ワンチャンあるかもしれません。
次回は発展として、Sandwich botでも作ってみようかと思います。
(儲からないけど、技術的に観点から面白そうなので)
ということで、以上です。
特にオチはないです
