KubernetesでSeleniumテスト

何やかんやE2Eテスト自動化したことなかったのでやってみる
ぐぐるとKubernetesベースのZaleniumなるツールが出てくるが
GitHubのRepository見ると「もう開発してまへん」て書いてあったので
Kubernetes Repositoryのsample参考に素直にやってみる
ちなみにKubernetesの1pod=1ChromeのようにSelenium動かすことで
時間のかかるE2Eテストも並列実行できて素敵やん!としたい!
Minikubeを起動する
とりあえずローカル環境で検証するのでMinikube起動
sampleを読むとClusterは最低4CPU, 6GB Memoryとあるので指定して起動
$ minikube start --cpus 4 --memory 6g
$
$ # 今回用のnamespace作成
$ kubectl create namespace selenium
$ # ダッシュボードみてみる
$ minikube dashbard
必要なリソースをデプロイ
以下リソースをデプロイする
1. selenium hub
a. deployment
b. service
2. selenium node (Chrome)
a. deployment
3. selenium node (Firefox)
a. deployment
selenium hub deployment
selenium nodeに指示を出す司令塔っぽいselenium hubをデプロイ
4444ポートでリクエストを受けられるようにしておく
selenium-hub-deployment.yaml
apiVersion: apps/v1
kind: Deployment
metadata:
 name: selenium-hub
 labels:
   app: selenium-hub
spec:
 replicas: 1
 selector:
   matchLabels:
     app: selenium-hub
 template:
   metadata:
     labels:
       app: selenium-hub
   spec:
     containers:
     - name: selenium-hub
       image: selenium/hub:3.141
       ports:
         - containerPort: 4444
       resources:
         limits:
           memory: "1000Mi"
           cpu: ".5"
       livenessProbe:
         httpGet:
           path: /wd/hub/status
           port: 4444
         initialDelaySeconds: 30
         timeoutSeconds: 5
       readinessProbe:
         httpGet:
           path: /wd/hub/status
           port: 4444
         initialDelaySeconds: 30
         timeoutSeconds: 5
リソース作成
$ kubectl create -f selenium-hub-deployment.yaml --namespace seleniumselenium hub service
type: NodePortでservice作成
これで、nodeのipと4444 portでselenium hubにアクセスできる!
selenium-hub-svc.yaml
apiVersion: v1
kind: Service
metadata:
 name: selenium-hub
 labels:
   app: selenium-hub
spec:
 ports:
 - port: 4444
   targetPort: 4444
   name: port0
 selector:
   app: selenium-hub
 type: NodePort
 sessionAffinity: None
serviceリソース作成&ブラウザからアクセスできるようにport forward
$ kubectl create -f selenium-hub-svc.yaml --namespace selenium
$
$ export PODNAME=`kubectl get pods --selector="app=selenium-hub" --output=template --template="{{with index .items 0}}{{.metadata.name}}{{end}}" --namespace selenium`
$ kubectl port-forward $PODNAME 4444:4444 --namespace selenium
Chromeのブラウザからselenium hubにアクセス
$ open /Applications/Google\ Chrome.app 'http://127.0.0.1:4444'こんな感じのページが見れたらうまくいってるはず!

selenium hub node deployment (Chrome)
実際にテストを実行するChromeブラウザ用のpod作成
selenium-node-chrome-deployment.yaml
apiVersion: apps/v1
kind: Deployment
metadata:
 name: selenium-node-chrome
 labels:
   app: selenium-node-chrome
spec:
 replicas: 2
 selector:
   matchLabels:
     app: selenium-node-chrome
 template:
   metadata:
     labels:
       app: selenium-node-chrome
   spec:
     volumes:
     - name: dshm
       emptyDir:
         medium: Memory
     containers:
     - name: selenium-node-chrome
       image: selenium/node-chrome-debug:3.141
       ports:
         - containerPort: 5555
       volumeMounts:
         - mountPath: /dev/shm
           name: dshm
       env:
         - name: HUB_HOST
           value: "selenium-hub"
         - name: HUB_PORT
           value: "4444"
       resources:
         limits:
           memory: "1000Mi"
           cpu: ".5"
リソース作成
$ kubectl create -f selenium-node-chrome-deployment.yaml --namespace seleniumselenium hub node deployment (Firefox)
実際にテストを実行するFirefoxブラウザ用のpod作成
selenium-node-firefox-deployment.yaml
apiVersion: apps/v1
kind: Deployment
metadata:
 name: selenium-node-firefox
 labels:
   app: selenium-node-firefox
spec:
 replicas: 2
 selector:
   matchLabels:
     app: selenium-node-firefox
 template:
   metadata:
     labels:
       app: selenium-node-firefox
   spec:
     volumes:
     - name: dshm
       emptyDir:
         medium: Memory
     containers:
     - name: selenium-node-firefox
       image: selenium/node-firefox-debug:3.141
       ports:
         - containerPort: 5900
       volumeMounts:
         - mountPath: /dev/shm
           name: dshm
       env:
         - name: HUB_HOST
           value: "selenium-hub"
         - name: HUB_PORT
           value: "4444"
       resources:
         limits:
           memory: "1000Mi"
           cpu: ".5"
リソース作成&selenium nodeの確認
$ kubectl create -f selenium-node-firefox-deployment.yaml --namespace selenium
$
$ open /Applications/Google\ Chrome.app 'http://127.0.0.1:4444/grid/console'
上手くできてればブラウザ上でデプロイしたノードが表示されるはず

私の場合はここで「insufficient memory error」みたいなのが出て
podがエラーで立ち上がらなかった
minikube起動時にmemoryを十分に与えてるのに何でや。と思ったが
nodeの情報見てみるとmemoryが2GiBくらいしかない。。。
$ kubectl describe nodes
...
Capacity:
cpu:                8
ephemeral-storage:  61255492Ki
hugepages-1Gi:      0
hugepages-2Mi:      0
memory:             2038184Ki
pods:               110
~/.minikubeを全部消してもう一回Minikube作ると上手くいった
$ rm -rf ~/.minikube
$ minikube start --cpus 4 --memory 6g
$ kubectl describe node
...
Capacity:
cpu:                4
ephemeral-storage:  16954224Ki
hugepages-2Mi:      0
memory:             6097228Ki
pods:               110
テスト実行を指示するpod作成
sampleを実行していくと
kubectl run selenium-python --image=google/python-hello
でpod作成しろって言われるけど「google/python-hello」なんてないって言われる😫
しゃあないから常時Runningになってくれるpodを自分で作成する
$ ll
total 24
drwxr-xr-x  5 s.uchiyama  staff  160  8 30 18:57 ./
drwxr-xr-x  3 s.uchiyama  staff   96  8 12 23:44 ../
-rw-r--r--  1 s.uchiyama  staff  136  8 30 18:57 Dockerfile
-rw-r--r--  1 s.uchiyama  staff  166  8 30 18:57 main.py
-rw-r--r--  1 s.uchiyama  staff   35  8 30 18:56 requirements.txt
main.py
from flask import Flask
app = Flask(__name__)


@app.route("/")
def hello():
   return "Hello from Python!"


if __name__ == "__main__":
   app.run(host='0.0.0.0')
requirements.txt
Flask == 1.1.2
selenium == 3.141.0
Dockerfile
FROM python:3.7

RUN mkdir /app
WORKDIR /app
ADD . /app/
RUN apt-get update \
&& apt-get --force-yes install -y vim \
&& apt-get clean \
&& rm -rf /var/lib/apt/lists/* /tmp/* /var/tmp/*
RUN pip install -r requirements.txt

EXPOSE 5000
CMD ["python", "/app/main.py"]
buildしてimageを作る
$ # localでbuildしたimageをminikubeで読ませるためのおまじない
$ eval $(minikube docker-env)
$ docker build -f Dockerfile -t hello-python:1.0.0 .
deploymentのmanifestを作る
apiVersion: apps/v1
kind: Deployment
metadata:
 name: hello-python
spec:
 selector:
   matchLabels:
     app: hello-python
 replicas: 1
 template:
   metadata:
     labels:
       app: hello-python
   spec:
     containers:
     - name: hello-python
       image: hello-python:1.0.0
       imagePullPolicy: Never
       ports:
       - containerPort: 5000
デプロイ!
$ kubectl create -f selenium-python-deployment.yaml --namespace selenium
$ kubectl get pods --namespace selenium
NAME                                     READY   STATUS    RESTARTS   AGE
hello-python-785f88d4d8-9bvng            1/1     Running   0          3m53s
...
テストを走らせてみる
作成したpodからselenium hubにリクエストしてテストを実行する!
$ kubectl exec -it $(kubectl get pods --selector="app=hello-python" --output=template --template="{{with index .items 0}}{{.metadata.name}}{{end}}" --namespace selenium) bash --namespace selenium
root@hello-python-5dc4bfdb4f-zxc5h:/app# vim selenium_test.py
ChromeとFirefoxそれぞれでgoogleページにアクセスするテスト
selenium_test.py
from selenium import webdriver
from selenium.webdriver.common.desired_capabilities import DesiredCapabilities

def check_browser(browser):
 driver = webdriver.Remote(
   command_executor='http://selenium-hub:4444/wd/hub',
   desired_capabilities=getattr(DesiredCapabilities, browser)
 )
 driver.get("http://google.com")
 assert "google" in driver.page_source
 driver.quit()
 print("Browser %s checks out!" % browser)


check_browser("FIREFOX")
check_browser("CHROME")
実行されているかどうか確認するためにChrome, Firefoxのpodにリモート接続してブラウザの動きを確認する。
vnc接続しようとするとpassword求められるので「secret」と入力すればOK
$ kubectl port-forward $(kubectl get pods --selector="app=selenium-node-chrome" --output=template --template="{{with index .items 0}}{{.metadata.name}}{{end}}" --namespace selenium) 5900:5900 --namespace selenium
$ open vnc://127.0.0.1:5900
$
$ kubectl port-forward $(kubectl get pods --selector="app=selenium-node-chrome" --output=template --template="{{with index .items 1}}{{.metadata.name}}{{end}}" --namespace selenium) 5901:5900 --namespace selenium
$ open vnc://127.0.0.1:5901
$
$ kubectl port-forward $(kubectl get pods --selector="app=selenium-node-firefox" --output=template --template="{{with index .items 0}}{{.metadata.name}}{{end}}" --namespace selenium) 5902:5900 --namespace selenium
$ open vnc://127.0.0.1:5902
$
$ kubectl port-forward $(kubectl get pods --selector="app=selenium-node-firefox" --output=template --template="{{with index .items 1}}{{.metadata.name}}{{end}}" --namespace selenium) 5903:5900 --namespace selenium
$ open vnc://127.0.0.1:5903
準備は整った。python テストを実行してみる!
root@hello-python-5dc4bfdb4f-zxc5h:/app# python selenium_test.py
Browser FIREFOX checks out!
Browser CHROME checks out!
するとvncでリモート接続した奴が動き出した!
Chromeでも検索してるぅ

Firefoxでgoogle検索してるぅー

キタコレ。あとは好きなテストケース書いてくだけや。
並列実行
が、しかし、並列実行ちゃんとしてくれるのかな。。てのが気になる
selenium hubに並列でポンポンリクエスト投げ込めば
selenium nodeによろしく処理分散してくれて並列実行してくれるのかな?
5個テストケース作ってみる
selenium_test.py
from selenium import webdriver
from selenium.webdriver.common.desired_capabilities import DesiredCapabilities

def check_browser(browser):
 driver = webdriver.Remote(
   command_executor='http://selenium-hub:4444/wd/hub',
   desired_capabilities=getattr(DesiredCapabilities, browser)
 )
 driver.get("http://google.com")
 assert "google" in driver.page_source
 driver.quit()
 print("Browser %s checks out!" % browser)


def test_one():
   check_browser("CHROME")

def test_two():
   check_browser("CHROME")

def test_three():
   check_browser("CHROME")

def test_four():
   check_browser("CHROME")

def test_five():
   check_browser("CHROME")
pytest-xdistを使って並列実行する検証してみる
root@hello-python-5dc4bfdb4f-zxc5h:/app# pip install pytest-xdist
root@hello-python-5dc4bfdb4f-zxc5h:/app#
root@hello-python-5dc4bfdb4f-zxc5h:/app# python -m pytest -n 4 -v selenium_test.py -s
...
selenium_test.py::test_one
selenium_test.py::test_two
selenium_test.py::test_four
selenium_test.py::test_three
[gw1] PASSED selenium_test.py::test_two
[gw0] PASSED selenium_test.py::test_one
selenium_test.py::test_five
[gw3] PASSED selenium_test.py::test_four
[gw2] PASSED selenium_test.py::test_three
[gw0] PASSED selenium_test.py::test_five

========================================================================== 5 passed in 16.69s ==========================================================================
test_one->test_two->test_fourと順不同に並列して実行されてるみたい
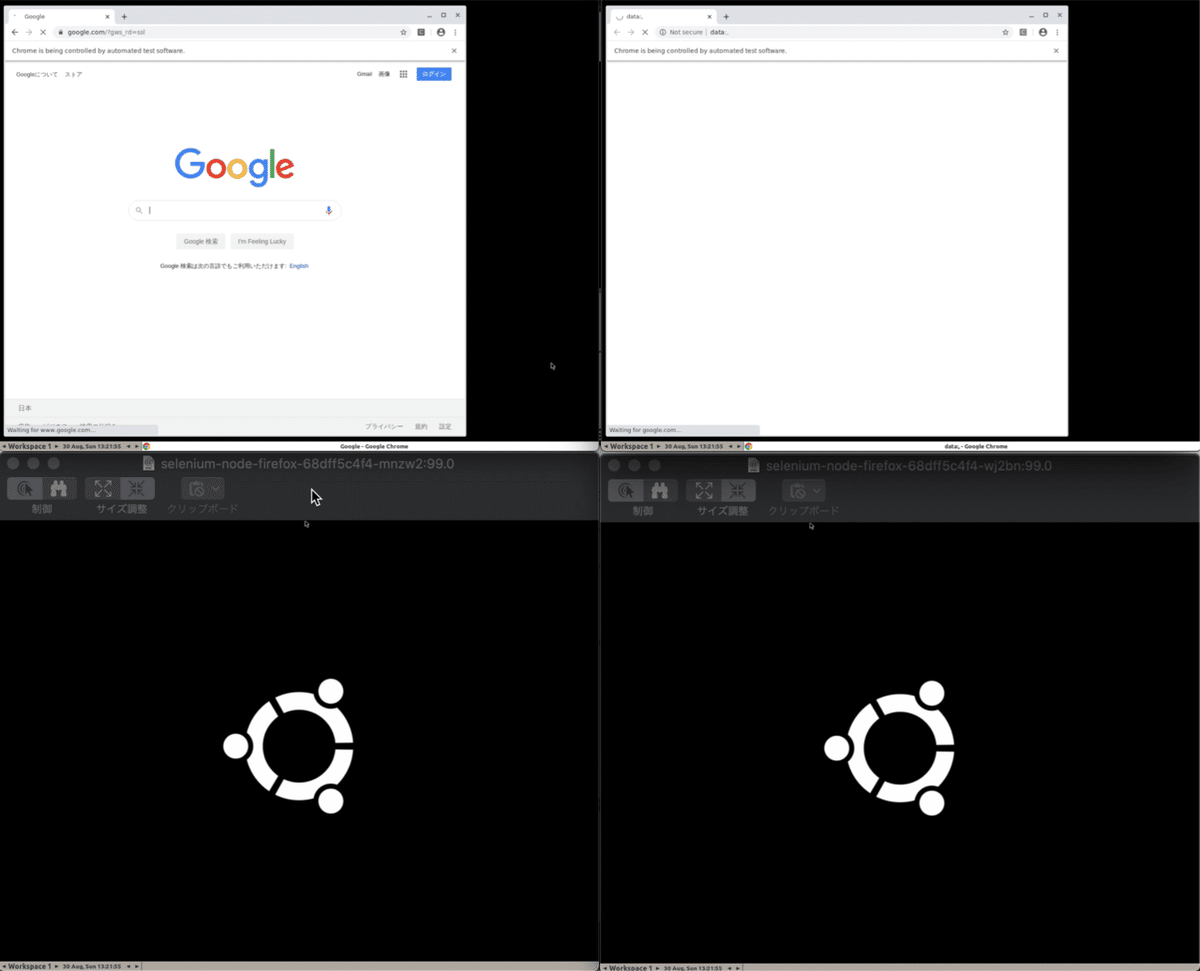
vnc見てみると、ChromeでGoogle Chromeアクセスし始めた!
空いたノードが順次Googleにアクセス初めて5回実行したら終わった
ということで、selenium hubに投げ込めばselenium nodeでよろしく実行してくれることもわかった
まとめ
思った以上に簡単にテストできたので
今作ってるアプリケーションのコアなシナリオのテスト書いて
Cloud Scheduler->Cloud Build(master branch)->GKE(selenium)
という流れで毎日夜テスト走らせるようにしてみよう👶