TWSNMPシリーズをLinux環境で自動起動するための設定
TWSNMP FC本体やtwpcap/twWifiScan/twBlueScanなどのセンサープログラムをLinux環境で利用する場合、OS起動した時に自動的に起動したいと思います。その方法についての解説です。
基本的には、systemdが使える環境の話です。Raspberry Piなど最近の環境ならばほとんど同じだと思います。
実行ファイルをコピーする
TWSNMP FCやセンサープログラムを動作させたいLinux環境にコピーします。おすすめのディレクトリは/opt/twsnmpです。Raspberry Piの場合は
# ls -l /opt/twsnmp/
合計 38656
-rwxr-xr-x 1 root root 3473408 9月 20 05:36 twBlueScan.arm
-rwxr-xr-x 1 root root 3473408 9月 20 05:36 twWifiScan.arm
-rwxr-xr-x 1 root root 32636928 9月 20 05:55 twsnmpfc.arm
serviceファイルを準備する
/etc/systemd/system/のディレクトリにserviceファイルを作成します。
Raspberry Pi上のTWSNMP FCの場合は、
/etc/systemd/system/twsnmpfc.service
というファイル名で中身を
[Unit]
Description=TWSNMP FC
After=network.target

[Service]
ExecStart=/opt/twsnmp/twsnmpfc.arm -datastore /var/twsnmpfc

Restart = always
Type = simple

[Install]
WantedBy=multi-user.target
のような感じにします。起動パラメータは、お好みに合わせて設定してください。TWSNMP FCの場合は、データストアのディレクトリを作成しておいてください。この例では、/var/twsnmpfcです。
手動起動で試してみる
次のコマンドを実行します。
# systemctl start twsnmpfc.service
起動します。serviceファイルが正しければ何も表示されないです。
起動できたか確認する
次のコマンドを実行します。
# systemctl status twsnmpfc.service
実行していれば
● twsnmpfc.service - TWSNMP FC
  Loaded: loaded (/etc/systemd/system/twsnmpfc.service; disabled; vendor preset: enabled)
  Active: active (running) since Mon 2021-09-20 06:37:13 JST; 19s ago
Main PID: 3516 (twsnmpfc.arm)
   Tasks: 9 (limit: 4915)
  CGroup: /system.slice/twsnmpfc.service
          └─3516 /opt/twsnmp/twsnmpfc.arm -datastore /var/twsnmpfc

9月 20 06:37:30 raspberrypi twsnmpfc.arm[3516]: 2021-09-20T06:37:30.445 start ping
9月 20 06:37:30 raspberrypi twsnmpfc.arm[3516]: 2021-09-20T06:37:30.446 ping err=socket: permission denied
9月 20 06:37:30 raspberrypi twsnmpfc.arm[3516]: 2021-09-20T06:37:30.446 start report
9月 20 06:37:30 raspberrypi twsnmpfc.arm[3516]: 2021-09-20T06:37:30.447 start logger
9月 20 06:37:30 raspberrypi twsnmpfc.arm[3516]: 2021-09-20T06:37:30.447 start monitor
9月 20 06:37:30 raspberrypi twsnmpfc.arm[3516]: 2021-09-20T06:37:30.447 start map
9月 20 06:37:30 raspberrypi twsnmpfc.arm[3516]: 2021-09-20T06:37:30.447 start ai
9月 20 06:37:30 raspberrypi twsnmpfc.arm[3516]: 2021-09-20T06:37:30.447 start notify
9月 20 06:37:30 raspberrypi twsnmpfc.arm[3516]: 2021-09-20T06:37:30.447 check notify last=16a6539d6597c4b1 len=2
9月 20 06:37:30 raspberrypi twsnmpfc.arm[3516]: 2021-09-20T06:37:30.449 check old report dur=7.5µs
のような状態を関連するログが表示されます。
停止している場合は、
● twsnmpfc.service - TWSNMP FC
  Loaded: loaded (/etc/systemd/system/twsnmpfc.service; disabled; vendor preset: enabled)
  Active: inactive (dead)
のようになります。
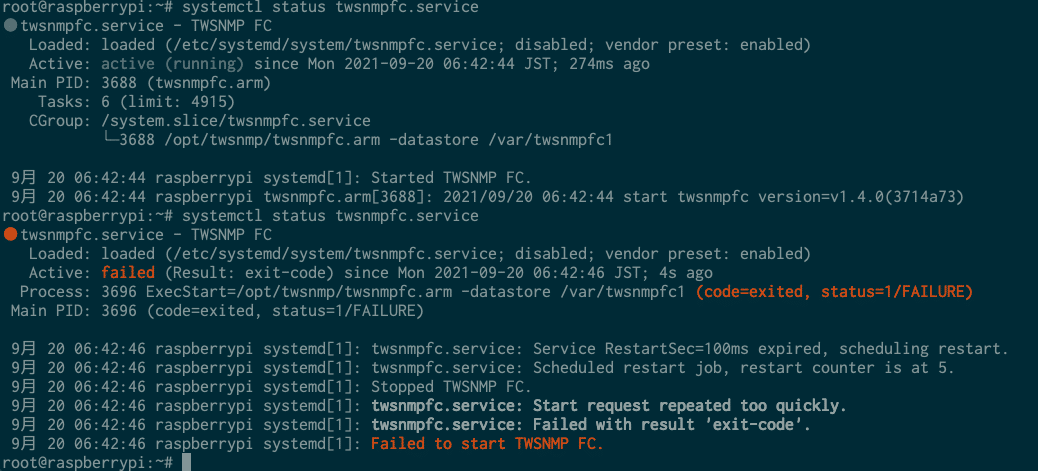
パラメータを間違えて起動できない場合は、

のようにエラーが表示されます。
手動停止する
停止する時は次のコマンドを実行します。
# systemctl stop twsnmpfc.service
問題なければ何も表示されません。
自動起動に設定する
手動で問題なく起動できるようなったら自動起動するために次のコマンドを実行します。
#systemctl enable twsnmpfc.service
問題なければ、以下のようななメッセージが表示されます。
Created symlink /etc/systemd/system/multi-user.target.wants/twsnmpfc.service → /etc/systemd/system/twsnmpfc.service.自動起動になっているか確認する
自動起動の設定がちゃんとできているか心配ならば(エンジニアならきっと心配だと思います)、次のコマンドを実行してください。
#systemctl list-unit-files

のようにenableになっていれば、大丈夫なはずです。心配なら再起動して確認してください。(私は心配なので再起動して確認します。)
自動起動をやめる
自動起動をやめたくなったら次のコマンドを実行します。
# systemctl disable twsnmpfc.service
うまくいけば、
Removed /etc/systemd/system/multi-user.target.wants/twsnmpfc.service.のようなメッセージが表示されます。
センサーのserviceファイルの例
TWSNMP FC以外のセンサープログラムのserviceファイルの例をいくつか紹介しておきます。
amd64環境のtwBlueScanの場合(/etc/systemd/system/twBlueScan.service)
[Unit]
Description=Bluetooth Device  Sensor for TWSNMP
After=network.target

[Service]
ExecStart=/opt/twsnmp/twBlueScan -syslog 192.168.1.250,192.168.1.4

Restart = always
Type = simple

[Install]
WantedBy=multi-user.target
amd64環境のtwWifiScanの場合(/etc/systemd/system/twWifiScan.service)
[Unit]
Description=Wifi AP Sensor for TWSNMP
After=network.target

[Service]
ExecStart=/opt/twsnmp/twWifiScan -syslog 192.168.1.250,192.168.1.4  -iface wlp2s0

Restart = always
Type = simple

[Install]
WantedBy=multi-user.target
です。送信先などのパラメータは必要に応じて変更してください。
この記事の設定で何やっているか気になる人へ
書いてある通りに設定すれば、動作すると思いますが、いったい何をやっているか気になる人は、
が参考になると思います。私もこれを読んでスッキリしました。
いいなと思ったら応援しよう!

