Webサイトを開発してみる(入門編)ー第4章1.10 ー
第4章 1.10 ⑧ search.php のソースコードと詳細

1.10 ⑧ search.php のソースコードと解説
解説) search.php はサイト画面上部のメニュー右にある(サイト内)検索にてキーワードを検索が行われた際、その検索結果を表示するプログラムです。
基本的には archive.php と同様の動作をします。(ヘッダー部、フッター部、サイドバーに加え、下図の青線で囲んだ部分(記事一覧領域)に検索されたキーワードを含む「投稿」記事の一覧を表示します。)

以下が今回のプログラムソースです。
<?php get_header(); ?>

<div class="container">
    <div class="row">
        <div class="col-lg-3">
            <?php get_sidebar(); ?>
        </div>
        <div class="col-lg-1"></div>
        <div class="col-lg-7">
            <header class="content-Header">
                <h1 class="content-Title">
                    検索結果
                </h1>
            </header>
            <?php if (have_posts()) : ?>
                <p class="tom-search-success">「<?php the_search_query(); ?>」の検索結果</p>
                <?php while (have_posts()) :  the_post();  ?>
                    <div id="post-<?php the_ID(); ?>" class="container-fluid border-top border-success border-2"></div>
                    <div class="container">
                        <div class="row">
                            <div class="col-3 my-3">
                                <a href="<?php the_permalink(); ?>">
                                    <?php if (has_post_thumbnail()) : ?>
                                        <?php the_post_thumbnail('archive_thumbnail'); ?>
                                    <?php else : ?>
                                        <img src="<?php echo esc_url(get_template_directory_uri()); ?>/img/dummy-image.png" alt="" width="160" height="160" load="lazy">
                                    <?php endif; ?>
                                </a>
                            </div>
                            <div class="col-9 my-2">
                                <div>
                                    <a href="<?php the_permalink(); ?>">
                                        <div class="h5">
                                            <?php the_title(); ?>
                                        </div>
                                    </a>
                                </div>
                                <div class="h7">
                                    <?php the_excerpt(); ?>
                                </div>
                                <div class="text-end">
                                    <p>
                                        <img src="<?php echo esc_url(get_template_directory_uri()); ?>/img/new.png" alt="new" width="30" height="30">:
                                        <time datetime="<?php echo get_the_date(); ?>"><?php echo get_the_date(); ?></time>
                                        <img src="<?php echo esc_url(get_template_directory_uri()); ?>/img/update.png" alt="update" width="30" height="30">:
                                        <time datetime="<?php echo get_the_modified_date(); ?>"><?php echo get_the_modified_date(); ?></time>
                                    </p>
                                </div>
                            </div>
                        </div>
                    </div>
                <?php endwhile; ?>
            <?php else : ?>
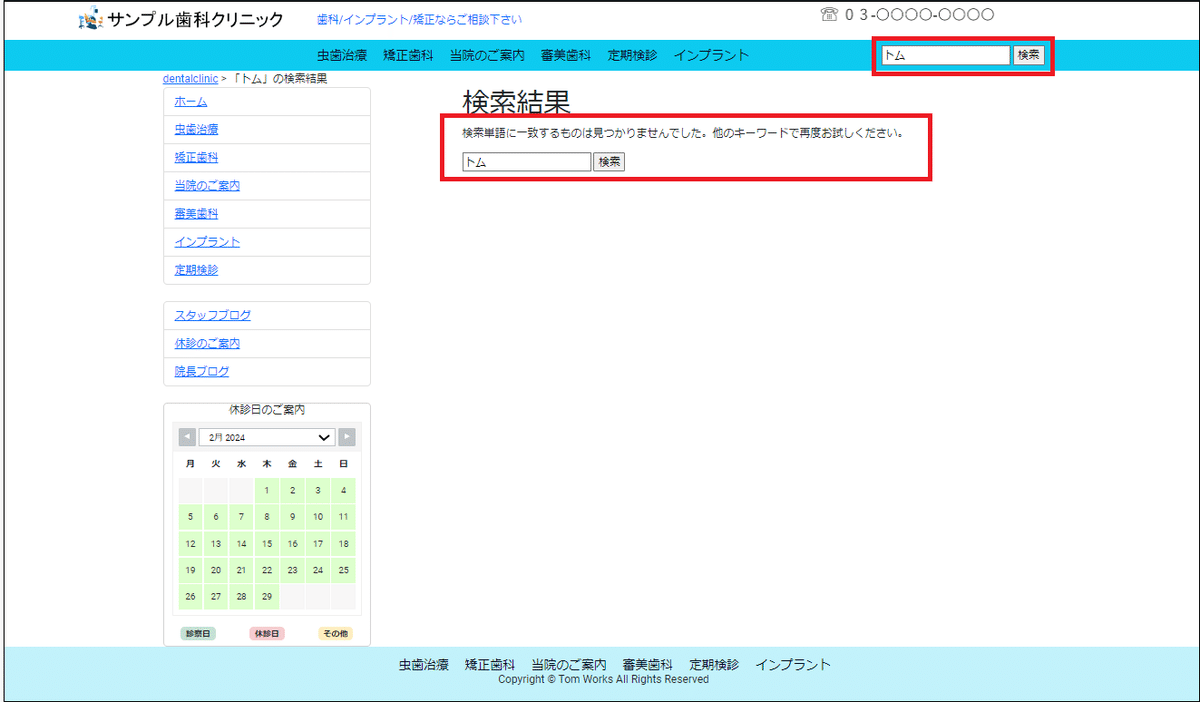
                <p class="tom-search-unsuccess">検索単語に一致するものは見つかりませんでした。他のキーワードで再度お試しください。</p>
                <?php get_search_form(); ?>
            <?php endif; ?>
            <div class="pagination justify-content-center">
                <?php the_posts_pagination(
                    array(
                        'prev_text' => '<span class="sr-only"><i class="bi bi-caret-left-square"></i></span>',
                        'next_text' => '<span class="sr-only"><i class="bi bi-caret-right-square"></i></span>',
                    )
                );
                ?>
            </div>
        </div>
        <div class="col-lg-1"></div>
    </div>
</div>

<?php get_footer(); ?>
解説
主なプログラムソースを解説します。
1:<?php get_header(); ?>
get_header():
ページのヘッダー部(画面の赤線の部分)を読み込む関数です。(ここでheader.php を読み込みます。)
5:<div class=”col-lg-3“>
col-lg-3 :
BootstrapのCSSクラスです。ページの中央部分を12分割したうちの左3分割分をサイドバー(画面の緑線の部分)のために確保します。
6:<?php get_sidebar(); ?>
get_sidebar():
ページのサイドバー(画面の緑線の部分)を読み込む関数です。(ここでsidebar.php を読み込みます。)
9:<div class=”col-lg-7“>
col-lg-7:
5行目と同じくBootstrapのCSSクラスです。ページの中央部分を12分割したうちの右9分割分(画面の青線の部分)の中央7分割分を記事一覧のために確保します。
15/56:
15 <?php if (have_posts()) : ?>
16 <p class=”tom-search-success”>「<?php the_search_query(); ?>」の検索結果</p>
17 <?php while (have_posts()) : the_post(); ?>
18 <div id=”post-<?php the_ID(); ?>” class=”container-fluid border-top border-success border-2″></div>
19 <div class=”container”>
20 <div class=”row”>
21 <div class=”col-3 my-3″>
22 <a href=”<?php the_permalink(); ?>”>
23 <?php if (has_post_thumbnail()) : ?>
24 <?php the_post_thumbnail(‘archive_thumbnail’); ?>
25 <?php else : ?>
26 <img src=”<?php echo esc_url(get_template_directory_uri()); ?>/img/dummy-image.png” alt=”” width=”160″ height=”160″ load=”lazy”>
27 <?php endif; ?>
28 </a>
29 </div>
30 <div class=”col-9 my-2″>
31 <div>
32 <a href=”<?php the_permalink(); ?>”>
33 <div class=”h5“>
34 <?php the_title(); ?>
35 </div>
36 </a>
37 </div>
38 <div class=”h7“>
39 <?php the_excerpt(); ?>
40 </div>
41 <div class=”text-end”>
42 <p>
43 <img src=”<?php echo esc_url(get_template_directory_uri()); ?>/img/new.png“ alt=”new” width=”30″ height=”30″>:
44 <time datetime=”<?php echo get_the_date(); ?>”><?php echo get_the_date(); ?></time>
45 <img src=”<?php echo esc_url(get_template_directory_uri()); ?>/img/update.png” alt=”update” width=”30″ height=”30″>:
46 <time datetime=”<?php echo get_the_modified_date(); ?>”><?php echo get_the_modified_date(); ?></time>
47 </p>
48 </div>
49 </div>
50 </div>
51 </div>
52 <?php endwhile; ?>
53 <?php else : ?>
54 <p class=”tom-search-unsuccess”>検索単語に一致するものは見つかりませんでした。他のキーワードで再度お試しください。</p>
55 <?php get_search_form(); ?>
56 <?php endif; ?>
☆ ページの記事一覧領域(画面の青線の部分)に検索されたキーワードを含む投稿記事の一覧を表示します。
15 if (have_posts()):
WordPressの記事があるかどうかを判定します。
16 the_search_query():
検索枠に入力されたキーワードを出力する関数です。
17 while (have_posts()) : the_post():
WordPressの記事がある間は記事を1件ずつ取り出すループです。(52行目のendwhileまでを繰り返します。)
18 the_ID():
現在の投稿記事のIDを出力します。
22,32 the_permalink():
現在の投稿記事のパーマリンクを出力しリンク設定します。
23 if (has_post_thumbnail()
24 the_post_thumbnail(‘archive_thumbnail’):
現在の記事にアイキャッチ画像の設定があるかを確認し、ある場合はその画像を表示します。
尚、functions.phpにて、
7 add_theme_support(‘post-thumbnails’)
10 add_image_size(‘archive_thumbnail’, 160, 160, true)
と定義しアイキャッチ画像を有効化、及び archive_thumbnail のサイズを設定しています。
26,43,45 echo esc_url(get_template_directory_uri()):
① esc_url() はWordPressでhref属性やsrc属性に指定するURLをXSSなどの攻撃からエスケープ処理(無害化)するセキュリティ用の関数です。
② get_template_directory_uri() はWordPressで有効になっているテーマフォルダーへのパスを取得する関数です。
26 /img/dummy-image.png:
アイキャッチ画像の設定が無い場合は代わりにダミー画像(オリジナルテーマTomWorksDentalフォルダにあるimgフォルダ内のdummy-image.png)を表示します。
33,34 h5, the_title():
記事のタイトルをh5(BootstrapのCSSクラス)の大きさで表示します。
38,39 h7, the_excerpt():
記事の抜粋をh7(BootstrapのCSSクラス)の大きさで表示します。
☆次に投稿記事を新規に作成した日付と更新した日付を表示します。
43,45 /img/new.png、/img/update.png:
オリジナルテーマTomWorksDentalフォルダにあるimgフォルダ内のnew.png、update.png画像を表示します。
44 get_the_date():
現在の記事を新規に作成した日付を取得します。(表示形式は、WordPress管理画面の「設定」>「一般」の日付形式に従います。)
46 get_the_modified_date():
現在の記事を更新した日付を表示します。
(表示形式は上記と同じです。)
54 <p class=”tom-search-unsuccess”>検索単語に一致するものは見つかりませんでした。他のキーワードで再度お試しください。</p>
55 <?php get_search_form(); ?>:
検索したキーワードを含め投稿記事が無い場合に上記メッセージとサイト内検索用の検索枠を表示します。※下図を参考にして下さい。
58/64:
58 <?php the_posts_pagination(
59 array(
60 ‘prev_text‘ => ‘<span class=”sr-only”><i class=”bi bi-caret-left-square”></i></span>’,
61 ‘next_text’ => ‘<span class=”sr-only”><i class=”bi bi-caret-right-square”></i></span>’,
62 )
63 );
64 ?>
☆同一カテゴリーで表示される投稿記事数が「最大投稿数」を超えた場合、「ページネーション(ページ送り)」を表示し、まだ表示する記事があることを示します。(※参考:第4章1.9 ページネーション(ページ送り)の例)
58 the_posts_pagination:
ページネーション(ページ送り)を表示する関数です。
60,61 prev_text、next_text’:
the_posts_pagination の配列キーです。前(後)のページへのリンクを表示します。
60,61 <i class=”bi bi-caret-left-square”></i>、<i class=”bi bi-caret-right-square”></i>:
BootstapのIcon(左・右の矢印)を使っています。
71<?php get_footer()
get_footer():
ページのフッター部(画面の黄線の部分)を読み込む関数です。
(ここでfooter.php を読み込みます。)
※参考:検索したキーワードを含め投稿記事が無い場合に、下図のようにメッセージとサイト内検索用の検索枠を表示します。

いいなと思ったら応援しよう!

