
YOLOv8をONNXに変換して動かしてみる

前回の記事では、YOLOv8で物体検出を行う手順を紹介しました。
今回は前回からの続きで、学習したYOLOv8のモデルをONNX形式に変換し、ONNX Runtime で実行する方法について紹介します。
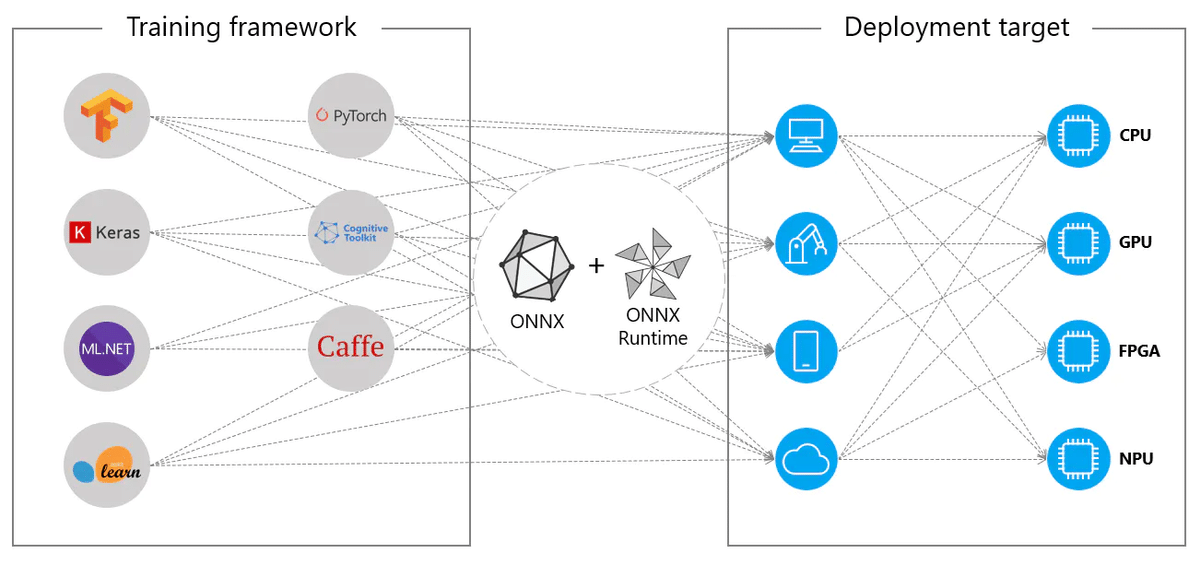
■ ONNXとは
機械学習モデルを、異なるフレームワーク間でシームレスに移行させるための共通フォーマットです。

通常、TensorFlowのフレームワークで作成した機械学習モデルは、TensorFlow上で実行します。YOLOであればPyTorchがベースとなっているため、実行するにはPyTorchの環境が必要です。
ONNXフォーマットに変換し、ONNX Runtimeを用意することで、様々なハードウェア環境上でモデル推論を行うことが可能になります。
また、ONNX Runtimeでモデルを走らせることにより、(GPUを積んでいない)CPU環境での高速化が見込まれます。一般的にPyTorchやTensorFlowなどの機械学習ライブラリは、モデルの学習や推論などのあらゆる機能をサポートしている為、推論に特化した環境ではありません。ONNX Runtimeはメモリ使用率やバイナリサイズなどが最適化されている為、CPUでの推論の高速化が期待できます。
それでは実際にモデルの変換と実行プログラムを実装していきます。
■ 環境構築
前回のこの記事からの続きです。
・ONNX Runtime
「onnx」と「onnxruntime」ライブラリをインストールします。
ANACONDA Navigator の「YOLOv8」環境(←前回の記事で作成した環境)からインストールします。
※因みに、「onnx」ライブラリはここでインストールしなくても、後ほど記述するPythonプログラムを実行すると自動でインストールしてくれます。

・OpenCV
同様にOpenCVライブラリもインストールします。"opencv" と検索すると「libopencv」「opencv」「py-opencv」が表示されるので、全てインストールします。

■ プログラム実装
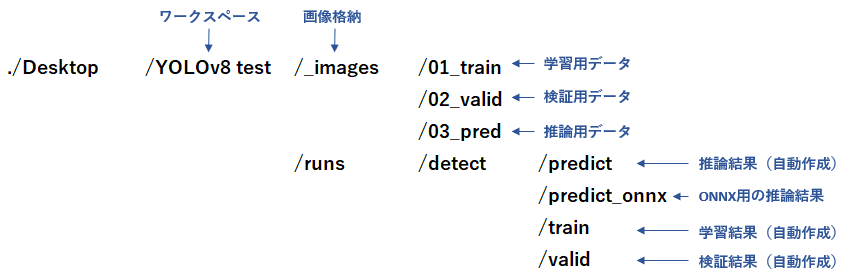
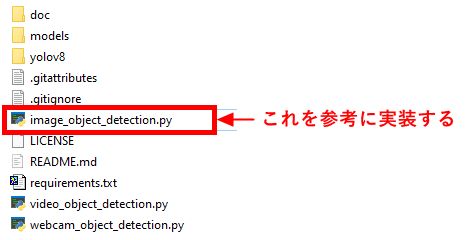
まずはじめに、前回に作成及び、自動で作成されたワークスペース配下のディレクトリ構成についてのおさらいです。
・ONNX形式に変換
前回作成したYOLOv8nでの学習モデルをONNX形式にエクスポートするには、下記URLを参考に実装します。https://docs.ultralytics.com/ja/modes/export/
VS Code を起動し、ワークスペース ("./Desktop/YOLOv8 test") 配下にPythonファイル "CupSoup_Detection_ONNX.py" を作成し、次のコードを実装します。
#
# CupSoup_Detection_ONNX.py
#

from ultralytics import YOLO

model_path = "./runs/detect/train/weights/best.pt"
onnx_path = "./runs/detect/train/weights/best.onnx"

# convert to ONNX model
model = YOLO(model_path)
model.export(format='onnx', imgsz=[480,640])
・モデルのロードと推論
ONNXモデルのロードと推論は、ONNX RuntimeのサイトのAPIリファレンスを参考に実装します。
※ONNX Runtime APIリファレンス:
https://onnxruntime.ai/docs/api/python/api_summary.html
"import onnxruntime" と、Runtimeをインポートしてから下図のようにロードと実行のAPIをコールします。

そしてその後、推論結果を基に後処理を実装します。具体的にはバウンディングボックスの重なりを求めIoUを計算したり、バウンディングボックスを描画したり。
これらの後処理を自前で実装するのは面倒なので、楽をしたいと思います。
GitHubの下記のページに行き、他の方が用意してくださった後処理のプログラムコードをダウンロードします。
https://github.com/ibaiGorordo/ONNX-YOLOv8-Object-Detection/tree/main
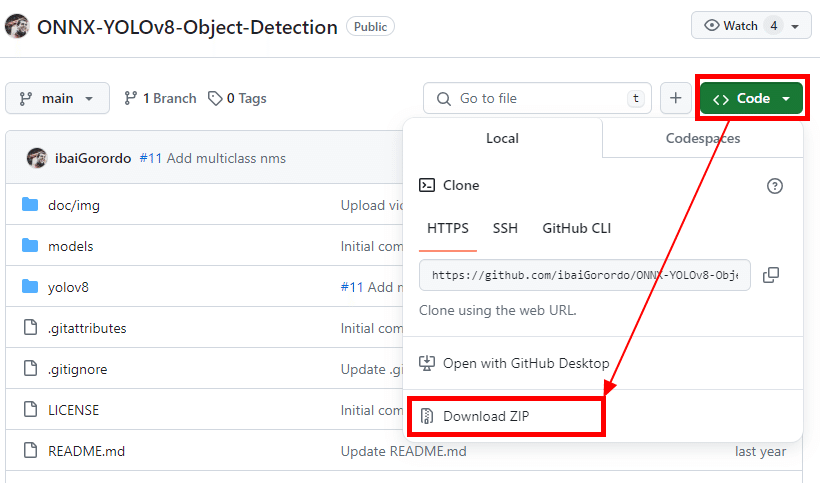
ダウンロードした "ONNX-YOLOv8-Object-Detection-main.zip" を解凍し、"yolov8" フォルダをVS Codeのワークスペース直下に置きます。
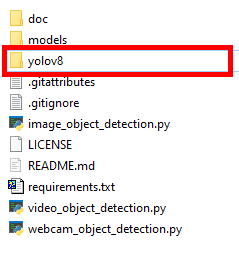
ワークスペース直下に配置した後のディレクトリ構造
./Desktop/YOLOv8 test/yolov8
VS Codeで、先ほど配置した "./yolov8/utils.py" の先頭の方にある "class_names = […]" の部分をコメントアウトし、下図のように変更します。

"CupSoup_Detection_ONNX.py" を、ダウンロードした "image_object_detection.py" を参考にしながらコーディングします。
以下が実装した全コードです。
#############################################################
# Convert trained model to ONNX format and prediction.
#############################################################

import cv2
from PIL import Image
import numpy as np
import os
import glob
import time


from ultralytics import YOLO

model_path = "./runs/detect/train/weights/best.pt"
onnx_path = "./runs/detect/train/weights/best.onnx"

# convert to ONNX model
model = YOLO(model_path)
model.export(format='onnx', imgsz=[480,640])


from yolov8 import YOLOv8

# Initialize yolov8 object detector
yolov8_detector = YOLOv8(onnx_path, conf_thres=0.8, iou_thres=0.5)


# Read image for prediction
img_dir = "./_images/03_pred"
img_file_list = glob.glob(os.path.join(img_dir, "*.bmp"))

# Create a directory for prediction results.
pred_dir = "./runs/detect/predict_onnx/"
if not os.path.exists(pred_dir):
	os.makedirs(pred_dir)

# exec. Prediction
i = 0
sum_t = 0.0
for img_file in img_file_list:
	i += 1
	img_file_no_ext = os.path.splitext(os.path.basename(img_file))[0]
	image = Image.open(img_file)
	imgcv = cv2.cvtColor(np.array(image, dtype=np.uint8), cv2.COLOR_RGB2BGR)

	# Detect Objects
	start_t = time.perf_counter()
	boxes, scores, class_ids = yolov8_detector(imgcv)
	proc_t = (time.perf_counter() - start_t) * 1000.0
	print("{:0>3}".format(i) + " : " + "{:.3f}".format(proc_t) + "ms")
	sum_t += proc_t

	# Draw detections
	combined_img = yolov8_detector.draw_detections(imgcv)

	print(img_file)
	cv2.imwrite(pred_dir + img_file_no_ext + ".jpg", combined_img)


ave_t = sum_t / i
print("Ave. : " + "{:.3f}".format(ave_t) + "ms")
プログラムを実行します。
私のPCのCPUで実行したところ、1枚あたりの平均処理時間は 39.2 ms でした。ONNXに変換する前のYOLOv8nのモデルでの平均処理時間は 49.5 ms だったので、約21%の短縮です。
結果画像は "./runs/detect/predict_onnx" フォルダに出力されています。


以上です。
■ 最後に
最後に参考になるURLをいくつか紹介します。
・Netron
Netronは機械学習モデルを可視化してくれるツールです。せっかくONNX形式に変換したのであれば、Netronを使ってモデルをグラフィカルに表示してみましょう。
・ONNX Runtime
ONNX Runtimeのインストール方法や、様々な言語での実装方法はこちらを参照してください。

・YOLOv8で物体検出Webサービスを作成する
ONNXをWebサービスにデプロイしています。Webサービスの作成方法だけでなく、推論後の後処理をスクラッチで実装する方法についても学べます。