[Shopify]コピペで簡単♪アカウント作成ページをカスタマイズ!(Dawn)79/100

こんにちは。Shopify専門エンジニアのまりん(@crowd37cord)です。
前回、前々回で作成した会員登録規約ページとログインページの続きでアカウント作成ページももう少しオシャレにしようかなぁと思います。
アカウント作成の際に、性別と生年月日の入力欄を作ってみました。必須項目ではないですが入れてくれたらラッキーかな。
対象テーマ:Dawn
前回の投稿の続きになります。
▼ログインページ
▼会員登録規約ページ
✔︎今回のゴール
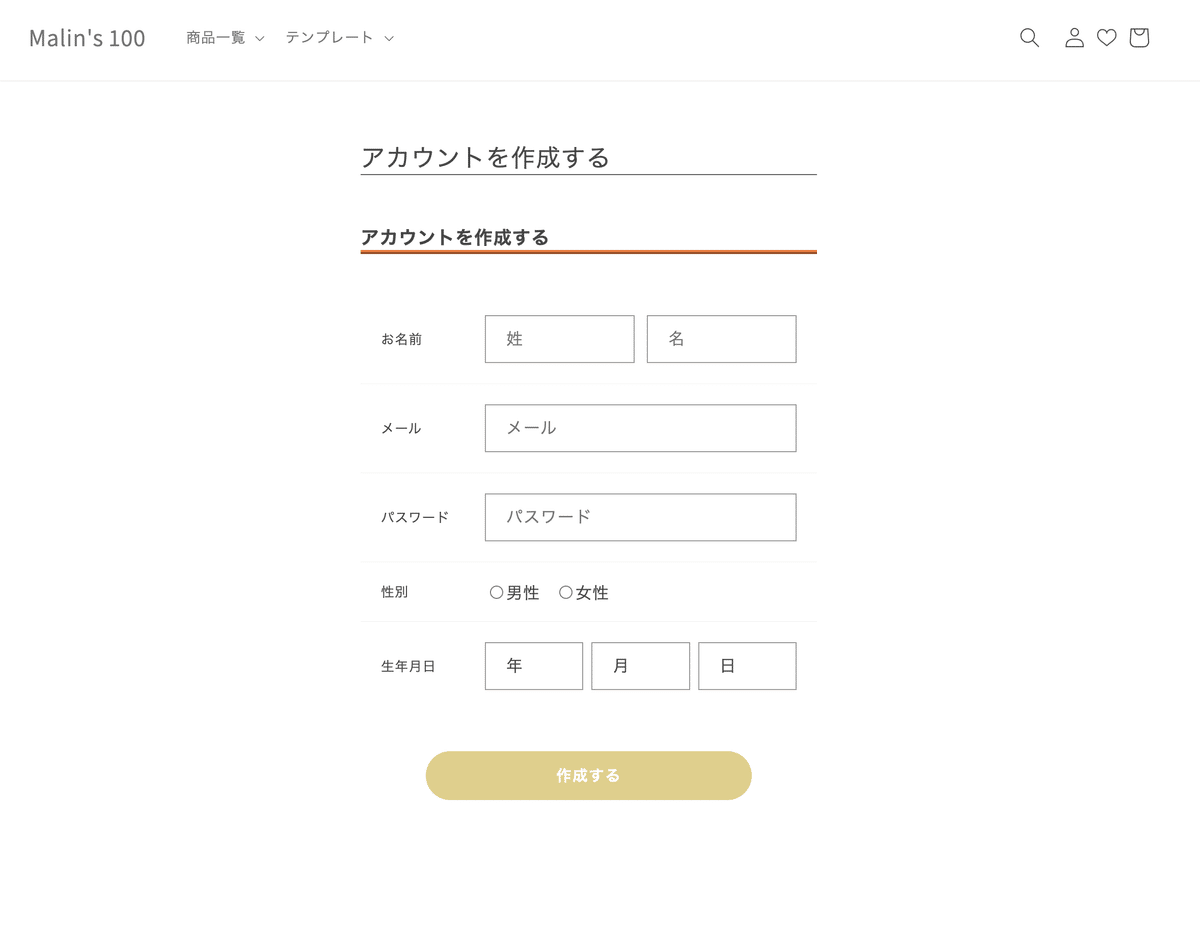
アカウント作成画面で、デフォルトではメールとパスワードでの登録になりますが、性別や生年月日も必須ではないですが入れてくれたら取得ができるようになります。
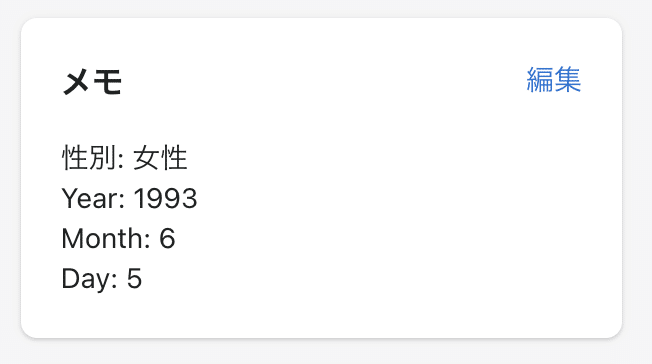
生年月日や性別情報は顧客管理のメモ欄に出てきます。
◆CMSの特徴
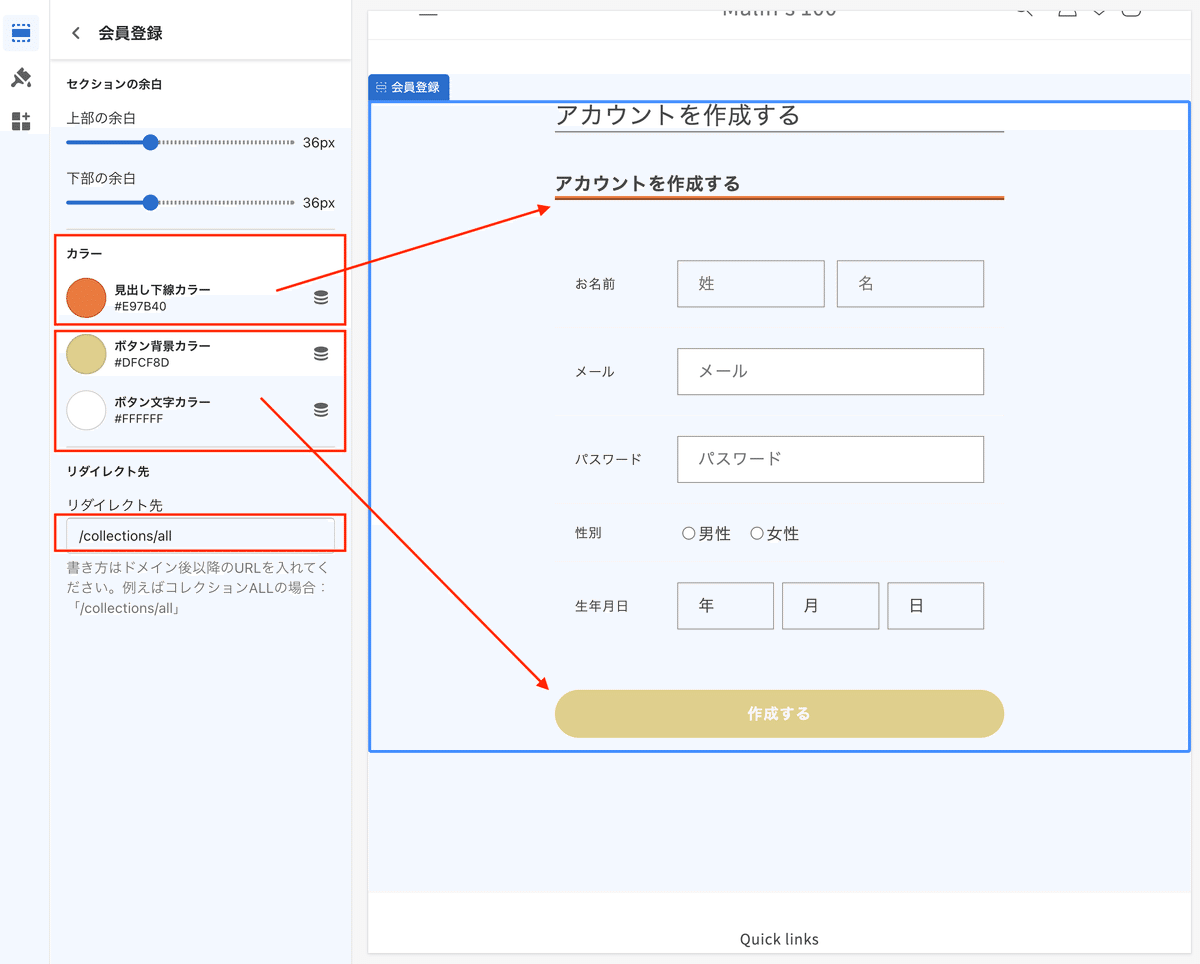
CMSでは下記の設定ができます。
・見出しの下線カラー
・ボタンの背景&文字カラー
・リダイレクト先
リダイレクト先は、登録ボタンクリック後にどのページに遷移したいかでお好みで設定できます。
登録後に商品一覧を見せたい場合は[/collections/all]を指定したりすることができます。
✔︎設置手順
◆事前準備
もしかしたらjQuery入れてない場合は日付選択の箇所がうまく表示されないかも。その場合はjQuery入れてください。
https://note.com/tech_malin/n/nebe055299b09
Step1 セクションを新規作成
1)管理画面>テーマ>コード編集>セクション>新規作成
ファイル名は
main-register-customにします
2)まずはSchemaを追記
下記をコピペ
◆Schemaコード
{% schema %}
{
  "name": "会員登録",
  "settings": [
    {
      "type": "header",
      "content": "t:sections.all.padding.section_padding_heading"
    },
    {
      "type": "range",
      "id": "padding_top",
      "min": 0,
      "max": 100,
      "step": 4,
      "unit": "px",
      "label": "t:sections.all.padding.padding_top",
      "default": 36
    },
    {
      "type": "range",
      "id": "padding_bottom",
      "min": 0,
      "max": 100,
      "step": 4,
      "unit": "px",
      "label": "t:sections.all.padding.padding_bottom",
      "default": 36
    },
    {
      "type": "header",
      "content": "カラー"
    },
    {
      "type": "color",
      "id": "color_border",
      "default": "#f28950",
      "label": "見出し下線カラー"
    },
    {
      "type": "color",
      "id": "color_btn",
      "default": "#c49845",
      "label": "ボタン背景カラー"
    },
    {
      "type": "color",
      "id": "color_btntxt",
      "default": "#fff",
      "label": "ボタン文字カラー"
    },
    {
      "type": "header",
      "content": "リダイレクト先"
    },
    {
      "type": "text",
      "id": "redirect",
      "default": "/account",
      "label": "リダイレクト先",
      "info": "書き方はドメイン後以降のURLを入れてください。例えばコレクションALLの場合:「/collections/all」"
    }
  ]
}
{% endschema %}
ここで一度現在のテンプレートを差し替えておいた方がスムーズなので先にテンプレートにこのセクションを紐付けます。
Step2-1 既存のcustomer/register.liquidを探す(バージョン古めの場合)
1)テンプレート>customer/register.liquid
2)内容を全て削除し下記のタグに置き換える
{% section 'main-register-custom' %}「main-register-custom」はStep1で作成したセクションファイル名になります。もしファイル名が異なる場合はStep1のファイル名と合わせてください。
これで一度CMSが使えるか確認してみます。
missing translationはマニュアルでセクション名変更するだけでOKです。
うまく反映されてました。
Step2-2 既存のcustomer/register.JSONを探す(Dawn Ver7以降の場合)
テンプレートファイルがJSONになっている場合は、下記に置き換える。
{
  "sections": {
    "main": {
      "type": "main-register-custom",
      "settings": {
        "padding_top": 36,
        "padding_bottom": 36
      }
    }
  },
  "order": [
    "main"
  ]
}"type": "main-register-custom",をStep1で作成したセクションファイル名にすれば良いだけです。
Step3 セクションファイルのHTML作成
main-register-custom.liquidのセクションファイルの肉付けをしていきます。
まずはHTMLを追記。
◆main-register-custom.liquidのHTMLコード
<div class="customer register malin__account malin__register-{{ section.id }} section-{{ section.id }}-padding">
  <svg style="display: none">
    <symbol id="icon-error" viewBox="0 0 13 13">
      <circle cx="6.5" cy="6.50049" r="5.5" stroke="white" stroke-width="2"/>
      <circle cx="6.5" cy="6.5" r="5.5" fill="#EB001B" stroke="#EB001B" stroke-width="0.7"/>
      <path d="M5.87413 3.52832L5.97439 7.57216H7.02713L7.12739 3.52832H5.87413ZM6.50076 9.66091C6.88091 9.66091 7.18169 9.37267 7.18169 9.00504C7.18169 8.63742 6.88091 8.34917 6.50076 8.34917C6.12061 8.34917 5.81982 8.63742 5.81982 9.00504C5.81982 9.37267 6.12061 9.66091 6.50076 9.66091Z" fill="white"/>
      <path d="M5.87413 3.17832H5.51535L5.52424 3.537L5.6245 7.58083L5.63296 7.92216H5.97439H7.02713H7.36856L7.37702 7.58083L7.47728 3.537L7.48617 3.17832H7.12739H5.87413ZM6.50076 10.0109C7.06121 10.0109 7.5317 9.57872 7.5317 9.00504C7.5317 8.43137 7.06121 7.99918 6.50076 7.99918C5.94031 7.99918 5.46982 8.43137 5.46982 9.00504C5.46982 9.57872 5.94031 10.0109 6.50076 10.0109Z" fill="white" stroke="#EB001B" stroke-width="0.7">
    </symbol>
  </svg>
  <h1>
    {{ 'customer.register.title' | t }}
  </h1>
  <h2>
    {{ 'customer.register.title' | t }}
  </h2>
  {%- form 'create_customer', novalidate: 'novalidate' -%}
    <input type="hidden" name="return_to" value="{{ section.settings.redirect }}">
    {%- if form.errors -%}
      <h2 class="form__message" tabindex="-1" autofocus>
        <svg aria-hidden="true" focusable="false" role="presentation">
          <use href="#icon-error" />
        </svg>
        {{ 'templates.contact.form.error_heading' | t }}
      </h2>
      <ul>
        {%- for field in form.errors -%}
          <li>
            {%- if field == 'form' -%}
              {{ form.errors.messages[field] }}
            {%- else -%}
              <a href="#RegisterForm-{{ field }}">
                {{ form.errors.translated_fields[field] | capitalize }}
                {{ form.errors.messages[field] }}
              </a>
            {%- endif -%}
          </li>
        {%- endfor -%}
      </ul>
    {%- endif -%}


      <table>
        <tbody>
          <tr>
            <th>お名前</th>
              <td class="malin__flex">
                <div class="field grid__half">
                <input
                  type="text"
                  name="customer[last_name]"
                  id="RegisterForm-LastName"
                  aria-required="true"
                  {% if form.last_name %}value="{{ form.last_name }}"{% endif %}
                  autocomplete="family-name"
                  placeholder="{{ 'customer.register.last_name' | t }}"
                >
                <label for="RegisterForm-LastName">
                  {{ 'customer.register.last_name' | t }}
                </label>
              </div>

              <div class="field grid__half">
                <input
                  type="text"
                  name="customer[first_name]"
                  id="RegisterForm-FirstName"
                  {% if form.first_name %}value="{{ form.first_name }}"{% endif %}
                  autocomplete="given-name"
                  placeholder="{{ 'customer.register.first_name' | t }}"
                >
                <label for="RegisterForm-FirstName">
                  {{ 'customer.register.first_name' | t }}
                </label>
              </div>
            </td>
          </tr>
          <tr>
            <th>メール</th>
            <td>
              <div class="field">
                <input
                  type="email"
                  name="customer[email]"
                  id="RegisterForm-email"
                  {% if form.email %} value="{{ form.email }}"{% endif %}
                  spellcheck="false"
                  autocapitalize="off"
                  autocomplete="email"
                  aria-required="true"
                  {% if form.errors contains 'email' %}
                    aria-invalid="true"
                    aria-describedby="RegisterForm-email-error"
                  {% endif %}
                  placeholder="{{ 'customer.register.email' | t }}"
                >
                <label for="RegisterForm-email">
                  {{ 'customer.register.email' | t }}
                </label>
              </div>
              {%- if form.errors contains 'email' -%}
                <span id="RegisterForm-email-error" class="form__message">
                  <svg aria-hidden="true" focusable="false" role="presentation">
                    <use href="#icon-error" />
                  </svg>
                  {{ form.errors.translated_fields['email'] | capitalize }} {{ form.errors.messages['email'] }}.
                </span>
              {%- endif -%}
            </td>
          </tr>
          <tr>
            <th>パスワード</th>
            <td>
              <div class="field">
                <input
                  type="password"
                  name="customer[password]"
                  id="RegisterForm-password"
                  aria-required="true"
                  {% if form.errors contains 'password' %}
                    aria-invalid="true"
                    aria-describedby="RegisterForm-password-error"
                  {% endif %}
                  placeholder="{{ 'customer.register.password' | t }}"
                >
                <label for="RegisterForm-password">
                  {{ 'customer.register.password' | t }}
                </label>
              </div>
              {%- if form.errors contains 'password' -%}
                <span id="RegisterForm-password-error" class="form__message">
                  <svg aria-hidden="true" focusable="false" role="presentation">
                    <use href="#icon-error" />
                  </svg>
                  {{ form.errors.translated_fields['password'] | capitalize }} {{ form.errors.messages['password'] }}.
                </span>
              {%- endif -%}

            </td>
          </tr>
          <tr>
            <th>性別</th>
            <td class="__gender">
              <input type="radio" name="customer[note][性別]" value="男性" id="male"><span>男性</span>
              <input type="radio" name="customer[note][性別]" value="女性" id="female"><span>女性</span>
            </td>
          </tr>
          <tr>
            <th>生年月日</th>
            <td>
              <ul class="grid grid--3-col">
                <li class="grid__item"><div class="field"><select id="year" name="customer[note][Year]" required><option value="0">年</option></select></div></li>
                <li class="grid__item"><div class="field"><select id="month" name="customer[note][Month]" required><option value="0">月</option></select></div></li>
                <li class="grid__item"><div class="field"><select id="day" name="customer[note][Day]" required><option value="0">日</option></select></div></li>
              </ul>
            </td>

          </tr>
        </tbody>
      </table>


    <button id="js-malin-btn" class="malin__btn" type="submit">
      {{ 'customer.register.submit' | t }}
    </button>
  {%- endform -%}
</div>
次に生年月日のJSを挿入します。
<script>
// --------------------▼ 誕生日 ▼--------------------

var time = new Date();
var year = time.getFullYear();

for (var i = year; i >= 1900; i--) {
  createOptionElements(i,'year');
}

for (var i = 1; i <= 12; i++) {
  createOptionElements(i,'month');
}

for (var i = 1; i <= 31; i++) {
  createOptionElements(i,'day');
}

function createOptionElements(num,parentId){
    var doc = document.createElement('option');
    doc.value = doc.innerHTML = num;
    document.getElementById(parentId).appendChild(doc);
}

// --------------------▲ 誕生日 ▲--------------------
</script>
日付が出るようになりましたね。
最後にレイアウトを整えます。
既存のCSSを上部にコピペ。
{{ 'customer.css' | asset_url | stylesheet_tag }}こちらも追記。
{%- style -%}
  .section-{{ section.id }}-padding {
    padding-top: {{ section.settings.padding_top | times: 0.75 | round: 0 }}px;
    padding-bottom: {{ section.settings.padding_bottom | times: 0.75 | round: 0 }}px;
  }

  @media screen and (min-width: 750px) {
    .section-{{ section.id }}-padding {
      padding-top: {{ section.settings.padding_top }}px;
      padding-bottom: {{ section.settings.padding_bottom }}px;
    }
  }

  .malin__register-{{ section.id }} h2 {
    border-bottom: 4px ridge {{ section.settings.color_border }};
  }
  .malin__register-{{ section.id }} .malin__btn {
    background-color: {{ section.settings.color_btn }};
    color: {{ section.settings.color_btntxt }};
  }
{%- endstyle -%}
Step4 追加のCSSを作成
1)アセット>新規ファイル作成
前回のログインページで作成したcustom-account.cssを使います。
まだの方は下記の名称でファイル作成しコードをコピペ。
タブ:空のファイル作成
形式:CSS
ファイル名:custom-account
ここから先は
Amazonギフトカード5,000円分が当たる
この記事が気に入ったらチップで応援してみませんか?