
[Shopify]コピペで簡単♪会員登録規約ページ設置方法(Dawn)77/100

こんにちは。Shopify専門エンジニアのまりん(@crowd37cord)です。
今日は会員登録をしてもらう際に規約を表示して同意する&同意しないボタンを設置したページを作成しようと思います。
同意するボタンを押したらアカウント作成画面へ
同意しないボタンを押したらTOPページへ遷移する
という動作にしようと思います。
対象テーマ:Dawn
今回は会員規約のみで次回はログイン画面から遷移できるようにしてみようと思っています。
✔︎今回のゴール


◆CMSの特徴


●メインビジュアル画像:非表示にしたい場合は挿入なしで
●ボタン文字:ボタン1とボタン2のテキスト
●カラー:
・トップの見出し
・コンテンツないのH2の下線
・ボタンの文字 ※1と2は共通
・ボタン1の背景
・ボタン2の背景
✔︎設置手順
Step1 セクションを新規作成
1)管理画面>テーマ>コード編集>セクション>新規作成
ファイル名は
section-entry-kiyakuにしておきます。
2)作成したら下記のSchemaをコピペ
◆Schemaコード
{% schema %}
{
  "name": "会員登録規約",
  "settings": [
    {
      "type": "header",
      "content": "t:sections.all.padding.section_padding_heading"
    },
    {
      "type": "range",
      "id": "padding_top",
      "min": 0,
      "max": 100,
      "step": 4,
      "unit": "px",
      "label": "t:sections.all.padding.padding_top",
      "default": 0
    },
    {
      "type": "range",
      "id": "padding_bottom",
      "min": 0,
      "max": 100,
      "step": 4,
      "unit": "px",
      "label": "t:sections.all.padding.padding_bottom",
      "default": 36
    },
    {
      "type": "header",
      "content": "メインビジュアル"
    },
    {
      "type": "image_picker",
      "id": "image",
      "label": "画像"
    },
    {
      "type": "header",
      "content": "ボタン文字"
    },
    {
      "type": "text",
      "id": "btn_txt1",
      "default": "同意しない",
      "label": "ボタン1 テキスト"
    },
    {
      "type": "text",
      "id": "btn_txt2",
      "default": "同意して会員登録へ",
      "label": "ボタン2 テキスト"
    },
    {
      "type": "header",
      "content": "カラー"
    },
    {
      "type": "color",
      "id": "color_h1",
      "default": "#000",
      "label": "ページトップ見出しカラー"
    },
    {
      "type": "color",
      "id": "border_h2",
      "default": "#c49845",
      "label": "コンテンツ内の見出しの下線カラー"
    },
    {
      "type": "color",
      "id": "color_btntxt",
      "default": "#fff",
      "label": "ボタン文字カラー"
    },
    {
      "type": "color",
      "id": "color_btn1",
      "default": "#5e5e5e",
      "label": "ボタン1 背景カラー"
    },
    {
      "type": "color",
      "id": "color_btn2",
      "default": "#c49845",
      "label": "ボタン2 背景カラー"
    }
  ]
}
{% endschema %}
とりあえず、HTMLにはテストと記載しておきます。
Step2 テンプレートを新規作成
テンプレート>新規作成
テンプレート:page
形式:JSON
ファイル名:entry-kiyaku

page.entry-kiyaku.jsonが作成できました。
下記のコードを貼り付け
◆page.entry-kiyaku.json
{
  "sections": {
    "main": {
      "type": "section-entry-kiyaku"
    }
  },
  "order": [
    "main"
  ]
}
これでテンプレートを作成できたので、一度新しいページを作成し、このテンプレートを指定しておきます。
Step3 会員規約ページを新規作成
管理画面>オンラインストア>ページ>ページ追加
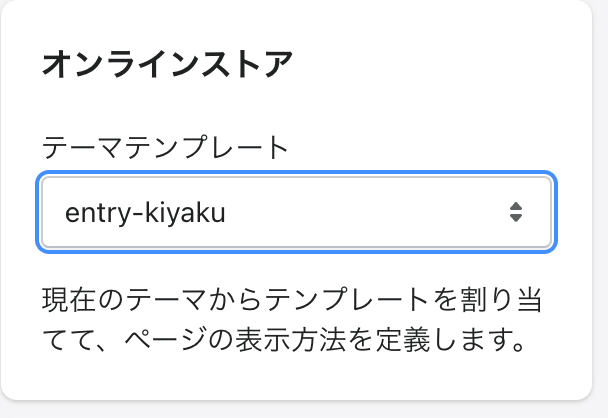
・ページのタイトルやハンドルはお好みでOK
私はタイトル:会員登録規約、ハンドル名:entry-kiyakuにしてみました
・テンプレート:entry-kiyakuを選択
Step4 作成したセクションファイルにHTMLを追記
Step1で作成したsection-entry-kiyaku.liquidに要素を追加していきます。
下記をSchemaの上にコピペ
<div class="malin__kiyaku malin__kiyaku-{{ section.id }} section-{{ section.id }}-padding">

  <div {% if section.settings.image != blank %}class="hero" style="background: url('{{ section.settings.image | img_url: 'master' }}') no-repeat center center / cover;"{% endif %}>
    <h1 style="color:{{ section.settings.color_h1 }}">{{ page.title }}</h1>
  </div>


    <div class="kiyaku__width">
      <div class="kiyaku__wrap">
        <div class="kiyaku__scroll">
        <div class="kiyaku__contents">{{ page.content }}</div>
        </div>
      </div>
    <ul class="malin__flex">
      <li>
        <a href="/" class="kiyaku__btn" style="color:{{ section.settings.color_btntxt }}; background:{{ section.settings.color_btn1 }};">
          {{ section.settings.btn_txt1 }}
        </a>
      </li>
      <li>
        <a href="{{ routes.account_register_url }}" class="kiyaku__btn" style="color:{{ section.settings.color_btntxt }}; background:{{ section.settings.color_btn2 }};">
          {{ section.settings.btn_txt2 }}
        </a>
      </li>
    </ul>
    </div>
</div>
規約内容はページのコンテンツ挿入から入れられるようにしています♪
あとはレイアウトを整えるだけ。
Step5 CSSを新規作成
アセット>新規ファイル追加
空のファイルタブ選択
拡張機能:CSS
ファイル名:custom-kiyaku
【ご注意】
※返金&サポートはしておりません。
※最新のDawnテーマ対象です。
別テーマでも使用できるかもしれませんが検証はしてません。
※コードのみのご紹介で解説などはしておりません。
※2023.1.8時点のコードです。メンテナンスは今後する予定はありません。
※環境によりレイアウト崩れることもありますので適当にCSSで調整していただければと思います。
ここから先は
Amazonギフトカード5,000円分が当たる
この記事が気に入ったらチップで応援してみませんか?