
検証用NW構築

こんにちは、tangoです。
今回なんですが、PacketTracerを用いてプチNW構築を行いたいと思います。
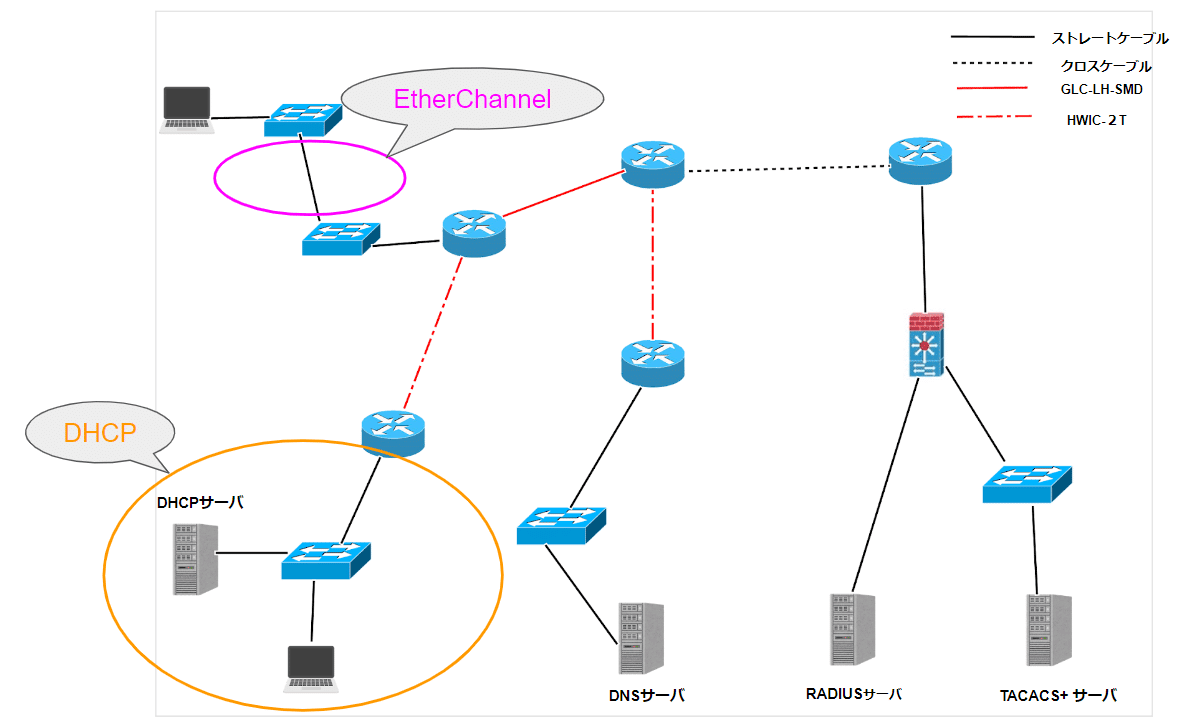
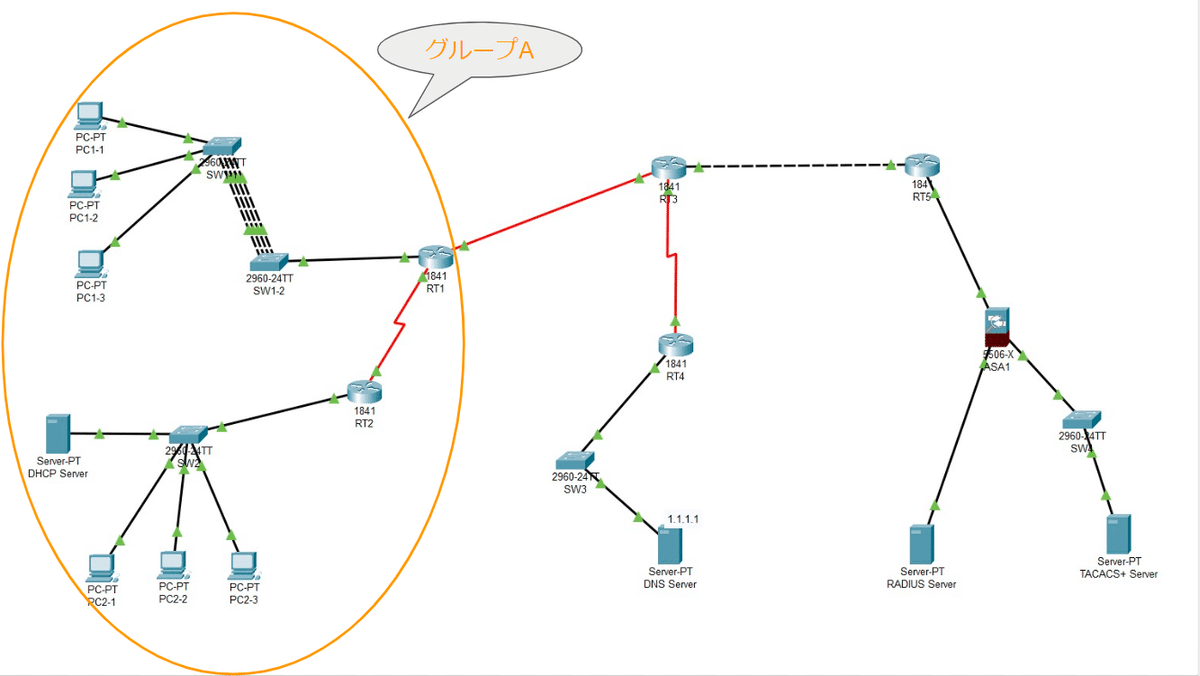
★構成図
今回構築するNW構成図は以下になります。
★グループAの構築
・SW1-1の設定
# グローバルコンフィグレーションモードに変更
enable
configure terminal

# 初期設定
hostname <ホスト名>
no ip domain-lookup

# Rapid PVST+に変更(任意)
spanning-tree mode rapid-pvst
※Rapid PVST+:高速スパニングツリー

# デフォルトゲートウェイの設定
ip default-gateway <RT1-PC側のIPアドレス>

# 即フォワーディング設定
int range <インターフェース開始-インターフェース終了>
spanning-tree portfast
exit

# EtherChannel(リンクアグリゲーション)設定
int range <インターフェース開始-インターフェース終了>
channel-group <GroupNumber> mode {active | passive(※1)}
exit
(※1)active ⇔ passive になるように設定する。


# DHCP設定
int vlan <Vlan番号>
ip address dhcp
no shutdown
exit

# 設定内容の確認
do show running-config
do show etherchannel summary
・SW1-2の設定
# グローバルコンフィグレーションモードに変更
enable
configure terminal

# 初期設定
hostname <ホスト名>
no ip domain-lookup

# Rapid PVST+に変更(任意)
spanning-tree mode rapid-pvst
※Rapid PVST+:高速スパニングツリー

# デフォルトゲートウェイの設定
ip default-gateway <RT1-PC側のIPアドレス>

# EtherChannel(リンクアグリゲーション)設定
int range <インターフェース開始-インターフェース終了>
channel-group <GroupNumber> mode {active | passive(※1)}
exit
(※1)active ⇔ passive になるように設定する。

# DHCP設定
int vlan <Vlan番号>
ip address dhcp
no shutdown
exit

# 設定内容の確認
do show running-config
do show etherchannel summary
・RT1の設定
# グローバルコンフィグレーションモードに変更
enable
configure terminal

# 初期設定
hostname <ホスト名>
no ip domain-lookup
line console 0
logging synchronous
exit

# インターフェース設定
int <PC側_インターフェース>
ip address <IPアドレス> <サブネット>
no shut
int <RT2側_インターフェース>
ip address <IPアドレス> <サブネット>
no shut
exit
int <RT3側_インターフェース>
ip address <IPアドレス> <サブネット>
no shut
exit

# IPアドレス設定の確認
do show ip interface brief

# DHCP設定
ip dhcp pool <Pool Name>
network <NWアドレス> <サブネット>
default-router <RT1-PC側のIPアドレス>
dns-server <DNS ServerのIPアドレス>
exit
do show ip dhcp pool
do show ip dhcp binding

# OSPF設定
router ospf <ProcessID(1-65535)>
router-id <IPアドレス>
network <RT3側_NWアドレス> <ワイルドカード> area 0
network <RT2側_NWアドレス> <ワイルドカード> area 0
network <PC側_NWアドレス> <ワイルドカード> area 1
exit
do show running-config | section ospf
・SW2の設定
# グローバルコンフィグレーションモードに変更
enable
configure terminal
# 初期設定
hostname <ホスト名>
no ip domain-lookup
# Rapid PVST+に変更(任意)
spanning-tree mode rapid-pvst
※Rapid PVST+:高速スパニングツリー
# デフォルトゲートウェイの設定
ip default-gateway <RT3-Fa0/0_IPaddress>
# 即フォワーディング設定
int <DNS Server_インターフェース>
spanning-tree portfast
exit
# DHCP設定
int vlan <Vlan番号>
ip address dhcp
no shutdown
exit
# 設定内容の確認
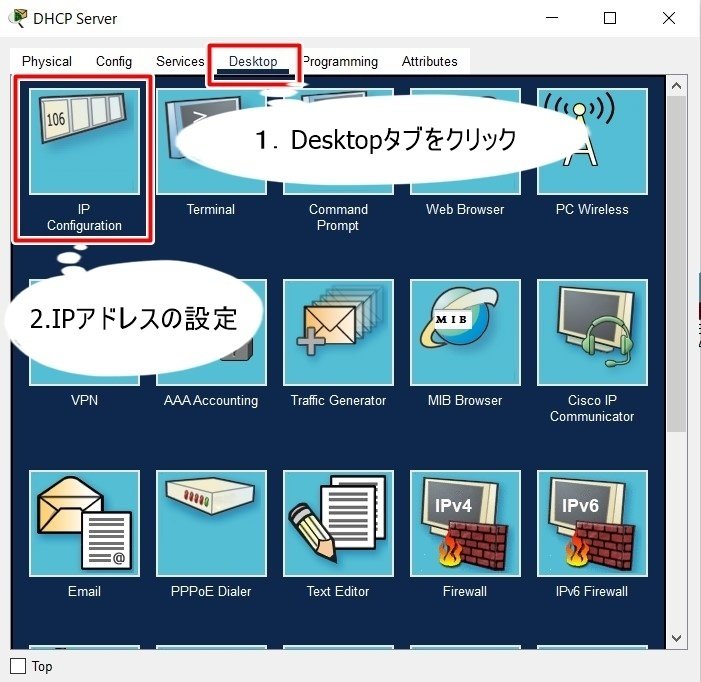
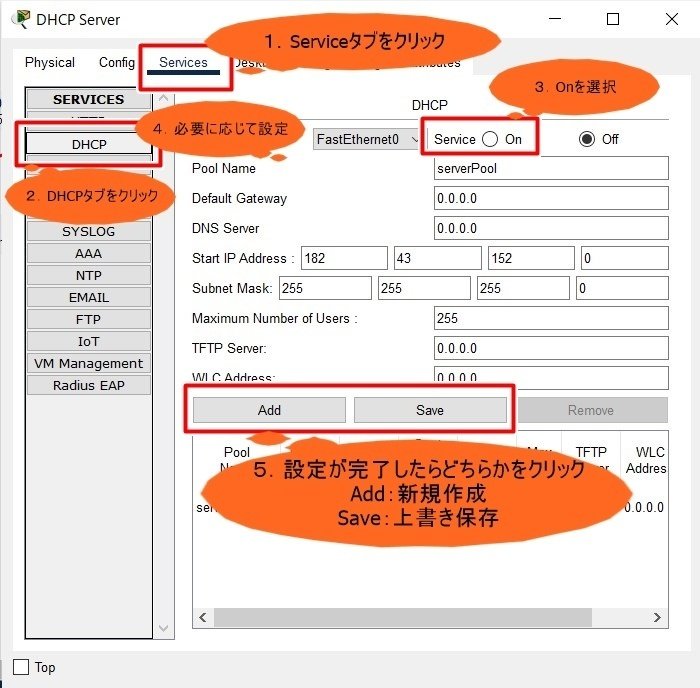
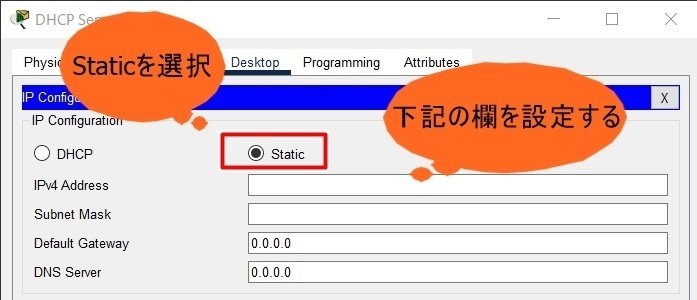
do show running-config・DHCP Serverの設定

・RT2の設定
# グローバルコンフィグレーションモードに変更
enable
configure terminal

# 初期設定
hostname <ホスト名>
no ip domain-lookup
line console 0
logging synchronous
exit

# インターフェース設定
int <RT1側_インターフェース>
ip address <IPアドレス> <サブネット>
no shut

# OSPF設定
router ospf <ProcessID(1-65535)>
router-id <IPアドレス>
network <RT1側_NWアドレス> <ワイルドカード> area 0
network <DHCP側_NWアドレス> <ワイルドカード> area 1
exit
do show running-config | section ospf
★グループBの構築
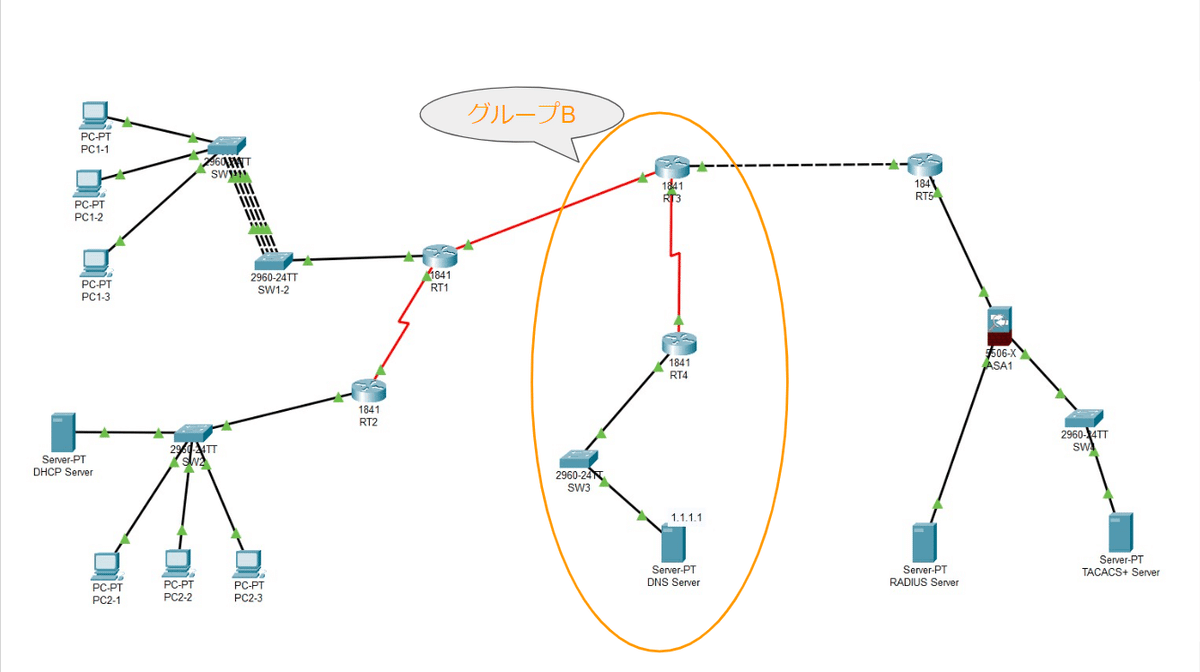
・RT3の設定
# グローバルコンフィグレーションモードに変更
enable
configure terminal

# 初期設定
hostname <ホスト名>
no ip domain-lookup
line console 0
logging synchronous
exit

# インターフェース設定
int <RT1側_インターフェース>
ip address <IPアドレス> <サブネット>
no shut
int <RT4側_インターフェース>
ip address <IPアドレス> <サブネット>
no shut
int <RT5側_インターフェース>
ip address <IPアドレス> <サブネット>
no shut
exit
do show ip interface brief

# OSPF設定
router ospf <ProcessID(1-65535)>
router-id <IPアドレス>
network <RT1側_NWアドレス> <ワイルドカード> area 0
network <RT5側_NWアドレス> <ワイルドカード> area 0
network <RT4側_NWアドレス> <ワイルドカード> area 0
exit
do show running-config | section ospf
・RT4の設定
# グローバルコンフィグレーションモードに変更
enable
configure terminal

# 初期設定
hostname <ホスト名>
no ip domain-lookup
line console 0
logging synchronous
exit

# インターフェース設定
int <RT3側_インターフェース>
ip address <IPアドレス> <サブネット>
no shut
int <DNS Server側_インターフェース>
ip address <IPアドレス> <サブネット>
no shut
exit
do show ip interface brief

# OSPF設定
router ospf <ProcessID(1-65535)>
router-id <IPアドレス>
network <RT2側_NWアドレス> <ワイルドカード> area 0
network <SW2側_NWアドレス> <ワイルドカード> area 2
exit
do show running-config | section ospf
・SW3の設定
# グローバルコンフィグレーションモードに変更
enable
configure terminal

# 初期設定
hostname <ホスト名>
no ip domain-lookup

# Rapid PVST+に変更(任意)
spanning-tree mode rapid-pvst
※Rapid PVST+:高速スパニングツリー

# デフォルトゲートウェイの設定
ip default-gateway <RT3-Fa0/0_IPaddress>

# 即フォワーディング設定
int <DNS Server_インターフェース>
spanning-tree portfast
exit

# 設定内容の確認
do show running-config
・DNS Serverの設定


★グループCの構築
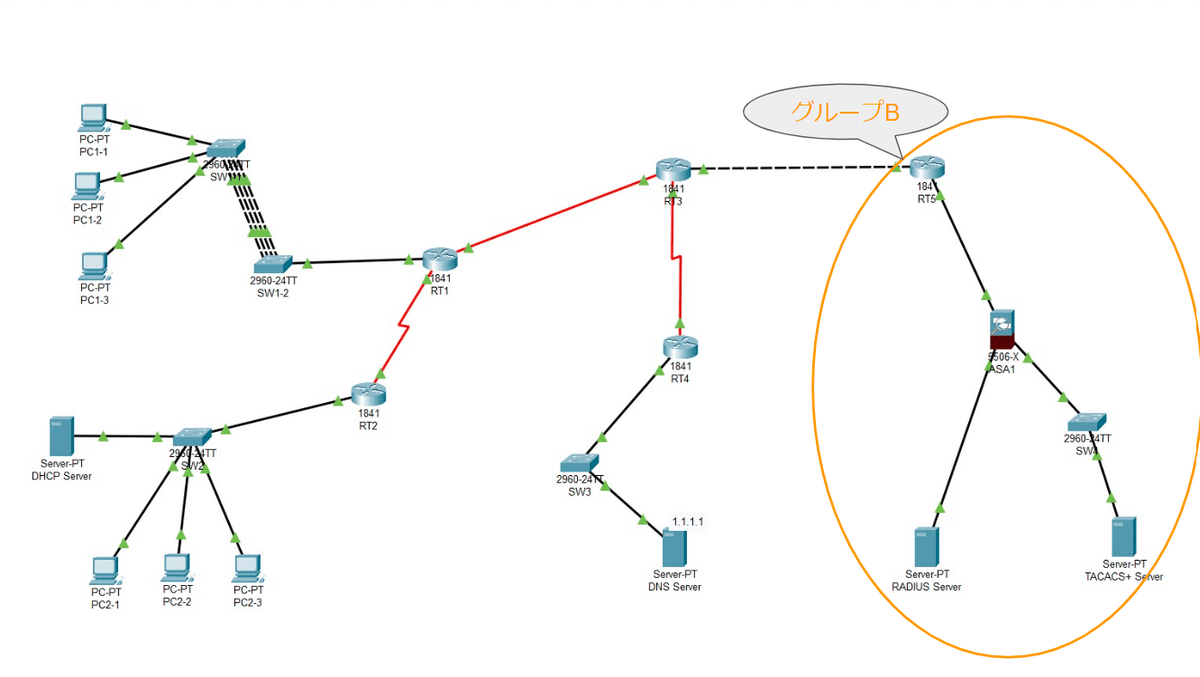
・RT5の設定
# グローバルコンフィグレーションモードに変更
enable
configure terminal

# 初期設定
hostname <ホスト名>
no ip domain-lookup
line console 0
logging synchronous
exit

# インターフェース設定
int <RT3側_インターフェース>
ip address <IPアドレス> <サブネット>
no shut
int <ASA1側_インターフェース>
ip address <IPアドレス> <サブネット>
no shut
exit
do show ip interface brief

# OSPF設定
router ospf <ProcessID(1-65535)>
router-id <IPアドレス>
network <RT3側_NWアドレス> <ワイルドカード> area 0
network <ASA1側_NWアドレス> <ワイルドカード> area 0
exit
do show running-config | section ospf
・ASA1の設定
# グローバルコンフィグレーションモードに変更
enable
configure terminal

# 初期設定
hostname <ホスト名>

# インターフェース設定
int <RT5側_インターフェース>
nameif <name>
security-level <0-100>
ip address <IPアドレス> <サブネット>
no shut
int <RADIUS Server_インターフェース>
nameif <name>
security-level <0-100>
ip address <IPアドレス> <サブネット>
no shut
int <SW4側_インターフェース>
nameif <name>
security-level <0-100>
ip address <IPアドレス> <サブネット>
no shut
exit
show ip

# OSPF設定
router ospf <ProcessID(1-65535)>
router-id <IPアドレス>
network <RT5側__NWアドレス> <サブネット> area 0
network <RADIUS Server_NWアドレス> <サブネット> area 3
network <SW4_NWアドレス> <サブネット> area 3
exit
show running-config | section ospf
・SW4の設定
# グローバルコンフィグレーションモードに変更
enable
configure terminal

# 初期設定
hostname <ホスト名>
no ip domain-lookup

# Rapid PVST+に変更(任意)
spanning-tree mode rapid-pvst
※Rapid PVST+:高速スパニングツリー

# デフォルトゲートウェイの設定
ip default-gateway <ASA1-Gi1/4_IPaddress>

# 即フォワーディング設定
int <TACACS+ Server_インターフェース>
spanning-tree portfast
exit

# 設定内容の確認
do show running-config
・RADIUS Serverの設定
・TACACS+ Serverの設定

以上になります。
みなさんのエンジニアライフに少しでもお役に立てれば幸いです。
ありがとうございました。
★概要欄
・GitHub
https://github.com/tango3304