
[WIXOSS] GrandPrix Dallas Azusa Primer

Hello everyone. I'm Starfruit. I'll be introducing the Azusa deck that achieved remarkable success at GP Dallas—winning the event, securing 2nd and 5th place, and going undefeated in the Swiss rounds.
Although I placed in the top 16, I played a significant role in the deck-building process and encouraged my friends Nichole, Fatigued, and skob to use it. They went on to finish 1st, 2nd, and 5th, respectively.
A big shoutout to my friends for topping the GP and everyone who helped during the testing sessions. Congratulations to Nichole and Fatigued on earning Mugen Shoujo invitations—best of luck in March! Special thanks to Tetrus for deck optimization, kokako for Nanashi practice matches, Dusel for providing JP Blue Archive playsets used in early testing, and @nanashi_anthos for both the decklist inspiration and guidance on playing Azusa.
Introduction
Azusa is a control-tempo deck that excels at managing resources, maintaining a consistent card advantage engine, and creating an open lane on-demand using Azusa's Once Per Turn ability.
Here's Nichole's deck profile. Before reading the article, watch this video for her insights into the deck and reflections on the event.

What We Fought
Nichole
Round 1: Azusa (Win)
Round 2: Aiyai (Win)
Round 3: Azusa (Lose) [Skob]
Round 4: Denonbu (Win)
Round 5: Azusa (Win)
Round 6: Unrest Nanashi (Lose)
Round 7: Unrest Nanashi (Win)
-----------------------------------------------
Top 8: Azusa (Win) [Skob]
Top 4: Unrest Nanashi (Win)
Finals: Azusa (Win) [Fatigued]
Fatigued
Round 1: Sashe (Win)
Round 2: Blue Archive Mugen (Win)
Round 3: Unrest Nanashi (Win)
Round 4: Unrest Nanashi (Lose)
Round 5: Dissona Mikomiko (Win)
Round 6: Blue Archive Myu (Lose)
Round 7: Team Card Jockey (Win)
-----------------------------------------------
Top 8: Myu (W)
Top 4: Unrest Nanashi (Win)
Finals: Azusa (Lose) [Nichole]
skob
Round 1: Denonbu (Win)
Round 2: Azusa (Win)
Round 3: Azusa (Win) [Nichole]
Round 4: Blue Archive Myu (Win)
Round 5: Unrest Nanashi (Win)
Round 6: Unrest Nanashi (Win)
Round 7: Unrest Nanashi (Win)
-----------------------------------------------
Top 8: Azusa (Lose) [Nichole]
Starfruit
Round 1: Neru (Lose)
Round 2: Azusa (Win)
Round 3: Yuzuki (Lose)
Round 4: Blue Archive Mugen (Win)
Round 5: Instigate Nanashi (Win)
Round 6: Dissona Mikomiko (Win)
Round 7: Unrest Nanashi (Win)
Deck List
I'll explain each card in the deck, but feel free to skip to the sections that interest you most.

LRIG Deck
1 Shirasu Azusa
1 Shirasu Azusa [Kick 'em While They're Down]
1 Shirasu Azusa [sagitta mortis]
1 Shirasu Azusa [intulit mortem]
1 Madoka START
1 Madoka//Float
1 Madoka//Dub
1 Rei, On the Wings of Tomorrow
1 Rei*Lunar Blossom
1 Rei*Empty Blade
1 Kronos School of Journalism
1 Tea Party
Life Bursts
4 Hayase Yuuka
2 Aomori Mine
4 Hanekawa Hasumi
4 Saiba Momoi
2 Morizuka Suzumi
4 Servant #
Non-Life Bursts
4 Nekozuka Hibiki
3 Misono Mika
1 Utazumi Sakurako
1 Kudo Izuna
1 Phalaris, Code: Ancient
3 Kyoyama Kazusa
3 Shizuyama Mashiro
4 Iochi Mari
Card Explanations
LRIG Deck
Shirasu Azusa
Why choose Azusa over other LRIGs for the GP? While Azusa might not match the raw power of Dissona LRIGs, she stands out as the most consistent LRIG in the format. Her ability to reliably open a lane and sculpt your hand ensures you can find Servants, key SIGNIs, or crucial follow-ups when needed. This consistency is critical to winning the tournament, where the deck must perform steadily across seven rounds and the top cut to secure victory.
Madoka//Float & Madoka//Dub
Madoka Assists are essential in any Azusa deck. Madoka//Float adds stability by helping you draw Servants, Level 1s, and Hasumi early in the game. Since Azusa aims to establish consistent boards on Turn 1 and Turn 2, drawing three cards with Madoka//Float allows you to dig deeper for those crucial pieces.
Madoka//Dub is a cost-efficient Assist that helps you reach 8 Limit by Turn 3, preserves your Life Cloth for Azusa's Once Per Turn ability, and provides a card draw. The deck also incorporates Rei Assists to force discards to pressure your opponent's hand. Even if your opponent uses Zeno Cluster to recover, Dub enables you to maintain that pressure and sets up powerful follow-ups with Hibiki and Momoi.
Furthermore, Hibiki and Momoi can discard three cards, but if your opponent holds four cards, you would need an additional SIGNI—like another Hibiki or Momoi—to discard the fourth. Dub simplifies this by reducing their hand to three, allowing you to instead commit a different SIGNI, such as Yuuka, for added versatility.
Rei*Lunar Blossom & Rei*Empty Blade
The Rei Assists were pivotal to this deck's success at the GP, transforming it from a decent deck to a true powerhouse.
In almost every matchup, you grow Rei*Lunar Blossom and Rei*Empty Blade on Turn 2. This sequence forces your opponent to discard most of their hand, sets your Limit to 6, and draws three cards to help you secure key pieces like Hasumi, Momoi, and additional Servants. This aggressive hand disruption often compels your opponent to use a Zeno Cluster early, setting up a devastating follow-up on the next turn with complete hand discard pressure from Hibiki and Momoi.
Kronos School of Journalism
To guarantee the bond with Hasumi, Kronos is included in the deck instead of General Student Council.
Tea Party
Most non-Blue Archive decks in this format, such as Dissona and Denonbu, are aggressive. Tea Party's SIGNI Barrier is crucial in this deck, providing a solid defense to prevent being overwhelmed before you can establish control.
Main Deck
Hayase Yuuka
Yuuka helps filter your hand, draws Servants, and makes your boards more resilient to removal. She also helps trigger Hibiki's on-attack discard ability. Decking out can sometimes be beneficial, as it allows you to shuffle back Servants, Hasumi, and Level 3s. This refresh enhances Azusa's Once Per Game ability by offering a better selection of cards.
Nekozuka Hibiki
Hibiki is the only SIGNI in this format that discards two cards. If your opponent still has cards left after growing Rei, Hibiki ensures that their hand continues to be discarded, eventually reducing it to zero.
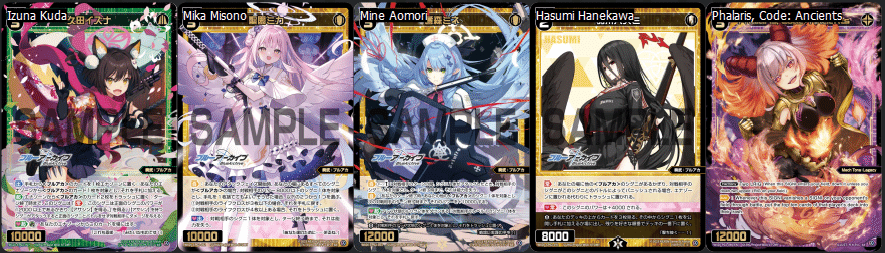
Misono Mika
When it's time to play more aggressively, Mika helps by opening additional holes for a damage race. Her discard effect triggers Hibiki, further depleting your opponent's hand while pushing extra damage. Mika creates more lanes in the final turns, guaranteeing a win even through Life Bursts.
Aomori Mine
Mine wasn't in the initial list, but we added her at the last minute for two reasons. First, she protects against troublesome keywords. Assassin and Lancer can damage through strong boards, and Double Crush can bring you to dangerously low Life Cloth. Mine helps ensure stability against decks like Dissona Hanayo, Yuzuki, and Shiroko.
The second reason is for the mirror match. Mine neutralizes Hasumi's effect, preventing Hasumi from trashing your SIGNIs and removing the extra power to vanish your Level 3s. Thus, Mine forces your Azusa opponent to use their Once Per Turn ability to remove her. Pairing Mine with Yuuka often causes your opponent to play awkwardly into your board.
Utazumi Sakurako & Kudo Izuna & Phalaris, Code: Ancient
Sakurako, Izuna, and Phalaris are grouped as finishers, each helping push for lethal damage and working well together when drawn. You only need one of each, as drawing multiples can create dead draws.
Sakurako increases your maximum damage potential by one on the final turn, making winning through Mel Invisible and Deus Shield easier.
Izuna serves as both a finisher and a recovery tool for important SIGNIs. When you're not ready to win but need specific SIGNIs, Izuna can fetch them from your ener. In the mirror match, Izuna's Assassin can help steal the win when your opponent has 0 Life Cloth, Yuuka on the field, and a Servant with multiple cards in hand.
Phalaris, though not a Blue Archive SIGNI, plays a crucial role when your opponent is at 1 Life Cloth and is down to fewer than 10 cards in the deck. Azusa's Once Per Turn can remove a SIGNI, and Phalaris will attack another SIGNI to mill out your opponent. The refresh damage will reduce their Life Cloth to zero, and another SIGNI can attack for the win. Unlike Yuuka, Hibiki, and Momoi, which require Blue Archive SIGNIs on the field, you can pair Sakurako and Izuna with Phalaris for massive final-turn damage.
Hanekawa Hasumi
Hasumi is the default bond in every game and a key cornerstone of the deck. Once bonded, she becomes a Level 2 with 12,000 power on both turns, effectively functioning as a Level 3 SIGNI. Setting up multiple Hasumis on Turn 2 allows you to trash your opponent's entire field. Against players who mismanage their ener, multiple Hasumis can also lock them from growing to Level 3.
Saiba Momoi
Momoi is essentially an 8,000 power Manomin. She triggers Hibiki for mass discards and turns overdrawn cards into exchanging discards with your opponent. She is played at four copies as she's crucial to have on Turn 2. Momoi excels on 8 Limit boards, where she can help maintain hand pressure while having high power fields.
Kyoyama Kazusa
Kazusa may not be as crucial as Hasumi and Momoi, but she's still valuable for her 8,000 power. She can open lanes when going second to damage race and, on the final turn, helps open three lanes against weakened boards.
Iochi Mari
Mari is the most essential Level 1 Blue Archive SIGNI, and you should always prioritize seeing her first and second. She protects you from removal Level 1 Assist and aggressive SIGNIs like Firecracker.
Morizuka Suzumi
Azusa struggles against SIGNIs that resist her Once Per Turn ability, such as Exia, H2O, Ann//Dissona, and Denonbu after Tuning. Suzumi helps easily manage these threats, providing a reliable solution to such resistant SIGNIs.
Shizuyama Mashiro
Mashiro was the second SIGNI not in the initial list, with Tetrus strongly recommending her inclusion. While the deck performed well going first, it faced challenges going second. Your opponent could sometimes open three lanes, even with Mari and another Level 1. Ideally, you'd want double Mari for going second, but it's hard to achieve consistently.
Mashiro offers a different solution. With Mari and Mashiro, you can still establish a solid defense while enabling immediate resource harassment. Mashiro lets your Mari trash your opponent's Level 1, reducing their ener for Turn 2. Your opponent must commit more hand cards or ener to open three lanes. The ener starvation from Mashiro compounds over time, especially as Hasumi begins trashing their SIGNIs.
Servant
It's necessary to have four copies for every deck to play.
Basic Game Play Patterns
Azusa is a deck focused on resource management over damage. It slows down the opponent with hand destruction and places high-power SIGNIs to limit their opponent's options. The longer the game goes, the more advantageous Azusa becomes. With that in mind, here's an outline of the general flow from mulligan to the end of the game.
Mulligan
Your ideal hand comprises Mari, a Level 1 SIGNI, and a Servant. Regardless of who goes first, mulligan aggressively. Even if your hand is still lacking after the mulligan, Madoka//Float and Kronos will help by drawing deeper into your deck, hopefully fixing your hand by drawing five additional cards.

This hand is solid, including Mari, a Level 1, and a Servant. Shuffle back Momoi and Hasumi into the deck to slightly increase the likelihood of flipping them as Life Bursts.

This hand is passable, and there are two approaches you can consider. The first option is to mulligan the two Mika and Hibiki. The second option is to shuffle back the two Mika, Hibiki, and Mashiro to increase the likelihood of drawing a Servant. With Madoka//Float and Kronos, you can try to redraw the second Level 1.

This hand is mediocre, and the only card worth keeping is Mari. Mulligan Hibiki, Mika, and the two Hasumi to increase the chances of drawing another Level 1 and a Servant.
No Level 1s and no Servant—mulligan the entire hand.
Level 1
Regardless of Who Goes First:
What you charge first depends on your hand and matchup. Against slow decks that don't give much ener, charge as much white ener as possible. Against fast decks like Dissona, charge blue ener to set up for Madoka//Dub later.
You can also grow into Madoka//Float. Since none of the Life Bursts interact with the trash, you can safely discard anything. If your hand is terrible, use Kronos to filter it. Alternatively, you can hold Kronos for Turn 2 to further refine your hand.
Going First:
You want to play Mari and a Level 1 SIGNI, as both will have Shadow 1 at the end of the turn.
Going Second:
Depending on your opponent's Assists, you want to play double Mari or Mari + Mashiro.
If your opponent has a removal Level 1 Assist, play double Mari. Your opponent may use a Level 2 SIGNI to remove one Mari, but the other Mari will still have Shadow 1 to protect herself from the Level 1 Assist.
If your opponent doesn't have a removal Level 1 Assist, play Mari + Mashiro to trash a SIGNI and deny them an ener.
Ultimately, the choice depends on your hand, so don't force a play if it's not viable.
Level 2
Regardless of Who Goes First:
Grow to Rei*Lunar Blossom and Rei*Empty Blade. Rei will let you draw three cards to find Hasumi, discard three random cards from your opponent's hand, and reach 6 Limit. If you haven't used Kronos yet, do so to filter your hand and bond Hasumi. Tea Party can help you find missing cards like Servants, Hasumi, or Momoi while setting up a SIGNI Barrier. You'll typically bond with Azusa, though this may vary depending on the matchup.
Fill the closed lanes with as many Hasumi as possible, prioritizing them for resource denial and board strength. If you don't find Hasumi, you can play Momoi to convert extra cards into discards.
Aim for 8 Limit when Azusa grows to Level 3. Grow Madoka//Dub during your opponent's attack phase. If your hand can play at 7 Limit and your opponent isn't threatening significant damage, you can skip using Madoka//Dub.
Going First:
The ideal setup is double Hasumi + Momoi. The two Hasumi will trash two of your opponent's SIGNIs, while the Rei Assists and Momoi will discard four cards. Your opponent will lose six cards and need to use Zeno Cluster to avoid falling too far behind.
Going Second:
There are a few board setups you can aim for, assuming your opponent has three SIGNIs:
Ideal Board: Triple Hasumi. The three Hasumi will trash three SIGNIs, effectively playing Go to the Top. You can grow lock your opponent, or if they grow to Level 3, they'll do so with little to zero ener.
Alternative Board: Any combination of Momoi and Hasumi doesn't restrict ener as much as triple Hasumi, but it still effectively resource harasses your opponent's hand and ener.
Damage Race Board: Kazusa, Momoi, and Hasumi. Playing these three is useful if you must damage race against aggro or self-resource decks going second. Place Kazusa in front of a SIGNI, tap her to bounce a Level 1, then play Momoi in an open lane and Hasumi in the last closed lane.
Level 3
After reaching Level 3, your approach will vary based on the matchup. Still, you should focus on threatening damage using Azusa's Once Per Turn ability, Hibiki to discard your opponent's hand, and Yuuka to refill your hand. To avoid being hit by upped Life Bursts, it's crucial to threaten only one damage at a time rather than open multiple lanes. What you do next will depend on the matchup, which I will cover in the following section.
Matchups
Unrest Nanashi
Threats:
Nanashi, Hedonim, Umr//Dissona, Alfou//Dissona, Allos Piruluk//Dissona, Bang//Dissona, Unrest☆UN☆REST!
Summary:
Nanashi is one of the most popular and powerful LRIGs in the EN format, and it's the deck that Nichole, Fatigued, skob, and I faced the most often in Swiss.
Azusa can resource harass Nanashi's hand and ener, but Nanashi has several ways to threaten damage in her LRIG deck. With Hedonim's coin skill, Once Per Game, mill effects, and Unrest, Nanashi can quickly deal four points of damage. To mitigate this, Madoka//Dub and Tea Party's SIGNI Barrier can block up to two points, so it's better to play as if you're only working with 5 Life Cloth.
Nanashi's Once Per Game, Hedonim's coin skill, and Umr//Dissona allow her to open lanes through Yuuka. A well-timed Unrest, supported by EXTRAs and Pond Turtles, or a lucky snipe from Allos Piruluk//Dissona, can tear apart your hand and weaken your follow-ups. If Nanashi gains access to Hedonim, she can continually revive Umr//Dissona, which creates an ongoing threat of SIGNI damage + LRIG swing. Without Servants or a means to stop the recursion, Azusa will quickly lose the damage race.
What to Do:
Nanashi requires three black ener to grow to Levels 2 and 3, but the deck typically contains only 14-15 black cards. Against Azusa, Nanashi needs to either charge black ener or grow Mel Revise to generate black ener. However, doing so means she is not charging blue, and it will limit her ability to spam EXTRA or Unrest. Azusa can take advantage of this by using Mashiro and Hasumi to trash their board and restrict their ener. If Nanashi mishandles her ener, Azusa can lock them from growing.
When going second, it's sometimes better not to swing with Azusa if it means denying Nanashi the opportunity to reach Level 3. At Level 2, Nanashi struggles to contest Hasumi and Momoi effectively, leaving them only with the LRIG attack or using an early Unrest. Either way, this works to your advantage, as Azusa can take the initiative and grow to Level 3 first.
Nanashi will generate Virus tokens on your SIGNI Zones throughout the game. Since all your SIGNIs are high-power, the Viruses cannot freely vanish them. Focus on reaching 8 Limit quickly and avoid playing Level 1 SIGNIs.
The next challenge to deal with is Umr//Dissona. When you see Umr in the trash, play Phalaris when it's safe. Phalaris will refresh Nanashi's deck, and since Nanashi typically runs only one Umr//Dissona, she'll have trouble finding Umr again. Remember that Phalaris is not a Blue Archive SIGNI, so Hibiki and Yuuka's Start of Attack Phase triggers won't activate.
Lastly is playing against Unrest. Hold Azusa's Once Per Game until after Nanashi plays Unrest. Nanashi will attempt to use Unrest, EXTRA, and Pond Turtles to empty your hand, hoping that the two cards you draw and whatever you add from Azusa's top three won't be enough to regain tempo. To counter this, use Azusa's Once Per Game after Unrest to find the best follow-up and re-establish your resource engines. Once Nanashi uses Unrest, it becomes significantly more challenging for her to discard your hand completely, giving you the upper hand for the remainder of the game.
What to Bond:
Hasumi and Azusa
Azusa
Threats:
Rei*Lunar Blossom & Rei*Empty Blade, Hasumi, Hibiki
Summary:
In the Azusa mirror match, the primary focus is on resource management rather than dealing immediate damage. Both players will engage in a cycle of drawing cards, discarding hands, and trashing SIGNIs. Managing your resources efficiently while denying your opponent's card advantage is crucial. Ensure you charge enough white ener to reach Level 3 and have the resources to use Azusa's Once-Per-Turn to trash their SIGNIs.
What to Do:
If your opponent is not using Rei Assists, this is an easy win for you. Discarding three cards from the opponent and drawing three cards gives you a massive resource advantage early in the game, and without Rei Assists, they won't be able to catch up.
If your opponent uses Rei Assists, the game becomes much more different. Rei Assists swing tempo drastically, so it is essential to hold off on using them until the right time. At Level 2, you should play on 5 Limit and Level 3, on 7 Limit. If you use Rei Assists too early, you will overdraw and discard to hand size, which is detrimental in a resource-focused match. Also, your opponent will likely be able to grow Rei Assists, replenish their hand, and discard yours. You'll have few resources, making keeping up with their board difficult.
Whether your opponent is on Rei Assists or something else, it is often better to use Madoka//Dub to target your opponent's Hasumi, trying to attack your own Hasumi rather than stopping an open lane. Dub will protect your Hasumi, ensuring it stays on the field to trash their Hasumi. Additionally, Mashiro plays a crucial role in the mirror match, functioning as three extra copies of Hasumi. Since you'll be operating on 5 Limit and 7 Limit, Mashiro can serve as your Level 1 SIGNI, allowing your other SIGNIs—such as Hibiki, Yuuka, and Momoi—to mimic Hasumi's effect and trash your opponent's SIGNIs.
What to Bond:
Hasumi and either Azusa or Yuuka
Bonding with Yuuka is primarily for free draws. Yuuka helps refill your hand, keeping your resources intact while maintaining pressure on your opponent. However, you must carefully manage the number of Yuukas in your deck. Once you've run out of Yuukas, her bond will no longer provide value until you refresh your deck.
The choice between bonding with Azusa or Yuuka depends on your opponent's playstyle. If they focus on vanishing your SIGNIs or if you've already used many of your Yuukas, bonding with Azusa is more efficient. However, if there are still plenty of Yuukas in your deck and your opponent plays more passively, bonding with Yuuka for the card draw can be a better option.
Denonbu
Threats:
Ultra Super Heroes, Tuning, Urith & Ex Assists, Fesonne Magic, Futaba Kayano
Summary:
Denonbu can use Futaba to generate a lot of hand and ener. When they are in a difficult position, Ultra Super Heroes can find extra cards and force damage. Additionally, they can use Tuning to get back two Futabas and generate enough resources to combat Azusa's resource harassment while creating strong, high-powered fields with Shadow immunity. Once Denonbu gets enough resources to stabilize, Mimito and Matoi can convert their ener into damage, such as Lancer and Double Crush.
What to Do:
Focus on resource harassing Denonbu with Rei Assists and Hibiki, applying pressure to their hand. Once you have depleted Denonbu's hand, go for the damage race with Mika and Kazusa. Hold Suzumi until they use Tuning to remove the Shadow, and use Yuuka to protect your board, limiting their removal options to Assists, Matoi Ogami, and Fesonne Magic Black.
What to Bond:
Hasumi and either Azusa or Hibiki.
Bond Azusa if the game if you expect the game to go long. On the other hand, if you're in a good position in resources and can play aggressively, bond with Hibiki. Denonbu doesn't resource harass, allowing you to discard two for Hibiki's bond skill.
Dissona Piruluk
Threats:
Save//Dissona, LOVIT//Dissona, Bang//Dissona, Ann//Dissona, Unrest☆UN☆REST!
Summary:
Dissona Piruluk is similar to Denonbu, generating substantial resources to fight back against Azusa's discards. Piruluk can threaten a full hand discard using Unrest, Pond Turtle, and EXTRA and set up for a devastating final turn with multiple Spells to clear the field.
What to Do:
Focus on resource denial using Rei Assists and Hibiki to disrupt Piruluk's hand and force out Unrest and Zeno. Once you discard Piruluk's hand, apply pressure with Mika and Kazusa. If Ann//Dissona is in their deck, hold Suzumi to deal with Ann's effects.
What to Bond:
Hasumi and Azusa
Dissona Hanayo
Threats:
Hanayo's Assassin, LOVIT//Dissona, Bang//Dissona
Summary:
Hanayo has several ways to bypass Azusa's defenses. Her Once Per Game crushes a Life Cloth, as if you are playing with 6 Life Cloth. She can have a SIGNI gain Assassin to attack through your defenses each turn. Alternatively, the SIGNI can get Double Crush with an open lane. Hanayo is versatile with Pieces in her LRIG deck, using cards like Ultra Super Heroes, Sunspot Memory, Unrest, Instigate, or Connect Spinning, making her strategy problematic to predict.
What to Do:
After discarding Hanayo's hand, limit her damage options. Her main threats are LOVIT//Dissona, Bang//Dissona, and Assassin, so play Yuuka and Mine to protect your Life Cloth. Outside of Pieces and Eldora On Stage, Hanayo has limited card advantage. By choking her resources, Hanayo will eventually run out of steam.
What to Bond:
Hasumi and Azusa
Cards We Did Not Play
Kenzaki Tsurugi
Tsurugi is strong against decks that don't discard your hand, such as Tama and Denonbu. We initially included Tsurugi in the list but replaced her with Mine shortly before the event. We expected to face popular matchups like the Azusa Mirror and Unrest Nanashi, where Mine performs better. Tsurugi's ability to recover a Servant is less impactful in discard-heavy matchups, as your opponent can anticipate and discard your Servant. If your local meta has more non-discard decks, Tsurugi can be better than Mine.
Oono Tsukuyo
Unlike Mashiro, Tsukuyo is only valid when going first and does not provide much value when going second. As the game progresses, Tsukuyo becomes a dead card. You typically avoid playing Level 1s after growing Rei, and while Mari and Mashiro can still be charged as white ener if drawn late, Tsukuyo is green, which can brick your ener.
Kurosaki Koyuki
Since you typically have 6 and 8 Limit, you prioritize playing Momoi for board strength rather than Koyuki. Rei Assists already handles random discards, so the additional random discard from Koyuki is less valuable than Momoi's higher power and board presence.
Yukayuka Assists & Machina Assists
The two Assists serve similar purposes. Madoka Assists are too strong to replace, so the real question is whether Yukayuka or Machina is better to use over Rei. Since Azusa does not use Zeno Cluster, if your opponent, such as Nanashi or Mikomiko, uses Unrest to discard your entire hand on Turn 2, will Yukayuka or Machina help you stabilize? More often than not, the answer is no. Your opponent will likely have a whole field and a full hand of cards. To understand this, let's look at how Dissona mirrors with Unrest typically play out:
Player 1 uses Unrest to discard Player 2's hand
Player 2 uses Zeno Cluster
On Player 2's turn, they use Unrest to discard Player 1's hand
Player 1 uses Zeno Cluster
Azusa does not have a Piece like Unrest to regain tempo. Rei is similar to Unrest in some ways: while Rei doesn't open a lane like Unrest, she draws and discards more cards. Now, let's replace Player 2 with Azusa using Rei Assists:
Player 1 uses Unrest to discard Azusa's hand
On Azusa's turn, grow Rei Assists in discarding Player 1's hand
Player 1 uses Zeno Cluster
Not only did you regain the cards lost from Unrest, but you could also discard your opponent's hand and force their Zeno Cluster. The Zeno Cluster is no longer available to counter Hibiki and Momoi on later turns. In this scenario, would Machina and Yukayuka have the same impact as Rei?
Seminar
If you play Seminar, Madoka//Dub will be your only defense, and you will likely lose to aggro without the SIGNI Barrier. Additionally, after growing Rei Assists, you'll have too many cards in hand, making it awkward to play Seminar in the same turn, as you'll discard too many cards to hand size.
Conclusion
This primer was my first time writing one, and it took much longer than I initially expected. I truly appreciate everyone who has read this far, and I hope my insights into Azusa and the EN meta have helped you better understand the format. If this article is well received, I'll consider writing more in the future. I appreciate your support!