
VRMFrontViewを使った配信、録画画面作成

Cafe Playsさん作のVRMFrontViewというソフトウェアを使ったVRゲームの配信、録画画面の作成方法解説です
使用ソフトウェア
VRMFrontView(Cafe Playsさん作)
バーチャルモーションキャプチャー(あきらさん作)
※pixivFANBOXの有料版が必要です
LIV
OBS Studio 30.2.3
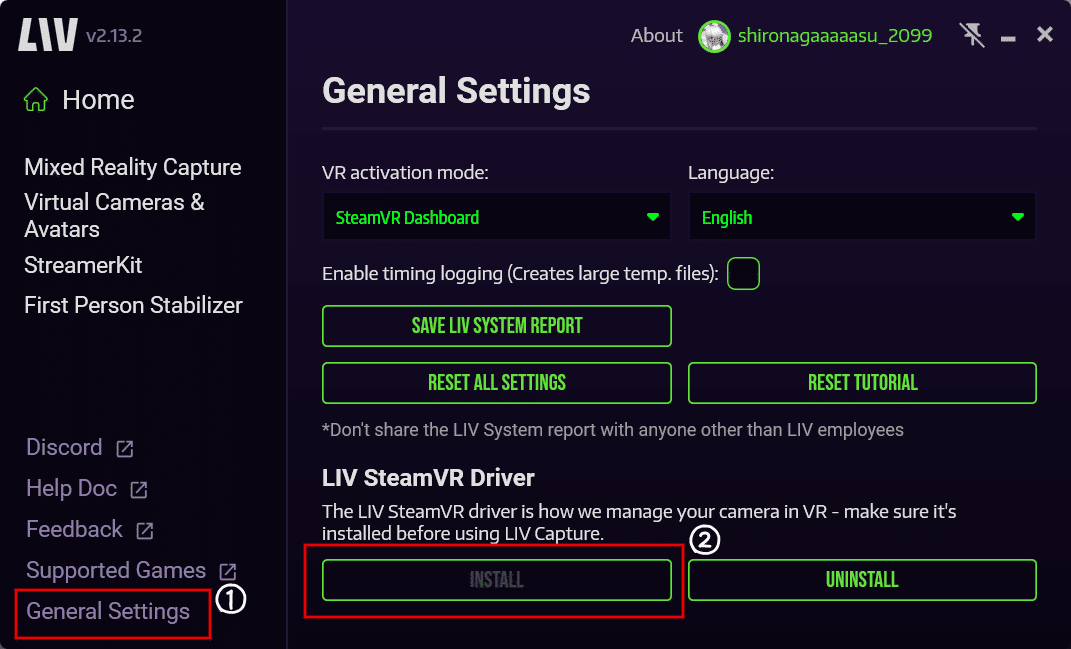
1.LIV導入
SteamからLIVをインストール
LIV の General Settings を選択
LIV SteamVR Driver の INSTALL をクリックしインストールする
完了後LIV終了
2.バーチャルモーションキャプチャー起動
バーチャルモーションキャプチャを起動
コントロールパネル の 詳細設定 をクリック
OSCでモーション送信を有効にする にチェック
Address、Port はデフォルト(127.0.0.1、39539)でも大丈夫


コントロールパネル の キャリブレーション をクリック
キャリブレーションをする

3.VRMFrontView起動、設定
3-1.VRMFrontViewを起動する

3-2.ポートチェック
Avatar タブから VMC Port In がバーチャルモーションキャプチャーのOSCモーション送信を有効にするのポートと同じかチェック
バーチャルモーションキャプチャー、VRMFrontViewともにデフォルトで大丈夫

3-3.背景、床用画像格納
背景や床に使用したい画像をVRMFrontViewインストールフォルダ直下のPictures に格納
背景には.mp4も使える

3-4.背景設定
Enviroment タブで以下を設定
Background Type
Night Star SkyboxやRedなどの単色、透過のTransparent、HorizonSkyboxがある
Background Pictureを使わないときに選択Background Picture
3-3で格納した画像を選択Size、Y Position
サイズと高さの調整ができる

3-5.床設定
Enviroment タブで以下を設定
Floor Picture
3-3で格納した画像を選択Size
Floor Pictureのサイズ調整Allow Transpearency
チェックを付けると影なし、チェック外すと床に影がつくDance Floor Type
Floor Pictureを設定しない場合に選択
Audio Linkを設定すると音に合わせて点滅したり、踏んだ場所の色が変わる床などがあるSize
Dance Floor Typeのサイズ変更Ground Type
ミラーやFloor Pictureを使わないときに床なしにしたりできる

3-6.アバター設定
Avatar タブでアバターのサイズや向き、高さを調整できる
Allow VMC Avatar Scaling
アバターの大きさをバーチャルモーションキャプチャーと同じにする場合チェックAvatar Scale
アバターの大きさ調整Avatar Rotation
アバターの左右の向き調整Avatar Y Position
アバターの上下の位置調整Blendshape Override
アバターのBlendshapeを固定できる
チェックを入れてバーで調整
複数チェックするとチェックした表情が合成される

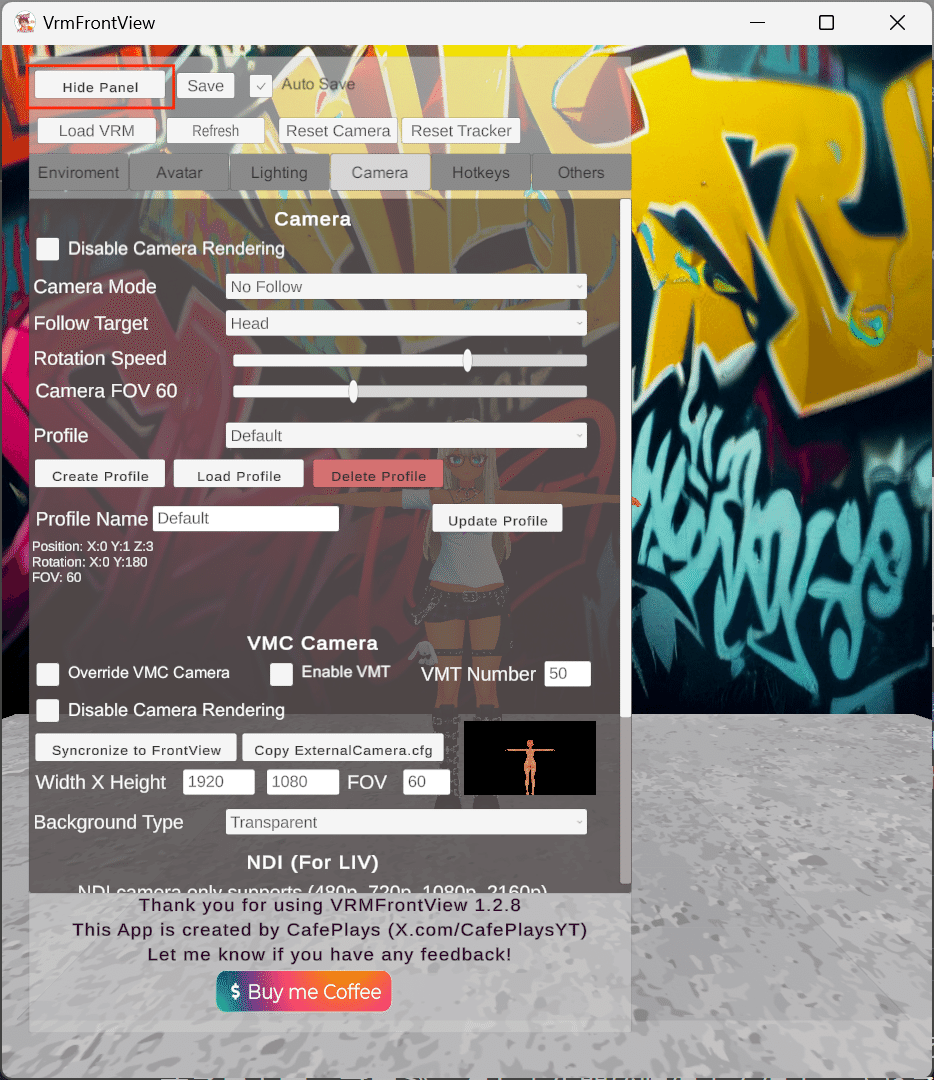
3-7.カメラ位置調整
左上の Hide Panel クリックし、パネル消去した後マウス、キーボードで調整
パネル再表示はマウスカーソルを左上に移動した際に表示される四角をクリック
カメラの画角調整
左クリック+マウス移動
カメラ位置は動かないズームイン、ズームアウト(FOVの調整)
右クリック+マウス上下移動
マウスホイールカメラ位置移動
マウスホイールクリック+マウス移動カメラ位置リセット
パネルのReset Cameraクリック


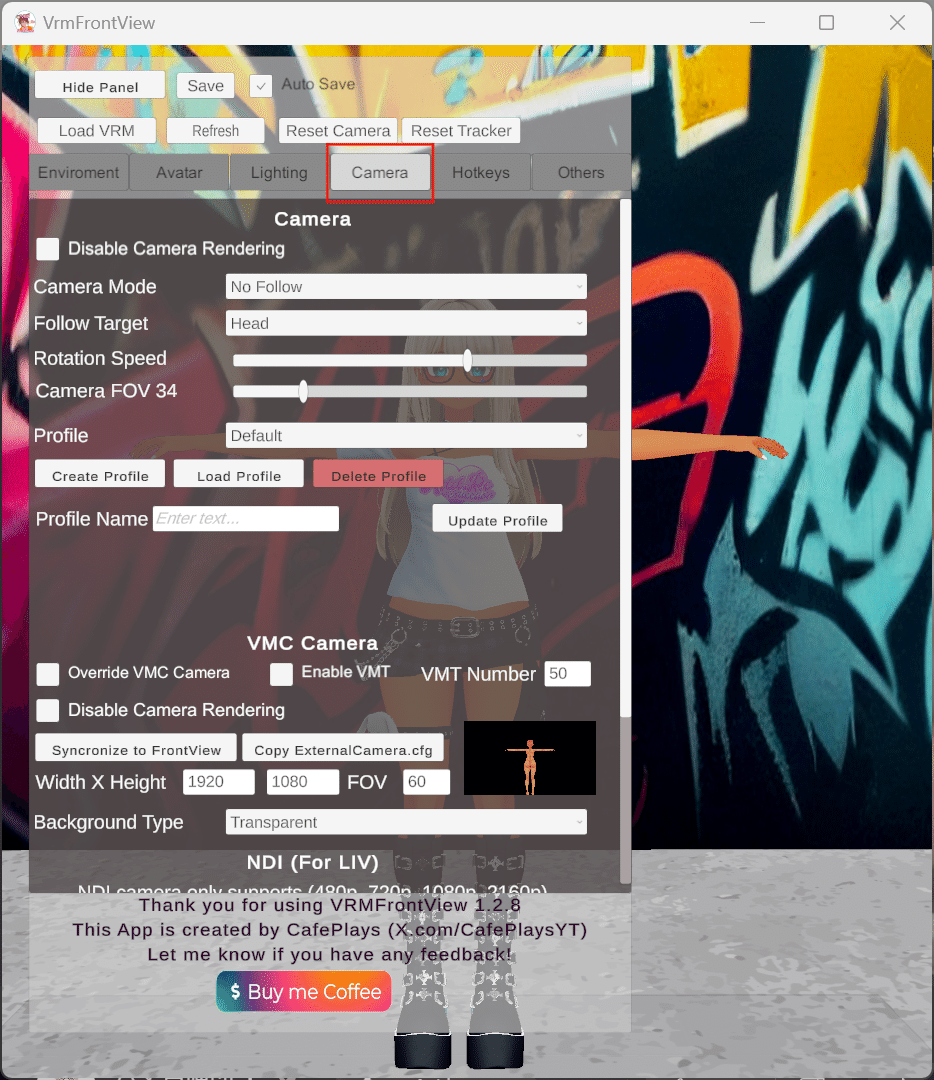
3-8.カメラ設定
Camera タブでカメラの調整ができる
Camera Mode
No Followで固定カメラ、それ以外は下のFollow Targetを基準に追従するか設定できるFollow Target
Camera ModeがNo Follow以外の場合の基準Rotation Speed
Camera ModeがNo Follow以外の場合のカメラの速度Camera FOV
Field of View(視野角)の設定Profile
現在選択中のProfile名Create、Load、Delete Profile
カメラProfileの作成、読み込み、削除ができる
保存できるのはカメラの位置、角度、FOV
カメラ位置、角度を変えてCreateで新規Profile作成。名前は自動
上のProfileで選択後、LoadでProfile読み込み
上のProfileで選択後、DeleteでProfile削除
3-9.アバターの足埋まり調整
ワールドの高さ調整と、アバターの高さ調整がある
アバターの高さ調整は 3-6 参照
ワールドの高さ調整
Enviroment タブの World Height で調整

3-10. 設定の保存
設定が終わったらパネルの Save をクリックして設定を保存する
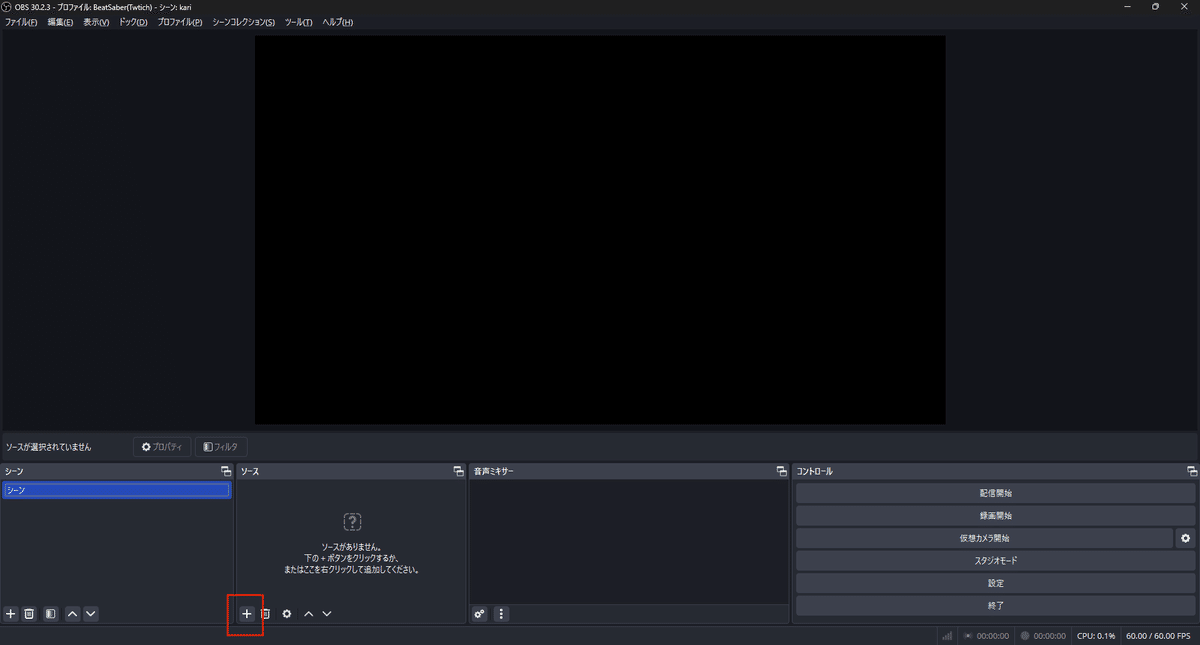
4-A.LIV(アバターなし)とVRMFrontViewでOBS画面作成
4-A-1.VRMFrontViewの画面をOBSのソースに設定
OBSのソースからゲームキャプチャを追加し
モード 特定のウィンドウをキャプチャ
ウィンドウ [VRMFrontView.exe]: VRMFrontView
ウィンドウの一致優先順位 ウィンドウのタイトルに一致する必要があります
に設定


4-A-2.LIV起動
LIVを起動
Virtual Cameras & Avatarsを選択
START VR CAMERAS & AVATARSをクリック

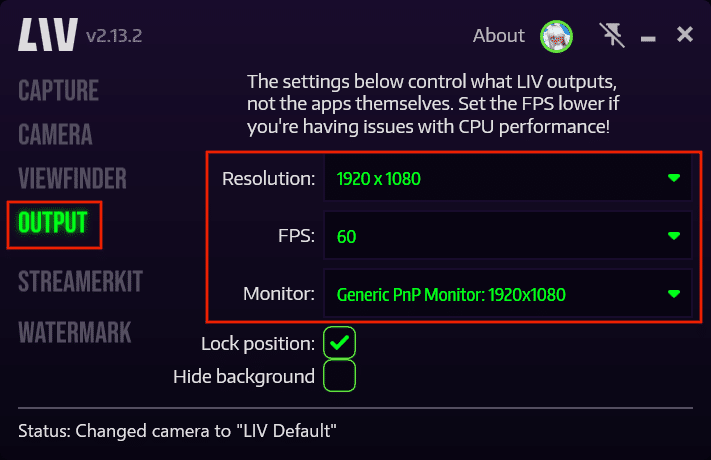
OUTPUT選択
ResolutionをOBSのキャンバスサイズ、FPSとMonitorを表示するモニターに合わせる

4-A-3.LIVアバター非表示設定
HMDを被りSteamVRの画面でLIVをクリック
※画像の位置にボタンがない場合は足元のLIVの文字に緑ドットを合わせるとLIVの文字が緑になり正面にウィンドウ開く

正面のAvatarクリック
画面左のVisibillityのAvatar Legs Headのチェックをはずす

4-A-4.LIVカメラ設定
正面のCamera1をクリック
Selfieを選択

カメラの位置を変更する場合 Selfieの場合は後ろにあるカメラを操作する

カメラの角度、焦点(?)を変更する場合カメラから伸びてる点線の先の×を操作する。

カメラ位置、角度を数値で設定したい場合は
C:\Users\ユーザー名\AppData\Local\LIV\App 配下にある バージョン名.jsonを開き書き換える
この説明通りの場合
"Name": "LIV Default"
を検索し、その下の
"fieldOfView"
"cameraPosition"
"cameraTargetPosition"
を書き換える
4-A-5.LIVからゲーム起動
LIVの画面から
CAPTUREを選択
AUTOを選択
プルダウンから起動するゲームを選択
SYNC & LAUNCHで起動

4-A-6.LIV OUTPUT画面をOBSソースに設定
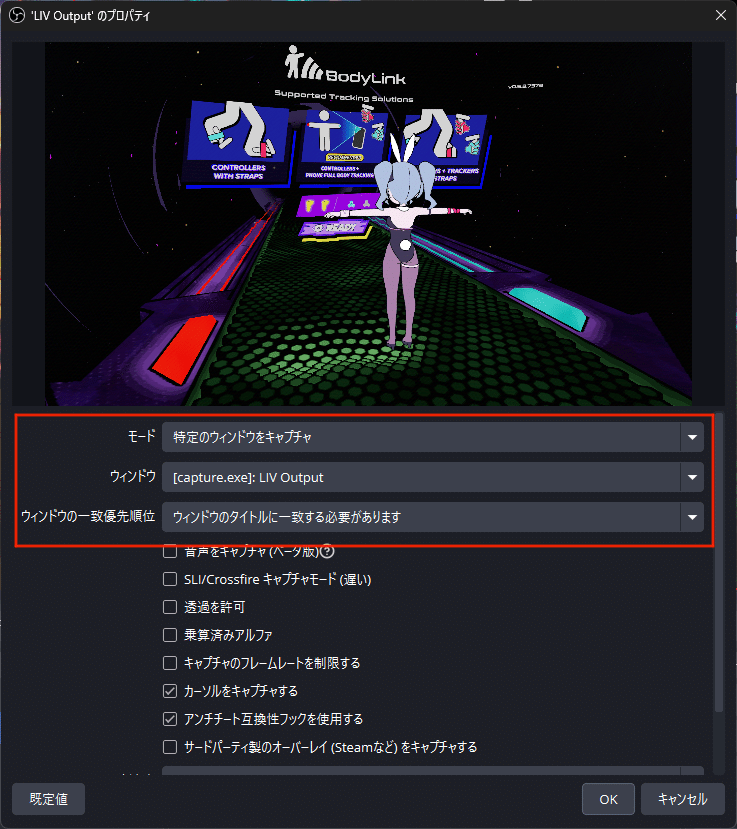
OBSのソースからゲームキャプチャを追加し
モード 特定のウィンドウをキャプチャ
ウィンドウ [capture.exe]: LIV Output
ウィンドウの一致優先順位 ウィンドウのタイトルに一致する必要があります
に設定

4-A-7.完成画面
ソースでVRMFrontViewが上になるよう順番を設定したら完了

4-B.LIV(アバター合成)とVRMFrontViewでOBS画面作成
4-B-1.VRMFrontViewの画面をOBSのソースに設定
OBSのソースからゲームキャプチャを追加し
モード 特定のウィンドウをキャプチャ
ウィンドウ [VRMFrontView.exe]: VRMFrontView
ウィンドウの一致優先順位 ウィンドウのタイトルに一致する必要があります
に設定
4-B-2.バーチャルモーションキャプチャー設定
コントロールパネルの詳細設定をクリック

VMTインストールの インストール をクリック
有効にチェック(右のNoを覚えておく。デフォルト50)
LIV向けexternalcamera.cfgの書き出し をクリックし保存。LIVで読み込むので保存場所は覚えておく

4-B-3.VRMFrontView設定
Camera タブを選択 Enable NDI for VMC Camera のチェックをいれる

4-B-4.LIV設定
LIVを起動
Mixed Reality Captureを選択、START MR をクリック

CAMERA を選択、Add をクリックしカメラを追加する

Type で LIV Camera for iOS(NDI) を選択
Device で (VRMFrontView) となっているものを選択
ProfileName に名前を入力

CALIBRATION を選択
Details にチェック
Import をクリック
From file をクリックし 4-B-2 で書き出した externalcamera.cfg を読み込む
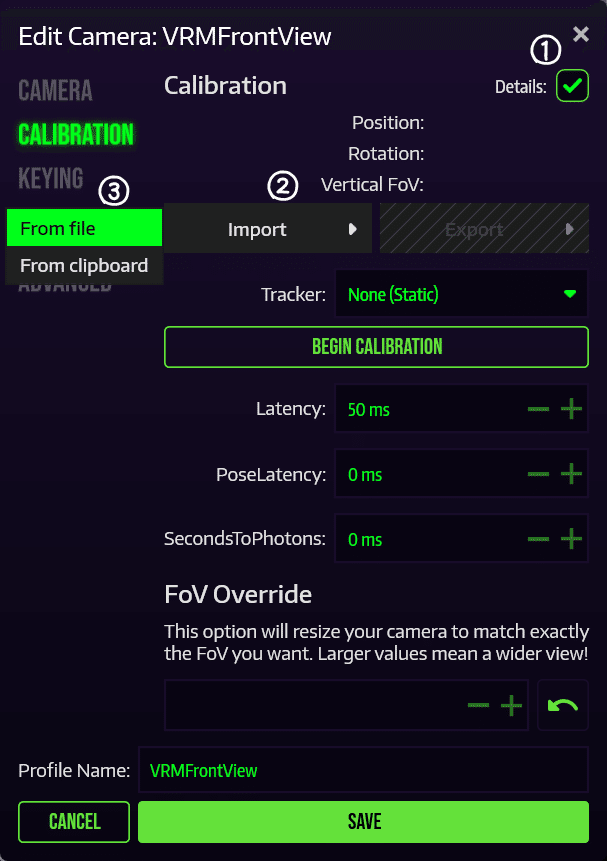
読み込みに成功したら OK をクリック

Detailsが下画像のようになっているかチェック
TrackerでVMT_xx VMT_xxとなっているものを選択。xxは4-B-2でチェックした有効の右のNo
SAVE をクリックし保存

OUTPUT選択
Resolution をOBSのキャンバスサイズ、FPSとMonitor を表示するモニターに合わせる
4-B-5.LIVからゲーム起動
LIVの画面から
CAPTURE を選択
AUTO を選択
プルダウンから起動するゲームを選択
SYNC & LAUNCHで起動

4-B-6.LIV OUTPUT画面をOBSソースに設定
OBSのソースからゲームキャプチャを追加し
モード 特定のウィンドウをキャプチャ
ウィンドウ [capture.exe]: LIV Output
ウィンドウの一致優先順位 ウィンドウのタイトルに一致する必要があります
に設定
4-B-7.画面完成
ソースでVRMFrontViewが上になるよう順番を設定したら完了

4-B-8.LIV Output画角変更
LIV Outputの画角を変える場合はバーチャルモーションキャプチャーのカメラを操作する
コントロールパネル の カメラ タブを選択。カメラの種類を選ぶ
今回はフリー

カメラの画角調整
右クリック+マウス移動
カメラ位置は動かないズームイン、ズームアウト(FOVの調整)
マウスホイールカメラ位置移動
マウスホイールクリック+マウス移動
5.2回目以降の起動順
上記4までは初回設定なので2回目以降は下記順番で起動すればよい
OBS等録画、配信用ソフトはいつ起動でも大丈夫
SteamVR起動
SteamVRでトラッカーの割り当て確認
トラッカーのキャリブレーション
バーチャルモーションキャプチャ起動
バーチャルモーションキャプチャーでキャリブレーション
VRMFrontView起動
LIV起動
LIVからVRゲームの起動
6.注意事項
VRMFrontView、バーチャルモーションキャプチャーともに設定を変更したら保存するのを忘れずに